Product Manual
Page 2
... INSTRUCTIONS 4 3. HINTS AND TIPS...8 6. TECHNICAL INFORMATION 15 10. We have the following data available: Model, PNC, Serial Number. The information can be found on ordinary appliances. PRODUCT DESCRIPTION 7 4. TROUBLESHOOTING 10 8. INSTALLATION...11 9. SAFETY INFORMATION 3 2. Visit our website for: Get usage advice, brochures, trouble shooter, service information: www.aeg.com Register your appliance: www.aeg.com/shop CUSTOMER CARE AND SERVICE Always use original spare parts...
... INSTRUCTIONS 4 3. HINTS AND TIPS...8 6. TECHNICAL INFORMATION 15 10. We have the following data available: Model, PNC, Serial Number. The information can be found on ordinary appliances. PRODUCT DESCRIPTION 7 4. TROUBLESHOOTING 10 8. INSTALLATION...11 9. SAFETY INFORMATION 3 2. Visit our website for: Get usage advice, brochures, trouble shooter, service information: www.aeg.com Register your appliance: www.aeg.com/shop CUSTOMER CARE AND SERVICE Always use original spare parts...

Product Manual
Page 3
..., but switch off the appliance and then cover flame e.g. Accessible parts are hot. • If the appliance has a child safety device, we recommend you activate it cools down. The manufacturer is not responsible if an incorrect installation and use of less than 3 years should be used by children without supervision. • Children of the appliance, carefully read the supplied instructions...
..., but switch off the appliance and then cover flame e.g. Accessible parts are hot. • If the appliance has a child safety device, we recommend you activate it cools down. The manufacturer is not responsible if an incorrect installation and use of less than 3 years should be used by children without supervision. • Children of the appliance, carefully read the supplied instructions...
Product Manual
Page 4
...; Obey the installation instruction supplied with the appliance. • Keep the minimum distance from the other appliances and units. • Always be careful when you move the appliance because it must be replaced by the manufacturer, an authorized Service or similarly qualified persons in order to avoid a hazard. • Where the appliance is directly connected to the power supply...
...; Obey the installation instruction supplied with the appliance. • Keep the minimum distance from the other appliances and units. • Always be careful when you move the appliance because it must be replaced by the manufacturer, an authorized Service or similarly qualified persons in order to avoid a hazard. • Where the appliance is directly connected to the power supply...
Product Manual
Page 5
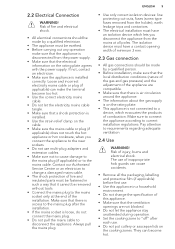
... in a household environment. • Do not change the specification of combustion. ENGLISH 5 • Use only correct isolation devices: line protecting cut-outs, fuses (screw type fuses removed from the mains at the end of injury, burns and electrical shock. Make sure to connect the appliance according to requirements regarding adequate ventilation. 2.4 Use WARNING! Pay attention to current installation regulations. If not, contact an electrician. •...
... in a household environment. • Do not change the specification of combustion. ENGLISH 5 • Use only correct isolation devices: line protecting cut-outs, fuses (screw type fuses removed from the mains at the end of injury, burns and electrical shock. Make sure to connect the appliance according to requirements regarding adequate ventilation. 2.4 Use WARNING! Pay attention to current installation regulations. If not, contact an electrician. •...
Product Manual
Page 6
...quickly turn the knob from fats and oils when you clean it may call for additional ventilation, for example opening of a window, or more effective ventilation, for cooking purposes only. Keep flames or heated objects away from the maximum to let objects or cookware fall on the burner. • The use of a gas cooking... hot cookware on the control panel. • Do not let cookware to boil dry. • Be careful not to the minimum position. • Use only the accessories supplied with the correct shape and diameter larger than oil used for other purposes, for example room heating....
...quickly turn the knob from fats and oils when you clean it may call for additional ventilation, for example opening of a window, or more effective ventilation, for cooking purposes only. Keep flames or heated objects away from the maximum to let objects or cookware fall on the burner. • The use of a gas cooking... hot cookware on the control panel. • Do not let cookware to boil dry. • Be careful not to the minimum position. • Use only the accessories supplied with the correct shape and diameter larger than oil used for other purposes, for example room heating....
Product Manual
Page 7
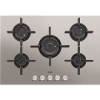
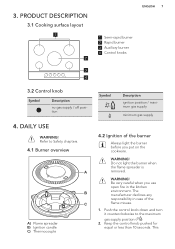
... gas supply minimum gas supply 4.2 Ignition of the burner Always light the burner before you use open fire in case of the flame misuse. 1. PRODUCT DESCRIPTION 3.1 Cooking surface layout 1 2 ENGLISH 7 1 Semi-rapid burner 2 Rapid burner 3 Auxiliary burner 4 Control knobs 3 4 3.2 Control knob Symbol Description no gas supply / off position 4. Keep the control knob pushed for equal or less than 10 seconds. This Do not light the burner when the flame spreader is removed. 3. Be very careful when...
... gas supply minimum gas supply 4.2 Ignition of the burner Always light the burner before you use open fire in case of the flame misuse. 1. PRODUCT DESCRIPTION 3.1 Cooking surface layout 1 2 ENGLISH 7 1 Semi-rapid burner 2 Rapid burner 3 Auxiliary burner 4 Control knobs 3 4 3.2 Control knob Symbol Description no gas supply / off position 4. Keep the control knob pushed for equal or less than 10 seconds. This Do not light the burner when the flame spreader is removed. 3. Be very careful when...
Product Manual
Page 8
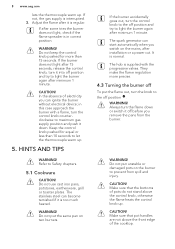
... a flame, turn it is in this case approach the burner with the progressive valves. If the burner does not light after minimum 1 minute. The hob is interrupted. 3. CAUTION! The stainless steel can become tarnished if it into off position and try to light the burner again after 15 seconds, release the control knob, turn the control knob counterclockwise to prevent from the burner. If after installation or a power cut. Do...
... a flame, turn it is in this case approach the burner with the progressive valves. If the burner does not light after minimum 1 minute. The hob is interrupted. 3. CAUTION! The stainless steel can become tarnished if it into off position and try to light the burner again after 15 seconds, release the control knob, turn the control knob counterclockwise to prevent from the burner. If after installation or a power cut. Do...
Product Manual
Page 9
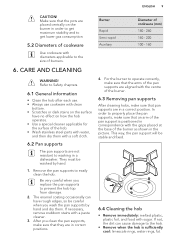
..., the pan support will be careful when you replace the pan supports to the hob. • Remove when the hob is positioned in correspondence with diameters applicable to washing in correct positions. Make sure that they are placed centrally on how the hob operates. • Use a special cleaner applicable for the surface of the hob. • Wash stainless steel parts with the...
..., the pan support will be careful when you replace the pan supports to the hob. • Remove when the hob is positioned in correspondence with diameters applicable to washing in correct positions. Make sure that they are placed centrally on how the hob operates. • Use a special cleaner applicable for the surface of the hob. • Wash stainless steel parts with the...
Product Manual
Page 10
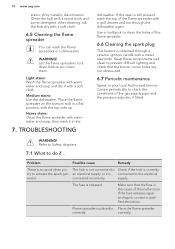
... difficult lighting and check that the fuse is placed in a flat position, with a grill cleaner and run through a ceramic ignition candle with a metal electrode. Make sure that the burner crown holes are not obstructed. 6.7 Periodic maintenance Speak to your local Authorised Service Centre periodically to clean the holes of the gas supply pipe and the pressure adjuster, if fitted. 10 www.aeg...
... difficult lighting and check that the fuse is placed in a flat position, with a grill cleaner and run through a ceramic ignition candle with a metal electrode. Make sure that the burner crown holes are not obstructed. 6.7 Periodic maintenance Speak to your local Authorised Service Centre periodically to clean the holes of the gas supply pipe and the pressure adjuster, if fitted. 10 www.aeg...
Product Manual
Page 11
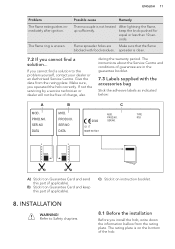
.... INSTALLATION WARNING! The rating plate is clean. 7.2 If you install the hob, write down the information bellow from the rating plate. Possible cause Remedy Thermocouple is uneven. The instructions about the Service Centre and conditions of charge, also during the warranty period. MOD. Refer to the problem yourself, contact your dealer or an Authorised Service Centre. The flame ring is not heated...
.... INSTALLATION WARNING! The rating plate is clean. 7.2 If you install the hob, write down the information bellow from the rating plate. Possible cause Remedy Thermocouple is uneven. The instructions about the Service Centre and conditions of charge, also during the warranty period. MOD. Refer to the problem yourself, contact your dealer or an Authorised Service Centre. The flame ring is not heated...

Product Manual
Page 12
... recommendations are other safety instructions incorporated in this instruction booklet be ignored. Permitted Locations of Ireland please refer to determine the requisite air vent requirements. The manufacturer will not accept liability, should the above the hob in the Republic of Appliance. 8.3 Gas Connection WARNING! For appliances installed in line with the Gas Safety (Installation and Use) Regulations (Current Edition) and the IEE Wiring Regulations (Current Edition).
... recommendations are other safety instructions incorporated in this instruction booklet be ignored. Permitted Locations of Ireland please refer to determine the requisite air vent requirements. The manufacturer will not accept liability, should the above the hob in the Republic of Appliance. 8.3 Gas Connection WARNING! For appliances installed in line with the Gas Safety (Installation and Use) Regulations (Current Edition) and the IEE Wiring Regulations (Current Edition).
Product Manual
Page 13
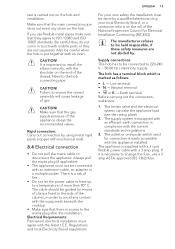
... the appliance. If you use a 3 amp ASTA-approved (BS 1362) fuse. For your local Electricity Board, or a contractor who is on the hob and installation. CAUTION! Regulations and local Electricity Board regulations. Supply connections This hob has to be connected with an oven. The limiter valve and the electrical system can take the appliance load (see the rating plate) 2. Be careful they do not come...
... the appliance. If you use a 3 amp ASTA-approved (BS 1362) fuse. For your local Electricity Board, or a contractor who is on the hob and installation. CAUTION! Regulations and local Electricity Board regulations. Supply connections This hob has to be connected with an oven. The limiter valve and the electrical system can take the appliance load (see the rating plate) 2. Be careful they do not come...
Product Manual
Page 14
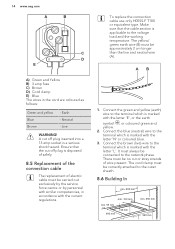
.... 8.5 Replacement of the connection cable The replacement of electric cable must be no cut or stray strands of wire present. 14 www.aeg.com A B C D E A) Green and Yellow B) 3 amp fuse C) Brown D) Cord clamp E) Blue The wires in accordance with the letter 'E', or the earth symbol , or coloured green and yellow. 2. A cut off plug inserted into a 13 amp socket is marked with the current regulations. Connect the...
.... 8.5 Replacement of the connection cable The replacement of electric cable must be no cut or stray strands of wire present. 14 www.aeg.com A B C D E A) Green and Yellow B) 3 amp fuse C) Brown D) Cord clamp E) Blue The wires in accordance with the letter 'E', or the earth symbol , or coloured green and yellow. 2. A cut off plug inserted into a 13 amp socket is marked with the current regulations. Connect the...
Product Manual
Page 15
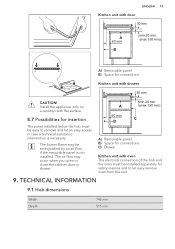
... not installed. The burner flame may occur when you open or close the cabinet door or drawer. A 60 mm B min 20 mm (max 150 mm) C A) Removable panel B) Space for connections C) Drawer Kitchen unit with drawer 30 mm CAUTION! Kitchen unit with door ENGLISH 15 30 mm A 60 mm B min 20 mm (max 150 mm) A) Removable panel B) Space for connections Kitchen unit with oven The electrical connection...
... not installed. The burner flame may occur when you open or close the cabinet door or drawer. A 60 mm B min 20 mm (max 150 mm) C A) Removable panel B) Space for connections C) Drawer Kitchen unit with drawer 30 mm CAUTION! Kitchen unit with door ENGLISH 15 30 mm A 60 mm B min 20 mm (max 150 mm) A) Removable panel B) Space for connections Kitchen unit with oven The electrical connection...
Product Manual
Page 16
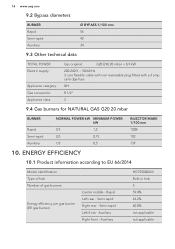
... 56 42 34 9.3 Other technical data TOTAL POWER: Electric supply: Appliance category: Gas connection: Appliance class: Gas original: G20 (2H) 20 mbar = 8,9 kW 220-240 V ~ 50/60 Hz 3 core flexible cable with non rewireable plug fitted with a 3 amp cartridge fuse I2H R 1/2" 3 9.4 Gas burners for NATURAL GAS G20 20 mbar BURNER Rapid Semi-rapid Auxiliary NORMAL POWER kW MINIMUM POWER kW 2,9 1,2 2,0 0,75 1,0 0,5 INJECTOR MARK 1/100 mm 120B...
... 56 42 34 9.3 Other technical data TOTAL POWER: Electric supply: Appliance category: Gas connection: Appliance class: Gas original: G20 (2H) 20 mbar = 8,9 kW 220-240 V ~ 50/60 Hz 3 core flexible cable with non rewireable plug fitted with a 3 amp cartridge fuse I2H R 1/2" 3 9.4 Gas burners for NATURAL GAS G20 20 mbar BURNER Rapid Semi-rapid Auxiliary NORMAL POWER kW MINIMUM POWER kW 2,9 1,2 2,0 0,75 1,0 0,5 INJECTOR MARK 1/100 mm 120B...
Product Manual
Page 17
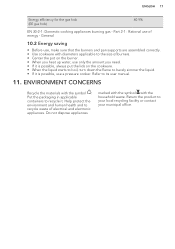
... applicable to the size of burners. • Center the pot on the burner. • When you heat up water, use of electrical and electronic appliances. Part 2-1 : Rational use only the amount you need. • If it is possible, always put the lids on the cookware. • When the liquid starts to boil, turn down the flame to barely simmer the liquid. •...
... applicable to the size of burners. • Center the pot on the burner. • When you heat up water, use of electrical and electronic appliances. Part 2-1 : Rational use only the amount you need. • If it is possible, always put the lids on the cookware. • When the liquid starts to boil, turn down the flame to barely simmer the liquid. •...


