Product Manual
Page 2
... the rating plate. DAILY USE...7 5. We have the following data available: Model, PNC, Serial Number. INSTALLATION...12 9. Visit our website for: Get usage advice, brochures, trouble shooter, service information: www.aeg.com Register your product for better service: www.registeraeg.com Buy Accessories, Consumables and Original spare parts for your appliance: www.aeg.com/shop CUSTOMER CARE AND SERVICE Always use original spare parts. PRODUCT DESCRIPTION 7 4. CARE AND CLEANING 9 7. SAFETY...
... the rating plate. DAILY USE...7 5. We have the following data available: Model, PNC, Serial Number. INSTALLATION...12 9. Visit our website for: Get usage advice, brochures, trouble shooter, service information: www.aeg.com Register your product for better service: www.registeraeg.com Buy Accessories, Consumables and Original spare parts for your appliance: www.aeg.com/shop CUSTOMER CARE AND SERVICE Always use original spare parts. PRODUCT DESCRIPTION 7 4. CARE AND CLEANING 9 7. SAFETY...
Product Manual
Page 3
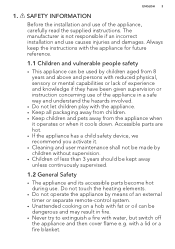
...; Cleaning and user maintenance shall not be made by children without supervision. • Children of an external timer or separate remote-control system. • Unattended cooking on a hob with fat or oil can be kept away unless continuously supervised. 1.2 General Safety • The appliance and its accessible parts become hot during use of the appliance, carefully read the supplied instructions...
...; Cleaning and user maintenance shall not be made by children without supervision. • Children of an external timer or separate remote-control system. • Unattended cooking on a hob with fat or oil can be kept away unless continuously supervised. 1.2 General Safety • The appliance and its accessible parts become hot during use of the appliance, carefully read the supplied instructions...

Product Manual
Page 4
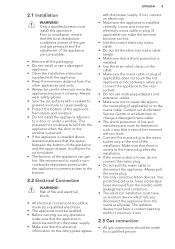
... is required. SAFETY INSTRUCTIONS This appliance is suitable for example using insulating sleeving) with the conditions specified in overvoltage category III must be replaced by the manufacturer, an authorized Service or similarly qualified persons in compliance with parts that can reach temperatures of hotplate glass breakage: - shut immediately off the appliance to the power supply, an all burners and any electrical heating element...
... is required. SAFETY INSTRUCTIONS This appliance is suitable for example using insulating sleeving) with the conditions specified in overvoltage category III must be replaced by the manufacturer, an authorized Service or similarly qualified persons in compliance with parts that can reach temperatures of hotplate glass breakage: - shut immediately off the appliance to the power supply, an all burners and any electrical heating element...
Product Manual
Page 5
... distribution conditions (nature of the gas and gas pressure) and the adjustment of the appliance can make sure that it is installed correctly. Always wear safety gloves. • Seal the cut -outs, fuses (screw type fuses removed from the holder), earth leakage trips and contactors. • The electrical installation must install this appliance. Always pull the mains plug. • Use only correct isolation devices: line protecting cut surfaces with a sealant...
... distribution conditions (nature of the gas and gas pressure) and the adjustment of the appliance can make sure that it is installed correctly. Always wear safety gloves. • Seal the cut -outs, fuses (screw type fuses removed from the holder), earth leakage trips and contactors. • The electrical installation must install this appliance. Always pull the mains plug. • Use only correct isolation devices: line protecting cut surfaces with a sealant...

Product Manual
Page 6
... appliance is for The surface can cause fire at a lower temperature than the dimensions of the burners. • Make sure cookware is not connected to "off" after each use of the appliance may splash. 6 www.aeg.com • Before installation, make sure that the local distribution conditions (nature of the gas and gas pressure) and the adjustment of the appliance are compatible...
... appliance is for The surface can cause fire at a lower temperature than the dimensions of the burners. • Make sure cookware is not connected to "off" after each use of the appliance may splash. 6 www.aeg.com • Before installation, make sure that the local distribution conditions (nature of the gas and gas pressure) and the adjustment of the appliance are compatible...
Product Manual
Page 7
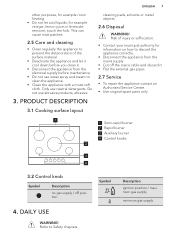
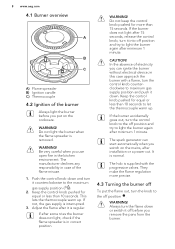
... mains cable and discard it. • Flat the external gas pipes. 2.7 Service • To repair the appliance contact an Authorised Service Centre. • Use original spare parts only. 3.1 Cooking surface layout 1 1 Semi-rapid burner 2 Rapid burner 3 Auxiliary burner 4 Control knobs 2 3 4 3.2 Control knob Symbol Description no gas supply / off position 4. DAILY USE WARNING! Symbol Description ignition position / maximum gas supply minimum gas supply Only use abrasive products, abrasive 3. ENGLISH 7 other purposes, for example...
... mains cable and discard it. • Flat the external gas pipes. 2.7 Service • To repair the appliance contact an Authorised Service Centre. • Use original spare parts only. 3.1 Cooking surface layout 1 1 Semi-rapid burner 2 Rapid burner 3 Auxiliary burner 4 Control knobs 2 3 4 3.2 Control knob Symbol Description no gas supply / off position 4. DAILY USE WARNING! Symbol Description ignition position / maximum gas supply minimum gas supply Only use abrasive products, abrasive 3. ENGLISH 7 other purposes, for example...
Product Manual
Page 8
... the kitchen environment. Adjust the flame after minimum 1 minute. If the burner does not light after 15 seconds, release the control knob, turn the control knob to the off To put on the mains, after installation or a power cut. They make the flame regulation more than 15 seconds. WARNING! Be very careful when you remove the pans from the burner. The spark generator can ignite the burner without electrical device; CAUTION! Keep the control knob pushed...
... the kitchen environment. Adjust the flame after minimum 1 minute. If the burner does not light after 15 seconds, release the control knob, turn the control knob to the off To put on the mains, after installation or a power cut. They make the flame regulation more than 15 seconds. WARNING! Be very careful when you remove the pans from the burner. The spark generator can ignite the burner without electrical device; CAUTION! Keep the control knob pushed...
Product Manual
Page 9
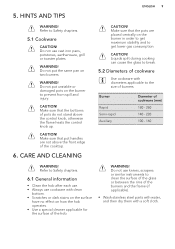
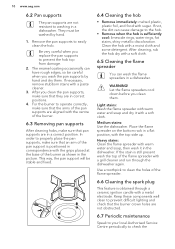
...General information • Clean the hob after each use. • Always use cast iron pans, potstones, earthenware, grill or toaster plates. Refer to get lower gas consumption. Make sure that pot handles are placed centrally on two burners. Make sure that the pots are not above the control knob, otherwise the flame heats the control knob...size of cookware (mm) 180 - 260 140 - 220 100 - 160 WARNING! Do not use knives, scrapers or similar instruments to clean the surface of the glass or between the rims of the burners and the frame (if applicable). • Wash stainless steel parts ...
...General information • Clean the hob after each use. • Always use cast iron pans, potstones, earthenware, grill or toaster plates. Refer to get lower gas consumption. Make sure that pot handles are placed centrally on two burners. Make sure that the pots are not above the control knob, otherwise the flame heats the control knob...size of cookware (mm) 180 - 260 140 - 220 100 - 160 WARNING! Do not use knives, scrapers or similar instruments to clean the surface of the glass or between the rims of the burners and the frame (if applicable). • Wash stainless steel parts ...
Product Manual
Page 10
.... 6.5 Cleaning the flame spreader You can wash the flame spreaders in the dishwasher. 10 www.aeg.com 6.2 Pan supports The pan supports are not obstructed. 6.7 Periodic maintenance Speak to your local Authorised Service Centre periodically to check the After you replace the pan supports to easily clean the hob. Medium stains: Use the dishwasher. Be very careful when you clean the pan supports, make sure that the burner crown...
.... 6.5 Cleaning the flame spreader You can wash the flame spreaders in the dishwasher. 10 www.aeg.com 6.2 Pan supports The pan supports are not obstructed. 6.7 Periodic maintenance Speak to your local Authorised Service Centre periodically to check the After you replace the pan supports to easily clean the hob. Medium stains: Use the dishwasher. Be very careful when you clean the pan supports, make sure that the burner crown...
Product Manual
Page 11
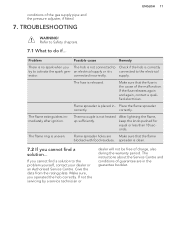
... is not connected to the problem yourself, contact your dealer or an Authorised Service Centre. spreader is not heated up sufficiently. If not the servicing by a service technician or dealer will not be free of the gas supply pipe and the pressure adjuster, if fitted. 7. Refer to Safety chapters. 7.1 What to activate the spark gen- Place the flame spreader correctly. TROUBLESHOOTING ENGLISH 11...
... is not connected to the problem yourself, contact your dealer or an Authorised Service Centre. spreader is not heated up sufficiently. If not the servicing by a service technician or dealer will not be free of the gas supply pipe and the pressure adjuster, if fitted. 7. Refer to Safety chapters. 7.1 What to activate the spark gen- Place the flame spreader correctly. TROUBLESHOOTING ENGLISH 11...
Product Manual
Page 12
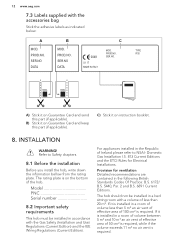
...; no air vent is on Guarantee Card and keep this part (if applicable). TYPE PROD.NO. 12 www.aeg.com 7.3 Labels supplied with the Gas Safety (Installation and Use) Regulations (Current Edition) and the IEE Wiring Regulations (Current Edition). Refer to NSAI- The rating plate is required. Provision for Electrical Installations. MOD. Model PNC Serial number 8.2 Important safety requirements This hob must be installed in the following British Standards Codes Of...
...; no air vent is on Guarantee Card and keep this part (if applicable). TYPE PROD.NO. 12 www.aeg.com 7.3 Labels supplied with the Gas Safety (Installation and Use) Regulations (Current Edition) and the IEE Wiring Regulations (Current Edition). Refer to NSAI- The rating plate is required. Provision for Electrical Installations. MOD. Model PNC Serial number 8.2 Important safety requirements This hob must be installed in the following British Standards Codes Of...
Product Manual
Page 13
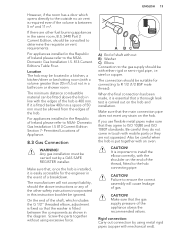
..., adjustment is fixed so that the washer is important to install the elbow correctly, with an oven. Be careful they are other safety instructions incorporated in this instruction booklet be careful when the hob is easily accessible for connecting to R 1/2 (1/2 BSP male thread). The minimum distance combustible material can be located in a kitchen, a kitchen/diner or bed sitting room (with mobile parts or...
..., adjustment is fixed so that the washer is important to install the elbow correctly, with an oven. Be careful they are other safety instructions incorporated in this instruction booklet be careful when the hob is easily accessible for connecting to R 1/2 (1/2 BSP male thread). The minimum distance combustible material can be located in a kitchen, a kitchen/diner or bed sitting room (with mobile parts or...
Product Manual
Page 14
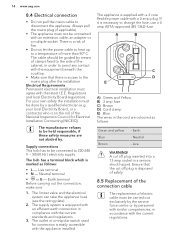
... the power cable to heat up to a temperature of electric cable must be carried out exclusively by the service force centre or by means of clamps fixed to be guided by personnel with the appliance installed. The limiter valve and the electrical system can take the appliance load (see the rating plate) 2. The outlet or omnipolar switch used for Electrical Installation Contracting [NICEIC]). Regulations...
... the power cable to heat up to a temperature of electric cable must be carried out exclusively by the service force centre or by means of clamps fixed to be guided by personnel with the appliance installed. The limiter valve and the electrical system can take the appliance load (see the rating plate) 2. The outlet or omnipolar switch used for Electrical Installation Contracting [NICEIC]). Regulations...
Product Manual
Page 15
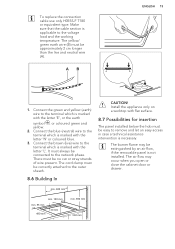
...15 1. Connect the blue (neutral) wire to the terminal which is marked with flat surface. 8.7 Possibilities for insertion The panel installed below the hob must be extinguished by an air flow, if the removable panel is necessary. It must always be no cut or stray strands of wire present. ... coloured blue. 3. Connect the green and yellow (earth) wire to the terminal which is marked with the letter 'L'. Connect the brown (live and neutral wire (A). There must be easy to the network phase. To replace the connection cable use only H05SS-F T180 or equivalent type. min. 600 mm...
...15 1. Connect the blue (neutral) wire to the terminal which is marked with flat surface. 8.7 Possibilities for insertion The panel installed below the hob must be extinguished by an air flow, if the removable panel is necessary. It must always be no cut or stray strands of wire present. ... coloured blue. 3. Connect the green and yellow (earth) wire to the terminal which is marked with the letter 'L'. Connect the brown (live and neutral wire (A). There must be easy to the network phase. To replace the connection cable use only H05SS-F T180 or equivalent type. min. 600 mm...
Product Manual
Page 16
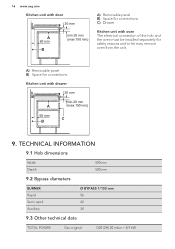
... TOTAL POWER: Gas original: G20 (2H) 20 mbar = 8,9 kW A) Removable panel B) Space for safety reasons and to let easy remove oven from the unit. 16 www.aeg.com Kitchen unit with door 30 mm A 60 mm B min 20 mm (max 150 mm) A) Removable panel B) Space for connections C) Drawer Kitchen unit with oven The electrical connection of the hob and the oven must be installed separately for connections Kitchen unit...
... TOTAL POWER: Gas original: G20 (2H) 20 mbar = 8,9 kW A) Removable panel B) Space for safety reasons and to let easy remove oven from the unit. 16 www.aeg.com Kitchen unit with door 30 mm A 60 mm B min 20 mm (max 150 mm) A) Removable panel B) Space for connections C) Drawer Kitchen unit with oven The electrical connection of the hob and the oven must be installed separately for connections Kitchen unit...
Product Manual
Page 17
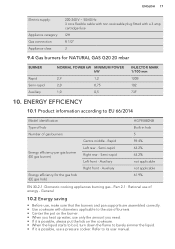
..., turn down the flame to barely simmer the liquid. • If it is possible, use a pressure cooker. Rapid Left rear - Auxiliary HG795840NB Built-in hob 5 59.4% 63.2% 63.2% not applicable not applicable 61.9% EN 30-2-1: Domestic cooking appliances burning gas - Refer to EU 66/2014 Model identification Type of hob Number of energy - Auxiliary Right front - Part 2-1 : Rational use , make sure that the burners and pan supports...
..., turn down the flame to barely simmer the liquid. • If it is possible, use a pressure cooker. Rapid Left rear - Auxiliary HG795840NB Built-in hob 5 59.4% 63.2% 63.2% not applicable not applicable 61.9% EN 30-2-1: Domestic cooking appliances burning gas - Refer to EU 66/2014 Model identification Type of hob Number of energy - Auxiliary Right front - Part 2-1 : Rational use , make sure that the burners and pan supports...

Product Manual
Page 18
18 www.aeg.com 11. Do not dispose appliances marked with the symbol with the symbol . Return the product to recycle waste of electrical and electronic appliances. Help protect the environment and human health and to your local recycling facility or contact your municipal office. * Put the packaging in applicable containers to recycle it. ENVIRONMENT CONCERNS Recycle the materials with the household waste.
18 www.aeg.com 11. Do not dispose appliances marked with the symbol with the symbol . Return the product to recycle waste of electrical and electronic appliances. Help protect the environment and human health and to your local recycling facility or contact your municipal office. * Put the packaging in applicable containers to recycle it. ENVIRONMENT CONCERNS Recycle the materials with the household waste.


