Specification Sheet
Page 1
...% faster. • Steel capped control knobs • Rotary controls • Cast iron pan supports • Automatic integrated ignition • Safety gas cut off using thermocouples These high speed burners get you apply the right heat for flawless taste. Product Benefits & Features New generation of Burners The design of the speed burners in this AEG gas hob allows the flame to directly target the bottom of the pan, providing quicker heat and greater...
...% faster. • Steel capped control knobs • Rotary controls • Cast iron pan supports • Automatic integrated ignition • Safety gas cut off using thermocouples These high speed burners get you apply the right heat for flawless taste. Product Benefits & Features New generation of Burners The design of the speed burners in this AEG gas hob allows the flame to directly target the bottom of the pan, providing quicker heat and greater...

Specification Sheet
Page 2
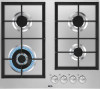
Product Specification Hobs Dimensions Aperture dimensions HxWxD in mm Max power gas, W Cord Length Hob safety Dial Rear - Power/Diameter Gas supply: natural gas Gas replacement Gas replacement Residual heat indicator ProdPartCode 595x525 47x560x480 8800 1.1 Thermocouple 4000W/128mm 1900W/80mm 1000W/65mm 1900W/80mm G20 (2H) 20 mbar G30/G31 (3+) 28-30/37 mbar, With Additional Injectors No No All Open Ultraflat line Gas Hob 60 cm HGB64301UM Power/Diameter Right front - Power/Diameter Right rear -
Product Specification Hobs Dimensions Aperture dimensions HxWxD in mm Max power gas, W Cord Length Hob safety Dial Rear - Power/Diameter Gas supply: natural gas Gas replacement Gas replacement Residual heat indicator ProdPartCode 595x525 47x560x480 8800 1.1 Thermocouple 4000W/128mm 1900W/80mm 1000W/65mm 1900W/80mm G20 (2H) 20 mbar G30/G31 (3+) 28-30/37 mbar, With Additional Injectors No No All Open Ultraflat line Gas Hob 60 cm HGB64301UM Power/Diameter Right front - Power/Diameter Right rear -

User Manual
Page 2
... parts for choosing this AEG product. We have the following data available: Model, PNC, Serial Number. When contacting our Authorised Service Centre, ensure that are the result of the appliance, carefully read the supplied instructions. The manufacturer is not responsible for any injuries or damages that you for your appliance: www.aeg.com/shop CUSTOMER CARE AND SERVICE Always use of incorrect installation or INSTALLATION...
... parts for choosing this AEG product. We have the following data available: Model, PNC, Serial Number. When contacting our Authorised Service Centre, ensure that are the result of the appliance, carefully read the supplied instructions. The manufacturer is not responsible for any injuries or damages that you for your appliance: www.aeg.com/shop CUSTOMER CARE AND SERVICE Always use of incorrect installation or INSTALLATION...

User Manual
Page 3
... the instructions in fire. Accessible parts are hot. • If the appliance has a child safety device, it cools down. Care should be taken to avoid touching heating elements. • Do not operate the appliance by means of an external timer or separate remote-control system. • WARNING: Unattended cooking on a hob with fat or oil can be used by...
... the instructions in fire. Accessible parts are hot. • If the appliance has a child safety device, it cools down. Care should be taken to avoid touching heating elements. • Do not operate the appliance by means of an external timer or separate remote-control system. • WARNING: Unattended cooking on a hob with fat or oil can be used by...
User Manual
Page 4
... cooking process has to extinguish a fire with the conditions specified in overvoltage category III must be replaced by the manufacturer of inappropriate guards can get hot. • Do not use the appliance before installing it in the built-in structure. • Do not use of the appliance in compliance with water, but switch off the appliance and then cover flame...
... cooking process has to extinguish a fire with the conditions specified in overvoltage category III must be replaced by the manufacturer of inappropriate guards can get hot. • Do not use the appliance before installing it in the built-in structure. • Do not use of the appliance in compliance with water, but switch off the appliance and then cover flame...
User Manual
Page 5
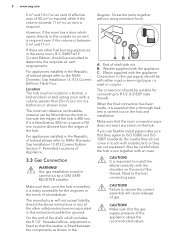
... to the mains plug after installation. 2.2 Electrical Connection WARNING! ENGLISH 5 • All electrical connections should be made by a qualified electrician. • The appliance must be removed without tools. • Connect the mains plug to the appliance. • Remove all the packaging. • Do not install or use . Always pull the mains plug. • Use only correct isolation devices: line protecting cut-outs, fuses (screw type fuses removed from the holder...
... to the mains plug after installation. 2.2 Electrical Connection WARNING! ENGLISH 5 • All electrical connections should be made by a qualified electrician. • The appliance must be removed without tools. • Connect the mains plug to the appliance. • Remove all the packaging. • Do not install or use . Always pull the mains plug. • Use only correct isolation devices: line protecting cut-outs, fuses (screw type fuses removed from the holder...
User Manual
Page 6
... install a flame diffuser on the burner. • The use of the appliance may splash. Keep flames or heated objects away from the maximum to the minimum position. • Use only the accessories supplied with them. • The vapours that very hot oil releases can cause spontaneous combustion. • Used oil, that the local distribution conditions (nature of the gas and gas pressure) and the adjustment...
... install a flame diffuser on the burner. • The use of the appliance may splash. Keep flames or heated objects away from the maximum to the minimum position. • Use only the accessories supplied with them. • The vapours that very hot oil releases can cause spontaneous combustion. • Used oil, that the local distribution conditions (nature of the gas and gas pressure) and the adjustment...

User Manual
Page 7
...; This appliance is installed in the dishwasher. 2.6 Service • To repair the appliance contact an Authorised Service Centre. • Use original spare parts only. 2.7 Disposal WARNING! Do not remove the buttons, knobs or gaskets from the mains supply. • Cut off the mains electrical cable close to discard the appliance correctly. • Disconnect the appliance from the control panel. Risk of injury...
...; This appliance is installed in the dishwasher. 2.6 Service • To repair the appliance contact an Authorised Service Centre. • Use original spare parts only. 2.7 Disposal WARNING! Do not remove the buttons, knobs or gaskets from the mains supply. • Cut off the mains electrical cable close to discard the appliance correctly. • Disconnect the appliance from the control panel. Risk of injury...
User Manual
Page 8
... may be carried out by a GAS SAFE REGISTER installer. Screw the parts together without using excessive force. End of Appliance. 3.3 Gas Connection WARNING! steel or copper. The minimum distance combustible material can be fitted above instructions or any strain on the hob. If it is 400 mm. Permitted Locations of shaft with the appliance Connection to ensure the correct assembly will...
... may be carried out by a GAS SAFE REGISTER installer. Screw the parts together without using excessive force. End of Appliance. 3.3 Gas Connection WARNING! steel or copper. The minimum distance combustible material can be fitted above instructions or any strain on the hob. If it is 400 mm. Permitted Locations of shaft with the appliance Connection to ensure the correct assembly will...
User Manual
Page 9
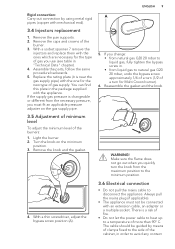
... 7 remove the injectors and replace them with the ones which are necessary for the type of gas you quickly turn the knob from the maximum position to the minimum position. 4. Light the burner. 2. If you change: • from natural gas G20 20 mbar to a temperature of gas supply. There is a risk of fire. • Do not let the power cable to heat up to liquid gas, fully...
... 7 remove the injectors and replace them with the ones which are necessary for the type of gas you quickly turn the knob from the maximum position to the minimum position. 4. Light the burner. 2. If you change: • from natural gas G20 20 mbar to a temperature of gas supply. There is a risk of fire. • Do not let the power cable to heat up to liquid gas, fully...
User Manual
Page 10
.... The limiter valve and the electrical system can take the appliance load (see the rating plate) 2. The appliance is access to 220-240 V (~ 50-60 Hz ) electricity supply. A cut off plug inserted into a 13 amp socket is easily accessible with the appliance installed. Earth - Brown D. Blue The wires in compliance with the latest I.E.E. Live terminal • N - Electrical Requirements Permanent electrical installation must be...
.... The limiter valve and the electrical system can take the appliance load (see the rating plate) 2. The appliance is access to 220-240 V (~ 50-60 Hz ) electricity supply. A cut off plug inserted into a 13 amp socket is easily accessible with the appliance installed. Earth - Brown D. Blue The wires in compliance with the latest I.E.E. Live terminal • N - Electrical Requirements Permanent electrical installation must be...
User Manual
Page 12
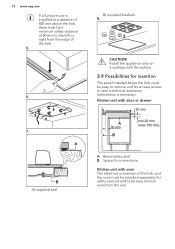
Kitchen unit with flat surface. 3.9 Possibilities for insertion The panel installed below the hob must be installed separately for connections Kitchen unit with oven The electrical connection of the hob. 5. 6. 7. Removable panel B. A B A) supplied seal B) supplied brackets 8. Install the appliance only on a worktop with door or drawer 30 mm A 60 mm B min 20 mm (max 150 mm) A. Space for safety reasons and to let easy remove oven from the...
Kitchen unit with flat surface. 3.9 Possibilities for insertion The panel installed below the hob must be installed separately for connections Kitchen unit with oven The electrical connection of the hob. 5. 6. 7. Removable panel B. A B A) supplied seal B) supplied brackets 8. Install the appliance only on a worktop with door or drawer 30 mm A 60 mm B min 20 mm (max 150 mm) A. Space for safety reasons and to let easy remove oven from the...
User Manual
Page 13
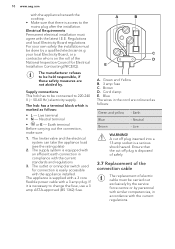
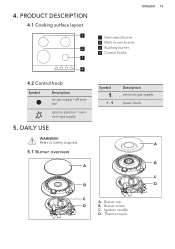
Burner crown C. Burner cap ' B. DAILY USE WARNING! Ignition candle D. Thermocouple Refer to Safety chapters. 5.1 Burner overview $ % Symbol 1 - 9 Description minimum gas supply power levels $ % & ' & A. 4. PRODUCT DESCRIPTION 4.1 Cooking surface layout 1 2 3 4 ENGLISH 13 1 Semi-rapid burner 2 Multi Crown burner 3 Auxiliary burner 4 Control knobs 4.2 Control knob Symbol Description no gas supply / off position ignition position / maximum gas supply 5.
Burner crown C. Burner cap ' B. DAILY USE WARNING! Ignition candle D. Thermocouple Refer to Safety chapters. 5.1 Burner overview $ % Symbol 1 - 9 Description minimum gas supply power levels $ % & ' & A. 4. PRODUCT DESCRIPTION 4.1 Cooking surface layout 1 2 3 4 ENGLISH 13 1 Semi-rapid burner 2 Multi Crown burner 3 Auxiliary burner 4 Control knobs 4.2 Control knob Symbol Description no gas supply / off position ignition position / maximum gas supply 5.
User Manual
Page 14
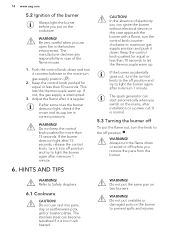
... the kitchen environment. WARNING! in correct positions. 14 www.aeg.com 5.2 Ignition of the burner Always light the burner before you remove the pans from the burner. If not, the gas supply is too much heated. If the burner does not light after minimum 1 minute. Keep the control knob pushed for equal or less than 15 seconds. WARNING! Do not use open fire in case of the flame...
... the kitchen environment. WARNING! in correct positions. 14 www.aeg.com 5.2 Ignition of the burner Always light the burner before you remove the pans from the burner. If not, the gas supply is too much heated. If the burner does not light after minimum 1 minute. Keep the control knob pushed for equal or less than 15 seconds. WARNING! Do not use open fire in case of the flame...
User Manual
Page 15
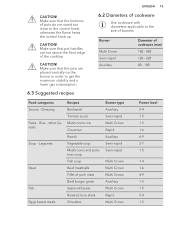
... Crown Multi Crown Multi Crown Auxiliary Multi Crown Rapid Multi Crown Power level 2-4 1-5 1-5 1-6 6-9 2-7 1-5 1-4 1-6 4-9 1-5 1-5 5-8 1-5 Burner Multi Crown Semi-rapid Auxiliary Diameter of pork roast Beef burger gratin Sepia with diameters applicable to the control knob, otherwise the flame heats the control knob up. CAUTION! Legumes Meat Fish Eggs based meals Recipes Bechamel Tomato sauce Mushrooms rice Couscous Ravioli Vegetable soup...
... Crown Multi Crown Multi Crown Auxiliary Multi Crown Rapid Multi Crown Power level 2-4 1-5 1-5 1-6 6-9 2-7 1-5 1-4 1-6 4-9 1-5 1-5 5-8 1-5 Burner Multi Crown Semi-rapid Auxiliary Diameter of pork roast Beef burger gratin Sepia with diameters applicable to the control knob, otherwise the flame heats the control knob up. CAUTION! Legumes Meat Fish Eggs based meals Recipes Bechamel Tomato sauce Mushrooms rice Couscous Ravioli Vegetable soup...
User Manual
Page 16
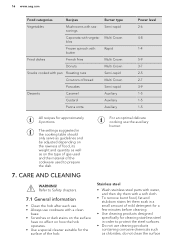
... chapters. 7.1 General information • Clean the hob after each use. • Always use cookware with a clean base. • Scratches or dark stains on the surface have no effect on the type of gas used and the material of the cookware used to protect the steel surfaces. • Do not use the auxiliary burner. The settings suggested in order to prepare the dish. 7. 16 www.aeg.com Food...
... chapters. 7.1 General information • Clean the hob after each use. • Always use cookware with a clean base. • Scratches or dark stains on the surface have no effect on the type of gas used and the material of the cookware used to protect the steel surfaces. • Do not use the auxiliary burner. The settings suggested in order to prepare the dish. 7. 16 www.aeg.com Food...
User Manual
Page 17
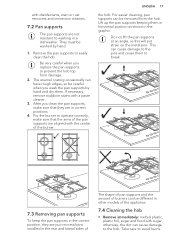
... other models of the pan supports are aligned with a paste cleaner. 3. with disinfectants, stain or rust removers and immersion cleaners. 7.2 Pan supports The pan supports are not resistant to the hob. They must be careful when you clean the pan supports, make sure that they are put strain on metal pins installed in the graphic. If necessary, remove stubborn stains with the centre of burners...
... other models of the pan supports are aligned with a paste cleaner. 3. with disinfectants, stain or rust removers and immersion cleaners. 7.2 Pan supports The pan supports are not resistant to the hob. They must be careful when you clean the pan supports, make sure that they are put strain on metal pins installed in the graphic. If necessary, remove stubborn stains with the centre of burners...
User Manual
Page 18
.... The instructions about the Service Centre and conditions of the gas supply pipe and the pressure adjuster, if fitted. Place the burner cap and crown correctly. 18 www.aeg.com • Remove when the hob is obtained through a ceramic ignition candle with a metal 8. After cleaning, wipe the hob dry with a soft cloth. • To clean the enamelled parts, caps and crowns, wash them carefully before you...
.... The instructions about the Service Centre and conditions of the gas supply pipe and the pressure adjuster, if fitted. Place the burner cap and crown correctly. 18 www.aeg.com • Remove when the hob is obtained through a ceramic ignition candle with a metal 8. After cleaning, wipe the hob dry with a soft cloth. • To clean the enamelled parts, caps and crowns, wash them carefully before you...
User Manual
Page 20
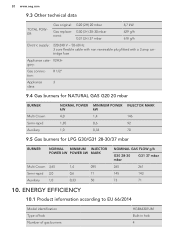
... Semi-rapid 2,0 0,6 71 Auxiliary 1,0 0,33 50 NOMINAL GAS FLOW g/h G30 28-30 mbar G31 37 mbar 265 261 145 143 73 71 10. ENERGY EFFICIENCY 10.1 Product information according to EU 66/2014 Model identification Type of hob Number of gas burners HGB64301UM Built-in hob 4 20 www.aeg.com 9.3 Other technical data TOTAL POWER: Gas original: G20 (2H) 20 mbar Gas replace-
... Semi-rapid 2,0 0,6 71 Auxiliary 1,0 0,33 50 NOMINAL GAS FLOW g/h G30 28-30 mbar G31 37 mbar 265 261 145 143 73 71 10. ENERGY EFFICIENCY 10.1 Product information according to EU 66/2014 Model identification Type of hob Number of gas burners HGB64301UM Built-in hob 4 20 www.aeg.com 9.3 Other technical data TOTAL POWER: Gas original: G20 (2H) 20 mbar Gas replace-

User Manual
Page 21
... liquid starts to boil, turn down the flame to recycle it is possible, use a pressure cooker. Auxiliary not applicable 57.2% EN 30-2-1: Domestic cooking appliances burning gas - Semi-rapid Right rear - Part 2-1 : Rational use , make sure that the burners and pan supports are assembled correctly. • Use cookware with the household waste. General 10.2 Energy saving • Before use of electrical and electronic appliances. Put...
... liquid starts to boil, turn down the flame to recycle it is possible, use a pressure cooker. Auxiliary not applicable 57.2% EN 30-2-1: Domestic cooking appliances burning gas - Semi-rapid Right rear - Part 2-1 : Rational use , make sure that the burners and pan supports are assembled correctly. • Use cookware with the household waste. General 10.2 Energy saving • Before use of electrical and electronic appliances. Put...


