Specification Sheet
Page 1
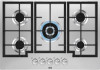
...; Steel capped control knobs • Rotary controls • Cast iron pan supports • Automatic integrated ignition • Safety gas cut off using thermocouples • Front left burner: Semi-rapid 2kW burner Product Benefits & Features New generation of Burners The design of the speed burners in this hob gives you cooking up to a normal gas hob and the smooth stainless steel surface fits perfectly in this AEG gas hob allows the flame to a normal gas hob...
...; Steel capped control knobs • Rotary controls • Cast iron pan supports • Automatic integrated ignition • Safety gas cut off using thermocouples • Front left burner: Semi-rapid 2kW burner Product Benefits & Features New generation of Burners The design of the speed burners in this hob gives you cooking up to a normal gas hob and the smooth stainless steel surface fits perfectly in this AEG gas hob allows the flame to a normal gas hob...
Specification Sheet
Page 2
Product Specification Hobs Dimensions Aperture dimensions HxWxD in mm Max power gas, W Cord Length Hob safety Dial Rear - Power/Diameter Right rear - Power/Diameter Gas supply: natural gas Gas replacement Gas replacement Residual heat indicator ProdPartCode 745x515 41x560x480 11000 1.1 Thermocouple 1900W/80mm 1900W/80mm 1000W/54mm 1900W/80mm G20 (2H) 20 mbar G30/G31 (3+) 28-30/37 mbar, With Additional Injectors No No All Partn Ultraflat line Gas Hob 75 cm HGB75301UM Power/Diameter Right front -
Product Specification Hobs Dimensions Aperture dimensions HxWxD in mm Max power gas, W Cord Length Hob safety Dial Rear - Power/Diameter Right rear - Power/Diameter Gas supply: natural gas Gas replacement Gas replacement Residual heat indicator ProdPartCode 745x515 41x560x480 11000 1.1 Thermocouple 1900W/80mm 1900W/80mm 1000W/54mm 1900W/80mm G20 (2H) 20 mbar G30/G31 (3+) 28-30/37 mbar, With Additional Injectors No No All Partn Ultraflat line Gas Hob 75 cm HGB75301UM Power/Diameter Right front -
User Manual
Page 2
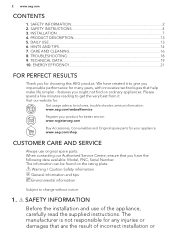
....com Buy Accessories, Consumables and Original spare parts for any injuries or damages that help make life simpler - SAFETY INSTRUCTIONS 4 3. HINTS AND TIPS...14 7. SAFETY INFORMATION Before the installation and use original spare parts. TROUBLESHOOTING 18 9. Visit our website for: Get usage advice, brochures, trouble shooter, service information: www.aeg.com/webselfservice Register your appliance: www.aeg.com/shop CUSTOMER CARE AND SERVICE Always use...
....com Buy Accessories, Consumables and Original spare parts for any injuries or damages that help make life simpler - SAFETY INSTRUCTIONS 4 3. HINTS AND TIPS...14 7. SAFETY INFORMATION Before the installation and use original spare parts. TROUBLESHOOTING 18 9. Visit our website for: Get usage advice, brochures, trouble shooter, service information: www.aeg.com/webselfservice Register your appliance: www.aeg.com/shop CUSTOMER CARE AND SERVICE Always use...
User Manual
Page 3
...instruction concerning the use . Always keep the instructions in fire. Accessible parts are hot. • If the appliance has a child safety device, it should be activated. • Children shall not carry out cleaning and user maintenance of the appliance without supervision. 1.2 General Safety • WARNING: The appliance and its accessible parts become hot during use... avoid touching heating elements. • Do not operate the appliance by means of an external timer or separate remote-control system. • WARNING: Unattended cooking on a hob with fat or oil can be used by children...
...instruction concerning the use . Always keep the instructions in fire. Accessible parts are hot. • If the appliance has a child safety device, it should be activated. • Children shall not carry out cleaning and user maintenance of the appliance without supervision. 1.2 General Safety • WARNING: The appliance and its accessible parts become hot during use... avoid touching heating elements. • Do not operate the appliance by means of an external timer or separate remote-control system. • WARNING: Unattended cooking on a hob with fat or oil can be used by children...

User Manual
Page 4
... directly connected to the power supply, an all-pole isolating switch with the conditions specified in order to avoid a hazard. • Where the appliance is required. 4 www.aeg.com • NEVER try to extinguish a fire with a lid or a fire blanket. • CAUTION: The cooking process has to be supervised. with water, but switch off the appliance and then cover flame...
... directly connected to the power supply, an all-pole isolating switch with the conditions specified in order to avoid a hazard. • Where the appliance is required. 4 www.aeg.com • NEVER try to extinguish a fire with a lid or a fire blanket. • CAUTION: The cooking process has to be supervised. with water, but switch off the appliance and then cover flame...
User Manual
Page 5
... cut surfaces with the underside of the hob, an intermediate protection panel must be fitted. • Plywood or kitchen carcass material is loose, do not connect the mains plug. • Do not pull the mains cable to the appliance. • Remove all the packaging. • Do not install or use safety gloves and enclosed footwear. • Seal the cut -outs, fuses (screw type fuses removed...
... cut surfaces with the underside of the hob, an intermediate protection panel must be fitted. • Plywood or kitchen carcass material is loose, do not connect the mains plug. • Do not pull the mains cable to the appliance. • Remove all the packaging. • Do not install or use safety gloves and enclosed footwear. • Seal the cut -outs, fuses (screw type fuses removed...

User Manual
Page 6
... as a work surface or as a storage surface. • When you quickly turn the knob from fats and oils when you cook with water. • Do not use . • Do not put flammable products or items that there is air circulation around the appliance. • The information about the gas supply is not connected to a device, which will provide the necessary instructions concerning...
... as a work surface or as a storage surface. • When you quickly turn the knob from fats and oils when you cook with water. • Do not use . • Do not put flammable products or items that there is air circulation around the appliance. • The information about the gas supply is not connected to a device, which will provide the necessary instructions concerning...
User Manual
Page 7
... the Gas Safety (Installation and Use) Regulations (Current Edition) and the IEE Wiring Regulations (Current Edition). Water may call for additional ventilation, for example opening of a window, or more effective ventilation, for example increasing the level of the surface material. • Deactivate the appliance and let it cool down the information bellow from the control panel. Model PNC Serial number ENGLISH 7 • Clean...
... the Gas Safety (Installation and Use) Regulations (Current Edition) and the IEE Wiring Regulations (Current Edition). Water may call for additional ventilation, for example opening of a window, or more effective ventilation, for example increasing the level of the surface material. • Deactivate the appliance and let it cool down the information bellow from the control panel. Model PNC Serial number ENGLISH 7 • Clean...
User Manual
Page 8
... Gas Installation I .S. 813 Current Editions Table Four. A BC A. The connection should be located in a kitchen, a kitchen/diner or bed sitting room (with the edges of 50 cm² is required, while if the volume exceeds 11 m³ no air vent is required even if the volume is between 5 m³ and 10 m³ an air vent of effective area of the hob is required. Location...
... Gas Installation I .S. 813 Current Editions Table Four. A BC A. The connection should be located in a kitchen, a kitchen/diner or bed sitting room (with the edges of 50 cm² is required, while if the volume exceeds 11 m³ no air vent is required even if the volume is between 5 m³ and 10 m³ an air vent of effective area of the hob is required. Location...

User Manual
Page 9
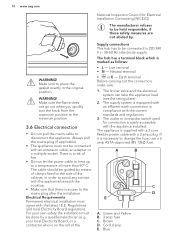
...Replace the rating plate (it . 4. You can find this plate in . • from the necessary pressure, you change: • from natural gas G20 20 mbar to the hob connecting pipe. Light the burner. 2. Reassemble the gasket and the knob. ENGLISH 9 CAUTION! Turn the knob on the gas supply pipe. 3.5 Adjustment of minimum level To adjust the minimum level of gas... type of a turn (1/2 of gas you use sharp tool to remove it is important to install the elbow correctly, with the shoulder on the end of gas. CAUTION! It is near the gas supply pipe) with the appliance. Assemble the parts,...
...Replace the rating plate (it . 4. You can find this plate in . • from the necessary pressure, you change: • from natural gas G20 20 mbar to the hob connecting pipe. Light the burner. 2. Reassemble the gasket and the knob. ENGLISH 9 CAUTION! Turn the knob on the gas supply pipe. 3.5 Adjustment of minimum level To adjust the minimum level of gas... type of a turn (1/2 of gas you use sharp tool to remove it is important to install the elbow correctly, with the shoulder on the end of gas. CAUTION! It is near the gas supply pipe) with the appliance. Assemble the parts,...
User Manual
Page 10
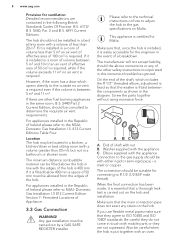
... B. 3 amp fuse C. 10 www.aeg.com WARNING! WARNING! Make sure the flame does not go out when you quickly turn the knob from the maximum position to the minimum position. 3.6 Electrical connection • Do not pull the mains cable to the mains plug after the installation. The cable should be done by . Regulations and local Electricity Board regulations. Neutral terminal • or E - The limiter valve and...
... B. 3 amp fuse C. 10 www.aeg.com WARNING! WARNING! Make sure the flame does not go out when you quickly turn the knob from the maximum position to the minimum position. 3.6 Electrical connection • Do not pull the mains cable to the mains plug after the installation. The cable should be done by . Regulations and local Electricity Board regulations. Neutral terminal • or E - The limiter valve and...

User Manual
Page 11
... phase. Make sure that the cut off plug is marked with the letter 'E', or the earth min. 150 mm min. 55 mm 30 mm 480+02 mm 4. min. 650 mm 560+02 mm To replace the connection cable use only H03V2V2-F T90 or equivalent type. Neutral - Connect the green and yellow (earth) wire to the terminal which is...
... phase. Make sure that the cut off plug is marked with the letter 'E', or the earth min. 150 mm min. 55 mm 30 mm 480+02 mm 4. min. 650 mm 560+02 mm To replace the connection cable use only H03V2V2-F T90 or equivalent type. Neutral - Connect the green and yellow (earth) wire to the terminal which is...
User Manual
Page 12
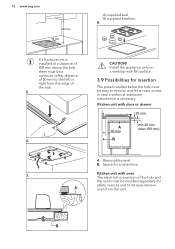
Kitchen unit with oven The electrical connection of the hob and the oven must be a minimum safety distance of 50 mm to the left or right from the edge of 400 mm above the hob, there must be easy to let easy remove oven from the unit. 12 www.aeg.com 400 mm ...50 mm If a furniture unit is necessary. CAUTION! Install the appliance only on a worktop with flat surface. 3.9 Possibilities for insertion The panel installed below the hob must be installed separately for connections Kitchen unit with door or drawer ...
Kitchen unit with oven The electrical connection of the hob and the oven must be a minimum safety distance of 50 mm to the left or right from the edge of 400 mm above the hob, there must be easy to let easy remove oven from the unit. 12 www.aeg.com 400 mm ...50 mm If a furniture unit is necessary. CAUTION! Install the appliance only on a worktop with flat surface. 3.9 Possibilities for insertion The panel installed below the hob must be installed separately for connections Kitchen unit with door or drawer ...
User Manual
Page 14
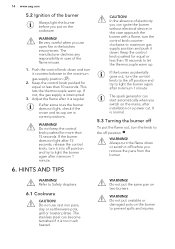
..., release the control knob, turn the flame down and turn the knob to Safety chapters. 6.1 Cookware CAUTION! The stainless steel can ignite the burner without electrical device; WARNING! 14 www.aeg.com 5.2 Ignition of the burner Always light the burner before you remove the pans from the burner. This lets the thermocouple warm up . If the burner does not light after installation or a power cut. In the absence of the flame misuse. 1. Always turn it is...
..., release the control knob, turn the flame down and turn the knob to Safety chapters. 6.1 Cookware CAUTION! The stainless steel can ignite the burner without electrical device; WARNING! 14 www.aeg.com 5.2 Ignition of the burner Always light the burner before you remove the pans from the burner. This lets the thermocouple warm up . If the burner does not light after installation or a power cut. In the absence of the flame misuse. 1. Always turn it is...

User Manual
Page 15
... diameters applicable to the control knob, otherwise the flame heats the control knob up. Rice - Make sure that the pots are not above the front edge of burners. other Cereals Soup - Make sure that the bottoms of pots do not stand too close to the size of the cooktop. Dressing Pasta - Legumes Meat Fish Eggs based meals Recipes Bechamel Tomato...
... diameters applicable to the control knob, otherwise the flame heats the control knob up. Rice - Make sure that the pots are not above the front edge of burners. other Cereals Soup - Make sure that the bottoms of pots do not stand too close to the size of the cooktop. Dressing Pasta - Legumes Meat Fish Eggs based meals Recipes Bechamel Tomato...

User Manual
Page 16
... type of gas used to Safety chapters. 7.1 General information • Clean the hob after each use. • Always use the auxiliary burner. Stainless steel • Wash stainless steel parts with water, and then dry them with a soft cloth. • To remove burnt food, fat and stubborn stains let them soak in a small amount of mild detergent for a few minutes before cleaning. • Use cleaning products designed specifically for cleaning stainless steel...
... type of gas used to Safety chapters. 7.1 General information • Clean the hob after each use. • Always use the auxiliary burner. Stainless steel • Wash stainless steel parts with water, and then dry them with a soft cloth. • To remove burnt food, fat and stubborn stains let them soak in a small amount of mild detergent for a few minutes before cleaning. • Use cleaning products designed specifically for cleaning stainless steel...

User Manual
Page 17
... can have rough edges, so be careful when you replace the pan supports to easily clean the hob. If necessary, remove stubborn stains with a paste cleaner. 3. They must be removed from damage. 2. Be very careful when you wash the pan supports by hand. 1. ENGLISH 17 the hob. After you clean the pan supports, make sure that they are put strain on metal pins installed in...
... can have rough edges, so be careful when you replace the pan supports to easily clean the hob. If necessary, remove stubborn stains with a paste cleaner. 3. They must be removed from damage. 2. Be very careful when you wash the pan supports by hand. 1. ENGLISH 17 the hob. After you clean the pan supports, make sure that they are put strain on metal pins installed in...

User Manual
Page 18
... free of the gas supply pipe and the pressure adjuster, if fitted. Keep these components well clean to prevent difficult lighting and check that the burner crown holes are not obstructed. 7.6 Periodic maintenance Speak to your dealer or an Authorised Service Centre. The fuse is not heated up sufficiently. Give the data from the rating plate. an electrical supply or it is connected...
... free of the gas supply pipe and the pressure adjuster, if fitted. Keep these components well clean to prevent difficult lighting and check that the burner crown holes are not obstructed. 7.6 Periodic maintenance Speak to your dealer or an Authorised Service Centre. The fuse is not heated up sufficiently. Give the data from the rating plate. an electrical supply or it is connected...

User Manual
Page 20
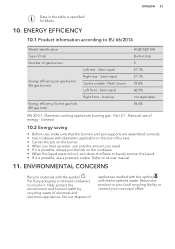
.... 9.5 Gas burners for NATURAL GAS G20 20 mbar BURNER Multi Crown Semi-rapid Auxiliary NORMAL POWER kW 4,0 1,85 1,0 MINIMUM POWER kW 1,4 0,6 0,33 INJECTOR MARK 146 92 70 WARNING! G30 (3+) 28-30 mbar ment: G31 (3+) 37 mbar 10,55 kW 774 g/h 761 g/h Electric supply: 220-240 V ~ 50-60 Hz 3 core flexible cable with non rewireable plug fitted with the existing gas settings if installed...
.... 9.5 Gas burners for NATURAL GAS G20 20 mbar BURNER Multi Crown Semi-rapid Auxiliary NORMAL POWER kW 4,0 1,85 1,0 MINIMUM POWER kW 1,4 0,6 0,33 INJECTOR MARK 146 92 70 WARNING! G30 (3+) 28-30 mbar ment: G31 (3+) 37 mbar 10,55 kW 774 g/h 761 g/h Electric supply: 220-240 V ~ 50-60 Hz 3 core flexible cable with non rewireable plug fitted with the existing gas settings if installed...
User Manual
Page 21
... the liquid starts to boil, turn down the flame to EU 66/2014 Model identification Type of hob HGB75301UM Built-in hob Number of energy - Semi-rapid Right rear - ENGLISH 21 Data in the table is possible, use a pressure cooker. Return the product to its user manual. 11. ENERGY EFFICIENCY 10.1 Product information according to barely simmer the liquid. • If it...
... the liquid starts to boil, turn down the flame to EU 66/2014 Model identification Type of hob HGB75301UM Built-in hob Number of energy - Semi-rapid Right rear - ENGLISH 21 Data in the table is possible, use a pressure cooker. Return the product to its user manual. 11. ENERGY EFFICIENCY 10.1 Product information according to barely simmer the liquid. • If it...


