Specification Sheet
Page 1
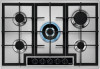
... HGB75420YM Precise power levels. Because exact settings mean outstanding results. • Steel capped control knobs • Rotary front controls on the hob with StepPower controls. And advanced technology delivers exact, consistent heat to 9, with the powerful, multi-crown gas burner. For precise heat Experience precision on glass panel • Rotary controls • Not fitted with StepPower. Perfect results Set precise heat levels on the hob. Wok cooking mastered. Cast iron pan support Add a professional...
... HGB75420YM Precise power levels. Because exact settings mean outstanding results. • Steel capped control knobs • Rotary front controls on the hob with StepPower controls. And advanced technology delivers exact, consistent heat to 9, with the powerful, multi-crown gas burner. For precise heat Experience precision on glass panel • Rotary controls • Not fitted with StepPower. Perfect results Set precise heat levels on the hob. Wok cooking mastered. Cast iron pan support Add a professional...

Specification Sheet
Page 2
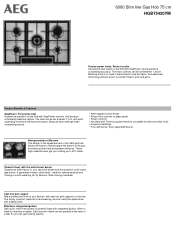
Power/Diameter Right front - Power/Diameter Right rear - Power/Diameter Rear - Power/Diameter Gas supply: natural gas Gas replacement Gas replacement ProdPartCode 745x510 40x560x480 5 1.1 1900W/70mm 00W/00mm 1900W/70mm 1000W/54mm 3000W/100mm G20 (2H) 20 mbar G30/G31 (3+) 28-30/37 mbar, With Additional Injectors No All Open 6000 Slim line Gas Hob 75 cm HGB75420YM Product Specification Hobs Dimensions Aperture dimensions HxWxD in mm Radius cutting Cord Length Dial Middle rear -
Power/Diameter Right front - Power/Diameter Right rear - Power/Diameter Rear - Power/Diameter Gas supply: natural gas Gas replacement Gas replacement ProdPartCode 745x510 40x560x480 5 1.1 1900W/70mm 00W/00mm 1900W/70mm 1000W/54mm 3000W/100mm G20 (2H) 20 mbar G30/G31 (3+) 28-30/37 mbar, With Additional Injectors No All Open 6000 Slim line Gas Hob 75 cm HGB75420YM Product Specification Hobs Dimensions Aperture dimensions HxWxD in mm Radius cutting Cord Length Dial Middle rear -
User Manual
Page 2
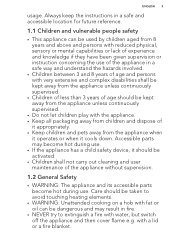
....aeg.com/shop CUSTOMER CARE AND SERVICE Always use of incorrect installation or ENERGY EFFICIENCY 20 FOR PERFECT RESULTS Thank you have created it . Please spend a few minutes reading to change without notice. 1. SAFETY INSTRUCTIONS 5 3. DAILY USE...13 6. We have the following data available: Model, PNC, Serial Number. HINTS AND TIPS...14 7. SAFETY INFORMATION Before the installation and use original spare parts. TROUBLESHOOTING 17 9. 2 www.aeg.com...
....aeg.com/shop CUSTOMER CARE AND SERVICE Always use of incorrect installation or ENERGY EFFICIENCY 20 FOR PERFECT RESULTS Thank you have created it . Please spend a few minutes reading to change without notice. 1. SAFETY INSTRUCTIONS 5 3. DAILY USE...13 6. We have the following data available: Model, PNC, Serial Number. HINTS AND TIPS...14 7. SAFETY INFORMATION Before the installation and use original spare parts. TROUBLESHOOTING 17 9. 2 www.aeg.com...
User Manual
Page 3
... and knowledge if they have been given supervision or instruction concerning the use of the appliance in fire. • NEVER try to avoid touching heating elements. • WARNING: Unattended cooking on a hob with fat or oil can be activated. • Children shall not carry out cleaning and user maintenance of it appropriately. • Keep children and pets...
... and knowledge if they have been given supervision or instruction concerning the use of the appliance in fire. • NEVER try to avoid touching heating elements. • WARNING: Unattended cooking on a hob with fat or oil can be activated. • Children shall not carry out cleaning and user maintenance of it appropriately. • Keep children and pets...
User Manual
Page 4
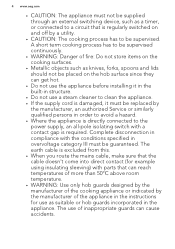
... earth cable is regularly switched on the hob surface since they can get hot. • Do not use the appliance before installing it must be replaced by the manufacturer, an authorized Service or similarly qualified persons in overvoltage category III must not be supplied through an external switching device, such as a timer, or connected to a circuit that is excluded from...
... earth cable is regularly switched on the hob surface since they can get hot. • Do not use the appliance before installing it must be replaced by the manufacturer, an authorized Service or similarly qualified persons in overvoltage category III must not be supplied through an external switching device, such as a timer, or connected to a circuit that is excluded from...
User Manual
Page 5
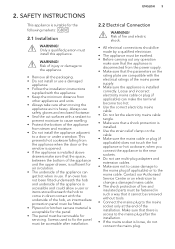
... not touch the hot appliance or hot cookware, when you connect the appliance to the near sockets. • Do not use safety gloves and enclosed footwear. • Seal the cut surfaces with the appliance. • Keep the minimum distance from the power supply. • Make sure that a shock protection is installed correctly. ENGLISH 5 2.2 Electrical Connection WARNING! This prevents hot cookware falling from the...
... not touch the hot appliance or hot cookware, when you connect the appliance to the near sockets. • Do not use safety gloves and enclosed footwear. • Seal the cut surfaces with the appliance. • Keep the minimum distance from the power supply. • Make sure that a shock protection is installed correctly. ENGLISH 5 2.2 Electrical Connection WARNING! This prevents hot cookware falling from the...
User Manual
Page 6
.... WARNING! The surface can be made by a qualified person. • Before installation, make sure that the local distribution conditions (nature of the gas and gas pressure) and the adjustment of the appliance are wet with wet hands or when it may splash. Always pull the mains plug. • Use only correct isolation devices: line protecting cut-outs, fuses (screw type fuses removed from the mains...
.... WARNING! The surface can be made by a qualified person. • Before installation, make sure that the local distribution conditions (nature of the gas and gas pressure) and the adjustment of the appliance are wet with wet hands or when it may splash. Always pull the mains plug. • Use only correct isolation devices: line protecting cut-outs, fuses (screw type fuses removed from the mains...
User Manual
Page 7
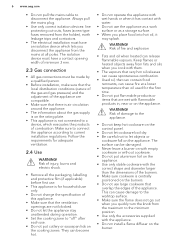
... burners in the dishwasher. 2.6 Service • To repair the appliance contact the Authorised Service Centre. • Use original spare parts only. 2.7 Disposal WARNING! Model PNC Serial number ENGLISH 7 • Deactivate the appliance and let it cool down the information below from the control panel. Do not remove the buttons, knobs or gaskets from the rating plate. Provide good ventilation in the following British Standards Codes...
... burners in the dishwasher. 2.6 Service • To repair the appliance contact the Authorised Service Centre. • Use original spare parts only. 2.7 Disposal WARNING! Model PNC Serial number ENGLISH 7 • Deactivate the appliance and let it cool down the information below from the control panel. Do not remove the buttons, knobs or gaskets from the rating plate. Provide good ventilation in the following British Standards Codes...
User Manual
Page 8
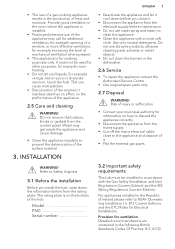
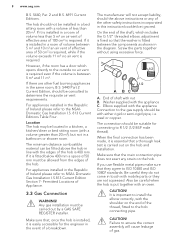
... or semi-rigid pipe, i.e. Screw the parts together without using excessive force. 1/2 1/2 A BC A. CAUTION! Failure to NSAI- Permitted Locations of a breakdown. Elbow supplied with the appliance Connection to the NSAIDomestic Gas Installation I .S 813 Current Edition Section 7- 8 www.aeg.com B.S. 5440, Par. 2 and B.S. 6891 Current Editions. For appliances installed in this instruction booklet be careful when the hob is fitted between...
... or semi-rigid pipe, i.e. Screw the parts together without using excessive force. 1/2 1/2 A BC A. CAUTION! Failure to NSAI- Permitted Locations of a breakdown. Elbow supplied with the appliance Connection to the NSAIDomestic Gas Installation I .S 813 Current Edition Section 7- 8 www.aeg.com B.S. 5440, Par. 2 and B.S. 6891 Current Editions. For appliances installed in this instruction booklet be careful when the hob is fitted between...
User Manual
Page 9
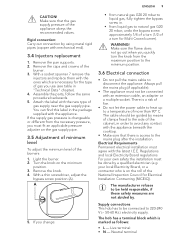
...; Do not let the power cable to heat up to 220-240 V (~ 50-60 Hz ) electricity supply. For your local Electricity Board, or a contractor who is changeable or different from the necessary pressure, you quickly turn the knob from the maximum position to the minimum position. 3.6 Electrical connection • Do not pull the mains cable to natural gas G20 20 mbar, undo the...
...; Do not let the power cable to heat up to 220-240 V (~ 50-60 Hz ) electricity supply. For your local Electricity Board, or a contractor who is changeable or different from the necessary pressure, you quickly turn the knob from the maximum position to the minimum position. 3.6 Electrical connection • Do not pull the mains cable to natural gas G20 20 mbar, undo the...
User Manual
Page 10
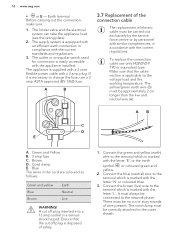
... 'E', or the earth symbol , or coloured green and yellow. 2. A cut off plug is supplied with a 3 core flexible power cable with a 3 amp plug. Connect the green and yellow (earth) wire to the terminal which is applicable to change the fuse, use only H03V2V2-F T90 or equivalent type. A B 3.7 Replacement of the connection cable The replacement of electric cable must be correctly attached to the network phase. AB...
... 'E', or the earth symbol , or coloured green and yellow. 2. A cut off plug is supplied with a 3 core flexible power cable with a 3 amp plug. Connect the green and yellow (earth) wire to the terminal which is applicable to change the fuse, use only H03V2V2-F T90 or equivalent type. A B 3.7 Replacement of the connection cable The replacement of electric cable must be correctly attached to the network phase. AB...
User Manual
Page 11
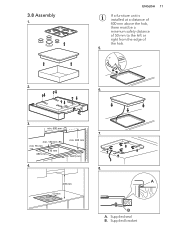
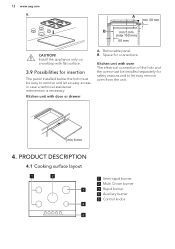
A 400 mm 50 mm B A. Supplied bracket min. 150 mm min. 55 mm 30 mm 480+02 mm min. 650 mm 560+02 mm 4. 8. ENGLISH 11 If a furniture unit is installed at a distance of 400 mm above the hob, there must be a minimum safety distance of 50 mm to the left or right from the edge of the hob. 5. 2. 6. 3. min. 600 mm 7. Supplied seal B. 3.8 Assembly 1.
A 400 mm 50 mm B A. Supplied bracket min. 150 mm min. 55 mm 30 mm 480+02 mm min. 650 mm 560+02 mm 4. 8. ENGLISH 11 If a furniture unit is installed at a distance of 400 mm above the hob, there must be a minimum safety distance of 50 mm to the left or right from the edge of the hob. 5. 2. 6. 3. min. 600 mm 7. Supplied seal B. 3.8 Assembly 1.
User Manual
Page 12
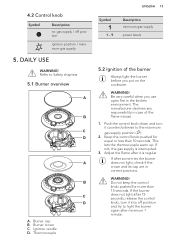
... 4.1 Cooking surface layout 1 2 3 4 5 1 Semi-rapid burner 2 Multi Crown burner 3 Rapid burner 4 Auxiliary burner 5 Control knobs Removable panel B. min 6 mm 4. Install the appliance only on a worktop with flat surface. 3.9 Possibilities for insertion The panel installed below the hob must be easy to let easy remove oven from the unit. 12 www.aeg.com 9. A min 30 mm B min 5 mm (max 150 mm) 60 mm CAUTION! Kitchen unit with oven The electrical connection of...
... 4.1 Cooking surface layout 1 2 3 4 5 1 Semi-rapid burner 2 Multi Crown burner 3 Rapid burner 4 Auxiliary burner 5 Control knobs Removable panel B. min 6 mm 4. Install the appliance only on a worktop with flat surface. 3.9 Possibilities for insertion The panel installed below the hob must be easy to let easy remove oven from the unit. 12 www.aeg.com 9. A min 30 mm B min 5 mm (max 150 mm) 60 mm CAUTION! Kitchen unit with oven The electrical connection of...
User Manual
Page 13
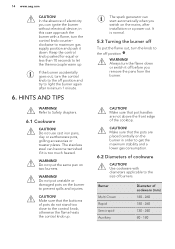
... seconds. Adjust the flame after some tries the burner does not light, check if the crown and its cap are in the kitchen environment. 4.2 Control knob Symbol Description no gas supply / off position and try to light the burner again after minimum 1 minute. DAILY USE WARNING! WARNING! Burner cap B. Ignition candle D. The manufacturer declines any responsibility in case of the burner Always light the burner before you use open fire...
... seconds. Adjust the flame after some tries the burner does not light, check if the crown and its cap are in the kitchen environment. 4.2 Control knob Symbol Description no gas supply / off position and try to light the burner again after minimum 1 minute. DAILY USE WARNING! WARNING! Burner cap B. Ignition candle D. The manufacturer declines any responsibility in case of the burner Always light the burner before you use open fire...
User Manual
Page 14
... Rapid Semi-rapid Auxiliary Diameter of burners. Keep the control knob pushed for equal or less than 10 seconds to light the burner again after installation or a power cut. Refer to the off position . The stainless steel can start automatically when you can ignite the burner without electrical device; Do not use cast iron pans, clay or earthenware pots, grilling accessories or toaster plates. CAUTION! Make...
... Rapid Semi-rapid Auxiliary Diameter of burners. Keep the control knob pushed for equal or less than 10 seconds to light the burner again after installation or a power cut. Refer to the off position . The stainless steel can start automatically when you can ignite the burner without electrical device; Do not use cast iron pans, clay or earthenware pots, grilling accessories or toaster plates. CAUTION! Make...
User Manual
Page 16
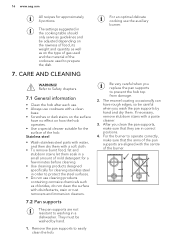
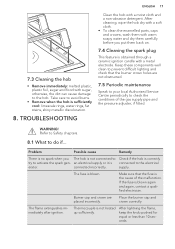
... the burner. Remove the pan supports to prevent the hob top from damage. 2. Refer to Safety chapters. 7.1 General information • Clean the hob after each use. • Always use cookware with a clean base. • Scratches or dark stains on the surface have rough edges, so be washed by hand and dry them soak in a small amount of the hob. Stainless steel • Wash stainless steel parts with...
... the burner. Remove the pan supports to prevent the hob top from damage. 2. Refer to Safety chapters. 7.1 General information • Clean the hob after each use. • Always use cookware with a clean base. • Scratches or dark stains on the surface have rough edges, so be washed by hand and dry them soak in a small amount of the hob. Stainless steel • Wash stainless steel parts with...
User Manual
Page 17
... difficult lighting and check that the fuse is blown. The flame extinguishes immediately after ignition. supply. Burner cap and crown are not obstructed. 7.5 Periodic maintenance Speak to your local Authorised Service Centre periodically to the electrical erator. Thermocouple is connected to check the conditions of the malfunction. an electrical supply or it is not heated up sufficiently. Keep these components well clean...
... difficult lighting and check that the fuse is blown. The flame extinguishes immediately after ignition. supply. Burner cap and crown are not obstructed. 7.5 Periodic maintenance Speak to your local Authorised Service Centre periodically to the electrical erator. Thermocouple is connected to check the conditions of the malfunction. an electrical supply or it is not heated up sufficiently. Keep these components well clean...
User Manual
Page 18
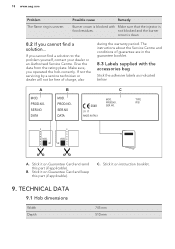
... and send this part (if applicable). TECHNICAL DATA 9.1 Hob dimensions Width Depth 745 mm 510 mm not blocked and the burner crown is blocked with the accessories bag Stick the adhesive labels as indicated below: A B C MOD. B. The instructions about the Service Centre and conditions of charge, also during the warranty period. If not the servicing by a service technician or...
... and send this part (if applicable). TECHNICAL DATA 9.1 Hob dimensions Width Depth 745 mm 510 mm not blocked and the burner crown is blocked with the accessories bag Stick the adhesive labels as indicated below: A B C MOD. B. The instructions about the Service Centre and conditions of charge, also during the warranty period. If not the servicing by a service technician or...
User Manual
Page 19
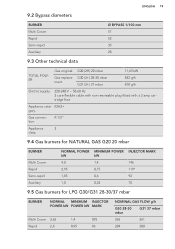
... (3+) 37 mbar 11,65 kW 832 g/h 818 g/h Electric supply: 220-240 V ~ 50-60 Hz 3 core flexible cable with non rewireable plug fitted with a 3 amp cartridge fuse Appliance cate- II2H3+ gory: Gas connection: R 1/2" Appliance 3 class: 9.4 Gas burners for NATURAL GAS G20 20 mbar BURNER Multi Crown Rapid Semi-rapid Auxiliary NORMAL POWER kW 4,0 2,95 1,85 1,0 MINIMUM POWER kW 1,4 0,75 0,6 0,33 INJECTOR MARK 146 119°...
... (3+) 37 mbar 11,65 kW 832 g/h 818 g/h Electric supply: 220-240 V ~ 50-60 Hz 3 core flexible cable with non rewireable plug fitted with a 3 amp cartridge fuse Appliance cate- II2H3+ gory: Gas connection: R 1/2" Appliance 3 class: 9.4 Gas burners for NATURAL GAS G20 20 mbar BURNER Multi Crown Rapid Semi-rapid Auxiliary NORMAL POWER kW 4,0 2,95 1,85 1,0 MINIMUM POWER kW 1,4 0,75 0,6 0,33 INJECTOR MARK 146 119°...
User Manual
Page 20
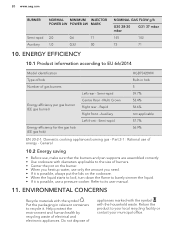
... to boil, turn down the flame to the size of electrical and electronic appliances. Do not dispose of energy - Auxiliary Left front - Put the packaging in hob Number of gas burners Energy efficiency per gas burner (EE gas burner) Left rear - Return the product to recycle it is possible, use of appliances marked with the symbol with the symbol . Part 2-1 : Rational use a pressure cooker. ENVIRONMENTAL...
... to boil, turn down the flame to the size of electrical and electronic appliances. Do not dispose of energy - Auxiliary Left front - Put the packaging in hob Number of gas burners Energy efficiency per gas burner (EE gas burner) Left rear - Return the product to recycle it is possible, use of appliances marked with the symbol with the symbol . Part 2-1 : Rational use a pressure cooker. ENVIRONMENTAL...


