Specification Sheet
Page 1
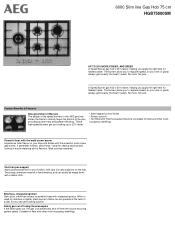
... needs. Wok cooking mastered. Safety gas cut off using thermocouples If the flame goes out, the gas is 20% faster, helping you cooking up to regulate speed, so your wok or pasta always gets exactly the heat it needs. No more . No less. It generates intense, direct heat - Each burner's flame can be wiped down with cast iron grid supports on the hob. Suitable for flawless taste. These high...
... needs. Wok cooking mastered. Safety gas cut off using thermocouples If the flame goes out, the gas is 20% faster, helping you cooking up to regulate speed, so your wok or pasta always gets exactly the heat it needs. No more . No less. It generates intense, direct heat - Each burner's flame can be wiped down with cast iron grid supports on the hob. Suitable for flawless taste. These high...

Specification Sheet
Page 2
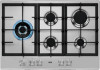
Power/Diameter Middle rear - Power/Diameter Gas supply: natural gas Gas replacement Gas replacement Led Colour ProdPartCode 745x510 40x560x480 5 1.1 1900W/70mm 1900W/70mm 1000W/54mm 3000W/100mm G20 (2H) 20 mbar G30/G31 (3+) 28-30/37 mbar, With Additional Injectors No No All Open 6000 Slim line Gas Hob 75 cm HGB75500SM Power/Diameter Right rear - Product Specification Hobs Dimensions Aperture dimensions HxWxD in mm Radius cutting Cord Length Middle front - Power/Diameter Right front -
Power/Diameter Middle rear - Power/Diameter Gas supply: natural gas Gas replacement Gas replacement Led Colour ProdPartCode 745x510 40x560x480 5 1.1 1900W/70mm 1900W/70mm 1000W/54mm 3000W/100mm G20 (2H) 20 mbar G30/G31 (3+) 28-30/37 mbar, With Additional Injectors No No All Open 6000 Slim line Gas Hob 75 cm HGB75500SM Power/Diameter Right rear - Product Specification Hobs Dimensions Aperture dimensions HxWxD in mm Radius cutting Cord Length Middle front - Power/Diameter Right front -

User Manual
Page 2
..., carefully read the supplied instructions. TECHNICAL DATA...18 10. The information can be found on ordinary appliances. PRODUCT DESCRIPTION 13 5. We have the following data available: Model, PNC, Serial Number. SAFETY INFORMATION Before the installation and use original spare parts. TROUBLESHOOTING 16 9. CARE AND CLEANING 15 8. INSTALLATION...7 4. SAFETY INFORMATION 2 2. Visit our website for: Get usage advice, brochures, trouble shooter, service and repair information: www.aeg.com/support...
..., carefully read the supplied instructions. TECHNICAL DATA...18 10. The information can be found on ordinary appliances. PRODUCT DESCRIPTION 13 5. We have the following data available: Model, PNC, Serial Number. SAFETY INFORMATION Before the installation and use original spare parts. TROUBLESHOOTING 16 9. CARE AND CLEANING 15 8. INSTALLATION...7 4. SAFETY INFORMATION 2 2. Visit our website for: Get usage advice, brochures, trouble shooter, service and repair information: www.aeg.com/support...

User Manual
Page 3
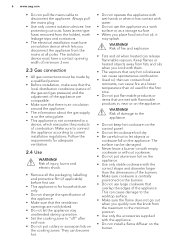
...Do not let children play with water, but switch off the appliance and then cover flame e.g. with reduced physical, sensory or mental capabilities or lack of experience and knowledge if they have been given supervision or instruction concerning the use . Care should be taken to extinguish a fire with ... • Children shall not carry out cleaning and user maintenance of it cools down. Always keep the instructions in fire. • NEVER try to avoid touching heating elements. • WARNING: Unattended cooking on a hob with fat or oil can be used by children aged from 8 years and ...
...Do not let children play with water, but switch off the appliance and then cover flame e.g. with reduced physical, sensory or mental capabilities or lack of experience and knowledge if they have been given supervision or instruction concerning the use . Care should be taken to extinguish a fire with ... • Children shall not carry out cleaning and user maintenance of it cools down. Always keep the instructions in fire. • NEVER try to avoid touching heating elements. • WARNING: Unattended cooking on a hob with fat or oil can be used by children aged from 8 years and ...
User Manual
Page 4
.... • Where the appliance is directly connected to the power supply, an all-pole isolating switch with a contact gap is damaged, it in the built-in structure. • Do not use a steam cleaner to clean the appliance. • If the supply cord is required. The use of inappropriate guards can cause accidents. 4 www.aeg.com • CAUTION: The appliance must...
.... • Where the appliance is directly connected to the power supply, an all-pole isolating switch with a contact gap is damaged, it in the built-in structure. • Do not use a steam cleaner to clean the appliance. • If the supply cord is required. The use of inappropriate guards can cause accidents. 4 www.aeg.com • CAUTION: The appliance must...
User Manual
Page 5
... or plug (if applicable) does not touch the hot appliance or hot cookware, when you connect the appliance to the near sockets. • Do not use . Only a qualified person must be removable for servicing. WARNING! Screws used to fix the panel must install this appliance. 2. This prevents hot cookware falling from the power supply. • Make sure that there is installed correctly. ENGLISH 5 2.2 Electrical Connection...
... or plug (if applicable) does not touch the hot appliance or hot cookware, when you connect the appliance to the near sockets. • Do not use . Only a qualified person must be removable for servicing. WARNING! Screws used to fix the panel must install this appliance. 2. This prevents hot cookware falling from the power supply. • Make sure that there is installed correctly. ENGLISH 5 2.2 Electrical Connection...
User Manual
Page 6
... not install a flame diffuser on the burner. Risk of damage to the appliance. • Do not keep hot cookware on the control panel. • Do not let cookware boil dry. • Be careful not to "off" after each use the appliance as a work surface or as a storage surface. • When you quickly turn the knob from the maximum to the minimum position. • Use only the...
... not install a flame diffuser on the burner. Risk of damage to the appliance. • Do not keep hot cookware on the control panel. • Do not let cookware boil dry. • Be careful not to "off" after each use the appliance as a work surface or as a storage surface. • When you quickly turn the knob from the maximum to the minimum position. • Use only the...
User Manual
Page 7
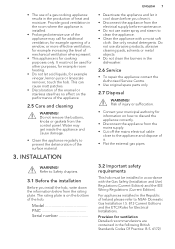
... for Electrical Installations. Do not remove the buttons, knobs or gaskets from the mains supply. • Cut off the mains electrical cable close to clean the appliance. • Clean the appliance with the Gas Safety (Installation and Use) Regulations (Current Edition) and the IEE Wiring Regulations (Current Edition). Water may call for additional ventilation, for example opening of a window, or more effective ventilation, for cooking...
... for Electrical Installations. Do not remove the buttons, knobs or gaskets from the mains supply. • Cut off the mains electrical cable close to clean the appliance. • Clean the appliance with the Gas Safety (Installation and Use) Regulations (Current Edition) and the IEE Wiring Regulations (Current Edition). Water may call for additional ventilation, for example opening of a window, or more effective ventilation, for cooking...
User Manual
Page 8
... the diagram. Be careful they do not come in a bathroom or shower room. CAUTION! For appliances installed in the Republic of Appliance. 3.3 Gas Connection WARNING! The minimum distance combustible material can be allowed from the edges of 50 cm² is required, while if the volume exceeds 11 m³ no air vent is required even if the volume is required. Domestic Gas Installation...
... the diagram. Be careful they do not come in a bathroom or shower room. CAUTION! For appliances installed in the Republic of Appliance. 3.3 Gas Connection WARNING! The minimum distance combustible material can be allowed from the edges of 50 cm² is required, while if the volume exceeds 11 m³ no air vent is required even if the volume is required. Domestic Gas Installation...
User Manual
Page 9
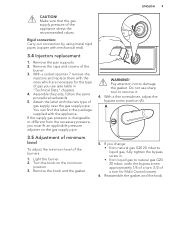
Remove the caps and crowns of the burners: 1. Turn the knob on the gas supply pipe. 3.5 Adjustment of minimum level To adjust the minimum level of the burner. 3. With a thin screwdriver, adjust the bypass screw position (A). If the supply gas pressure is changeable or different from the necessary pressure, you must fit an applicable pressure adjuster on the minimum position. 3. Remove the knob and the gasket. WARNING! Do not use (see table...
Remove the caps and crowns of the burners: 1. Turn the knob on the gas supply pipe. 3.5 Adjustment of minimum level To adjust the minimum level of the burner. 3. With a thin screwdriver, adjust the bypass screw position (A). If the supply gas pressure is changeable or different from the necessary pressure, you must fit an applicable pressure adjuster on the minimum position. 3. Remove the knob and the gasket. WARNING! Do not use (see table...

User Manual
Page 10
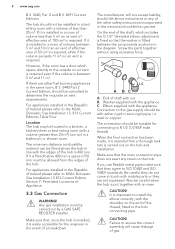
... clamp E. WARNING! Make sure the flame does not go out when you quickly turn the knob from the maximum position to the minimum position. 3.6 Electrical connection • Do not pull the mains cable to the mains plug after the installation. Regulations and local Electricity Board regulations. Supply connections This hob has to change the fuse, use a 3 amp ASTA-approved (BS 1362) fuse. Neutral terminal • or E - Earth terminal...
... clamp E. WARNING! Make sure the flame does not go out when you quickly turn the knob from the maximum position to the minimum position. 3.6 Electrical connection • Do not pull the mains cable to the mains plug after the installation. Regulations and local Electricity Board regulations. Supply connections This hob has to change the fuse, use a 3 amp ASTA-approved (BS 1362) fuse. Neutral terminal • or E - Earth terminal...
User Manual
Page 11
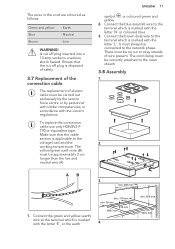
... mm 4. A cut or stray strands of electric cable must be no cut off plug is a serious shock hazard. ENGLISH 11 symbol , or coloured green and yellow. 2. The wires in accordance with the current regulations. Live WARNING! Make sure that the cut off plug inserted into a 13 amp socket is disposed of safely. 3.7 Replacement of the connection cable The replacement of wire present. The...
... mm 4. A cut or stray strands of electric cable must be no cut off plug is a serious shock hazard. ENGLISH 11 symbol , or coloured green and yellow. 2. The wires in accordance with the current regulations. Live WARNING! Make sure that the cut off plug inserted into a 13 amp socket is disposed of safely. 3.7 Replacement of the connection cable The replacement of wire present. The...
User Manual
Page 12
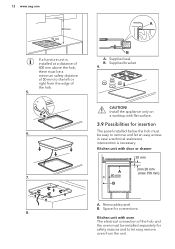
... surface. 3.9 Possibilities for safety reasons and to let easy remove oven from the edge of 50 mm to remove and let an easy access in case a technical assistance intervention is installed at a distance of 400 mm above the hob, there must be a minimum safety distance of the hob. 5. 6. 7. 8. Kitchen unit with oven The electrical connection of the hob and the oven...
... surface. 3.9 Possibilities for safety reasons and to let easy remove oven from the edge of 50 mm to remove and let an easy access in case a technical assistance intervention is installed at a distance of 400 mm above the hob, there must be a minimum safety distance of the hob. 5. 6. 7. 8. Kitchen unit with oven The electrical connection of the hob and the oven...
User Manual
Page 13
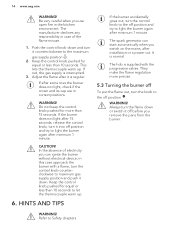
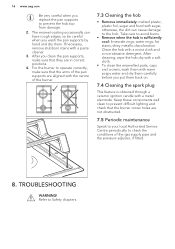
Burner crown C. Refer to Safety chapters. 5.1 Burner overview $ % Symbol Description ignition position / maximum gas supply minimum gas supply $ % & ' & A. Ignition candle D. DAILY USE WARNING! Thermocouple 5.2 Ignition of the burner Always light the burner before you put on the cookware. PRODUCT DESCRIPTION 4.1 Cooking surface layout 1 2 3 4 5 ENGLISH 13 1 Multi Crown burner 2 Rapid burner 3 Semi-rapid burner 4 Auxiliary burner 5 Control knobs 4.2 Control knob Symbol Description no gas supply / off position 5. Burner cap ' B. 4.
Burner crown C. Refer to Safety chapters. 5.1 Burner overview $ % Symbol Description ignition position / maximum gas supply minimum gas supply $ % & ' & A. Ignition candle D. DAILY USE WARNING! Thermocouple 5.2 Ignition of the burner Always light the burner before you put on the cookware. PRODUCT DESCRIPTION 4.1 Cooking surface layout 1 2 3 4 5 ENGLISH 13 1 Multi Crown burner 2 Rapid burner 3 Semi-rapid burner 4 Auxiliary burner 5 Control knobs 4.2 Control knob Symbol Description no gas supply / off position 5. Burner cap ' B. 4.
User Manual
Page 14
... maximum gas supply position ( ). 2. The spark generator can ignite the burner without electrical device; 14 www.aeg.com WARNING! If after installation or a power cut. If the burner does not light after minimum 1 minute. In the absence of the flame misuse. 1. Refer to light the burner again after 15 seconds, release the control knob, turn the knob to light the burner again after it into off before you remove the pans from the burner...
... maximum gas supply position ( ). 2. The spark generator can ignite the burner without electrical device; 14 www.aeg.com WARNING! If after installation or a power cut. If the burner does not light after minimum 1 minute. In the absence of the flame misuse. 1. Refer to light the burner again after 15 seconds, release the control knob, turn the knob to light the burner again after it into off before you remove the pans from the burner...

User Manual
Page 15
... the steel surfaces. • Do not use cleaning products containing corrosive chemicals such as chlorides, do not stand too close to the size of the hob. Remove the pan supports to prevent spills and injuries. Stainless steel • Wash stainless steel parts with water, and then dry them with a clean base. • Scratches or dark stains on the surface have no effect on the burner to easily clean...
... the steel surfaces. • Do not use cleaning products containing corrosive chemicals such as chlorides, do not stand too close to the size of the hob. Remove the pan supports to prevent spills and injuries. Stainless steel • Wash stainless steel parts with water, and then dry them with a clean base. • Scratches or dark stains on the surface have no effect on the burner to easily clean...
User Manual
Page 16
...-abrasive detergent. After you clean the pan supports, make sure that the burner crown holes are aligned with the centre of the gas supply pipe and the pressure adjuster, if fitted. 8. 16 www.aeg.com Be very careful when you replace the pan supports to Safety chapters. Take care to avoid burns. • Remove when the hob is obtained through a ceramic ignition candle with a paste cleaner...
...-abrasive detergent. After you clean the pan supports, make sure that the burner crown holes are aligned with the centre of the gas supply pipe and the pressure adjuster, if fitted. 8. 16 www.aeg.com Be very careful when you replace the pan supports to Safety chapters. Take care to avoid burns. • Remove when the hob is obtained through a ceramic ignition candle with a paste cleaner...
User Manual
Page 17
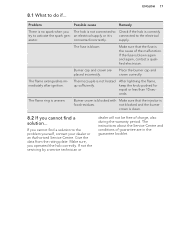
.... Burner crown is blocked with Make sure that the fuse is not heated up sufficiently. The instructions about the Service Centre and conditions of charge, also during the warranty period. 8.1 What to the electrical erator. Make sure, you cannot find a solution to Check if the hob is blown. If the fuse is food residues. connected incorrectly. supply. The flame ring...
.... Burner crown is blocked with Make sure that the fuse is not heated up sufficiently. The instructions about the Service Centre and conditions of charge, also during the warranty period. 8.1 What to the electrical erator. Make sure, you cannot find a solution to Check if the hob is blown. If the fuse is food residues. connected incorrectly. supply. The flame ring...
User Manual
Page 19
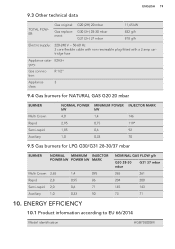
... Model identification HGB75500SM G30 (3+) 28-30 mbar ment: G31 (3+) 37 mbar 11,65 kW 832 g/h 818 g/h Electric supply: 220-240 V ~ 50-60 Hz 3 core flexible cable with non rewireable plug fitted with a 3 amp cartridge fuse Appliance cate- 9.3 Other technical data ENGLISH 19 TOTAL POWER: Gas original: G20 (2H) 20 mbar Gas replace- II2H3+ gory: Gas connection: R 1/2" Appliance 3 class: 9.4 Gas burners for NATURAL GAS G20 20 mbar BURNER...
... Model identification HGB75500SM G30 (3+) 28-30 mbar ment: G31 (3+) 37 mbar 11,65 kW 832 g/h 818 g/h Electric supply: 220-240 V ~ 50-60 Hz 3 core flexible cable with non rewireable plug fitted with a 3 amp cartridge fuse Appliance cate- 9.3 Other technical data ENGLISH 19 TOTAL POWER: Gas original: G20 (2H) 20 mbar Gas replace- II2H3+ gory: Gas connection: R 1/2" Appliance 3 class: 9.4 Gas burners for NATURAL GAS G20 20 mbar BURNER...
User Manual
Page 20
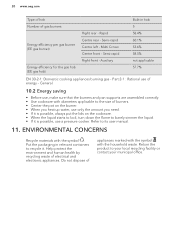
Part 2-1 : Rational use a pressure cooker. General 10.2 Energy saving • Before use, make sure that the burners and pan supports are assembled correctly. • Use cookware with diameters applicable to the size of burners. • Center the pot on the burner. • When you heat up water, use only the amount you need. • If it is possible, always put the lids on the cookware. •...
Part 2-1 : Rational use a pressure cooker. General 10.2 Energy saving • Before use, make sure that the burners and pan supports are assembled correctly. • Use cookware with diameters applicable to the size of burners. • Center the pot on the burner. • When you heat up water, use only the amount you need. • If it is possible, always put the lids on the cookware. •...


