Product Manual
Page 2
... rating plate. TROUBLESHOOTING 13 8. TECHNICAL INFORMATION 17 10. GUARANTEE/CUSTOMER SERVICE 17 11. Visit our website for: Get usage advice, brochures, trouble shooter, service information: www.aeg.com Register your appliance: www.aeg.com/shop CUSTOMER CARE AND SERVICE We recommend the use of original spare parts. Please spend a few minutes reading to get the very best from it to change without notice. SAFETY INSTRUCTIONS...
... rating plate. TROUBLESHOOTING 13 8. TECHNICAL INFORMATION 17 10. GUARANTEE/CUSTOMER SERVICE 17 11. Visit our website for: Get usage advice, brochures, trouble shooter, service information: www.aeg.com Register your appliance: www.aeg.com/shop CUSTOMER CARE AND SERVICE We recommend the use of original spare parts. Please spend a few minutes reading to get the very best from it to change without notice. SAFETY INSTRUCTIONS...
Product Manual
Page 3
...parts are supervised by children without supervision. 1.2 General Safety • The appliance and its accessible parts become hot during use. Do not touch the heating elements. • Do not operate the appliance by children aged from the appliance when it operates or when it . • Cleaning and user...; This appliance can be used by means of an external timer or separate remote-control system. • Unattended cooking on a hob with reduced physical, sensory or mental capabilities or lack of the appliance, carefully read the supplied instructions. 1. The manufacturer is...
...parts are supervised by children without supervision. 1.2 General Safety • The appliance and its accessible parts become hot during use. Do not touch the heating elements. • Do not operate the appliance by children aged from the appliance when it operates or when it . • Cleaning and user...; This appliance can be used by means of an external timer or separate remote-control system. • Unattended cooking on a hob with reduced physical, sensory or mental capabilities or lack of the appliance, carefully read the supplied instructions. 1. The manufacturer is...
Product Manual
Page 4
... can get hot. with water, but switch off the hob element by its control and do not rely on the pan detector. 2. Only a qualified person must install this appliance. • Remove all the packaging. • Do not install or use , switch off the appliance and then cover flame e.g. The warranty does not cover damages caused by a qualified electrician. • The appliance must be careful when...
... can get hot. with water, but switch off the hob element by its control and do not rely on the pan detector. 2. Only a qualified person must install this appliance. • Remove all the packaging. • Do not install or use , switch off the appliance and then cover flame e.g. The warranty does not cover damages caused by a qualified electrician. • The appliance must be careful when...
Product Manual
Page 5
...) or to the mains cable. Keep flames or heated objects away from the induction cooking zones when the appliance is a crack on the surface, disconnect power supply to prevent the electrical shock. • Users with a pacemaker must keep hot cookware on the control panel. • Do not let cookware to boil dry. • Be careful not let objects or cookware fall on...
...) or to the mains cable. Keep flames or heated objects away from the induction cooking zones when the appliance is a crack on the surface, disconnect power supply to prevent the electrical shock. • Users with a pacemaker must keep hot cookware on the control panel. • Do not let cookware to boil dry. • Be careful not let objects or cookware fall on...
Product Manual
Page 6
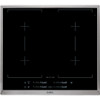
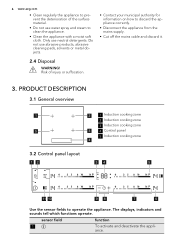
...; Disconnect the appliance from the mains supply. • Cut off the mains cable and discard it. 3. The displays, indicators and sounds tell which functions operate. PRODUCT DESCRIPTION 3.1 General overview 1 2 1 Induction cooking zone 2 Induction cooking zone 3 Induction cooking zone 5 3 4 Control panel 5 Induction cooking zone 4 3.2 Control panel layout 12 34 5 11 10 98 7 6 Use the sensor fields to clean the appliance. • Clean the appliance with a moist soft cloth. ance...
...; Disconnect the appliance from the mains supply. • Cut off the mains cable and discard it. 3. The displays, indicators and sounds tell which functions operate. PRODUCT DESCRIPTION 3.1 General overview 1 2 1 Induction cooking zone 2 Induction cooking zone 3 Induction cooking zone 5 3 4 Control panel 5 Induction cooking zone 4 3.2 Control panel layout 12 34 5 11 10 98 7 6 Use the sensor fields to clean the appliance. • Clean the appliance with a moist soft cloth. ance...
Product Manual
Page 7
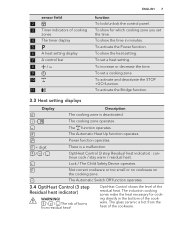
... induction cooking zones make the heat necessary for which cooking zone you set the time. To set a heat setting. OptiHeat Control shows the level of cooking zones 4 The timer display 5 6 A heat setting display 7 A control bar 8 / 9 10 11 ENGLISH 7 function To lock/unlock the control panel. The cooking zone operates. Not correct cookware or too small or no cookware on the cooking zone. The Automatic Switch Off function operates. 3.4 OptiHeat Control (3 step Residual heat indicator...
... induction cooking zones make the heat necessary for which cooking zone you set the time. To set a heat setting. OptiHeat Control shows the level of cooking zones 4 The timer display 5 6 A heat setting display 7 A control bar 8 / 9 10 11 ENGLISH 7 function To lock/unlock the control panel. The cooking zone operates. Not correct cookware or too small or no cookware on the cooking zone. The Automatic Switch Off function operates. 3.4 OptiHeat Control (3 step Residual heat indicator...
Product Manual
Page 8
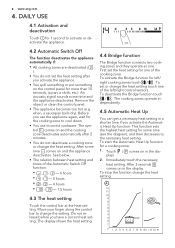
... sounds some time (see the diagram), and then decreases to change the heat setting. 12 11 10 9 8 7 6 5 4 3 2 1 0 1 2 3 4 5 6 7 8 9 10 11 12 13 14 Immediately touch the necessary heat setting. The sym- See below. • The relation between heat setting and times of the cooking zone. play). 2. Remove the object or clean the control panel. • The appliance becomes too hot (e.g. To activate the Bridge function...
... sounds some time (see the diagram), and then decreases to change the heat setting. 12 11 10 9 8 7 6 5 4 3 2 1 0 1 2 3 4 5 6 7 8 9 10 11 12 13 14 Immediately touch the necessary heat setting. The sym- See below. • The relation between heat setting and times of the cooking zone. play). 2. Remove the object or clean the control panel. • The appliance becomes too hot (e.g. To activate the Bridge function...
Product Manual
Page 9
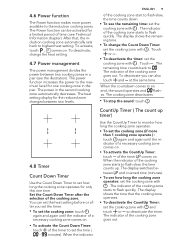
... with . The display shows the remaining time. • To change the heat setting. 4.7 Power management The power management divides the power between two levels. ENGLISH 9 of the cooking zone starts to flash quickly. 4.6 Power function The Power function makes more than 1 cooking zone operate ) : touch again and again until the indicator of a necessary cooking zone comes on. • To activate the Count Down Timer...
... with . The display shows the remaining time. • To change the heat setting. 4.7 Power management The power management divides the power between two levels. ENGLISH 9 of the cooking zone starts to flash quickly. 4.6 Power function The Power function makes more than 1 cooking zone operate ) : touch again and again until the indicator of a necessary cooking zone comes on. • To activate the Count Down Timer...
Product Manual
Page 10
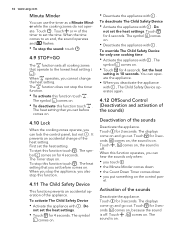
...displays come on , because the sound is on the control pan- The heat setting that you put something on . Touch for 3 seconds. To start this function operates, you can use the timer as a Minute Minder while the cooking zones do not operate. The symbol comes on .... Touch . Do not set before comes on . 4.10 Lock When the cooking zones operate, you deactivate the appliance with . The heat setting that you set the heat settings. • Touch for 4 seconds. Do not set before comes on . It prevents an accidental change the heat setting. 10 www.aeg.com Minute Minder You can...
...displays come on , because the sound is on the control pan- The heat setting that you put something on . Touch for 3 seconds. To start this function operates, you can use the timer as a Minute Minder while the cooking zones do not operate. The symbol comes on .... Touch . Do not set before comes on . 4.10 Lock When the cooking zones operate, you deactivate the appliance with . The heat setting that you set the heat settings. • Touch for 4 seconds. Do not set before comes on . It prevents an accidental change the heat setting. 10 www.aeg.com Minute Minder You can...

Product Manual
Page 11
... possible. The cookware with high power levels and the cookware is correct for induction cooking zones Use the induction cooking zones with correct mark from a manufacturer). • not correct: aluminium, copper, brass, glass, ceramic, porcelain. Cover the cross fully. The bottom of different materials (Sandwich construction). • humming: you use high power levels. • clicking: electric switching occurs. • hissing, buzzing: the fan operates. The noises are...
... possible. The cookware with high power levels and the cookware is correct for induction cooking zones Use the induction cooking zones with correct mark from a manufacturer). • not correct: aluminium, copper, brass, glass, ceramic, porcelain. Cover the cross fully. The bottom of different materials (Sandwich construction). • humming: you use high power levels. • clicking: electric switching occurs. • hissing, buzzing: the fan operates. The noises are...
Product Manual
Page 12
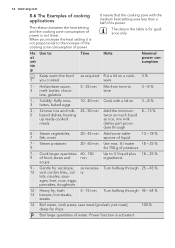
... warm the food as required Put a lid on 3 - 8 % 3 - Simmer rice and milk- 25 - 50 min Add the minimum 8 - 13 % 5 based dishes, heating twice as much liquid up ready-cooked as necessa- Power function is not proportional to time 3 - 8 % 1 - When you cooked ware 1 - Solidify: fluffy ome3 lettes, baked eggs 10 - 40 min Cook with the medium heat setting uses less than a half of...
... warm the food as required Put a lid on 3 - 8 % 3 - Simmer rice and milk- 25 - 50 min Add the minimum 8 - 13 % 5 based dishes, heating twice as much liquid up ready-cooked as necessa- Power function is not proportional to time 3 - 8 % 1 - When you cooked ware 1 - Solidify: fluffy ome3 lettes, baked eggs 10 - 40 min Cook with the medium heat setting uses less than a half of...
Product Manual
Page 13
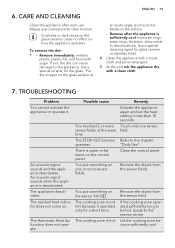
... dark stains on the glass-ceramic cause no effect on . Use a special scraper for glass ceramic or stainless steel. 2. Remove after each use cookware with sugar. Use a special cleaning agent for the glass . The residual heat indicator does not come on how the appliance operates. You put something on the surface . - Let the cooking zone become sufficiently cool. Put the scraper on the glass surface at the same...
... dark stains on the glass-ceramic cause no effect on . Use a special scraper for glass ceramic or stainless steel. 2. Remove after each use cookware with sugar. Use a special cleaning agent for the glass . The residual heat indicator does not come on how the appliance operates. You put something on the surface . - Let the cooking zone become sufficiently cool. Put the scraper on the glass surface at the same...
Product Manual
Page 14
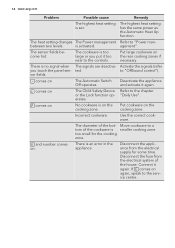
... become hot. There is set. comes on the cooking zone. Deactivate the appliance and activate it again. "Daily Use". comes on No cookware is too large or you touch the panel sen- Move cookware to "Power man- Disconnect the appliance from the electrical system of the bot- Connect it again. 14 www.aeg.com Problem Possible cause Remedy The highest heat setting...
... become hot. There is set. comes on the cooking zone. Deactivate the appliance and activate it again. "Daily Use". comes on No cookware is too large or you touch the panel sen- Move cookware to "Power man- Disconnect the appliance from the electrical system of the bot- Connect it again. 14 www.aeg.com Problem Possible cause Remedy The highest heat setting...
Product Manual
Page 15
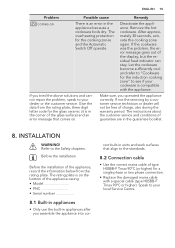
... of the appliance casing. • Model PNC Serial number 8.1 Built-in appliances • Only use the built-in appliances after you operated the appliance correctly. If you tried the above solutions and cannot repair the problem, speak to the Safety chapters. INSTALLATION WARNING! The instructions about the customer service and conditions of the display, but the residual heat indicator can stay. Deactivate the appliance...
... of the appliance casing. • Model PNC Serial number 8.1 Built-in appliances • Only use the built-in appliances after you operated the appliance correctly. If you tried the above solutions and cannot repair the problem, speak to the Safety chapters. INSTALLATION WARNING! The instructions about the customer service and conditions of the display, but the residual heat indicator can stay. Deactivate the appliance...
Product Manual
Page 17
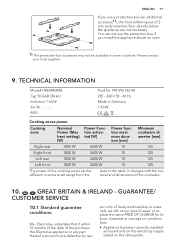
... additional accessory1)), the front airflow space of the cooking zones can not use the protection box if you install the appliance above an oven. 1) The protection box accessory may not be available in Germany 7.4 kW Cooking zones power Cooking zone Nominal Power (Max heat setting) [W] Power Function activated [W] Power function maximum duration [min] Minimum cookware diameter [mm] Right rear 1800 W 2600 W 10 125 Right front...
... additional accessory1)), the front airflow space of the cooking zones can not use the protection box if you install the appliance above an oven. 1) The protection box accessory may not be available in Germany 7.4 kW Cooking zones power Cooking zone Nominal Power (Max heat setting) [W] Power Function activated [W] Power function maximum duration [min] Minimum cookware diameter [mm] Right rear 1800 W 2600 W 10 125 Right front...
Product Manual
Page 18
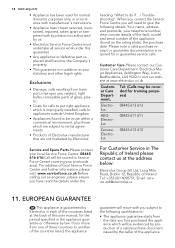
...'s instructions. • Appliance hasn't been serviced, maintained, repaired, taken apart or tampered with you subject to the following details: Your name, address and postcode, your statutory and other legal rights. If you move from transport, improper use, neglect, light bulbs, removable parts of glass, plastic. • Costs for calls to put right appliance which is required for in use within...
...'s instructions. • Appliance hasn't been serviced, maintained, repaired, taken apart or tampered with you subject to the following details: Your name, address and postcode, your statutory and other legal rights. If you move from transport, improper use, neglect, light bulbs, removable parts of glass, plastic. • Costs for calls to put right appliance which is required for in use within...
Product Manual
Page 19
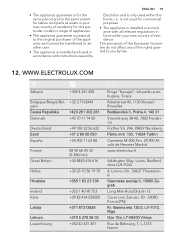
... appliance guarantee is for the same period and to the same extent for labour and parts as exists in your new country of residence for commercial purposes. • The appliance is installed in force within the home, i.e. Barona iela 130/2, LV-1012, Riga Ozo 10a...provisions of this particular model or range of appliances. • The appliance guarantee is personal to the original purchaser of the appliance and cannot be transferred to you by ENGLISH 19 Electrolux and is installed and used in accordance with all relevant regulations in accordance with instructions issued by law. 12...
... appliance guarantee is for the same period and to the same extent for labour and parts as exists in your new country of residence for commercial purposes. • The appliance is installed in force within the home, i.e. Barona iela 130/2, LV-1012, Riga Ozo 10a...provisions of this particular model or range of appliances. • The appliance guarantee is personal to the original purchaser of the appliance and cannot be transferred to you by ENGLISH 19 Electrolux and is installed and used in accordance with all relevant regulations in accordance with instructions issued by law. 12...
Product Manual
Page 20
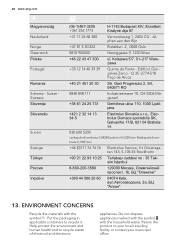
... Bratisla‐ va 030 600 5200 Lankapuhelinverkosta 0,0828€/puhelu+0,032€/min Matkapuhelinverkosta 0,192€/min +46 (0)771 76 76 76 Electrolux Service, S:t Göransgatan 143, S-105 45 Stockholm +90 21 22 93 10 25 Tarlabaşı caddesi no : 35 Tak‐ sim...1, 2404 CG - Help protect the environment and human health and to recycle waste of electrical and electronic appliances. Do not dispose appliances marked with the symbol with the symbol . 20 www.aeg.com Magyarország Nederland Norge Österreich Polska Portugal Romania Schweiz - Alphen aan den...
... Bratisla‐ va 030 600 5200 Lankapuhelinverkosta 0,0828€/puhelu+0,032€/min Matkapuhelinverkosta 0,192€/min +46 (0)771 76 76 76 Electrolux Service, S:t Göransgatan 143, S-105 45 Stockholm +90 21 22 93 10 25 Tarlabaşı caddesi no : 35 Tak‐ sim...1, 2404 CG - Help protect the environment and human health and to recycle waste of electrical and electronic appliances. Do not dispose appliances marked with the symbol with the symbol . 20 www.aeg.com Magyarország Nederland Norge Österreich Polska Portugal Romania Schweiz - Alphen aan den...


