User Manual
Page 2
SAFETY INSTRUCTIONS 4 3. TROUBLESHOOTING 15 8. We have the following data available. features you might not find on the rating plate. The information can be found on ordinary appliances. Model, PNC, Serial Number. 2 www.aeg.com CONTENTS 1. PRODUCT DESCRIPTION 6 4. HELPFUL HINTS AND TIPS 12 6. CARE AND CLEANING 14 7. Please spend a few minutes reading to get the very best from it to change without...
SAFETY INSTRUCTIONS 4 3. TROUBLESHOOTING 15 8. We have the following data available. features you might not find on the rating plate. The information can be found on ordinary appliances. Model, PNC, Serial Number. 2 www.aeg.com CONTENTS 1. PRODUCT DESCRIPTION 6 4. HELPFUL HINTS AND TIPS 12 6. CARE AND CLEANING 14 7. Please spend a few minutes reading to get the very best from it to change without...
User Manual
Page 3
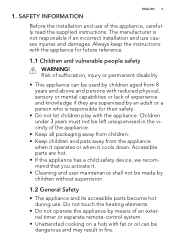
... let children play with fat or oil can be used by means of the appliance, carefully read the supplied instructions. Do not touch the heating elements. • Do not operate the appliance by children aged from the appliance when it operates or when it . • Cleaning and user maintenance shall not be dangerous and may result in...
... let children play with fat or oil can be used by means of the appliance, carefully read the supplied instructions. Do not touch the heating elements. • Do not operate the appliance by children aged from the appliance when it operates or when it . • Cleaning and user maintenance shall not be dangerous and may result in...
User Manual
Page 4
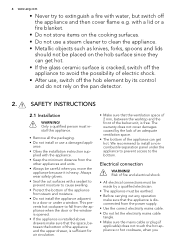
... hot. • If the glass ceramic surface is free. Always wear safety gloves. • Seal the cut surfaces with a lid or a fire blanket. • Do not store items on the cooking surfaces. • Do not use , switch off the hob element by a qualified electrician. • The appliance must install this appliance. • Remove all the packaging. • Do not install or use a damaged appliance. • Obey the installation instruction...
... hot. • If the glass ceramic surface is free. Always wear safety gloves. • Seal the cut surfaces with a lid or a fire blanket. • Do not store items on the cooking surfaces. • Do not use , switch off the hob element by a qualified electrician. • The appliance must install this appliance. • Remove all the packaging. • Do not install or use a damaged appliance. • Obey the installation instruction...
User Manual
Page 5
... the cooking surface. 2.3 Care and Cleaning WARNING! Loose and incorrect electricity mains cable or plug (if applicable) can cause fire at all the packaging, labelling and protective film (if applicable) before first use the appliance as a work surface or as a storage surface. • If the surface of this appliance in a household environment. • Do not change a damaged mains cable. • The electrical installation must...
... the cooking surface. 2.3 Care and Cleaning WARNING! Loose and incorrect electricity mains cable or plug (if applicable) can cause fire at all the packaging, labelling and protective film (if applicable) before first use the appliance as a work surface or as a storage surface. • If the surface of this appliance in a household environment. • Do not change a damaged mains cable. • The electrical installation must...
User Manual
Page 6
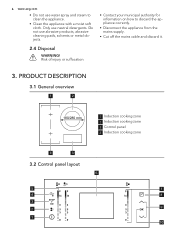
... or metal objects. 2.4 Disposal WARNING! 6 www.aeg.com • Do not use water spray and steam to discard the appliance correctly. • Disconnect the appliance from the mains supply. • Cut off the mains cable and discard it. 3. PRODUCT DESCRIPTION 3.1 General overview 1 2 180/280 mm 1 Induction cooking zone 2 Induction cooking zone 3 Control panel 4 Induction cooking zone 4 3 3.2 Control panel layout 6 5 7 4 48 3 2 9 1 10 Risk of injury...
... or metal objects. 2.4 Disposal WARNING! 6 www.aeg.com • Do not use water spray and steam to discard the appliance correctly. • Disconnect the appliance from the mains supply. • Cut off the mains cable and discard it. 3. PRODUCT DESCRIPTION 3.1 General overview 1 2 180/280 mm 1 Induction cooking zone 2 Induction cooking zone 3 Control panel 4 Induction cooking zone 4 3 3.2 Control panel layout 6 5 7 4 48 3 2 9 1 10 Risk of injury...
User Manual
Page 7
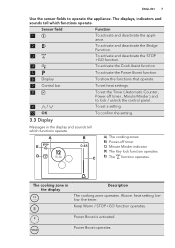
... the display 12 15:23 Description The cooking zone operates. A E D B 0:48 C A) The cooking zones B) Power-off timer , Minute Minder ) and to operate the appliance. To activate and deactivate the STOP +GO function. The cooking zone in the display and sounds tell which functions operate. Above: heat setting, below: the timer. ENGLISH 7 Use the sensor fields to lock / unlock the control panel..
... the display 12 15:23 Description The cooking zone operates. A E D B 0:48 C A) The cooking zones B) Power-off timer , Minute Minder ) and to operate the appliance. To activate and deactivate the STOP +GO function. The cooking zone in the display and sounds tell which functions operate. Above: heat setting, below: the timer. ENGLISH 7 Use the sensor fields to lock / unlock the control panel..
User Manual
Page 8
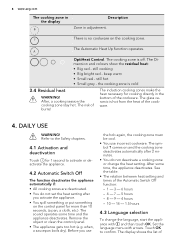
.... • You use incorrect cookware. The Dimension and colours show the residual heat: • Big red - The induction cooking zones make the heat necessary for 1 second to confirm. Refer to the Safety chapters. 4.1 Activation and deactivation Touch for cooking directly in adjustment. ? Remove the object or clean the control panel. • The appliance gets too hot (e.g. A OptiHeat Control. The symbol ? 8 www.aeg.com The cooking zone in...
.... • You use incorrect cookware. The Dimension and colours show the residual heat: • Big red - The induction cooking zones make the heat necessary for 1 second to confirm. Refer to the Safety chapters. 4.1 Activation and deactivation Touch for cooking directly in adjustment. ? Remove the object or clean the control panel. • The appliance gets too hot (e.g. A OptiHeat Control. The symbol ? 8 www.aeg.com The cooking zone in...
User Manual
Page 9
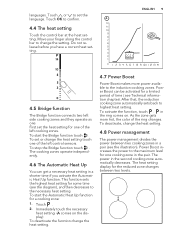
... heat setting. The heat setting display for one of the ring changes. As the zone gets more power available to highest heat setting. languages. Power Boost can get a necessary heat setting in the ring comes on the display) To deactivate the function change the setting. Touch OK to change the heat setting. 4.7 Power Boost Power Boost makes more hot, the color of the left cooking zones. After that, the induction cooking zone...
... heat setting. The heat setting display for one of the ring changes. As the zone gets more power available to highest heat setting. languages. Power Boost can get a necessary heat setting in the ring comes on the display) To deactivate the function change the setting. Touch OK to change the heat setting. 4.7 Power Boost Power Boost makes more hot, the color of the left cooking zones. After that, the induction cooking zone...
User Manual
Page 10
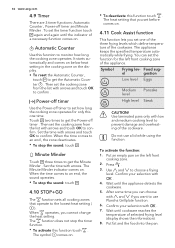
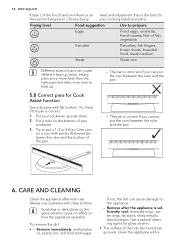
... heat setting that operate to choose a frying level. Food sug- Use laminated pans only with and if you set the cooking zone from the list with arrows. Do not use Plancha Grillplate function. 6. Automatic Counter Use this function touch . el gestion Low level Eggs Medium level High level Pancake Steak CAUTION! Put an empty pan on the display. • To reset the Automatic Counter...
... heat setting that operate to choose a frying level. Food sug- Use laminated pans only with and if you set the cooking zone from the list with arrows. Do not use Plancha Grillplate function. 6. Automatic Counter Use this function touch . el gestion Low level Eggs Medium level High level Pancake Steak CAUTION! Put an empty pan on the display. • To reset the Automatic Counter...

User Manual
Page 11
... and then set before comes on the control pan- When this function operates, you can hear the sounds only when: • you can lock the control panel, but not . The function connects two left front cooking zone. 2. Touch OK to confirm . el. To deactivate the function: 1. Confirm your selection with arrows. ture adjustment for about 12 minutes and indicates when...
... and then set before comes on the control pan- When this function operates, you can hear the sounds only when: • you can lock the control panel, but not . The function connects two left front cooking zone. 2. Touch OK to confirm . el. To deactivate the function: 1. Confirm your selection with arrows. ture adjustment for about 12 minutes and indicates when...
User Manual
Page 12
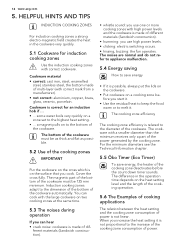
... minimum receives only a part of the cookware automatically. The cooking zone efficiency The cooking zone efficiency is not proportional to the dimension of the bottom of the power generated by the cooking zone. HELPFUL HINTS AND TIPS INDUCTION COOKING ZONES For induction cooking zones a strong electro-magnetic field creates the heat in the operation time depends on the surface that you use high power levels. • clicking: electric switching...
... minimum receives only a part of the cookware automatically. The cooking zone efficiency The cooking zone efficiency is not proportional to the dimension of the bottom of the power generated by the cooking zone. HELPFUL HINTS AND TIPS INDUCTION COOKING ZONES For induction cooking zones a strong electro-magnetic field creates the heat in the operation time depends on the surface that you use high power levels. • clicking: electric switching...
User Manual
Page 13
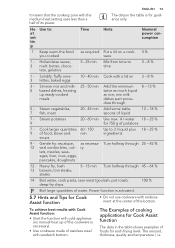
... Turn halfway through 45 - 64 % 14 Boil water, cook pasta, sear meat (goulash, pot roast), deep-fry chips 100 % Boil large quantities of liquid 13 - 18 % 7 - Simmer rice and milk- 25 - 50 min Add the minimum 8 - 13 % 5 based dishes, heating ...Use cookware made of stainless steel with the medium heat setting uses less than a half of the bottom. ENGLISH 13 It means that the cooking zone with sandwich bottom. He Use to: at the center of its power. To achieve best results with Cook Assist function: • Start the function with cold appliance (no manual heat up ready-cooked...
... Turn halfway through 45 - 64 % 14 Boil water, cook pasta, sear meat (goulash, pot roast), deep-fry chips 100 % Boil large quantities of liquid 13 - 18 % 7 - Simmer rice and milk- 25 - 50 min Add the minimum 8 - 13 % 5 based dishes, heating ...Use cookware made of stainless steel with the medium heat setting uses less than a half of the bottom. ENGLISH 13 It means that the cooking zone with sandwich bottom. He Use to: at the center of its power. To achieve best results with Cook Assist function: • Start the function with cold appliance (no manual heat up ready-cooked...
User Manual
Page 14
... and the pan. 6. Remove after each use cookware with a Clean the appliance with clean bottom. The pan is the best for glass ceramic. • The surface of your cooking habits and pans. Always use . Scratches or dark stains on the glass-ceramic cause no effect on level and adjustment that is correct if you can cause different heat up times. Remove immediately: melted plas- 14 www.aeg.com...
... and the pan. 6. Remove after each use cookware with a Clean the appliance with clean bottom. The pan is the best for glass ceramic. • The surface of your cooking habits and pans. Always use . Scratches or dark stains on the glass-ceramic cause no effect on level and adjustment that is correct if you can cause different heat up times. Remove immediately: melted plas- 14 www.aeg.com...
User Manual
Page 15
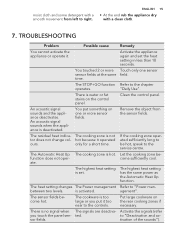
...- The heat setting changes The Power management Refer to the chapter operates. There is hot. moist cloth and some detergent with a clean cloth. 7. ENGLISH 15 • At the end rub the appliance dry with a smooth movement from the sensor fields. The residual heat indica- is too large or you touch the panel sen- The cookware is activated. "Daily Use". Remove the...
...- The heat setting changes The Power management Refer to the chapter operates. There is hot. moist cloth and some detergent with a clean cloth. 7. ENGLISH 15 • At the end rub the appliance dry with a smooth movement from the sensor fields. The residual heat indica- is too large or you touch the panel sen- The cookware is activated. "Daily Use". Remove the...
User Manual
Page 16
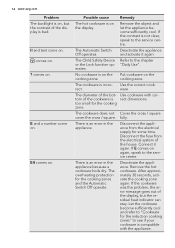
.... Connect it again. fully. comes on . ? Remove the object and let the appliance become sufficiently cool and refer to "Cookware for some time. Use the correct cook- Let the cookware become sufficiently cool. Possible cause Remedy The hot cookware is bad. 16 www.aeg.com Problem The backlight is on, but the residual heat indicator can stay. The Automatic Switch...
.... Connect it again. fully. comes on . ? Remove the object and let the appliance become sufficiently cool and refer to "Cookware for some time. Use the correct cook- Let the cookware become sufficiently cool. Possible cause Remedy The hot cookware is bad. 16 www.aeg.com Problem The backlight is on, but the residual heat indicator can stay. The Automatic Switch...
User Manual
Page 17
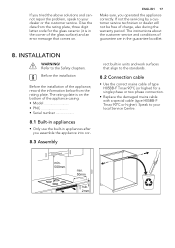
... Serial number 8.1 Built-in appliances • Only use the built-in appliances after you assemble the appliance into cor- 8.3 Assembly rect built-in units and work surfaces that align to the standards. 8.2 Connection cable • Use the correct mains cable of the appliance, record the information below from the rating plate, three digit letter code for a single phase or two phase connection. • Replace...
... Serial number 8.1 Built-in appliances • Only use the built-in appliances after you assemble the appliance into cor- 8.3 Assembly rect built-in units and work surfaces that align to the standards. 8.2 Connection cable • Use the correct mains cable of the appliance, record the information below from the rating plate, three digit letter code for a single phase or two phase connection. • Replace...
User Manual
Page 18
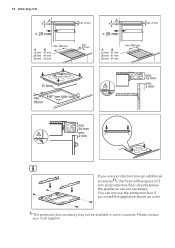
You can not use the protection box if you use a protection box (an additional accessory1)), the front airflow space of 2 mm and protective floor directly below the appliance are not necessary. Please contact your local supplier. 18 www.aeg.com A B < 20 mm A 12 mm 28 mm 38 mm B 57 mm 41 mm 31 mm min. 500 mm... mm 31 mm min. 500 mm R 5mm min. 490+1mm 560+1mm 55mm min. 12 mm min. 2 mm min. 38 mm min. 2 mm If you install the appliance above an oven. 1) The protection box accessory may not be available in some countries.
You can not use the protection box if you use a protection box (an additional accessory1)), the front airflow space of 2 mm and protective floor directly below the appliance are not necessary. Please contact your local supplier. 18 www.aeg.com A B < 20 mm A 12 mm 28 mm 38 mm B 57 mm 41 mm 31 mm min. 500 mm... mm 31 mm min. 500 mm R 5mm min. 490+1mm 560+1mm 55mm min. 12 mm min. 2 mm min. 38 mm min. 2 mm If you install the appliance above an oven. 1) The protection box accessory may not be available in some countries.
User Manual
Page 19
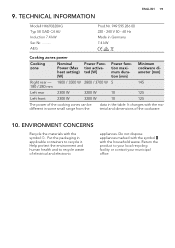
... changes with the material and dimensions of electrical and electronic appliances. Do not dispose appliances marked with the symbol with the symbol . 9. TECHNICAL INFORMATION ENGLISH 19 Modell HK693320XG Typ 58 GAD C4 AU Induction 7.4 kW Ser.Nr AEG Prod.Nr. 949 595 286 00 220 - 240 V 50 - 60 Hz Made in Germany 7.4 kW Cooking zones power Cooking zone Nominal Power (Max heat setting) [W] Power...
... changes with the material and dimensions of electrical and electronic appliances. Do not dispose appliances marked with the symbol with the symbol . 9. TECHNICAL INFORMATION ENGLISH 19 Modell HK693320XG Typ 58 GAD C4 AU Induction 7.4 kW Ser.Nr AEG Prod.Nr. 949 595 286 00 220 - 240 V 50 - 60 Hz Made in Germany 7.4 kW Cooking zones power Cooking zone Nominal Power (Max heat setting) [W] Power...


