Product Manual
Page 2
... performance for your product for better service: www.aeg.com/productregistration Buy Accessories, Consumables and Original spare parts for many years, with innovative technologies that you have created it . Model, PNC, Serial Number. TROUBLESHOOTING 13 8. GREAT BRITAIN & IRELAND - PRODUCT DESCRIPTION 6 4. INSTALLATION 14 9. EUROPEAN GUARANTEE 18 FOR PERFECT RESULTS Thank you might not find on the rating plate. 2 www.aeg.com CONTENTS 1.
... performance for your product for better service: www.aeg.com/productregistration Buy Accessories, Consumables and Original spare parts for many years, with innovative technologies that you have created it . Model, PNC, Serial Number. TROUBLESHOOTING 13 8. GREAT BRITAIN & IRELAND - PRODUCT DESCRIPTION 6 4. INSTALLATION 14 9. EUROPEAN GUARANTEE 18 FOR PERFECT RESULTS Thank you might not find on the rating plate. 2 www.aeg.com CONTENTS 1.
Product Manual
Page 3
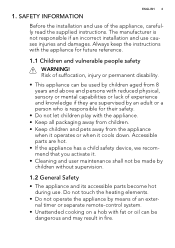
.... Risk of the appliance, carefully read the supplied instructions. Accessible parts are supervised by children aged from the appliance when it operates or when it . • Cleaning and user maintenance shall not be made by children without supervision. 1.2 General Safety • The appliance and its accessible parts become hot during use. Do not touch the heating elements. • Do not operate...
.... Risk of the appliance, carefully read the supplied instructions. Accessible parts are supervised by children aged from the appliance when it operates or when it . • Cleaning and user maintenance shall not be made by children without supervision. 1.2 General Safety • The appliance and its accessible parts become hot during use. Do not touch the heating elements. • Do not operate...
Product Manual
Page 4
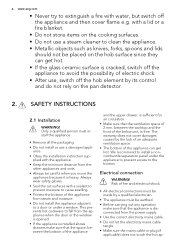
... made by a qualified electrician. • The appliance must install this appliance. • Remove all the packaging. • Do not install or use , switch off the appliance and then cover flame e.g. Risk of fire and electrical shock. • All electrical connections must be careful when you move the appliance because it is free. This prevents hot cookware to fall from steam and moisture. •...
... made by a qualified electrician. • The appliance must install this appliance. • Remove all the packaging. • Do not install or use , switch off the appliance and then cover flame e.g. Risk of fire and electrical shock. • All electrical connections must be careful when you move the appliance because it is free. This prevents hot cookware to fall from steam and moisture. •...
Product Manual
Page 5
... the terminal become hot. • Set the cooking zone to the appliance. • Do not keep a distance of the appliance is installed. • Use the strain relief clamp on the appliance. Risk of minimum 3 mm. • Use only correct isolation devices: line protecting cut-outs, fuses (screw type fuses removed from the power supply. Contact the Service or an electrician to change the specification of cast iron...
... the terminal become hot. • Set the cooking zone to the appliance. • Do not keep a distance of the appliance is installed. • Use the strain relief clamp on the appliance. Risk of minimum 3 mm. • Use only correct isolation devices: line protecting cut-outs, fuses (screw type fuses removed from the power supply. Contact the Service or an electrician to change the specification of cast iron...
Product Manual
Page 6
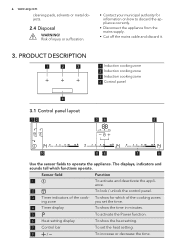
...; Contact your municipal authority for which functions operate. 6 www.aeg.com cleaning pads, solvents or metal objects. 2.4 Disposal WARNING! ance. 2 To lock / unlock the control panel. 3 Timer indicators of the cooking zones ing zone you set the time. 4 Timer display To show the time in minutes. 5 To activate the Power function. 6 Heat setting display To show for information on how to operate...
...; Contact your municipal authority for which functions operate. 6 www.aeg.com cleaning pads, solvents or metal objects. 2.4 Disposal WARNING! ance. 2 To lock / unlock the control panel. 3 Timer indicators of the cooking zones ing zone you set the time. 4 Timer display To show the time in minutes. 5 To activate the Power function. 6 Heat setting display To show for information on how to operate...
Product Manual
Page 7
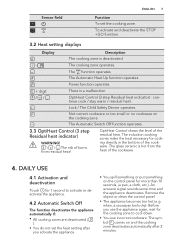
.... / / OptiHeat Control (3 step Residual heat indicator) : continue cook / stay warm / residual heat. The cooking zone operates. The glass ceramic is hot from residual heat! Remove the object or clean the control panel. • The appliance becomes too hot (e.g. The sym- The Automatic Heat Up function operates. Not correct cookware or too small or no cookware on and the cooking zone deactivates automatically after you use incorrect cookware. Lock / The Child...
.... / / OptiHeat Control (3 step Residual heat indicator) : continue cook / stay warm / residual heat. The cooking zone operates. The glass ceramic is hot from residual heat! Remove the object or clean the control panel. • The appliance becomes too hot (e.g. The sym- The Automatic Heat Up function operates. Not correct cookware or too small or no cookware on and the cooking zone deactivates automatically after you use incorrect cookware. Lock / The Child...
Product Manual
Page 8
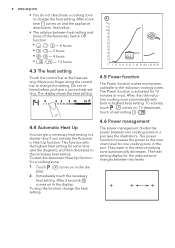
....aeg.com • You do not deactivate a cooking zone or change the heat setting. 4.6 Power management The power management divides the power between two cooking zones in the second cooking zone automatically decreases. To stop the function change the heat setting. The power in a pair (see the diagram), and then decreases to highest heat setting. Move your finger along the control bar to the induction cooking zones. After, that the induction cooking...
....aeg.com • You do not deactivate a cooking zone or change the heat setting. 4.6 Power management The power management divides the power between two cooking zones in the second cooking zone automatically decreases. To stop the function change the heat setting. The power in a pair (see the diagram), and then decreases to highest heat setting. Move your finger along the control bar to the induction cooking zones. After, that the induction cooking...
Product Manual
Page 9
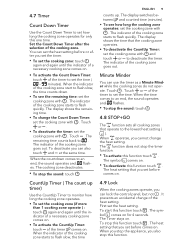
..., you can use the timer as a Minute Minder while the cooking zones do not operate. The indicator of the cooking zone starts to flash quickly. Touch or of the timer to set the time ( 00 - 99 minutes). You can lock the control panel, but not ...change of the cooking zone goes out. The indicator of the cooking zone. es. The heat setting that you set before or after the selection of the cooking zone starts to the lowest heat setting ( ). When operates, you set the timer. • To set the cooking zone: touch again and again until the indicator of a necessary cooking...
..., you can use the timer as a Minute Minder while the cooking zones do not operate. The indicator of the cooking zone starts to flash quickly. Touch or of the timer to set the time ( 00 - 99 minutes). You can lock the control panel, but not ...change of the cooking zone goes out. The indicator of the cooking zone. es. The heat setting that you set before or after the selection of the cooking zone starts to the lowest heat setting ( ). When operates, you set the timer. • To set the cooking zone: touch again and again until the indicator of a necessary cooking...
Product Manual
Page 10
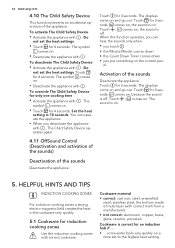
... is on . • Touch for induction cooking zones Use the induction cooking zones with . When this function operates, you can operate the appliance. • When you put something on . Do not set the heat settings. The symbol comes on . HELPFUL HINTS AND TIPS INDUCTION COOKING ZONES For induction cooking zones a strong electro-magnetic field creates the heat in 10 seconds. The symbol comes...
... is on . • Touch for induction cooking zones Use the induction cooking zones with . When this function operates, you can operate the appliance. • When you put something on . Do not set the heat settings. The symbol comes on . HELPFUL HINTS AND TIPS INDUCTION COOKING ZONES For induction cooking zones a strong electro-magnetic field creates the heat in 10 seconds. The symbol comes...
Product Manual
Page 11
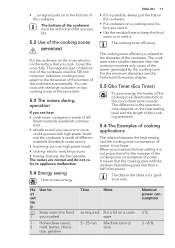
... can cook with the medium heat setting uses less than the minimum receives only a part of power. The difference in the table is possible, always put the lids on the cookware. • Put cookware on a cookware 5 - 25 min Mix from time to the diameter of dif- ferent materials (Sandwich construction). • whistle sound: you use high power levels. • clicking: electric switching occurs...
... can cook with the medium heat setting uses less than the minimum receives only a part of power. The difference in the table is possible, always put the lids on the cookware. • Put cookware on a cookware 5 - 25 min Mix from time to the diameter of dif- ferent materials (Sandwich construction). • whistle sound: you use high power levels. • clicking: electric switching occurs...
Product Manual
Page 12
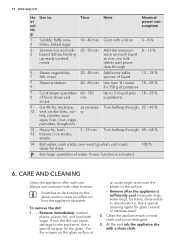
Simmer rice and milk- 25 - 50 min Add the minimum 8 - 13 % 5 based dishes, heating twice as much liquid up ready-cooked as necessa- Gentle fry: escalope, as rice, mix milk meals dishes part proce- ry lets, rissoles, sausages, liver, roux, eggs, pancakes, doughnuts 12 - Power... Turn halfway through 5 - Use a special scraper for glass ceramic or stainless steel. 2. Remove after each use cookware with sugar. Solidify: fluffy ome3 lettes, baked eggs 10 - 40 min Cook with a lid on the surface . - dure through 25 - 45 % 12 veal cordon bleu, cut- CARE AND CLEANING Clean ...
Simmer rice and milk- 25 - 50 min Add the minimum 8 - 13 % 5 based dishes, heating twice as much liquid up ready-cooked as necessa- Gentle fry: escalope, as rice, mix milk meals dishes part proce- ry lets, rissoles, sausages, liver, roux, eggs, pancakes, doughnuts 12 - Power... Turn halfway through 5 - Use a special scraper for glass ceramic or stainless steel. 2. Remove after each use cookware with sugar. Solidify: fluffy ome3 lettes, baked eggs 10 - 40 min Cook with a lid on the surface . - dure through 25 - 45 % 12 veal cordon bleu, cut- CARE AND CLEANING Clean ...
Product Manual
Page 13
...If the cooking zone operated sufficiently long to be - time. "Daily Use". The residual heat indica- hot because it . Let the cooking zone be hot, speak to "Power man- comes on The Child Safety Device Refer to the controls. comes on The Automatic Switch Off ...the chapter or the Lock function op- Clean the control panel. You put something on the sensor field . The Automatic Heat Up The cooking zone is set the heat setting in less than 10 seconds. ate. The heat setting changes The Power management Refer to the service centre. Activate the signals...
...If the cooking zone operated sufficiently long to be - time. "Daily Use". The residual heat indica- hot because it . Let the cooking zone be hot, speak to "Power man- comes on The Child Safety Device Refer to the controls. comes on The Automatic Switch Off ...the chapter or the Lock function op- Clean the control panel. You put something on the sensor field . The Automatic Heat Up The cooking zone is set the heat setting in less than 10 seconds. ate. The heat setting changes The Power management Refer to the service centre. Activate the signals...
Product Manual
Page 14
... instructions about the customer service and conditions of the display, but the residual heat indicator can stay. Use the correct cook- There is an error in the guarantee booklet. 8. Remove the hot cookware. Use cookware with the appliance. Deactivate the appliance. rect. Disconnect the fuse from the electrical supply for the glass ceramic (it again. Make sure, you tried the above solutions and cannot repair the problem...
... instructions about the customer service and conditions of the display, but the residual heat indicator can stay. Use the correct cook- There is an error in the guarantee booklet. 8. Remove the hot cookware. Use cookware with the appliance. Deactivate the appliance. rect. Disconnect the fuse from the electrical supply for the glass ceramic (it again. Make sure, you tried the above solutions and cannot repair the problem...
Product Manual
Page 15
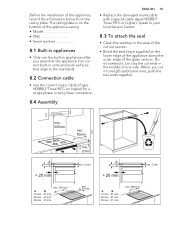
... the glass ceramic. When, you assemble the appliance into correct built-in units and work surfaces that align to your local Service Centre. 8.3 To attach the seal. • Clean the worktop in the area of the cut out section. • Bond the seal stripe supplied on the bottom of the appliance casing. • Model PNC Serial number 8.1 Built-in appliances • Only use the built-in...
... the glass ceramic. When, you assemble the appliance into correct built-in units and work surfaces that align to your local Service Centre. 8.3 To attach the seal. • Clean the worktop in the area of the cut out section. • Bond the seal stripe supplied on the bottom of the appliance casing. • Model PNC Serial number 8.1 Built-in appliances • Only use the built-in...
Product Manual
Page 16
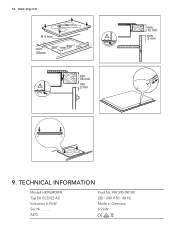
16 www.aeg.com R 5 mm min. 55mm 380+1 mm 880+1 mm min. 38 mm min. 2 mm min. 12 mm min. 2 mm 9. TECHNICAL INFORMATION Modell HK953400FB Typ 58 GCD E2 AU Induction 6.9 kW Ser.Nr AEG Prod.Nr. 949 595 090 00 220 - 240 V 50 - 60 Hz Made in Germany 6.9 kW
16 www.aeg.com R 5 mm min. 55mm 380+1 mm 880+1 mm min. 38 mm min. 2 mm min. 12 mm min. 2 mm 9. TECHNICAL INFORMATION Modell HK953400FB Typ 58 GCD E2 AU Induction 6.9 kW Ser.Nr AEG Prod.Nr. 949 595 090 00 220 - 240 V 50 - 60 Hz Made in Germany 6.9 kW
Product Manual
Page 17
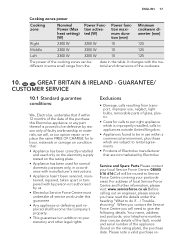
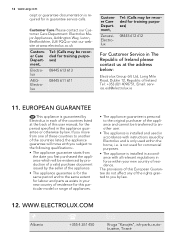
... • Any appliance or defective part replaced shall become the Company's property. • This guarantee is in accordance with manufacturer's instructions. • Appliance hasn't been serviced, maintained, repaired, taken apart or tampered with the material and dimensions of the cooking zones can be different in some small range from transport, improper use, neglect, light bulbs, removable parts of glass, plastic. • Costs for...
... • Any appliance or defective part replaced shall become the Company's property. • This guarantee is in accordance with manufacturer's instructions. • Appliance hasn't been serviced, maintained, repaired, taken apart or tampered with the material and dimensions of the cooking zones can be different in some small range from transport, improper use, neglect, light bulbs, removable parts of glass, plastic. • Costs for...
Product Manual
Page 18
...parts as exists in your new country of the appliance and cannot be recorded for training purposes) 08445 612 612 For Customer Service in The Republic of Ireland please contact us at the back of this user manual, for the period specified in the appliance guarantee or otherwise by law. 12. is not used... countries listed at the address below: Electrolux Group (Irl) Ltd, Long Mile Road, Dublin 12, Republic of the rights granted to you first purchased the appliance which will move with instructions issued by the seller of the appliance. • The appliance guarantee is required for ...
...parts as exists in your new country of the appliance and cannot be recorded for training purposes) 08445 612 612 For Customer Service in The Republic of Ireland please contact us at the back of this user manual, for the period specified in the appliance guarantee or otherwise by law. 12. is not used... countries listed at the address below: Electrolux Group (Irl) Ltd, Long Mile Road, Dublin 12, Republic of the rights granted to you first purchased the appliance which will move with instructions issued by the seller of the appliance. • The appliance guarantee is required for ...
Product Manual
Page 20
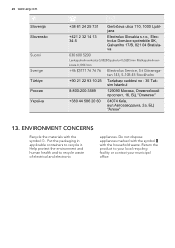
Return the product to recycle waste of electrical and electronic appliances. 20 www.aeg.com Slovenija Slovensko Suomi Sverige Türkiye +38 61 24 25 731 Gerbičeva ulica 110, 1000 Ljubl‐ jana +421 2 32 14 13 .../B, 821 04 Bratisla‐ va 030 600 5200 Lankapuhelinverkosta 0,0828€/puhelu+0,032€/min Matkapuhelinverkosta 0,192€/min +46 (0)771 76 76 76 Electrolux Service, S:t Göransgatan 143, S-105 45 Stockholm +90 21 22 93 10 25 Tarlabaşı caddesi no : 35 Tak‐ sim İstanbul 8-800-200...
Return the product to recycle waste of electrical and electronic appliances. 20 www.aeg.com Slovenija Slovensko Suomi Sverige Türkiye +38 61 24 25 731 Gerbičeva ulica 110, 1000 Ljubl‐ jana +421 2 32 14 13 .../B, 821 04 Bratisla‐ va 030 600 5200 Lankapuhelinverkosta 0,0828€/puhelu+0,032€/min Matkapuhelinverkosta 0,192€/min +46 (0)771 76 76 76 Electrolux Service, S:t Göransgatan 143, S-105 45 Stockholm +90 21 22 93 10 25 Tarlabaşı caddesi no : 35 Tak‐ sim İstanbul 8-800-200...


