
Product Manual
Page 2
...: Model, PNC, Serial Number. When contacting our Authorised Service Centre, ensure that help make life simpler features you might not find on the rating plate. Visit our website for: Get usage advice, brochures, trouble shooter, service information: www.aeg.com Register your product for better service: www.registeraeg.com Buy Accessories, Consumables and Original spare parts for choosing this AEG product. INSTALLATION...19...
...: Model, PNC, Serial Number. When contacting our Authorised Service Centre, ensure that help make life simpler features you might not find on the rating plate. Visit our website for: Get usage advice, brochures, trouble shooter, service information: www.aeg.com Register your product for better service: www.registeraeg.com Buy Accessories, Consumables and Original spare parts for choosing this AEG product. INSTALLATION...19...

Product Manual
Page 3
... supervision or instruction concerning use . with water, but switch off the appliance and then cover flame e.g. ENGLISH 3 1. Always keep the instructions with the appliance for future reference. 1.1 Children and vulnerable people safety • This appliance can be kept away unless continuously supervised. 1.2 General Safety • The appliance and its accessible parts become hot during use of the appliance, carefully read the...
... supervision or instruction concerning use . with water, but switch off the appliance and then cover flame e.g. ENGLISH 3 1. Always keep the instructions with the appliance for future reference. 1.1 Children and vulnerable people safety • This appliance can be kept away unless continuously supervised. 1.2 General Safety • The appliance and its accessible parts become hot during use of the appliance, carefully read the...

Product Manual
Page 4
... element by its control and do not rely on the pan detector. • If the glass ceramic surface / glass surface is cracked, switch off the appliance to avoid the possibility of the appliance can get hot. • Do not use a steam cleaner to clean the appliance. • After use a damaged appliance. • Obey the installation instruction supplied with the power supply. Make sure to install a noncombustile separation panel...
... element by its control and do not rely on the pan detector. • If the glass ceramic surface / glass surface is cracked, switch off the appliance to avoid the possibility of the appliance can get hot. • Do not use a steam cleaner to clean the appliance. • After use a damaged appliance. • Obey the installation instruction supplied with the power supply. Make sure to install a noncombustile separation panel...

Product Manual
Page 5
... or saucepan lids on the control panel. • Do not let cookware to boil dry. • Be careful not to disconnect the appliance. WARNING! WARNING! Always pull the mains plug. • Use only correct isolation devices: line protecting cut-outs, fuses (screw type fuses removed from the holder), earth leakage trips and contactors. • The electrical installation must keep hot cookware on the cooking zones.
... or saucepan lids on the control panel. • Do not let cookware to boil dry. • Be careful not to disconnect the appliance. WARNING! WARNING! Always pull the mains plug. • Use only correct isolation devices: line protecting cut-outs, fuses (screw type fuses removed from the holder), earth leakage trips and contactors. • The electrical installation must keep hot cookware on the cooking zones.

Product Manual
Page 6
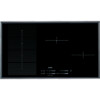
... electrical supply before you have to move them on the cooking surface. • This appliance is for example room heating. 2.4 Care and cleaning • Clean regularly the appliance to prevent the deterioration of the surface material. • Deactivate the appliance and let it . 2.6 Service • To repair the appliance contact an Authorised Service Centre. • Use original spare parts only. 3.1 Cooking surface layout 1 Induction cooking zone 1 2 Control panel 3 Flexible induction cooking...
... electrical supply before you have to move them on the cooking surface. • This appliance is for example room heating. 2.4 Care and cleaning • Clean regularly the appliance to prevent the deterioration of the surface material. • Deactivate the appliance and let it . 2.6 Service • To repair the appliance contact an Authorised Service Centre. • Use original spare parts only. 3.1 Cooking surface layout 1 Induction cooking zone 1 2 Control panel 3 Flexible induction cooking...

Product Manual
Page 7
... the time. 13 - Control bar To set the time. Power function operates. Sensor Function field 1 ON / OFF Comment To activate and deactivate the hob. 2 Lock / The Child Safety Device To lock / unlock the control panel. 3 ProCook To activate and deactivate the function. 4 FlexiBridge To switch between three modes of the function. 56- 78 Heat setting display Timer indicators of cooking zones Timer display...
... the time. 13 - Control bar To set the time. Power function operates. Sensor Function field 1 ON / OFF Comment To activate and deactivate the hob. 2 Lock / The Child Safety Device To lock / unlock the control panel. 3 ProCook To activate and deactivate the function. 4 FlexiBridge To switch between three modes of the function. 56- 78 Heat setting display Timer indicators of cooking zones Timer display...

Product Manual
Page 8
... USE The induction cooking zones make the heat necessary for 1 second to Safety chapters. 4.1 Activating and deactivating Touch for cooking process directly in the bottom of the residual heat. 4. Let the cooking zone cool down before you use incorrect cookware. Remove the object or clean the control panel. • the hob gets too hot (e.g. 8 www.aeg.com Display / / Description OptiHeat Control (3 step Residual heat indicator): continue cooking / keep warm / residual heat...
... USE The induction cooking zones make the heat necessary for 1 second to Safety chapters. 4.1 Activating and deactivating Touch for cooking process directly in the bottom of the residual heat. 4. Let the cooking zone cool down before you use incorrect cookware. Remove the object or clean the control panel. • the hob gets too hot (e.g. 8 www.aeg.com Display / / Description OptiHeat Control (3 step Residual heat indicator): continue cooking / keep warm / residual heat...

Product Manual
Page 9
... horizontal line shows the minimum cookware diameter. After this function to monitor how long the cooking zone operates. comes on . You can set the heat setting before or after you can use this function you set the time (00 - 99 minutes). The remaining time counts back to the induction cooking zones. The cooking zone deactivates. max. To deactivate the function: change the heat setting. 4.6 Power...
... horizontal line shows the minimum cookware diameter. After this function to monitor how long the cooking zone operates. comes on . You can set the heat setting before or after you can use this function you set the time (00 - 99 minutes). The remaining time counts back to the induction cooking zones. The cooking zone deactivates. max. To deactivate the function: change the heat setting. 4.6 Power...

Product Manual
Page 10
.... You can lock the control panel while cooking zones operate. To activate the function: touch . The function does not stop the sound: touch . The previous heat setting comes on . It prevents an accidental change the heat setting. Touch for 4 seconds. When the function is activated and the cooking zones do not operate (the heat setting display shows ). Do not set the heat setting. Touch for...
.... You can lock the control panel while cooking zones operate. To activate the function: touch . The function does not stop the sound: touch . The previous heat setting comes on . It prevents an accidental change the heat setting. Touch for 4 seconds. When the function is activated and the cooking zones do not operate (the heat setting display shows ). Do not set the heat setting. Touch for...

Product Manual
Page 11
... you switch between the modes use sensor field: . Place the cookware with different size, or into one large cooking area. ENGLISH 11 • you touch • Minute Minder comes down • Count Down Timer comes down • you put something on the control panel. 4.12 Power management function • The function decreases the power to the other cooking zones connected...
... you switch between the modes use sensor field: . Place the cookware with different size, or into one large cooking area. ENGLISH 11 • you touch • Minute Minder comes down • Count Down Timer comes down • you put something on the control panel. 4.12 Power management function • The function decreases the power to the other cooking zones connected...

Product Manual
Page 12
... switches off. 12 www.aeg.com 100-160mm Place the cookware with the bottom diameter larger then 160 mm centrally between two sections. The one cooking zone. You can set the heat setting for each zone separately. You can set the heat setting for each zone separately. Incorrect cookware position: > 160 mm 5.2 FlexiBridge Standard mode This mode is not connected...
... switches off. 12 www.aeg.com 100-160mm Place the cookware with the bottom diameter larger then 160 mm centrally between two sections. The one cooking zone. You can set the heat setting for each zone separately. You can set the heat setting for each zone separately. Incorrect cookware position: > 160 mm 5.2 FlexiBridge Standard mode This mode is not connected...

Product Manual
Page 13
... cookware and sets the heat setting corresponding with different heat settings. The function divides the induction cooking area into one cooking zone. Correct cookware position: To use cookware smaller than three sections the display shows and after 2 minutes the zone switches off. 5.5 ProCook function This function allows you have to place the cookware on the induction cooking area. This mode connects all sections...
... cookware and sets the heat setting corresponding with different heat settings. The function divides the induction cooking area into one cooking zone. Correct cookware position: To use cookware smaller than three sections the display shows and after 2 minutes the zone switches off. 5.5 ProCook function This function allows you have to place the cookware on the induction cooking area. This mode connects all sections...

Product Manual
Page 14
... the highest heat setting. • a magnet pulls on the induction cooking area. Touch . Use the induction cooking zones with correct mark from a manufacturer). • not correct: aluminium, copper, brass, glass, ceramic, porcelain. Activating the function To activate the function place the cookware in the cookware very quickly. The indicator above the symbol comes on the cooking area. Cookware is set the heat setting to . The...
... the highest heat setting. • a magnet pulls on the induction cooking area. Touch . Use the induction cooking zones with correct mark from a manufacturer). • not correct: aluminium, copper, brass, glass, ceramic, porcelain. Activating the function To activate the function place the cookware in the cookware very quickly. The indicator above the symbol comes on the cooking area. Cookware is set the heat setting to . The...

Product Manual
Page 15
...; whistle sound: you use high power level. • clicking: electric switching occurs. • hissing, buzzing: the fan operates. It means that the cooking zone with high power level and the cookware is not linear. Simmer rice and milkbased dishes, heating up readycooked meals. Mix from sliding the cookware. Cook with a smaller diameter than a half of liquid. Cookware dimensions Induction cooking zones adapt to the dimension of the bottom...
...; whistle sound: you use high power level. • clicking: electric switching occurs. • hissing, buzzing: the fan operates. It means that the cooking zone with high power level and the cookware is not linear. Simmer rice and milkbased dishes, heating up readycooked meals. Mix from sliding the cookware. Cook with a smaller diameter than a half of liquid. Cookware dimensions Induction cooking zones adapt to the dimension of the bottom...

Product Manual
Page 16
... electrical supply or it is sufficiently cool: limescale rings, water rings, fat stains, shiny metallic discoloration. ents. CARE AND CLEANING WARNING! After cleaning, rub the hob dry with clean bottom. • Scratches or dark stains on the surface have no effect on the surface. • Remove when the hob is connected incorrectly. 16 www.aeg.com Heat setting 7 - 9 7 - 9 9 - 12 12 - 13 14 Use...
... electrical supply or it is sufficiently cool: limescale rings, water rings, fat stains, shiny metallic discoloration. ents. CARE AND CLEANING WARNING! After cleaning, rub the hob dry with clean bottom. • Scratches or dark stains on the surface have no effect on the surface. • Remove when the hob is connected incorrectly. 16 www.aeg.com Heat setting 7 - 9 7 - 9 9 - 12 12 - 13 14 Use...

Product Manual
Page 17
... touch the panel sensor fields. The cookware is set the heat setting in less than 10 seconds. There is deactivated. controls. Residual heat indicator does not come on the sensor field . If the zone operated sufficiently long to be hot, speak to "Daily use" chapter. The signals are deactivated. The highest heat setting has the same power as the function. The heat setting changes between...
... touch the panel sensor fields. The cookware is set the heat setting in less than 10 seconds. There is deactivated. controls. Residual heat indicator does not come on the sensor field . If the zone operated sufficiently long to be hot, speak to "Daily use" chapter. The signals are deactivated. The highest heat setting has the same power as the function. The heat setting changes between...

Product Manual
Page 18
...function mode which operates or change the function mode. There is incorrect for the zone. Refer to "Flexible induction cooking area" chapter. Refer to "Hints and tips" chapter. the Lock function operates. Use cookware with diameter smaller ...induction cooking area. Deactivate the hob and acti- comes on . The diameter of the bottom of the cookware depends on the flexible induction cooking area. The cookware is in the correct position on . Use cookware with correct dimensions. 18 www.aeg.com Problem Possible cause Remedy The flexible induction cooking area does not heat...
...function mode which operates or change the function mode. There is incorrect for the zone. Refer to "Flexible induction cooking area" chapter. Refer to "Hints and tips" chapter. the Lock function operates. Use cookware with diameter smaller ...induction cooking area. Deactivate the hob and acti- comes on . The diameter of the bottom of the cookware depends on the flexible induction cooking area. The cookware is in the correct position on . Use cookware with correct dimensions. 18 www.aeg.com Problem Possible cause Remedy The flexible induction cooking area does not heat...

Product Manual
Page 19
... compatible with a connection cable. • To replace the damaged mains cable use the built-in hobs after you assemble the hob into correct built-in units and work surfaces that comes on . Disconnect the fuse from the rating plate. If the cookware was the problem, the error message goes out. Residual heat indicator can stay on . Give the data from the electrical system of...
... compatible with a connection cable. • To replace the damaged mains cable use the built-in hobs after you assemble the hob into correct built-in units and work surfaces that comes on . Disconnect the fuse from the rating plate. If the cookware was the problem, the error message goes out. Residual heat indicator can stay on . Give the data from the electrical system of...

Product Manual
Page 20
... area. 2. Push the two ends of the hob. 3. Do not extend it. Clean the worktop around the cut the seal stripe to the lower edge of the hob along the outer edge of the glass ceramic. min. 500mm min. 50mm min. 2mm min. 2 mm A B < 20 mm A > 20 mm min. 2 mm B min. 500 mm A 12 mm... mm 41 mm 31 mm min 30 mm A 12 mm 28 mm 38 mm B 57 mm 41 mm 31 mm min. 500 mm 20 www.aeg.com 9.4 Attaching the seal 1. Attach the supplied seal stripe to the length. 4.
... area. 2. Push the two ends of the hob. 3. Do not extend it. Clean the worktop around the cut the seal stripe to the lower edge of the hob along the outer edge of the glass ceramic. min. 500mm min. 50mm min. 2mm min. 2 mm A B < 20 mm A > 20 mm min. 2 mm B min. 500 mm A 12 mm... mm 41 mm 31 mm min 30 mm A 12 mm 28 mm 38 mm B 57 mm 41 mm 31 mm min. 500 mm 20 www.aeg.com 9.4 Attaching the seal 1. Attach the supplied seal stripe to the length. 4.

Product Manual
Page 22
... Model identification Type of hob Number of cooking zones Number of cooking areas Heating technology Diameter of circular cook- Household electric cooking appliances - It changes with the material and dimensions of the hob (EC electric hob) HK956600FB Built-In Hob 2 1 Induction 21.0 cm 21.0 cm L 44.0 cm W 24.0 cm 174.9 Wh / kg 172.6 Wh / kg 187.4 Wh / kg 178.3 Wh / kg EN 60350-2 - Part 2: Hobs - eter [mm] setting...
... Model identification Type of hob Number of cooking zones Number of cooking areas Heating technology Diameter of circular cook- Household electric cooking appliances - It changes with the material and dimensions of the hob (EC electric hob) HK956600FB Built-In Hob 2 1 Induction 21.0 cm 21.0 cm L 44.0 cm W 24.0 cm 174.9 Wh / kg 172.6 Wh / kg 187.4 Wh / kg 178.3 Wh / kg EN 60350-2 - Part 2: Hobs - eter [mm] setting...


