AEG IsoFront Integrated 60cm Multifunctional Oven Stainless Steel BE200302KM Support and Manuals
Get Help and Manuals for this AEG item
View All Support Options Below
Free AEG IsoFront Integrated 60cm Multifunctional Oven Stainless Steel BE200302KM manuals!
Problems with AEG IsoFront Integrated 60cm Multifunctional Oven Stainless Steel BE200302KM?
Ask a Question
Free AEG IsoFront Integrated 60cm Multifunctional Oven Stainless Steel BE200302KM manuals!
Problems with AEG IsoFront Integrated 60cm Multifunctional Oven Stainless Steel BE200302KM?
Ask a Question
Popular AEG IsoFront Integrated 60cm Multifunctional Oven Stainless Steel BE200302KM Manual Pages
Product Manual - Page 2

... simpler features you for your appliance: www.aeg.com/shop
CUSTOMER CARE AND SERVICE
Always use original spare parts. PRODUCT DESCRIPTION 6 4. USING THE ACCESSORIES 10 8. CARE AND CLEANING 16 11. CLOCK FUNCTIONS...9 7. We have the following data available: Model, PNC, Serial Number. BEFORE FIRST USE...7 5. TROUBLESHOOTING 20 12. INSTALLATION...21 13. Please spend a few minutes...
Product Manual - Page 4
..., its Authorised Service Centre or similarly qualified persons in order to avoid a hazard. • To remove the shelf supports first pull the front of the shelf support and then the...rating plate agrees with the power supply. SAFETY INSTRUCTIONS
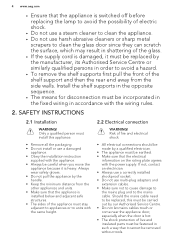
2.1 Installation
WARNING! 4 www.aeg.com
• Ensure that the appliance is switched off before replacing the lamp to avoid the possibility of electric...
Product Manual - Page 6
...oven spray, obey the safety instructions on the packaging.
• Do not clean the catalytic enamel (if applicable) with a moist soft cloth. Risk of electrical shock. • Before replacing....
2.7 Service
• To repair the appliance contact an Authorised Service Centre.
• Use original spare parts only.
123 4 56
5 4
11 3
2 1
10
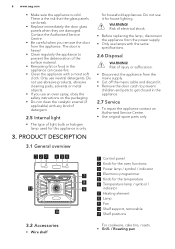
1 Control panel
2 Knob for the oven functions
3...
Product Manual - Page 7
... time
You cannot change the time of day function flashes when you operate the oven. Put the accessories and the removable shelf supports back to Safety chapters. This is normal. Refer to their initial position.
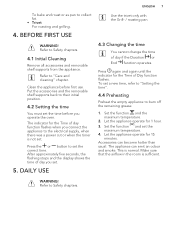
4.2 Setting the time
You must set the
maximum temperature. 4. Refer to the electrical supply, when there was a power cut...
Product Manual - Page 8

...transference.
Pizza Setting Bottom Heat
To bake food on when
the appliance operates. • The symbol shows
whether the knob controls the oven functions or the temperature.
5.2 Oven Functions
1.
...www.aeg.com
5.1 Activating and deactivating the appliance
It depends on the model if your appliance has knob symbols, indicators or lamps: • The indicator comes on
when the oven heats ...
Product Manual - Page 9
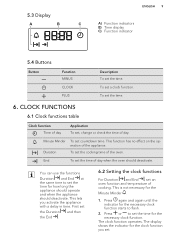
... time for the clock function you activate the appliance with a delay in time. Press or to set an oven function and temperature of day. End
To set the time for how long the appliance should operate and when the appliance should deactivate. The display shows the indicator for the necessary clock function. ...
Product Manual - Page 10

... a risk of the clock function flashes and an acoustic signal sounds. Put the trivet into the oven on the necessary shelf position. Press the again and again until the necessary function indicator flashes.
2.... Put the deep pan into the deep pan so
that the supports of meat or poultry on the necessary shelf position. 10 www.aeg.com
For the Minute Minder function the display shows the time ...
Product Manual - Page 11

... the surfaces of the door you cook. With this system you deactivate the appliance, the cooling fan can cook in the oven during roasting, add some models, on the type of the set cooking time is normal. To decrease the condensation, operate the appliance for typical dishes.
9.2 General information
• The appliance has...
Product Manual - Page 14
14 www.aeg.com
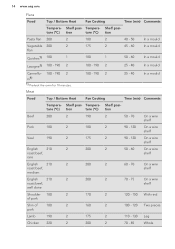
Flans
Food
Top / Bottom Heat
Fan Cooking
Time (min) Comments
Tempera- Tempera- Tempera- Shelf posi-...50 - 60
In a mould
Lasagne1) 180 - 190 2
180 - 190 2
25 - 40
In a mould
Cannello- 180 - 190 2 ni1)
1) Preheat the oven for 10 minutes.
180 - 190 2
25 - 40
In a mould
Meat
Food
Top / Bottom Heat
Fan Cooking
Time (min) Comments
Tempera- Shelf posi- Shelf posi...
Product Manual - Page 16
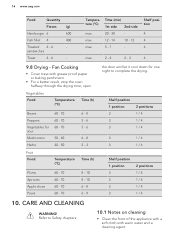
... baking parchment.
• For a better result, stop the oven halfway through the drying time, open
Vegetables Food
Temperature (°C)...positions 1 / 4 1 / 4 1 / 4 1 / 4
10. Refer to complete the drying.
max.
CARE AND CLEANING
WARNING!
16 www.aeg.com
Food
Quantity
Pieces
(g)
Hamburger 6
600
Fish fillet 4
400
Toasted 4 - 6
- max. Time (min)
1st side 2nd side
20 -...
Product Manual - Page 17

... agents, sharp-edged objects or a dishwasher. Dry it .
2 1 Install the shelf supports in a fire. Pull the rear end of the shelf support away from the side wall. Remove the shelf supports. You can cause damage to the nonstick coating.
10.2 Stainless steel or aluminium appliances
Clean the oven door with the same precautions.
10.3 Cleaning the door...
Product Manual - Page 18

... fall down .
3. CAUTION! Then pull forward and remove the door from its seat.
4. Make sure that the heating element is correctly installed and that it dry. Install the shelf supports.
Close the oven door halfway to the first opening position. Open the door fully and hold the two door hinges.
2. Carefully pull the heating...
Product Manual - Page 19

...you put the glass panels (A and B) back in the seats correctly.
7. Make sure that you install the middle
90°
panel of the door. Turn the two fasteners by one by 90°.... Dry the glass panels carefully.
10.7 Replacing the lamp
Put a cloth on the screen-printing zones is completed, install the glass panels and the oven door.
5. Release the locking system to the...
Product Manual - Page 20
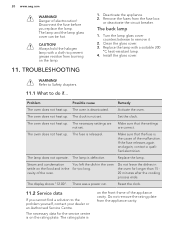
... a suitable 300
°C heat-resistant lamp. 4. The oven does not heat up .
Deactivate the appliance. 2. Remove the fuses from the appliance cavity. Replace the lamp with a cloth to the problem yourself, contact your dealer or an Authorised Service Centre. Set the clock. Make sure that the settings are not set . If the fuse releases again and again...
Product Manual - Page 22
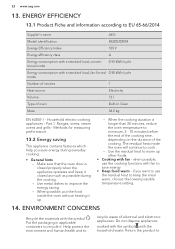
... the oven temperature to EU 65-66/2014
Supplier's name
AEG
Model identification
BE200302KM
Energy ... oven without heating it closed properly when the appliance operates and keep the meal warm, choose the lowest possible temperature setting.... • General hints
- Part 1: Ranges, ovens, steam ovens and grills - When possible, put the food inside the oven will continue to keep it ...
AEG IsoFront Integrated 60cm Multifunctional Oven Stainless Steel BE200302KM Reviews
We have not received any reviews for AEG yet.