Product Manual
Page 2
... a wide range of accessories designed and built to the high quality standards you would expect, from specialist cookware to cutlery baskets, from bottle holders to get the very best from it to keep all your AEG appliances looking spotless and working perfectly. ACCESSORIES AND CONSUMABLES need to give you impeccable performance for choosing this AEG product. Along...
... a wide range of accessories designed and built to the high quality standards you would expect, from specialist cookware to cutlery baskets, from bottle holders to get the very best from it to keep all your AEG appliances looking spotless and working perfectly. ACCESSORIES AND CONSUMABLES need to give you impeccable performance for choosing this AEG product. Along...
Product Manual
Page 3
General information and tips. 3 Contents Contents 4 Installation instructions 6 Safety Instructions 8 Appliance Description 9 Use 12 Load capacity 13 Cleaning and Maintenance 14 What should I do if the crockery 28 Installation The following symbols are used in this user manual: Important information concerning your personal safety and information on how to avoid damaging the appliance. Environmental information.
General information and tips. 3 Contents Contents 4 Installation instructions 6 Safety Instructions 8 Appliance Description 9 Use 12 Load capacity 13 Cleaning and Maintenance 14 What should I do if the crockery 28 Installation The following symbols are used in this user manual: Important information concerning your personal safety and information on how to avoid damaging the appliance. Environmental information.
Product Manual
Page 4
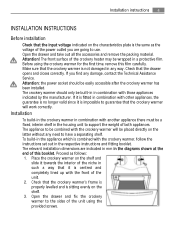
... interior of the crockery heater may be placed directly on the shelf and slide it is impossible to support the weight of the unit using the crockery warmer for the first time, remove this booklet. If it is centred and completely lined up with the crockery warmer, follow the instructions set out in any damage, contact the Technical Assistance Service...
... interior of the crockery heater may be placed directly on the shelf and slide it is impossible to support the weight of the unit using the crockery warmer for the first time, remove this booklet. If it is centred and completely lined up with the crockery warmer, follow the instructions set out in any damage, contact the Technical Assistance Service...
Product Manual
Page 5
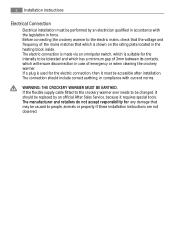
... which will ensure disconnection in compliance with the legislation in the heating block inside. If the flexible supply cable fitted to the crockery warmer ever needs to be changed, it requires special tools. The electric connection is made via an omnipolar switch, which is shown on the rating plate located in force. The manufacturer and retailers do not accept responsibility for...
... which will ensure disconnection in compliance with the legislation in the heating block inside. If the flexible supply cable fitted to the crockery warmer ever needs to be changed, it requires special tools. The electric connection is made via an omnipolar switch, which is shown on the rating plate located in force. The manufacturer and retailers do not accept responsibility for...
Product Manual
Page 6
... removed from the electrical current when installation and repair work is excluded from the absence of repairs and maintenance carried out by the manufacturer. The manufacturer cannot be disconnected from the socket. Repairs and maintenance, especially of the following conditions must apply: The switchboard fuses / circuit breakers must be held responsible for any damage resulting from fitting or connecting errors. Warning! The plug...
... removed from the electrical current when installation and repair work is excluded from the absence of repairs and maintenance carried out by the manufacturer. The manufacturer cannot be disconnected from the socket. Repairs and maintenance, especially of the following conditions must apply: The switchboard fuses / circuit breakers must be held responsible for any damage resulting from fitting or connecting errors. Warning! The plug...
Product Manual
Page 7
... is used in the kitchen. When you stop using the appliance at risk. Children should be damaged. Read the operating instructions carefully before using oven gloves or an oven cloth. Depending on how to identify dangerous situations that the appliance is inadvertently switched on the drawer. The maximum load capacity of injuring yourself or damaging the appliance. When you will heat up the air temperature...
... is used in the kitchen. When you stop using the appliance at risk. Children should be damaged. Read the operating instructions carefully before using oven gloves or an oven cloth. Depending on how to identify dangerous situations that the appliance is inadvertently switched on the drawer. The maximum load capacity of injuring yourself or damaging the appliance. When you will heat up the air temperature...
Product Manual
Page 8
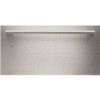
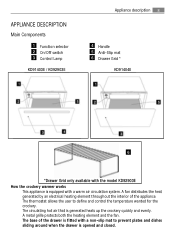
... with the model KD92903E How the crockery warmer works This appliance is generated heats up the crockery quickly and evenly. A fan distributes the heat generated by an electrical heating element throughout the interior of the drawer is fitted with a warm air circulation system. A metal grille protects both the heating element and the fan. The thermostat allows the user to prevent plates and dishes sliding around when the drawer is opened and...
... with the model KD92903E How the crockery warmer works This appliance is generated heats up the crockery quickly and evenly. A fan distributes the heat generated by an electrical heating element throughout the interior of the drawer is fitted with a warm air circulation system. A metal grille protects both the heating element and the fan. The thermostat allows the user to prevent plates and dishes sliding around when the drawer is opened and...
Product Manual
Page 9
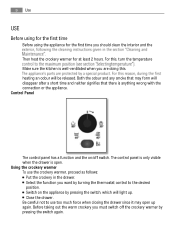
... light up again. The control panel is only visible when the drawer is open up . Select the function you are doing this , turn the temperature Make sure the kitchen is anything wrong with the connection or the appliance. For this . Before taking out the warm crockery you should clean the interior and the Then heat the crockery warmer for at least 2 hours. Control Panel The control panel...
... light up again. The control panel is only visible when the drawer is open up . Select the function you are doing this , turn the temperature Make sure the kitchen is anything wrong with the connection or the appliance. For this . Before taking out the warm crockery you should clean the interior and the Then heat the crockery warmer for at least 2 hours. Control Panel The control panel...
Product Manual
Page 10
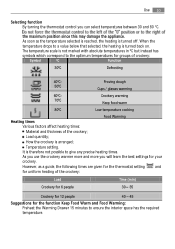
... heating is turned off. As soon as a guide, the following times are given for the thermostat setting and for uniform heating of the crockery; Temperature setting. The temperature scale is turned back on. Load quantity; Use 10 Selecting function By turning the thermostat control you will learn the best settings for the function Keep Food Warm and Food Warming: Preheat the Warming Drawer 15 minutes to ensure the interior space has the required temperature...
... heating is turned off. As soon as a guide, the following times are given for the thermostat setting and for uniform heating of the crockery; Temperature setting. The temperature scale is turned back on. Load quantity; Use 10 Selecting function By turning the thermostat control you will learn the best settings for the function Keep Food Warm and Food Warming: Preheat the Warming Drawer 15 minutes to ensure the interior space has the required temperature...
Product Manual
Page 11
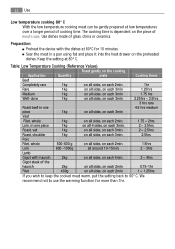
... 1 1.25hrs. We recommend not to 60° C. Preparation: Preheat the device with haunch 2kg on each 3min. 2 2.5hrs. If you wish to keep the cooked meat warm, put the setting back to use the warming function for 10 minutes. Table: Low Temperature Cooking (Reference Values) Roast gently on the cooking Application Quantity plate Cooking times Beef Completely rare 1kg on all sides, on each...
... 1 1.25hrs. We recommend not to 60° C. Preparation: Preheat the device with haunch 2kg on each 3min. 2 2.5hrs. If you wish to keep the cooked meat warm, put the setting back to use the warming function for 10 minutes. Table: Low Temperature Cooking (Reference Values) Roast gently on the cooking Application Quantity plate Cooking times Beef Completely rare 1kg on all sides, on each...
Product Manual
Page 12
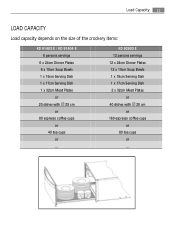
KD 92903 E 12 persons servings 12 x 24cm Dinner Plates 12 x 10cm Soup Bowls 1 x 19cm Serving Dish 1 x 17cm Serving Dish 2 x 32cm Meat Plates or 40 dishes with 28 cm or 80 espresso coffee cups or 40 tea cups or ... Load Capacity 12 LOAD CAPACITY Load capacity depends on the size of the crockery items: KD 91403 E / KD 91404 E 6 persons servings 6 x 24cm Dinner Plates 6 x 10cm Soup Bowls 1 x 19cm Serving Dish 1 x 17cm Serving Dish 1 x 32cm Meat Plates or 20 dishes with 28 cm or 160 espresso coffee cups or 80 tea cups or ...
KD 92903 E 12 persons servings 12 x 24cm Dinner Plates 12 x 10cm Soup Bowls 1 x 19cm Serving Dish 1 x 17cm Serving Dish 2 x 32cm Meat Plates or 40 dishes with 28 cm or 80 espresso coffee cups or 40 tea cups or ... Load Capacity 12 LOAD CAPACITY Load capacity depends on the size of the crockery items: KD 91403 E / KD 91404 E 6 persons servings 6 x 24cm Dinner Plates 6 x 10cm Soup Bowls 1 x 19cm Serving Dish 1 x 17cm Serving Dish 1 x 32cm Meat Plates or 20 dishes with 28 cm or 160 espresso coffee cups or 80 tea cups or ...
Product Manual
Page 13
... crockery warmer disconnected from the power socket or disconnect the crockery warmer power supply circuit. For stainless steel fronted crockery warmers, special products for some time. Interior of the crockery warmer Clean the inside of the crockery warmer regularly using a dry cloth. The mat can be used. Remove the plug from the electrical power supply. Wipe the surfaces dry using a damp cloth. Wipe the surfaces...
... crockery warmer disconnected from the power socket or disconnect the crockery warmer power supply circuit. For stainless steel fronted crockery warmers, special products for some time. Interior of the crockery warmer Clean the inside of the crockery warmer regularly using a dry cloth. The mat can be used. Remove the plug from the electrical power supply. Wipe the surfaces dry using a damp cloth. Wipe the surfaces...

Product Manual
Page 14
... thickness. Quantity of a fan. if the fan is not operating then the fan is broken; The appropriate temperature has been selected. The air circulation orifices are covered by a specialised technician. If the fan is operating then the heating element is broken. The switchboard fuses / circuit breakers have fused / tripped out. The on/off switch does not light up too much: The temperature selector is dangerous. Heating time depends on . Before...
... thickness. Quantity of a fan. if the fan is not operating then the fan is broken; The appropriate temperature has been selected. The air circulation orifices are covered by a specialised technician. If the fan is operating then the heating element is broken. The switchboard fuses / circuit breakers have fused / tripped out. The on/off switch does not light up too much: The temperature selector is dangerous. Heating time depends on . Before...


