
Specification Sheet
Page 1
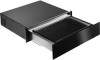
... the very best in your food for your food and spices inside the vacuum sealer drawer, close the lid and push the button. Place..., more moisture and enhance the infusion of the traditional marinating time. This special function is carefully developed to drastically reduce marinating times, enabling you best. even for meals prepared in advance ...Sealer Drawer KDE911423B Vacuum-seal your food's taste and texture Preserve more flavour Recreate authentic flavours from around the world with refrigeration storage by using the Vacuum Sealer drawer to seal and store food. You can...
... the very best in your food for your food and spices inside the vacuum sealer drawer, close the lid and push the button. Place..., more moisture and enhance the infusion of the traditional marinating time. This special function is carefully developed to drastically reduce marinating times, enabling you best. even for meals prepared in advance ...Sealer Drawer KDE911423B Vacuum-seal your food's taste and texture Preserve more flavour Recreate authentic flavours from around the world with refrigeration storage by using the Vacuum Sealer drawer to seal and store food. You can...

User Manual
Page 2
... serial number. Please spend a few minutes reading to change without notice. Visit our website to give you might not find information on technical support: www.aeg.com Register your product and receive a better service: www.aeg.com/productregistration Purchase accessories, consumables and original spare parts for choosing this AEG product. Information and general recommendations. CLEANING AND MAINTENANCE 12 8. Important safety information. BEFORE USING...
... serial number. Please spend a few minutes reading to change without notice. Visit our website to give you might not find information on technical support: www.aeg.com Register your product and receive a better service: www.aeg.com/productregistration Purchase accessories, consumables and original spare parts for choosing this AEG product. Information and general recommendations. CLEANING AND MAINTENANCE 12 8. Important safety information. BEFORE USING...

User Manual
Page 3
...safety ••Only qualified personnel can install the appliance and replace the cables. ••Disconnect the appliance from the power supply before installing and using the appliance. Always keep the instructions available for improper installation and use the appliance in a safe way and... ENGLISH 3 Carefully read the instructions before carrying out any maintenance operation. ••Do not use steam cleaners to clean the appliance. ••Do not use abrasive detergents or metal scrapers to clean the appliance. ••If the power cord is ...
...safety ••Only qualified personnel can install the appliance and replace the cables. ••Disconnect the appliance from the power supply before installing and using the appliance. Always keep the instructions available for improper installation and use the appliance in a safe way and... ENGLISH 3 Carefully read the instructions before carrying out any maintenance operation. ••Do not use steam cleaners to clean the appliance. ••Do not use abrasive detergents or metal scrapers to clean the appliance. ••If the power cord is ...
User Manual
Page 4
SAFETY INSTRUCTIONS 2.1 Installation CAUTION! Always wear safety gloves. • Do not turn the appliance upside down or tilt it! Otherwise, contact an electrician. • Always use multi-plug adapters or extension cables. • Make sure not to damage the mains plug and the mains cable. This may...if the mains socket is installed and secured to a fixed structure. • The sides of the appliance must have a contact opening width of the system. The isolation device must be equipped with the EEC directives. If the power cable must be replaced, this should be carried ...
SAFETY INSTRUCTIONS 2.1 Installation CAUTION! Always wear safety gloves. • Do not turn the appliance upside down or tilt it! Otherwise, contact an electrician. • Always use multi-plug adapters or extension cables. • Make sure not to damage the mains plug and the mains cable. This may...if the mains socket is installed and secured to a fixed structure. • The sides of the appliance must have a contact opening width of the system. The isolation device must be equipped with the EEC directives. If the power cable must be replaced, this should be carried ...
User Manual
Page 5
... the work cycle in the case of a power cut. • Do not place any weight on the appliance, or inside or close to repair the appliance. • Only use . ENGLISH 5 2.4 Cleaning and maintenance CAUTION! Do not place or keep flammable liquids, materials or objects on the cover. • Prevent any maintenance operation, turn the appliance off after use original spare parts. There...
... the work cycle in the case of a power cut. • Do not place any weight on the appliance, or inside or close to repair the appliance. • Only use . ENGLISH 5 2.4 Cleaning and maintenance CAUTION! Do not place or keep flammable liquids, materials or objects on the cover. • Prevent any maintenance operation, turn the appliance off after use original spare parts. There...
User Manual
Page 6
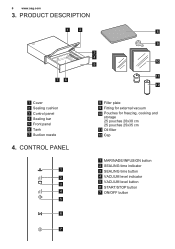
PRODUCT DESCRIPTION 1 2 8 9 3 4 10 5 11 76 12 1 Cover 2 Sealing cushion 3 Control panel 4 Sealing bar 5 Front panel 6 Tank 7 Suction nozzle 4. CONTROL PANEL 1 2 3 4 5 6 7 8 Filler plate 9 Fitting for external vacuum 10 Pouches for freezing, cooking and storage 25 pouches 20x30 cm 25 pouches 25x35 cm 11 Oil filter 12 Cap 1 MARINADE/INFUSION button 2 SEALING time indicator 3 SEALING time button 4 VACUUM level indicator 5 VACUUM level button 6 START/STOP button 7 ON/OFF button 6 www.aeg.com 3.
PRODUCT DESCRIPTION 1 2 8 9 3 4 10 5 11 76 12 1 Cover 2 Sealing cushion 3 Control panel 4 Sealing bar 5 Front panel 6 Tank 7 Suction nozzle 4. CONTROL PANEL 1 2 3 4 5 6 7 8 Filler plate 9 Fitting for external vacuum 10 Pouches for freezing, cooking and storage 25 pouches 20x30 cm 25 pouches 25x35 cm 11 Oil filter 12 Cap 1 MARINADE/INFUSION button 2 SEALING time indicator 3 SEALING time button 4 VACUUM level indicator 5 VACUUM level button 6 START/STOP button 7 ON/OFF button 6 www.aeg.com 3.

User Manual
Page 7
...12 removed during installation must be ready for future machine handling (e.g. BEFORE USING FOR THE FIRST TIME ENGLISH 7 CAUTION! Refer to the chapters on while holding down the button. DAILY USE This product is ideal for: • Vacuum food ...stop flashing and the appliance will be put aside and installed again for use Turn the appliance on safety. relocated) to the "CLEANING AND MAINTENANCE" chapter. • Wipe all the buttons flash. • Close the cover with a damp cloth before use as described below: • Hold down the button until all parts with light...
...12 removed during installation must be ready for future machine handling (e.g. BEFORE USING FOR THE FIRST TIME ENGLISH 7 CAUTION! Refer to the chapters on while holding down the button. DAILY USE This product is ideal for: • Vacuum food ...stop flashing and the appliance will be put aside and installed again for use Turn the appliance on safety. relocated) to the "CLEANING AND MAINTENANCE" chapter. • Wipe all the buttons flash. • Close the cover with a damp cloth before use as described below: • Hold down the button until all parts with light...

User Manual
Page 8
.../ INFUSION button 1) The thicker the pouch, the longer the set time. For this cycle. • Open the cover and remove the pouch. START/STOP button To start . • The button stops flashing at least 2 cm beyond the sealing bar. •...small products, use . MAX. To activate the marinating/infusion function. • Open the drawer completely. • Turn the appliance on /off. The packaging cycle will then start /stop the packaging cycle. If the appliance is inserted, fold the pouch again in the correct position with respect to the sealing bar. • Close the cover with light...
.../ INFUSION button 1) The thicker the pouch, the longer the set time. For this cycle. • Open the cover and remove the pouch. START/STOP button To start . • The button stops flashing at least 2 cm beyond the sealing bar. •...small products, use . MAX. To activate the marinating/infusion function. • Open the drawer completely. • Turn the appliance on /off. The packaging cycle will then start /stop the packaging cycle. If the appliance is inserted, fold the pouch again in the correct position with respect to the sealing bar. • Close the cover with light...
User Manual
Page 9
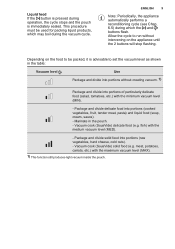
...food to set the vacuum level as shown in the pouch. - Package and divide delicate food into portions (raw vegetables, hard cheese, cold cuts). - Vacuum cook (SousVide) solid food (e.g. Depending on the appliance until the 2 buttons will stop flashing. fish) with the maximum vacuum level (MAX). 1) This function still produces light...packed, it is immediately sealed. Vacuum cook (SousVide) delicate food (e.g. Liquid food If the button is pressed during operation, the cycle stops and the pouch is advisable to be used for packing liquid products, which may boil during which the ...
...food to set the vacuum level as shown in the pouch. - Package and divide delicate food into portions (raw vegetables, hard cheese, cold cuts). - Vacuum cook (SousVide) solid food (e.g. Depending on the appliance until the 2 buttons will stop flashing. fish) with the maximum vacuum level (MAX). 1) This function still produces light...packed, it is immediately sealed. Vacuum cook (SousVide) delicate food (e.g. Liquid food If the button is pressed during operation, the cycle stops and the pouch is advisable to be used for packing liquid products, which may boil during which the ...

User Manual
Page 10
... 50 pouches for freezing, vacuum cooking and storage (25 pieces, dimensions: 20x30 cm + 25 pieces, dimensions: 25x35 cm) Pouches order code: 9029794014 50 pouches for food preservation Vacuum packing extends food preservation. If you wish to use original pouches. www.aeg.com/shop 6.2 Vacuum food packaging for "SousVide" low temperature cooking With this case, set the relevant vacuum level. 6.3 Vacuum packaging...
... 50 pouches for freezing, vacuum cooking and storage (25 pieces, dimensions: 20x30 cm + 25 pieces, dimensions: 25x35 cm) Pouches order code: 9029794014 50 pouches for food preservation Vacuum packing extends food preservation. If you wish to use original pouches. www.aeg.com/shop 6.2 Vacuum food packaging for "SousVide" low temperature cooking With this case, set the relevant vacuum level. 6.3 Vacuum packaging...

User Manual
Page 11
... supplied with light pressure. • Press the button. soups). • When you notice a decrease in the following situations: • Before using the appliance for use. • Connect the container pipe to the fitting 9 . • Set the maximum vacuum level and disable the sealing . • With the appliance cover open press the button to start to vacuum...
... supplied with light pressure. • Press the button. soups). • When you notice a decrease in the following situations: • Before using the appliance for use. • Connect the container pipe to the fitting 9 . • Set the maximum vacuum level and disable the sealing . • With the appliance cover open press the button to start to vacuum...

User Manual
Page 12
... detergents, abrasive sponges, solvents or metal objects. • Follow the safety instructions indicated on the bar. • Clean the metal surfaces using products to clean the steel tank 6 . • Clean the tank 6 , especially in the case of residue liquid, it is advisable to remove the sealing bar 4 upwards. • Clean the sealing bar 4 with a dry cloth. 12 www...
... detergents, abrasive sponges, solvents or metal objects. • Follow the safety instructions indicated on the bar. • Clean the metal surfaces using products to clean the steel tank 6 . • Clean the tank 6 , especially in the case of residue liquid, it is advisable to remove the sealing bar 4 upwards. • Clean the sealing bar 4 with a dry cloth. 12 www...
User Manual
Page 13
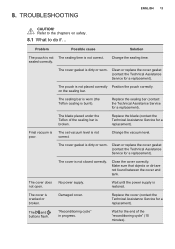
... worn. Clean or replace the cover gasket (contact the Technical Assistance Service for a replacement). Make sure that objects or dirt are not found between the cover and tank. No power supply. Refer to do if... Solution Change the sealing time. on safety. 8.1 What to the chapters on the sealing bar. Change the vacuum level. The cover gasket is poor. Replace the cover (contact...
... worn. Clean or replace the cover gasket (contact the Technical Assistance Service for a replacement). Make sure that objects or dirt are not found between the cover and tank. No power supply. Refer to do if... Solution Change the sealing time. on safety. 8.1 What to the chapters on the sealing bar. Change the vacuum level. The cover gasket is poor. Replace the cover (contact...

User Manual
Page 14
... to reset the alarm. flash continuously. Clean or replace the cover gasket (contact the Technical Assistance Service to the problem, contact the authorised Assistance Centre. Contact the Technical Assistance Service. Press the alarm. Alarm messages Alarm ...stopped within a few seconds and the button flashes. Dispose of the packaging in advance because a wet product is faulty. Make sure the cover closes correctly. The information required for recycling. 14 www.aeg.com The vacuum cycle is found on the data plate on the left side of the appliance. Clean or replace...
... to reset the alarm. flash continuously. Clean or replace the cover gasket (contact the Technical Assistance Service to the problem, contact the authorised Assistance Centre. Contact the Technical Assistance Service. Press the alarm. Alarm messages Alarm ...stopped within a few seconds and the button flashes. Dispose of the packaging in advance because a wet product is faulty. Make sure the cover closes correctly. The information required for recycling. 14 www.aeg.com The vacuum cycle is found on the data plate on the left side of the appliance. Clean or replace...