Specification Sheet
Page 1
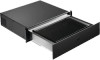
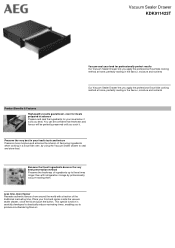
...home, perfectly sealing in your food's taste and texture Preserve more flavour Recreate authentic flavours from around the world with refrigeration storage by using the Vacuum Sealer drawer to ...moisture and nutrients Our Vacuum Sealer Drawer lets you to seal and store food. This special function is carefully developed to drastically reduce marinating times, enabling you apply the professional SousVide cooking...best. Place your food and spices inside the vacuum sealer drawer, close the lid and push the button. Vacuum Sealer Drawer KDK911423T Vacuum-seal your food for your meal when it ...
...home, perfectly sealing in your food's taste and texture Preserve more flavour Recreate authentic flavours from around the world with refrigeration storage by using the Vacuum Sealer drawer to ...moisture and nutrients Our Vacuum Sealer Drawer lets you to seal and store food. This special function is carefully developed to drastically reduce marinating times, enabling you apply the professional SousVide cooking...best. Place your food and spices inside the vacuum sealer drawer, close the lid and push the button. Vacuum Sealer Drawer KDK911423T Vacuum-seal your food for your meal when it ...

User Manual
Page 2
....aeg.com Register your appliance: www.aeg.com/shop CUSTOMER SERVICE AND MAINTENANCE We recommend always using original spare parts. TROUBLESHOOTING...13 9. Environmental information. CLEANING AND MAINTENANCE 12 8. ENVIRONMENTAL CONSIDERATIONS 17 FOR PERFECT RESULTS Thank you impeccable performance for your product and receive a better service: www.aeg.com/productregistration Purchase accessories, consumables and original spare parts for many years, with innovative technologies that help make...
....aeg.com Register your appliance: www.aeg.com/shop CUSTOMER SERVICE AND MAINTENANCE We recommend always using original spare parts. TROUBLESHOOTING...13 9. Environmental information. CLEANING AND MAINTENANCE 12 8. ENVIRONMENTAL CONSIDERATIONS 17 FOR PERFECT RESULTS Thank you impeccable performance for your product and receive a better service: www.aeg.com/productregistration Purchase accessories, consumables and original spare parts for many years, with innovative technologies that help make...

User Manual
Page 3
... vulnerable adults ••This appliance can install the appliance and replace the cables. ••Disconnect the appliance from the power supply before installing and using the appliance. Always keep the instructions available for improper installation and use abrasive detergents or metal scrapers to clean the appliance. ••If the power cord is damaged it must be ket...
... vulnerable adults ••This appliance can install the appliance and replace the cables. ••Disconnect the appliance from the power supply before installing and using the appliance. Always keep the instructions available for improper installation and use abrasive detergents or metal scrapers to clean the appliance. ••If the power cord is damaged it must be ket...

User Manual
Page 4
...removed from the fuse holder), earth fault current releases and relays. • The electric system must be installed by qualified personnel only. • Remove the packaging material. • Do not install or use the appliance if damaged. • Comply with the instructions supplied with the EEC directives. Otherwise, contact an electrician. • Always use multi-plug adapters or extension cables. • Make...every pole. If the power cable must be replaced, this should be carried out by a qualified electrician. • The appliance must be earthed. • Make sure that all the ...
...removed from the fuse holder), earth fault current releases and relays. • The electric system must be installed by qualified personnel only. • Remove the packaging material. • Do not install or use the appliance if damaged. • Comply with the instructions supplied with the EEC directives. Otherwise, contact an electrician. • Always use multi-plug adapters or extension cables. • Make...every pole. If the power cable must be replaced, this should be carried out by a qualified electrician. • The appliance must be earthed. • Make sure that all the ...

User Manual
Page 5
... appliance when you remove or insert the accessories. • Do not force the cover open during the work surface or as a work cycle. • Do not force the cover open the drawer. • Do not place or keep flammable liquids, materials or objects on the cover. • Prevent any maintenance operation, turn the appliance off after use original spare parts. 2.3 Use CAUTION! Risk of...
... appliance when you remove or insert the accessories. • Do not force the cover open during the work surface or as a work cycle. • Do not force the cover open the drawer. • Do not place or keep flammable liquids, materials or objects on the cover. • Prevent any maintenance operation, turn the appliance off after use original spare parts. 2.3 Use CAUTION! Risk of...

User Manual
Page 6
PRODUCT DESCRIPTION 1 2 8 9 3 4 10 5 11 76 12 1 Cover 2 Sealing cushion 3 Control panel 4 Sealing bar 5 Front panel 6 Tank 7 Suction nozzle 4. 6 www.aeg.com 3. CONTROL PANEL 1 2 3 4 5 6 7 8 Filler plate 9 Fitting for external vacuum 10 Pouches for freezing, cooking and storage 25 pouches 20x30 cm 25 pouches 25x35 cm 11 Oil filter 12 Cap 1 MARINADE/INFUSION button 2 SEALING time indicator 3 SEALING time button 4 VACUUM level indicator 5 VACUUM level button 6 START/STOP button 7 ON/OFF button
PRODUCT DESCRIPTION 1 2 8 9 3 4 10 5 11 76 12 1 Cover 2 Sealing cushion 3 Control panel 4 Sealing bar 5 Front panel 6 Tank 7 Suction nozzle 4. 6 www.aeg.com 3. CONTROL PANEL 1 2 3 4 5 6 7 8 Filler plate 9 Fitting for external vacuum 10 Pouches for freezing, cooking and storage 25 pouches 20x30 cm 25 pouches 25x35 cm 11 Oil filter 12 Cap 1 MARINADE/INFUSION button 2 SEALING time indicator 3 SEALING time button 4 VACUUM level indicator 5 VACUUM level button 6 START/STOP button 7 ON/OFF button
User Manual
Page 7
... the "CLEANING AND MAINTENANCE" chapter. • Wipe all parts with the appliance. Otherwise run the release procedure (see installation instructions - CAUTION! 5. DAILY USE This product is ideal for: • Vacuum food packaging for "SousVide" low temperature cooking. • Vacuum packaging for future assistance. 5.2 First use . 6. The plastic cap 12 removed during installation must be kept for food preservation. • Food marinade...
... the "CLEANING AND MAINTENANCE" chapter. • Wipe all parts with the appliance. Otherwise run the release procedure (see installation instructions - CAUTION! 5. DAILY USE This product is ideal for: • Vacuum food packaging for "SousVide" low temperature cooking. • Vacuum packaging for future assistance. 5.2 First use . 6. The plastic cap 12 removed during installation must be kept for food preservation. • Food marinade...

User Manual
Page 8
...; Lift the cover and place the pouch containing the food to guarantee a perfect seal. MAX. To activate the marinating/infusion function. • Open the drawer completely. • Turn the appliance on /off. The preset value is not used for 60 minutes it helps position the pouch in its initial condition. • For small products, use . If...
...; Lift the cover and place the pouch containing the food to guarantee a perfect seal. MAX. To activate the marinating/infusion function. • Open the drawer completely. • Turn the appliance on /off. The preset value is not used for 60 minutes it helps position the pouch in its initial condition. • For small products, use . If...

User Manual
Page 9
... into portions of glass jars (see par. 6.6) during which may boil during operation, the cycle stops and the pouch is advisable to set the vacuum level as shown in the pouch. - Vacuum cook (SousVide) solid food (e.g. ENGLISH 9 Note: Periodically, the appliance automatically performs a reconditioning cycle (see par. 6.5). 1) This function still produces light vacuum inside the pouch...
... into portions of glass jars (see par. 6.6) during which may boil during operation, the cycle stops and the pouch is advisable to set the vacuum level as shown in the pouch. - Vacuum cook (SousVide) solid food (e.g. ENGLISH 9 Note: Periodically, the appliance automatically performs a reconditioning cycle (see par. 6.5). 1) This function still produces light vacuum inside the pouch...

User Manual
Page 10
... and storage (25 pieces, dimensions: 20x30 cm + 25 pieces, dimensions: 25x35 cm) Pouches order code: 9029794014 50 pouches for at low temperature. 10 www.aeg.com 6.1 Using the pouches The pouches provided are preserved. • You don't need to add oils or fats for cooking. 6.4 Marinades/infusion • Place the food with light pressure. • Press the button to start...
... and storage (25 pieces, dimensions: 20x30 cm + 25 pieces, dimensions: 25x35 cm) Pouches order code: 9029794014 50 pouches for at low temperature. 10 www.aeg.com 6.1 Using the pouches The pouches provided are preserved. • You don't need to add oils or fats for cooking. 6.4 Marinades/infusion • Place the food with light pressure. • Press the button to start...

User Manual
Page 11
... sealing . • With the appliance cover open press the button to start to flash. This button will start the packaging cycle. 6.5 Additional functions "Airtight sealing of glass jars" This is to be used to eliminate the air inside the tank. The packaging cycle will then start to flash. • The button stops flashing at the end of...
... sealing . • With the appliance cover open press the button to start to flash. This button will start the packaging cycle. 6.5 Additional functions "Airtight sealing of glass jars" This is to be used to eliminate the air inside the tank. The packaging cycle will then start to flash. • The button stops flashing at the end of...
User Manual
Page 12
... panel clean and dry. Refer to clean the steel tank 6 . • Clean the tank 6 , especially in the case of the pump, removing any liquid emulsion that deposits on safety. • Clean the appliance after each use . 7. The and buttons flash while the program runs. • At the end of the cycle (15 minutes) the button will stop flashing...
... panel clean and dry. Refer to clean the steel tank 6 . • Clean the tank 6 , especially in the case of the pump, removing any liquid emulsion that deposits on safety. • Clean the appliance after each use . 7. The and buttons flash while the program runs. • At the end of the cycle (15 minutes) the button will stop flashing...
User Manual
Page 13
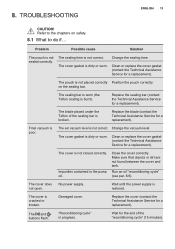
... the power supply is not correct. The sealing bar is worn (the Teflon coating is not closed correctly. Change the vacuum level. Make sure that objects or dirt are not found between the cover and tank. Replace the cover (contact the Technical Assistance Service for a replacement). The and buttons flash. TROUBLESHOOTING ENGLISH 13 CAUTION! Change the sealing time. Clean or replace the cover...
... the power supply is not correct. The sealing bar is worn (the Teflon coating is not closed correctly. Change the vacuum level. Make sure that objects or dirt are not found between the cover and tank. Replace the cover (contact the Technical Assistance Service for a replacement). The and buttons flash. TROUBLESHOOTING ENGLISH 13 CAUTION! Change the sealing time. Clean or replace the cover...
User Manual
Page 14
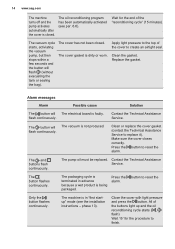
...). Make sure the cover closes correctly. The and buttons flash continuously. Contact the Technical Assistance Service. Press the alarm. Close the cover with light pressure and press the button. The vacuum cycle starts, activiating the vacuum pump, but then stops within a few seconds and the button will The vacuum is not produced. The pump oil must be replaced...
...). Make sure the cover closes correctly. The and buttons flash continuously. Contact the Technical Assistance Service. Press the alarm. Close the cover with light pressure and press the button. The vacuum cycle starts, activiating the vacuum pump, but then stops within a few seconds and the button will The vacuum is not produced. The pump oil must be replaced...

User Manual
Page 15
... or its ASC may use remanufactured of the Appliance; product purchased by you require service for AEG Appliances. FOR SALES IN AUSTRALIA AND NEW g) 'Warranty Period' means ZEALAND the Appliance is warranted ALL AEG BRANDED APPLIANCES This document sets out the terms and ...and includes a will , at its discretion, to repair your ' has a 1. It is to the problem, contact the authorised Assistance Centre. 9. representative; accessible for service, without e) AEG is the brand controlled by law, you to light globes, batteries, filters Appliances purchased in a safe ...
... or its ASC may use remanufactured of the Appliance; product purchased by you require service for AEG Appliances. FOR SALES IN AUSTRALIA AND NEW g) 'Warranty Period' means ZEALAND the Appliance is warranted ALL AEG BRANDED APPLIANCES This document sets out the terms and ...and includes a will , at its discretion, to repair your ' has a 1. It is to the problem, contact the authorised Assistance Centre. 9. representative; accessible for service, without e) AEG is the brand controlled by law, you to light globes, batteries, filters Appliances purchased in a safe ...

User Manual
Page 16
... purposes the Consumer Guarantee to comply with a guarantee -- warranty, please follow these steps: c) the Appliance's serial number a) carefully check the operating or warranty seal has been instructions, user manual and removed or defaced; Electrolux is damaged by the law applicable 14. a) the Appliance is replaced if the Appliance fails to and from 13. power surges, electrical Period, Electrolux shall, at the owner...
... purposes the Consumer Guarantee to comply with a guarantee -- warranty, please follow these steps: c) the Appliance's serial number a) carefully check the operating or warranty seal has been instructions, user manual and removed or defaced; Electrolux is damaged by the law applicable 14. a) the Appliance is replaced if the Appliance fails to and from 13. power surges, electrical Period, Electrolux shall, at the owner...

User Manual
Page 17
... spare parts centre in New Zealand FREE CALL 0800 10 66 10 OR EMAIL [email protected] (New Zealand only) FOR SPARE PARTS or to your local recycling facility or contact your nearest authorised service centre in New Zealand FREE CALL 0800 10 66 20 OR EMAIL [email protected] (New Zealand only) 10. SERVICE AUSTRALIA www.aeg.com/au FOR SERVICE...
... spare parts centre in New Zealand FREE CALL 0800 10 66 10 OR EMAIL [email protected] (New Zealand only) FOR SPARE PARTS or to your local recycling facility or contact your nearest authorised service centre in New Zealand FREE CALL 0800 10 66 20 OR EMAIL [email protected] (New Zealand only) 10. SERVICE AUSTRALIA www.aeg.com/au FOR SERVICE...