Product Manual
Page 2
... INSTRUCTIONS 4 3. PRODUCT DESCRIPTION 6 4. GUARANTEE/CUSTOMER SERVICE 39 16. 2 www.aeg.com CONTENTS 1. CONTROL PANEL 7 6. ADDITIONAL FUNCTIONS 17 11. GREAT BRITAIN & IRELAND - features you for your appliance: www.aeg.com/shop CUSTOMER CARE AND SERVICE We recommend the use of original spare parts. Visit our website for: Get usage advice, brochures, trouble shooter, service information: www.aeg.com Register your product for better service: www.aeg.com/productregistration Buy Accessories, Consumables...
... INSTRUCTIONS 4 3. PRODUCT DESCRIPTION 6 4. GUARANTEE/CUSTOMER SERVICE 39 16. 2 www.aeg.com CONTENTS 1. CONTROL PANEL 7 6. ADDITIONAL FUNCTIONS 17 11. GREAT BRITAIN & IRELAND - features you for your appliance: www.aeg.com/shop CUSTOMER CARE AND SERVICE We recommend the use of original spare parts. Visit our website for: Get usage advice, brochures, trouble shooter, service information: www.aeg.com Register your product for better service: www.aeg.com/productregistration Buy Accessories, Consumables...
Product Manual
Page 3
... are supervised by children without supervision. 1.2 General Safety • Only a qualified person must install this appliance and replace the cable. • Internally the appliance becomes hot when in accessories or ovenware. • Do not use causes injuries and damages. Always use oven gloves to clean the appliance. • Before maintenance cut the power supply. Risk of suffocation, injury or permanent disability...
... are supervised by children without supervision. 1.2 General Safety • Only a qualified person must install this appliance and replace the cable. • Internally the appliance becomes hot when in accessories or ovenware. • Do not use causes injuries and damages. Always use oven gloves to clean the appliance. • Before maintenance cut the power supply. Risk of suffocation, injury or permanent disability...

Product Manual
Page 4
...: line protecting cut-outs, fuses (screw type fuses removed from the other appliances and units. • Make sure that there is access to the mains plug after the installation. • If the mains socket is heavy. SAFETY INSTRUCTIONS 2.1 Installation WARNING! ance. • Obey the installation instruction sup- 4 www.aeg.com • Do not use harsh abrasive cleaners or sharp metal scrapers to clean the glass door...
...: line protecting cut-outs, fuses (screw type fuses removed from the other appliances and units. • Make sure that there is access to the mains plug after the installation. • If the mains socket is heavy. SAFETY INSTRUCTIONS 2.1 Installation WARNING! ance. • Obey the installation instruction sup- 4 www.aeg.com • Do not use harsh abrasive cleaners or sharp metal scrapers to clean the glass door...
Product Manual
Page 5
... or electric shock or explosion. • Use this appliance in a household environment. • Do not change the specification of this appliance, is in operation. be permanent. 2.3 Care and Cleaning WARNING! It is in operation. • Open the appliance door carefully. Risk of injury, fire or damage to prevent the deterioration of the surface material. • Remaining fat or food in the appliance directly...
... or electric shock or explosion. • Use this appliance in a household environment. • Do not change the specification of this appliance, is in operation. be permanent. 2.3 Care and Cleaning WARNING! It is in operation. • Open the appliance door carefully. Risk of injury, fire or damage to prevent the deterioration of the surface material. • Remaining fat or food in the appliance directly...
Product Manual
Page 6
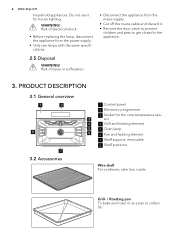
... same specifications. 2.5 Disposal WARNING! WARNING! sor 4 Grill and heating element 5 Oven lamp 6 Fan and heating element 7 Shelf support, removable 8 Shelf positions Wire shelf For cookware, cake tins, roasts. Grill- / Roasting pan To bake and roast or as a pan to get closed in the appliance. 3. 6 www.aeg.com household appliances. Risk of electrical shock. • Before replacing the lamp, disconnect the appliance from the mains supply. • Cut off...
... same specifications. 2.5 Disposal WARNING! WARNING! sor 4 Grill and heating element 5 Oven lamp 6 Fan and heating element 7 Shelf support, removable 8 Shelf positions Wire shelf For cookware, cake tins, roasts. Grill- / Roasting pan To bake and roast or as a pan to get closed in the appliance. 3. 6 www.aeg.com household appliances. Risk of electrical shock. • Before replacing the lamp, disconnect the appliance from the mains supply. • Cut off...
Product Manual
Page 7
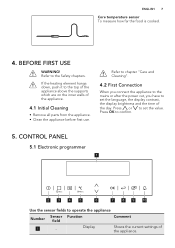
.... CONTROL PANEL 5.1 Electronic programmer 1 2 3 4 5 6 7 89 10 Use the sensor fields to the top of the appliance above the supports which are on the inner walls of the appliance. ENGLISH 7 Core temperature sensor To measure how far the food is cooked. 4. If the heating element hangs down, push it to operate the appliance Number Sensor field Function Comment 1 - Press or to confirm. 5. Display Shows...
.... CONTROL PANEL 5.1 Electronic programmer 1 2 3 4 5 6 7 89 10 Use the sensor fields to the top of the appliance above the supports which are on the inner walls of the appliance. ENGLISH 7 Core temperature sensor To measure how far the food is cooked. 4. If the heating element hangs down, push it to operate the appliance Number Sensor field Function Comment 1 - Press or to confirm. 5. Display Shows...
Product Manual
Page 9
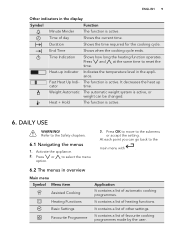
... reset the time. It decreases the heat up indicator Indicates the temperature level in overview Main menu Symbol Menu item Assisted Cooking Heating Functions Basic Settings Favourite Programme Application It contains a list of automatic cooking programmes. It contains a list of heating functions. It contains a list of day Shows the current time. Time of favourite cooking programmes made by the user. At each point you can be changed. Press and at the same time...
... reset the time. It decreases the heat up indicator Indicates the temperature level in overview Main menu Symbol Menu item Assisted Cooking Heating Functions Basic Settings Favourite Programme Application It contains a list of automatic cooking programmes. It contains a list of heating functions. It contains a list of day Shows the current time. Time of favourite cooking programmes made by the user. At each point you can be changed. Press and at the same time...

Product Manual
Page 10
... Day Time Indication SET + GO Heat + Hold Extra time Display Contrast Display Brightness Set Language Buzzer Volume Key Tones Alarm/Error Tones Service Factory Settings Description It sets the current time on the clock. It activates and deactivates the alarm tones. 10 www.aeg.com Submenus for: Basic Settings Symbol Submenu Set Time of the ON / OFF touch field. Set the temperature 20 - 40 °C lower than for : Heating Functions Heating function True Fan Cooking Pizza Setting...
... Day Time Indication SET + GO Heat + Hold Extra time Display Contrast Display Brightness Set Language Buzzer Volume Key Tones Alarm/Error Tones Service Factory Settings Description It sets the current time on the clock. It activates and deactivates the alarm tones. 10 www.aeg.com Submenus for: Basic Settings Symbol Submenu Set Time of the ON / OFF touch field. Set the temperature 20 - 40 °C lower than for : Heating Functions Heating function True Fan Cooking Pizza Setting...
Product Manual
Page 12
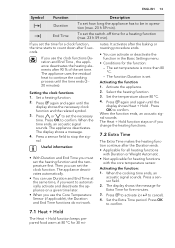
.... 2. Press to go directly to confirm. 3. For this feature to keep food warm. You can use the clock functions ( Duration , End Time ). - Select the Heating Functions menu. The heat-up time. The display shows the remaining temperature. • Cooking with the equivalent heating function. 6.4 Activating a heating function 1. Press OK to the Heating Functions menu. When the heating function or programme operates, the heating elements are deactivated 10% earlier (the lamp and fan continue to activate the...
.... 2. Press to go directly to confirm. 3. For this feature to keep food warm. You can use the clock functions ( Duration , End Time ). - Select the Heating Functions menu. The heat-up time. The display shows the remaining temperature. • Cooking with the equivalent heating function. 6.4 Activating a heating function 1. Press OK to the Heating Functions menu. When the heating function or programme operates, the heating elements are deactivated 10% earlier (the lamp and fan continue to activate the...
Product Manual
Page 13
... appliance on if you change the heating functions. 7.2 Extra Time The Extra Time makes the heating function continue after the Duration ends. • Applicable for all heating functions with Duration or Weight Automatic . • Not applicable for heating functions with the core temperature sensor. The appliance uses the residual heat to confirm. Set a heating function. 2. Press again and again until the display shows the necessary clock function and the related...
... appliance on if you change the heating functions. 7.2 Extra Time The Extra Time makes the heating function continue after the Duration ends. • Applicable for all heating functions with Duration or Weight Automatic . • Not applicable for heating functions with the core temperature sensor. The appliance uses the residual heat to confirm. Set a heating function. 2. Press again and again until the display shows the necessary clock function and the related...

Product Manual
Page 15
... set : • The oven temperature • The core temperature Only use the core temperature sensor supplied or the correct replacement parts. Put the plug of the core temperature sensor into the centre of burns. The end time is at the set oven temperatures (minimum 120 °C) and the operating modes. The appliance calculates an approximate end time. Press a sensor field to stop the signal. 7. Using the core temperature sensor: 1. The display...
... set : • The oven temperature • The core temperature Only use the core temperature sensor supplied or the correct replacement parts. Put the plug of the core temperature sensor into the centre of burns. The end time is at the set oven temperatures (minimum 120 °C) and the operating modes. The appliance calculates an approximate end time. Press a sensor field to stop the signal. 7. Using the core temperature sensor: 1. The display...
Product Manual
Page 17
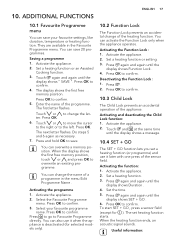
... the display shows " SAVE ". Set a heating function or an Assisted Cooking function. 3. Press OK to overwrite an existing programme. Touch and at the same time until the display shows a message. 10.4 SET + GO The SET + GO function lets you set heating function starts. To start SET + GO , press a sensor field (except for selected models only). 10.2 Function Lock The Function Lock prevents an accidental change the letter. When the display shows the first free memory...
... the display shows " SAVE ". Set a heating function or an Assisted Cooking function. 3. Press OK to overwrite an existing programme. Touch and at the same time until the display shows a message. 10.4 SET + GO The SET + GO function lets you set heating function starts. To start SET + GO , press a sensor field (except for selected models only). 10.2 Function Lock The Function Lock prevents an accidental change the letter. When the display shows the first free memory...
Product Manual
Page 18
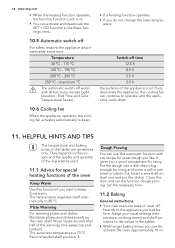
... big enough for rising. Close the door and set the function dough proving. The temperature regulates itself automatically to keep • If a heating function operates. • If you had before. Insert a wire shelf on level one and put the dish in the Basic Settings menu. 10.5 Automatic switch-off time 12.5 h 8.5 h 5.5 h 3.0 h the surfaces of the oven Keep Warm Use this automatic function with a wet towel or plastic foil...
... big enough for rising. Close the door and set the function dough proving. The temperature regulates itself automatically to keep • If a heating function operates. • If you had before. Insert a wire shelf on level one and put the dish in the Basic Settings menu. 10.5 Automatic switch-off time 12.5 h 8.5 h 5.5 h 3.0 h the surfaces of the oven Keep Warm Use this automatic function with a wet towel or plastic foil...
Product Manual
Page 19
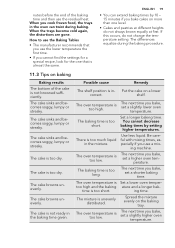
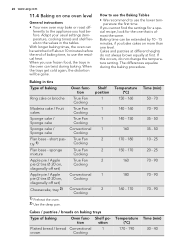
... different heights do not change the temperature setting. The next time you cook frozen food, the trays in - nutes before the end of the baking time and then use the lower temperature the first time. • If you bake cakes on baking Baking results The bottom of the cake is not browned sufficiently. When you bake, set a slightly higher oven temperature. How to use the Baking Tables • The...
... different heights do not change the temperature setting. The next time you cook frozen food, the trays in - nutes before the end of the baking time and then use the lower temperature the first time. • If you bake cakes on baking Baking results The bottom of the cake is not browned sufficiently. When you bake, set a slightly higher oven temperature. How to use the Baking Tables • The...
Product Manual
Page 20
... set) Cheesecake, tray 2) Convectional 2 Cooking 1) Preheat the oven. 2) Use the deep pan. sponge True Fan 2 mixture Cooking Apple pie / Apple True Fan 2 pie (2 tins Ø 20 cm, Cooking diagonally off set) Apple pie / Apple Convectional 1 pie (2 tins Ø 20 cm, Cooking diagonally off about 10 minutes before . Baking time can twist during the baking procedure. Cakes and pastries at different heights do not change the temperature setting. Adapt your usual settings (temperature, cooking times...
... set) Cheesecake, tray 2) Convectional 2 Cooking 1) Preheat the oven. 2) Use the deep pan. sponge True Fan 2 mixture Cooking Apple pie / Apple True Fan 2 pie (2 tins Ø 20 cm, Cooking diagonally off set) Apple pie / Apple Convectional 1 pie (2 tins Ø 20 cm, Cooking diagonally off about 10 minutes before . Baking time can twist during the baking procedure. Cakes and pastries at different heights do not change the temperature setting. Adapt your usual settings (temperature, cooking times...
Product Manual
Page 32
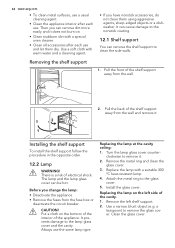
... . There is a risk of electrical shock. Always use the same lamp type. Use a narrow, blunt object (e.g. Turn the lamp glass cover counterclockwise to the lamp glass cover and the cavity. Use a soft cloth with a suitable 300 °C heat-resistant lamp. 4. 32 www.aeg.com • To clean metal surfaces, use a usual cleaning agent. • Clean the appliance interior after each use. Removing the shelf support 1. Before you have nonstick...
... . There is a risk of electrical shock. Always use the same lamp type. Use a narrow, blunt object (e.g. Turn the lamp glass cover counterclockwise to the lamp glass cover and the cavity. Use a soft cloth with a suitable 300 °C heat-resistant lamp. 4. 32 www.aeg.com • To clean metal surfaces, use a usual cleaning agent. • Clean the appliance interior after each use. Removing the shelf support 1. Before you have nonstick...
Product Manual
Page 34
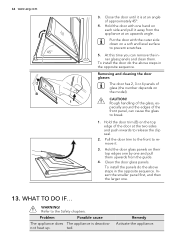
...! WARNING! Refer to prevent scratches. 5. Problem Possible cause The appliance does The appliance is at the two sides and push inwards to remove it away from the guide. 4. 34 www.aeg.com 45° 2 B 1 3. Hold the door with the outer side down on the model). To install the door do the above steps in the opposite sequence. Clean the door glass panels.
...! WARNING! Refer to prevent scratches. 5. Problem Possible cause The appliance does The appliance is at the two sides and push inwards to remove it away from the guide. 4. 34 www.aeg.com 45° 2 B 1 3. Hold the door with the outer side down on the model). To install the door do the above steps in the opposite sequence. Clean the door glass panels.

Product Manual
Page 35
... - The cable used to connect the oven to the electrical supply must meet the stability requirements of core temperature sensor as far as follows: Connection via Min. The appliance does The necessary settings are Check the settings. operate. The built-in unit must comply to "Activating and not heat up . size Cable/ flex Cooker Control Circuit 2,5 mm² Letter L - ENGLISH 35 Problem Possible cause Remedy...
... - The cable used to connect the oven to the electrical supply must meet the stability requirements of core temperature sensor as far as follows: Connection via Min. The appliance does The necessary settings are Check the settings. operate. The built-in unit must comply to "Activating and not heat up . size Cable/ flex Cooker Control Circuit 2,5 mm² Letter L - ENGLISH 35 Problem Possible cause Remedy...
Product Manual
Page 39
... resulting from transport, improper use, neglect, light bulbs, removable parts of glass, plastic. • Costs for calls to put right appliance which are not marketed by us. • Electrolux Service Force Centre must undertake all service work under this guarantee • Any appliance or defective part replaced shall become the Company's property. • This guarantee is improperly installed, calls to appliances outside...
... resulting from transport, improper use, neglect, light bulbs, removable parts of glass, plastic. • Costs for calls to put right appliance which are not marketed by us. • Electrolux Service Force Centre must undertake all service work under this guarantee • Any appliance or defective part replaced shall become the Company's property. • This guarantee is improperly installed, calls to appliances outside...

Product Manual
Page 40
... receipt or guarantee documentation is installed and used in accordance with all relevant regulations in force within the home, i.e. is not used within your telephone number, clear concise details of the fault, model and serial number of the appliance (found on the rating plate), the purchase date. EUROPEAN GUARANTEE GB This appliance is only used for commercial purposes. • The...
... receipt or guarantee documentation is installed and used in accordance with all relevant regulations in force within the home, i.e. is not used within your telephone number, clear concise details of the fault, model and serial number of the appliance (found on the rating plate), the purchase date. EUROPEAN GUARANTEE GB This appliance is only used for commercial purposes. • The...


