Specification Sheet
Page 1
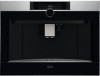
...range of coffee at once. Integrated Coffee Machine KKK994500M Italian espresso style coffee at the ideal conditions for the perfect foam, allowing the consistency to be adjusted to suit any coffee - Every time The high-pressure steamer heats... and foams milk to the ideal consistency for any taste. • Multi-cup jug • Uses fresh coffee beans or ground coffee. • Removable water tank • Height adjustable coffee dispenser • Drip... teas and other hot drinks. Perfectly prepared...
...range of coffee at once. Integrated Coffee Machine KKK994500M Italian espresso style coffee at the ideal conditions for the perfect foam, allowing the consistency to be adjusted to suit any coffee - Every time The high-pressure steamer heats... and foams milk to the ideal consistency for any taste. • Multi-cup jug • Uses fresh coffee beans or ground coffee. • Removable water tank • Height adjustable coffee dispenser • Drip... teas and other hot drinks. Perfectly prepared...
User Manual
Page 2
... advice, brochures, trouble shooter, service information: www.aeg.com/webselfservice Register your product for better service: www.registeraeg.com Buy Accessories, Consumables and Original spare parts for your appliance: www.aeg.com/shop CUSTOMER CARE AND SERVICE Always use original spare parts. When contacting our Authorised Service Centre, ensure that help make life simpler features you have created it . CONTROL PANEL...7 5. DESCALING...19 12. SETTING WATER HARDNESS...
... advice, brochures, trouble shooter, service information: www.aeg.com/webselfservice Register your product for better service: www.registeraeg.com Buy Accessories, Consumables and Original spare parts for your appliance: www.aeg.com/shop CUSTOMER CARE AND SERVICE Always use original spare parts. When contacting our Authorised Service Centre, ensure that help make life simpler features you have created it . CONTROL PANEL...7 5. DESCALING...19 12. SETTING WATER HARDNESS...
User Manual
Page 3
... use . Clean all the components thoroughly, taking particular care with parts in a safe way and if they are older than 8 years. Keep the appliance and its cord out of the reach of the appliance, carefully read the supplied instructions. SAFETY INFORMATION Before the installation and use of experience and knowledge, unless they understand the hazard involved. The surface of the heating element remains hot...
... use . Clean all the components thoroughly, taking particular care with parts in a safe way and if they are older than 8 years. Keep the appliance and its cord out of the reach of the appliance, carefully read the supplied instructions. SAFETY INFORMATION Before the installation and use of experience and knowledge, unless they understand the hazard involved. The surface of the heating element remains hot...
User Manual
Page 4
... the appliance. by clients in hotels, motels and other working environments; Appliances with glass surfaces: do not use alkaline cleaning agents when cleaning, use a soft cloth and a mild detergent. This is present in a safe way and understand the hazards involved. WARNING: Models with removable cord: avoid splashes of water on the power cord connector or socket at the back of the appliance...
... the appliance. by clients in hotels, motels and other working environments; Appliances with glass surfaces: do not use alkaline cleaning agents when cleaning, use a soft cloth and a mild detergent. This is present in a safe way and understand the hazards involved. WARNING: Models with removable cord: avoid splashes of water on the power cord connector or socket at the back of the appliance...
User Manual
Page 5
... contact Customer Services. Make sure the appliance is out of the appliance. This appliance is not suitable for example) in operation. The appliance has a cooling fan. Connect the appliance to the value indicated on the rating plate on whenever coffee, steam or hot water is freely acces- sible at the rear (maximum microwave power: 3 kW). 2.2 Instructions Read these instructions. Keep all times, enabling...
... contact Customer Services. Make sure the appliance is out of the appliance. This appliance is not suitable for example) in operation. The appliance has a cooling fan. Connect the appliance to the value indicated on the rating plate on whenever coffee, steam or hot water is freely acces- sible at the rear (maximum microwave power: 3 kW). 2.2 Instructions Read these instructions. Keep all times, enabling...
User Manual
Page 6
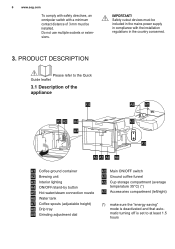
... funnel A12 Cup storage compartment (average temperature 35°C) (*) A13 Accessories compartment (left/right) (*) make sure the "energy saving" mode is deactivated and that automatic turning off is set to at least 1.5 hours Do not use multiple sockets or extensions. IMPORTANT! 6 www.aeg.com To comply with safety directives, an omnipolar switch with the installation regulations in the country concerned. 3.
... funnel A12 Cup storage compartment (average temperature 35°C) (*) A13 Accessories compartment (left/right) (*) make sure the "energy saving" mode is deactivated and that automatic turning off is set to at least 1.5 hours Do not use multiple sockets or extensions. IMPORTANT! 6 www.aeg.com To comply with safety directives, an omnipolar switch with the installation regulations in the country concerned. 3.
User Manual
Page 8
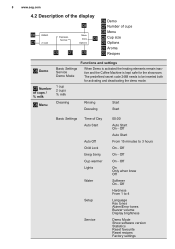
... C7 Number of cups / % milk C8 Menu Functions and settings Basic Settings Service Demo Mode When Demo is activated the heating elements remain inactive and the Coffee Machine is kept safe for activating and deactivating the demo mode. 1 cup 2 cups % milk Cleaning Rinsing Descaling Start Start Basic Settings Time of Day Auto Start Auto Off Child Lock Energy Saving Cup warmer Lights Water Setup Service 00:00 Auto Start On...
... C7 Number of cups / % milk C8 Menu Functions and settings Basic Settings Service Demo Mode When Demo is activated the heating elements remain inactive and the Coffee Machine is kept safe for activating and deactivating the demo mode. 1 cup 2 cups % milk Cleaning Rinsing Descaling Start Start Basic Settings Time of Day Auto Start Auto Off Child Lock Energy Saving Cup warmer Lights Water Setup Service 00:00 Auto Start On...
User Manual
Page 10
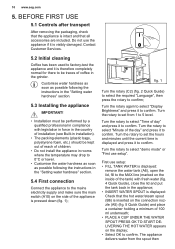
Contact Customer Services. 5.2 Initial cleaning Coffee has been used to factory-test the appliance and it is visibly damaged. fig. 1 Turn the rotary (C2) (fig. 2 Quick Guide) to select the required "Language", then press the rotary to the mains electricity supply and make sure the main switch (A10) on the side of the appliance is inserted on the connection nozzle (A5) (fig...
Contact Customer Services. 5.2 Initial cleaning Coffee has been used to factory-test the appliance and it is visibly damaged. fig. 1 Turn the rotary (C2) (fig. 2 Quick Guide) to select the required "Language", then press the rotary to the mains electricity supply and make sure the main switch (A10) on the side of the appliance is inserted on the connection nozzle (A5) (fig...
User Manual
Page 11
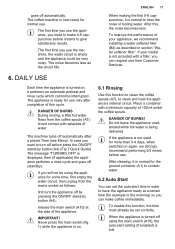
... 5-6 cappuccinos, it is on. 6.1 Rinsing Use this cycle. After this function, the time must already be interrupted. release the main switch (A10) at a certain time (for more than 3-4 days, when switched on , it starts to make coffee immediately. The first time you can request one from Customer Services. 6. DANGER OF BURNS During rinsing, a little hot water flows from the mains socket...
... 5-6 cappuccinos, it is on. 6.1 Rinsing Use this cycle. After this function, the time must already be interrupted. release the main switch (A10) at a certain time (for more than 3-4 days, when switched on , it starts to make coffee immediately. The first time you can request one from Customer Services. 6. DANGER OF BURNS During rinsing, a little hot water flows from the mains socket...
User Manual
Page 13
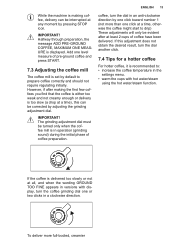
... using the hot water/steam function. To deliver more than one click at a time, otherwise the coffee might start to : • increase the coffee temperature in operation (grinding sound) during the initial phase of pre-ground coffee and press START. 7.3 Adjusting the coffee mill The coffee mill is displayed. Add one or two clicks in an anti-clockwise direction by adjusting the grinding adjustment...
... using the hot water/steam function. To deliver more than one click at a time, otherwise the coffee might start to : • increase the coffee temperature in operation (grinding sound) during the initial phase of pre-ground coffee and press START. 7.3 Adjusting the coffee mill The coffee mill is displayed. Add one or two clicks in an anti-clockwise direction by adjusting the grinding adjustment...
User Manual
Page 14
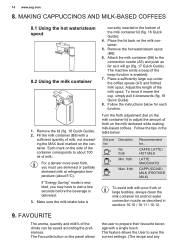
... settings. (The recipe and any 14 www.aeg.com 8. Place the lid back on the milk delivered while making milk-based coffees. Remove the lid (fig. 16 Quick Guide); 2. Fill the milk container (B8) with poor froth or large bubbles, always clean the milk container lid and hot water connection nozzle as it downwards (fig. 18 Quick Guide). 8. Adjust...
... settings. (The recipe and any 14 www.aeg.com 8. Place the lid back on the milk delivered while making milk-based coffees. Remove the lid (fig. 16 Quick Guide); 2. Fill the milk container (B8) with poor froth or large bubbles, always clean the milk container lid and hot water connection nozzle as it downwards (fig. 18 Quick Guide). 8. Adjust...
User Manual
Page 15
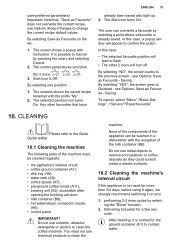
... (A11); • brewing unit (A2), accessible after opening the brewing unit door; • milk container (B8); • hot water/steam connection nozzle (A5); • control panel. see Options: Save as Favourite - After cleaning, it on the list: 1. It is not used for more than 3/4 days, before using it again, we strongly recommend switching it is normal for a few seconds. By selecting...
... (A11); • brewing unit (A2), accessible after opening the brewing unit door; • milk container (B8); • hot water/steam connection nozzle (A5); • control panel. see Options: Save as Favourite - After cleaning, it on the list: 1. It is not used for more than 3/4 days, before using it again, we strongly recommend switching it is normal for a few seconds. By selecting...
User Manual
Page 16
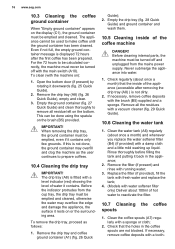
...) and whenever you replace the water softener filter (B4) (if provided) with a tooth- The appliance cannot be used to be calculated correctly, the machine must be turned off with the machine on the brush (B5) provided. Remove the drip tray (A8) (fig. 26 Quick Guide), empty and clean. 3. Before the indicator protrudes from the mains power supply. Check regularly (about...
...) and whenever you replace the water softener filter (B4) (if provided) with a tooth- The appliance cannot be used to be calculated correctly, the machine must be turned off with the machine on the brush (B5) provided. Remove the drip tray (A8) (fig. 26 Quick Guide), empty and clean. 3. Before the indicator protrudes from the mains power supply. Check regularly (about...
User Manual
Page 19
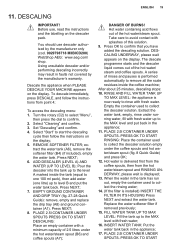
...the hot water/steam spout (B6) and coffee spouts (A7); Select "Cleaning" and confirm. 3. Set "Descaling" and confirm. 4. REMOVE SOFTENER FILTER; The descale programme starts and the descaler liquid comes out of this solution. 9. PRESS OK TO START RINSING: Place the container used to... solution. Before use descaler authorised by the manufacturer's warranty. You should use , read the instructions and the labelling on the display; 5. Descale the appliance when PLEASE DESCALE YOUR MACHINE appears on the display. To access the descaling menu: 1. Turn the rotary (C2...
...the hot water/steam spout (B6) and coffee spouts (A7); Select "Cleaning" and confirm. 3. Set "Descaling" and confirm. 4. REMOVE SOFTENER FILTER; The descale programme starts and the descaler liquid comes out of this solution. 9. PRESS OK TO START RINSING: Place the container used to... solution. Before use descaler authorised by the manufacturer's warranty. You should use , read the instructions and the labelling on the display; 5. Descale the appliance when PLEASE DESCALE YOUR MACHINE appears on the display. To access the descaling menu: 1. Turn the rotary (C2...
User Manual
Page 20
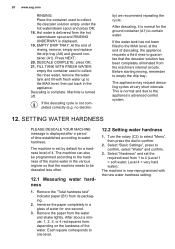
... machine is displayed after a period of time established according to empty the drip tray; After about a minute, 1, 2, 3, or 4 red squares form, depending on the hardness of rinsing, remove, empty and replace the drip tray (A8) and ground container (A1). Each square corresponds to one second. 3. Level 4 = very hard water); DESCALE COMPLETE: press OK; 21. no electric- If the...
... machine is displayed after a period of time established according to empty the drip tray; After about a minute, 1, 2, 3, or 4 red squares form, depending on the hardness of rinsing, remove, empty and replace the drip tray (A8) and ground container (A1). Each square corresponds to one second. 3. Level 4 = very hard water); DESCALE COMPLETE: press OK; 21. no electric- If the...
User Manual
Page 21
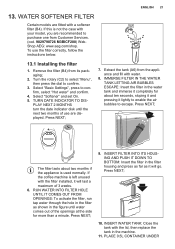
... displayed. Select "Softener" and set On. 5. IMMERSE FILTER IN THE WATER TANK LETTING AIR BUBBLES ESCAPE: Insert the filter in the machine. 11. If the coffee machine is left unused with the filter installed, it lightly to enable the air bubbles to purchase one from Customer Services. (cod. 9029798726 M3BICF200) WebShop AEG: www.aeg.com/shop. PLACE 0.5L CONTAINER UNDER Remove...
... displayed. Select "Softener" and set On. 5. IMMERSE FILTER IN THE WATER TANK LETTING AIR BUBBLES ESCAPE: Insert the filter in the machine. 11. If the coffee machine is left unused with the filter installed, it lightly to enable the air bubbles to purchase one from Customer Services. (cod. 9029798726 M3BICF200) WebShop AEG: www.aeg.com/shop. PLACE 0.5L CONTAINER UNDER Remove...
User Manual
Page 23
... Empty the ground container and drip tray (A8), clean and replace. Repeat coffee delivery and turn the grinding adjustment dial one click clockwise towards "7" while the coffee mill is clogged. Insert the hot water/steam spout (B6) ...cleaning, the ground container (A1) has not been replaced. Important: when removing the drip tray, the ground container must be emptied, even if it will go until the flow becomes regular. If this is correct (see section "Adjusting the coffee mill"). The ground container (A1) is fully inserted. ADJUST GRIND LEVEL Insufficient water in operation...
... Empty the ground container and drip tray (A8), clean and replace. Repeat coffee delivery and turn the grinding adjustment dial one click clockwise towards "7" while the coffee mill is clogged. Insert the hot water/steam spout (B6) ...cleaning, the ground container (A1) has not been replaced. Important: when removing the drip tray, the ground container must be emptied, even if it will go until the flow becomes regular. If this is correct (see section "Adjusting the coffee mill"). The ground container (A1) is fully inserted. ADJUST GRIND LEVEL Insufficient water in operation...
User Manual
Page 24
... appliance TO USER MANUAL is empty TURN THE MILK FROTH ADJUSTMENT DIAL TO POSITION TO START CLEANING TURN THE MILK FROTH ADJUSTMENT DIAL TO MILK POSITION PLEASE DESCALE YOUR MACHINE REPLACE SOFTENER FILTER PRESS OK TO START Milk has been delivered recently and the tubes inside the milk container must be cleaned. Press DESCALE to start descaling Press OK to replace or remove the...
... appliance TO USER MANUAL is empty TURN THE MILK FROTH ADJUSTMENT DIAL TO POSITION TO START CLEANING TURN THE MILK FROTH ADJUSTMENT DIAL TO MILK POSITION PLEASE DESCALE YOUR MACHINE REPLACE SOFTENER FILTER PRESS OK TO START Milk has been delivered recently and the tubes inside the milk container must be cleaned. Press DESCALE to start descaling Press OK to replace or remove the...
User Manual
Page 25
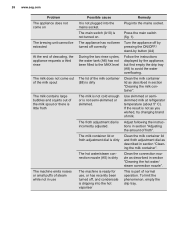
... "Adjusting the coffee mill"). TROUBLESHOOTING GUIDE Below is satisfactory. The brewing unit has cooled down because 2/3 minutes have passed since the last coffee was made. Remedy Warm the cups by rinsing using the rinse function Set a hotter coffee temperature in operation. Use coffee for espresso machines. If the problem cannot be resolved as described, contact Customer Services. The coffee is set. A low coffee temperature is...
... "Adjusting the coffee mill"). TROUBLESHOOTING GUIDE Below is satisfactory. The brewing unit has cooled down because 2/3 minutes have passed since the last coffee was made. Remedy Warm the cups by rinsing using the rinse function Set a hotter coffee temperature in operation. Use coffee for espresso machines. If the problem cannot be resolved as described, contact Customer Services. The coffee is set. A low coffee temperature is...
User Manual
Page 26
... adjustment dial is dirty The hot water/steam connection nozzle (A5) is dirty The machine is ready for use Possible cause It is dripping into the hot vaporiser Remedy Plug into the mains socket. To limit the phenomenon, empty the drip tray. Clean the connection nozzle as you wished, try changing brand of milk. 26 www.aeg.com Problem The appliance does not come...
... adjustment dial is dirty The hot water/steam connection nozzle (A5) is dirty The machine is ready for use Possible cause It is dripping into the hot vaporiser Remedy Plug into the mains socket. To limit the phenomenon, empty the drip tray. Clean the connection nozzle as you wished, try changing brand of milk. 26 www.aeg.com Problem The appliance does not come...


