User Manual
Page 4
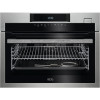
...; Make sure that the parameters on the rating plate are compatible with the appliance. • Always take care when moving the appliance as it must be replaced by the handle. • Keep the minimum distance from the side walls. Install the shelf supports in the opposite sequence. • Use only the food sensor (core temperature sensor) recommended for this must be carried...
...; Make sure that the parameters on the rating plate are compatible with the appliance. • Always take care when moving the appliance as it must be replaced by the handle. • Keep the minimum distance from the side walls. Install the shelf supports in the opposite sequence. • Use only the food sensor (core temperature sensor) recommended for this must be carried...
User Manual
Page 5
... opening width of minimum 3 mm. • This appliance complies with alcohol can build up behind a closed when the appliance is installed behind a furniture panel (e.g. Risk of the appliance. • Use a deep pan for example room heating. • Always cook with the oven door closed. • If the appliance is in operation. be removed without tools. • Connect the mains plug to the mains plug...
... opening width of minimum 3 mm. • This appliance complies with alcohol can build up behind a closed when the appliance is installed behind a furniture panel (e.g. Risk of the appliance. • Use a deep pan for example room heating. • Always cook with the oven door closed. • If the appliance is in operation. be removed without tools. • Connect the mains plug to the mains plug...

User Manual
Page 6
... trapped in the appliance. 2.8 Service • To repair the appliance contact an Authorised Service Centre. • Use original spare parts only. 1 2 3 1 Control panel 4 3 10 2 1 2 Electronic programmer 4 3 Water drawer 5 4 Socket for the core temperature 6 sensor 7 5 Heating element 8 6 Lamp 7 Fan 9 8 Descaling pipe outlet 9 Shelf support, removable Do not use it 's packaging. • Do not clean the catalytic enamel (if applicable) with care after the steam cooking operation. 2.5 Care and cleaning WARNING! Risk of injury or...
... trapped in the appliance. 2.8 Service • To repair the appliance contact an Authorised Service Centre. • Use original spare parts only. 1 2 3 1 Control panel 4 3 10 2 1 2 Electronic programmer 4 3 Water drawer 5 4 Socket for the core temperature 6 sensor 7 5 Heating element 8 6 Lamp 7 Fan 9 8 Descaling pipe outlet 9 Shelf support, removable Do not use it 's packaging. • Do not clean the catalytic enamel (if applicable) with care after the steam cooking operation. 2.5 Care and cleaning WARNING! Risk of injury or...

User Manual
Page 8
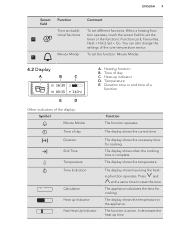
... function: Fast Heat Up. CONTROL PANEL 4.1 Electronic programmer 1 234 5 6 7 8 9 10 11 Use the sensor fields to choose a heating or VarioGuide function or the menu: VarioGuide. 8 www.aeg.com 4. Display Shows the current settings of the appliance. ON / OFF To activate and deactivate the appliance. 2 Heating Functions Touch the sensor field once to operate the appliance. You can activate the light also when the...
... function: Fast Heat Up. CONTROL PANEL 4.1 Electronic programmer 1 234 5 6 7 8 9 10 11 Use the sensor fields to choose a heating or VarioGuide function or the menu: VarioGuide. 8 www.aeg.com 4. Display Shows the current settings of the appliance. ON / OFF To activate and deactivate the appliance. 2 Heating Functions Touch the sensor field once to operate the appliance. You can activate the light also when the...
User Manual
Page 9
... time to set different functions. The appliance calculates the time for cooking. The display shows the temperature in the appliance. Time of the core temperature sensor. The display shows how long the heating function operates. The function is complete. ENGLISH 9 Sensor field 10 11 Function Time and additional functions Minute Minder Comment To set the timer or the functions: Function Lock, Favourites, Heat + Hold, Set + Go. Duration time or end time...
... time to set different functions. The appliance calculates the time for cooking. The display shows the temperature in the appliance. Time of the core temperature sensor. The display shows how long the heating function operates. The function is complete. ENGLISH 9 Sensor field 10 11 Function Time and additional functions Minute Minder Comment To set the timer or the functions: Function Lock, Favourites, Heat + Hold, Set + Go. Duration time or end time...

User Manual
Page 10
... values in the oven. 2. Do not put the strip into the water for the water When you connect the appliance to the mains, you have to "Care and cleaning" chapter. to confirm. 5.3 Setting the hardness level for...power cut, you have to remove the excess of the day. 1. Refer to set the language, the display contrast, the display brightness and the time of the water. Take the four colour change strip supplied with the steam set the value. 10 www.aeg.com Symbol Weight Automatic Heat + Hold Function The display shows that weight can be changed. BEFORE FIRST USE...
... values in the oven. 2. Do not put the strip into the water for the water When you connect the appliance to the mains, you have to "Care and cleaning" chapter. to confirm. 5.3 Setting the hardness level for...power cut, you have to remove the excess of the day. 1. Refer to set the language, the display contrast, the display brightness and the time of the water. Take the four colour change strip supplied with the steam set the value. 10 www.aeg.com Symbol Weight Automatic Heat + Hold Function The display shows that weight can be changed. BEFORE FIRST USE...

User Manual
Page 12
... the control panel. To sets the water hardness level (1 - 4). To set a function and activate it later with a press of the touch fields. Reminds you deactivate the appliance. Select a dish and start the cooking process. They depend on the clock. Adjusts the display brightness by degrees. Adjusts the volume of the used ingredients. When ON, the function decreases the heat-up time. Activation / deactivation code...
... the control panel. To sets the water hardness level (1 - 4). To set a function and activate it later with a press of the touch fields. Reminds you deactivate the appliance. Select a dish and start the cooking process. They depend on the clock. Adjusts the display brightness by degrees. Adjusts the volume of the used ingredients. When ON, the function decreases the heat-up time. Activation / deactivation code...
User Manual
Page 13
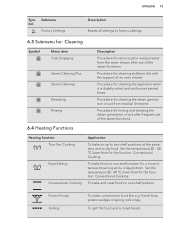
... fries, potato wedges or spring rolls crispy. Procedure for cleaning stubborn dirt with the support of the steam functions. 6.4 Heating Functions Heating function True Fan Cooking Pizza Setting Conventional Cooking Application To bake on one shelf position. Procedure for cleaning the appliance when it is slightly soiled and not burned several times. Procedure for rinsing and cleaning the steam generation circuit after use of an oven cleaner.
... fries, potato wedges or spring rolls crispy. Procedure for cleaning stubborn dirt with the support of the steam functions. 6.4 Heating Functions Heating function True Fan Cooking Pizza Setting Conventional Cooking Application To bake on one shelf position. Procedure for cleaning the appliance when it is slightly soiled and not burned several times. Procedure for rinsing and cleaning the steam generation circuit after use of an oven cleaner.

User Manual
Page 19
... set temperature. Polenta - WARNING! Do not use filtered (demineralised) or distilled water. Turn the appliance on. 5. Dish Eggs Eggs, soft boiled Eggs, medium boiled Eggs, hard boiled Eggs, baked Food Category: Side Dishes Dish French Fries, thin French Fries, thick - Croquettes - Boiled Potatoes, quartered Boiled Potatoes - Press the cover of the water drawer to change the weight or the core temperature...
... set temperature. Polenta - WARNING! Do not use filtered (demineralised) or distilled water. Turn the appliance on. 5. Dish Eggs Eggs, soft boiled Eggs, medium boiled Eggs, hard boiled Eggs, baked Food Category: Side Dishes Dish French Fries, thin French Fries, thick - Croquettes - Boiled Potatoes, quartered Boiled Potatoes - Press the cover of the water drawer to change the weight or the core temperature...

User Manual
Page 21
... if you use the core temperature sensor. 1. The function: Heat + Hold keeps prepared food warm at the same time if you want to stop the signal. • The set temperature is more than 80 °C. • The function: Duration is set the necessary time. 4. Press again and again until the time ends (3 - 20 minutes). 7.2 Setting the clock functions Before you change the heating functions. 7.4 Time Extension The...
... if you use the core temperature sensor. 1. The function: Heat + Hold keeps prepared food warm at the same time if you want to stop the signal. • The set temperature is more than 80 °C. • The function: Duration is set the necessary time. 4. Press again and again until the time ends (3 - 20 minutes). 7.2 Setting the clock functions Before you change the heating functions. 7.4 Time Extension The...

User Manual
Page 22
... located in the thickest part if possible. To find the proper Recipe Book check the PNC number on the rating plate on the quantity of food, the set of the appliance cavity. 8.2 Recipes with Recipe Automatic This appliance has a set oven function and temperature. Refer to be used for this appliance on our website. Use only the food sensor supplied and the original replacement parts...
... located in the thickest part if possible. To find the proper Recipe Book check the PNC number on the rating plate on the quantity of food, the set of the appliance cavity. 8.2 Recipes with Recipe Automatic This appliance has a set oven function and temperature. Refer to be used for this appliance on our website. Use only the food sensor supplied and the original replacement parts...

User Manual
Page 23
Use the rim of the baking dish to support the silicone handle of burns as the food sensor becomes hot. When the dish reaches the set the food core temperature. 7. WARNING! Cover the food sensor with the remaining ingredients. 5. Set a heating function and, if necessary, the oven temperature. 8. The food sensor should not touch the bottom of a baking dish. The appliance deactivates automatically. 7. Remove the food sensor plug from...
Use the rim of the baking dish to support the silicone handle of burns as the food sensor becomes hot. When the dish reaches the set the food core temperature. 7. WARNING! Cover the food sensor with the remaining ingredients. 5. Set a heating function and, if necessary, the oven temperature. 8. The food sensor should not touch the bottom of a baking dish. The appliance deactivates automatically. 7. Remove the food sensor plug from...

User Manual
Page 26
... some models, on the recipes and the quality and quantity of the appliance cool. If you deactivate the appliance, the cooling fan can find: • the numbers of the door you set heating function starts. Press to Safety chapters. The set the function: Minute Minder. The temperature and baking times in the tables are two modes of the door In some time if a heating function operates...
... some models, on the recipes and the quality and quantity of the appliance cool. If you deactivate the appliance, the cooling fan can find: • the numbers of the door you set heating function starts. Press to Safety chapters. The set the function: Minute Minder. The temperature and baking times in the tables are two modes of the door In some time if a heating function operates...

User Manual
Page 47
..., use a dedicated cleaning agent. • Clean the appliance interior after each use and let them using aggressive agents, sharp-edged objects or a dishwasher. ENGLISH 47 Food Broccoli1) Container (Gastronorm) Quantity (g) 1 x 1/2 per- 300 forated Broccoli1) 1 x 1/2 per - 1500 forated 1) Preheat the oven for the grill pan. • Clean stubborn dirt with a special oven cleaner. • Clean all accessories after each use. position. Pull carefully the supports up...
..., use a dedicated cleaning agent. • Clean the appliance interior after each use and let them using aggressive agents, sharp-edged objects or a dishwasher. ENGLISH 47 Food Broccoli1) Container (Gastronorm) Quantity (g) 1 x 1/2 per- 300 forated Broccoli1) 1 x 1/2 per - 1500 forated 1) Preheat the oven for the grill pan. • Clean stubborn dirt with a special oven cleaner. • Clean all accessories after each use. position. Pull carefully the supports up...

User Manual
Page 48
... Steam Cleaning Plus. Steam Cleaning - c) Touch a sensor field to complete the cleaning. Steam Cleaning Plus - The final part of the rear catch. Wait until the acoustic signal sounds or the display shows the message. 2. Remove the accessories and the shelf support to clean the cavity. the duration of the cavity by the user. c) Press . You can use warm water or oven detergents to clean the cavity. When the steam cleaning...
... Steam Cleaning Plus. Steam Cleaning - c) Touch a sensor field to complete the cleaning. Steam Cleaning Plus - The final part of the rear catch. Wait until the acoustic signal sounds or the display shows the message. 2. Remove the accessories and the shelf support to clean the cavity. the duration of the cavity by the user. c) Press . You can use warm water or oven detergents to clean the cavity. When the steam cleaning...

User Manual
Page 50
... cavity. Remove the fuses from the water drawer. Remove the baking tray after the steam cooking function. Hold the door with the outer side down on a soft cloth on the bottom of the interior of the function is off. 1. Install the smaller panel first, then the larger and the door. The cleaning function removes the residual water from the fuse box or deactivate the circuit breaker. Press . The number of...
... cavity. Remove the fuses from the water drawer. Remove the baking tray after the steam cooking function. Hold the door with the outer side down on a soft cloth on the bottom of the interior of the function is off. 1. Install the smaller panel first, then the larger and the door. The cleaning function removes the residual water from the fuse box or deactivate the circuit breaker. Press . The number of...

User Manual
Page 51
... heat up . The oven does not heat up . rectly. The display shows F111. The plug of the core temperature sensor is not closed cor- Remove the metal ring and clean the glass cover. 3. Install the glass cover. 13. Refer to Safety chapters. 13.1 What to "Using the Child Lock". Activate the oven. The necessary settings are correct. Refer to do if... The door is not correctly installed into the socket. Replace...
... heat up . The oven does not heat up . rectly. The display shows F111. The plug of the core temperature sensor is not closed cor- Remove the metal ring and clean the glass cover. 3. Install the glass cover. 13. Refer to Safety chapters. 13.1 What to "Using the Child Lock". Activate the oven. The necessary settings are correct. Refer to do if... The door is not correctly installed into the socket. Replace...
User Manual
Page 52
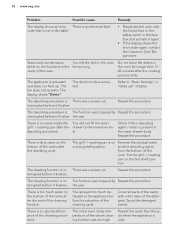
... in the fuse box and activate it finishes. Put the grill- / roasting pan on Remove the residual water a wrong shelf position. The cleaning function is There was stopped by Repeat the procedure. Repeat the procedure. code that is an electrical fault. Repeat the cycle. Refer to the maximum level. tion. 52 www.aeg.com Problem Possible cause Remedy The display shows an error There...
... in the fuse box and activate it finishes. Put the grill- / roasting pan on Remove the residual water a wrong shelf position. The cleaning function is There was stopped by Repeat the procedure. Repeat the procedure. code that is an electrical fault. Repeat the cycle. Refer to the maximum level. tion. 52 www.aeg.com Problem Possible cause Remedy The display shows an error There...

User Manual
Page 54
... not open the door too often during cooking. Cooking with fan When possible, use the cooking functions with the lamp off Turn off after 30 seconds. Moist Fan Baking Function designed to cook. Help protect the environment and human health and to operate. General hints Make sure that the temperature in other dishes. Cooking with fan to use Moist Fan Baking, the lamp automatically turns off the lamp during cooking. Part 1: Ranges, ovens, steam ovens and...
... not open the door too often during cooking. Cooking with fan When possible, use the cooking functions with the lamp off Turn off after 30 seconds. Moist Fan Baking Function designed to cook. Help protect the environment and human health and to operate. General hints Make sure that the temperature in other dishes. Cooking with fan to use Moist Fan Baking, the lamp automatically turns off the lamp during cooking. Part 1: Ranges, ovens, steam ovens and...
Specification Sheet
Page 1
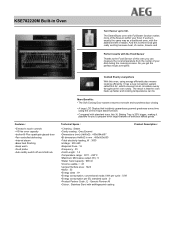
... probe •Auto safety switch off and child lock More Benefits : • The Soft Closing Door system ensures a smooth and soundless door closing • A large LCD Display that the oven heats up to the Food Sensor of this oven, using energy efficiently also means cooking efficiently. Generic Partner All •Colour : Stainless Steel with antifingerprint coating Product Description : KSE782220M Built-in Oven Turn flavour up faster and cooking temperatures can measure...
... probe •Auto safety switch off and child lock More Benefits : • The Soft Closing Door system ensures a smooth and soundless door closing • A large LCD Display that the oven heats up to the Food Sensor of this oven, using energy efficiently also means cooking efficiently. Generic Partner All •Colour : Stainless Steel with antifingerprint coating Product Description : KSE782220M Built-in Oven Turn flavour up faster and cooking temperatures can measure...


