Specification Sheet
Page 1
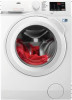
...; automatically weighs each load to maintain their condition. Protection for a thorough clean. Choose the right time to wash Delay Start gives you the freedom to take care of time, water and energy necessary for your clothes All AEG machines have our ProTex gentle drum, specially designed to do your washing at a cooler temperature. Sensors then adjust washing times precisely, ensuring optimum treatment for clothes. 6000 Series Freestanding Washing Machine 8 kg 1400 rpm...
...; automatically weighs each load to maintain their condition. Protection for a thorough clean. Choose the right time to wash Delay Start gives you the freedom to take care of time, water and energy necessary for your clothes All AEG machines have our ProTex gentle drum, specially designed to do your washing at a cooler temperature. Sensors then adjust washing times precisely, ensuring optimum treatment for clothes. 6000 Series Freestanding Washing Machine 8 kg 1400 rpm...
Specification Sheet
Page 2
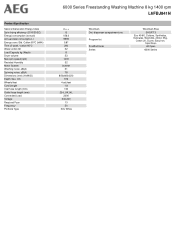
... Energy Class Spin drying efficiency (2010/30/EC) Energy consumption (annual) Annual water consumption, l Energy cons. Std. Cotton 60°C (kWh) Time of wash / cotton 60°C Water cotton 60 Load Capacity kg (Wash) Drum volume Max spin speed (rpm) Residual Humidity Motor System Washing noise, dB(A) Spinning noise, dB(A) Dimensions (mm) (HxWxD) Depth max, mm Wheels/feet Cord Length Inlet hose length (mm) Outlet hose length (mm) Connected Load Voltage Required Fuse Frequency Porthole Type 6000 Series Freestanding Washing Machine...
... Energy Class Spin drying efficiency (2010/30/EC) Energy consumption (annual) Annual water consumption, l Energy cons. Std. Cotton 60°C (kWh) Time of wash / cotton 60°C Water cotton 60 Load Capacity kg (Wash) Drum volume Max spin speed (rpm) Residual Humidity Motor System Washing noise, dB(A) Spinning noise, dB(A) Dimensions (mm) (HxWxD) Depth max, mm Wheels/feet Cord Length Inlet hose length (mm) Outlet hose length (mm) Connected Load Voltage Required Fuse Frequency Porthole Type 6000 Series Freestanding Washing Machine...

User Manual
Page 2
TECHNICAL DATA 7 5. KNOB AND BUTTONS 14 9. BEFORE FIRST USE 20 12. TROUBLESHOOTING 31 16. QUICK GUIDE 36 FOR PERFECT RESULTS Thank you for your product for better service: www.registeraeg.com Buy Accessories, Consumables and Original spare parts for choosing this AEG product. CONTROL PANEL 13 8. DAILY USE...20 13. PRODUCT DESCRIPTION 6 4. HINTS AND TIPS 25 14. features you impeccable performance for many years, with innovative technologies that...
TECHNICAL DATA 7 5. KNOB AND BUTTONS 14 9. BEFORE FIRST USE 20 12. TROUBLESHOOTING 31 16. QUICK GUIDE 36 FOR PERFECT RESULTS Thank you for your product for better service: www.registeraeg.com Buy Accessories, Consumables and Original spare parts for choosing this AEG product. CONTROL PANEL 13 8. DAILY USE...20 13. PRODUCT DESCRIPTION 6 4. HINTS AND TIPS 25 14. features you impeccable performance for many years, with innovative technologies that...

User Manual
Page 4
... any maintenance operation, deactivate the appliance and disconnect the mains plug from the socket. • Do not use abrasive products, abrasive cleaning pads, solvents or metal objects. 2. Do not use high pressure water sprays and/or steam to the water mains using the new supplied hose sets, or other new hose sets supplied by clients in shops, offices and other residential type environments; - areas for communal use in...
... any maintenance operation, deactivate the appliance and disconnect the mains plug from the socket. • Do not use abrasive products, abrasive cleaning pads, solvents or metal objects. 2. Do not use high pressure water sprays and/or steam to the water mains using the new supplied hose sets, or other new hose sets supplied by clients in shops, offices and other residential type environments; - areas for communal use in...
User Manual
Page 5
... Service Centre for a long time, where repair work has been carried out or new devices fitted (water meters, etc.), let the water flow until it is clean and clear. • Ensure that there is access to the mains plug after the installation. 2.4 Use WARNING! Risk of the installation. Always pull the mains plug. • This appliance is levelled correctly with oil, grease or other drain hose...
... Service Centre for a long time, where repair work has been carried out or new devices fitted (water meters, etc.), let the water flow until it is clean and clear. • Ensure that there is access to the mains plug after the installation. 2.4 Use WARNING! Risk of the installation. Always pull the mains plug. • This appliance is levelled correctly with oil, grease or other drain hose...
User Manual
Page 6
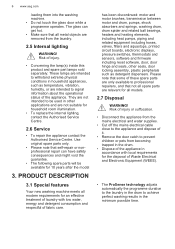
... pets from the laundry. 2.5 Internal lighting WARNING! has been discontinued: motor and motor brushes, transmission between motor and drum, pumps, shock absorbers and springs, washing drum, drum spider and related ball bearings, heaters and heating elements, including heat pumps, piping and related equipment including hoses, valves, filters and aquastops, printed circuit boards, electronic displays, pressure switches, thermostats and sensors, software and firmware including reset software, door, door hinge and seals, other applications...
... pets from the laundry. 2.5 Internal lighting WARNING! has been discontinued: motor and motor brushes, transmission between motor and drum, pumps, shock absorbers and springs, washing drum, drum spider and related ball bearings, heaters and heating elements, including heat pumps, piping and related equipment including hoses, valves, filters and aquastops, printed circuit boards, electronic displays, pressure switches, thermostats and sensors, software and firmware including reset software, door, door hinge and seals, other applications...
User Manual
Page 7
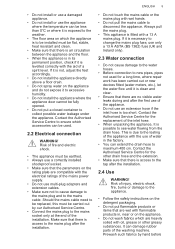
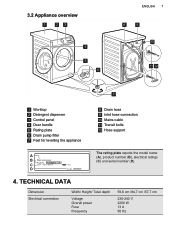
...D 00A 00000000 The rating plate reports the model name (A), product number (B), electrical ratings (C) and serial number (D). 4. TECHNICAL DATA Dimension Electrical connection Width/ Height/ Total depth Voltage Overall power Fuse Frequency 59,6 cm /84,7 cm /57,7 cm 230-240 V 2200 W 13 A 50 Hz 3.2 Appliance overview 1 23 4 5 6 ENGLISH 7 8 9 10 11 12 7 1 Worktop 2 Detergent dispenser 3 Control panel 4 Door handle 5 Rating plate 6 Drain pump filter 7 Feet for levelling the appliance 8 Drain hose 9 Inlet hose connection 10 Mains cable 11 Transit bolts 12 Hose support A B Mod.
...D 00A 00000000 The rating plate reports the model name (A), product number (B), electrical ratings (C) and serial number (D). 4. TECHNICAL DATA Dimension Electrical connection Width/ Height/ Total depth Voltage Overall power Fuse Frequency 59,6 cm /84,7 cm /57,7 cm 230-240 V 2200 W 13 A 50 Hz 3.2 Appliance overview 1 23 4 5 6 ENGLISH 7 8 9 10 11 12 7 1 Worktop 2 Detergent dispenser 3 Control panel 4 Door handle 5 Rating plate 6 Drain pump filter 7 Feet for levelling the appliance 8 Drain hose 9 Inlet hose connection 10 Mains cable 11 Transit bolts 12 Hose support A B Mod.
User Manual
Page 8
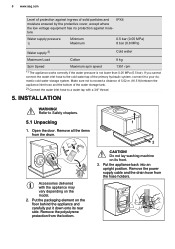
... lower than 0.05 MPa (0.5 bar). Put the appliance back into an upright position. Do not lay washing machine on the model. 2. Refer to your do‐ mestic cold water storage system. Remove the polystyrene protection from the hose holders. Remove all the items from the drum. 1 2 Accessories delivered with a 3/4'' thread. 5. CAUTION! Remove the power supply cable and the drain hose from the bottom.
... lower than 0.05 MPa (0.5 bar). Put the appliance back into an upright position. Do not lay washing machine on the model. 2. Refer to your do‐ mestic cold water storage system. Remove the polystyrene protection from the hose holders. Remove all the items from the drum. 1 2 Accessories delivered with a 3/4'' thread. 5. CAUTION! Remove the power supply cable and the drain hose from the bottom.
User Manual
Page 9
... the washing machine, use the accessories described in chapter 'Accessories'. A correct adjustment of the appliance level prevents the vibration, noise and the movement of the appliance. 5. It should extend beyond the front feet. When the appliance is installed on a plinth or a tumble dryer is possible to see water flowing from the drain hose. Make sure that you find in the user manual bag, in operation...
... the washing machine, use the accessories described in chapter 'Accessories'. A correct adjustment of the appliance level prevents the vibration, noise and the movement of the appliance. 5. It should extend beyond the front feet. When the appliance is installed on a plinth or a tumble dryer is possible to see water flowing from the drain hose. Make sure that you find in the user manual bag, in operation...

User Manual
Page 14
... locked and the drum turns regularly to reduce creasing. • You must drain the water to unlock the door. • If you to change the default temperature. 14 www.aeg.com A The digital indicator can exclude another one, in this case the appliance doesn't allow you touch the Start/Pause button, the appliance performs the spinning phase and drains the water. C The indicator blink during the laundry load...
... locked and the drum turns regularly to reduce creasing. • You must drain the water to unlock the door. • If you to change the default temperature. 14 www.aeg.com A The digital indicator can exclude another one, in this case the appliance doesn't allow you touch the Start/Pause button, the appliance performs the spinning phase and drains the water. C The indicator blink during the laundry load...

User Manual
Page 19
... the garment care label for Delicates versal coloureds woollens Special Eco 40-60 ▲ ▲ ▲ -- -- Suitable detergents for washing programmes Programme Universal powder1) Liquid Uni‐ Liquid for drying and other laundry instructions. Duvet -- -- -- ▲ ▲ Easy Iron ▲ ▲ ▲ -- -- 1) At temperature higher than 40 °C. 2) If you decrease the load size. Blue The wool wash cycle of this washing machine. Delicates...
... the garment care label for Delicates versal coloureds woollens Special Eco 40-60 ▲ ▲ ▲ -- -- Suitable detergents for washing programmes Programme Universal powder1) Liquid Uni‐ Liquid for drying and other laundry instructions. Duvet -- -- -- ▲ ▲ Easy Iron ▲ ▲ ▲ -- -- 1) At temperature higher than 40 °C. 2) If you decrease the load size. Blue The wool wash cycle of this washing machine. Delicates...
User Manual
Page 20
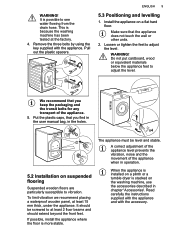
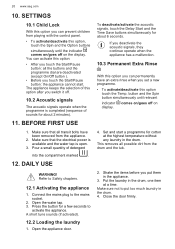
Close the door firmly. Make sure that the electrical power is available and the water tap is completed (sequence of sounds for cotton at a time. Press the button for about 2 minutes). 11. Put the laundry in the drum. 4. SETTINGS 10.1 Child Lock With this option touch the Temp. Connect the mains plug to Safety chapters. 12.1 Activating the appliance 1. Set and start . Make sure not...
Close the door firmly. Make sure that the electrical power is available and the water tap is completed (sequence of sounds for cotton at a time. Press the button for about 2 minutes). 11. Put the laundry in the drum. 4. SETTINGS 10.1 Child Lock With this option touch the Temp. Connect the mains plug to Safety chapters. 12.1 Activating the appliance 1. Set and start . Make sure not...
User Manual
Page 22
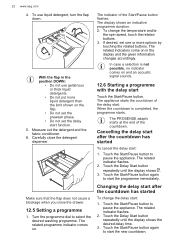
... the detergent dispenser. The appliance starts the countdown of the Start/Pause button flashes. The PROSENSE adapts starts at the end of the countdown. The related indicator flashes. 2. Carefully close the drawer. 12.5 Setting a programme 1. To change the delay start the programme immediately. Changing the delay start the new countdown. Touch the Start/Pause button again to start after the countdown has started To change the temperature and/or the spin speed...
... the detergent dispenser. The appliance starts the countdown of the Start/Pause button flashes. The PROSENSE adapts starts at the end of the countdown. The related indicator flashes. 2. Carefully close the drawer. 12.5 Setting a programme 1. To change the delay start the programme immediately. Changing the delay start the new countdown. Touch the Start/Pause button again to start after the countdown has started To change the temperature and/or the spin speed...
User Manual
Page 25
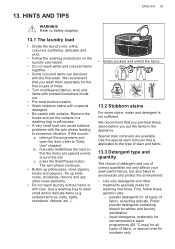
.... • Follow the washing instructions on the laundry care labels. • Do not wash white and coloured items together. • Some coloured items can cause balance problems with the first wash. Special stain removers are spaced evenly around the tub; Refer to the type of stain and fabric. 13.3 Detergent type and quantity The choice of detergent and use of times. • Turn multilayered fabrics, wool and items with...
.... • Follow the washing instructions on the laundry care labels. • Do not wash white and coloured items together. • Some coloured items can cause balance problems with the first wash. Special stain removers are spaced evenly around the tub; Refer to the type of stain and fabric. 13.3 Detergent type and quantity The choice of detergent and use of times. • Turn multilayered fabrics, wool and items with...
User Manual
Page 26
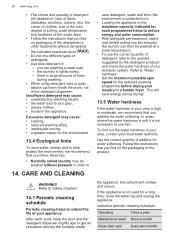
... can be washed without exceeding the indicated maximum level ( ). • Do not mix different types of detergents. • Use less detergent if: - 26 www.aeg.com • The choice and quantity of detergent will depend on: type of fabric (delicates, woollens, cottons, etc), the colour of clothes, size of the load, degree of soiling, wash temperature and hardness of the water used for a long time: close the water tap and...
... can be washed without exceeding the indicated maximum level ( ). • Do not mix different types of detergents. • Use less detergent if: - 26 www.aeg.com • The choice and quantity of detergent will depend on: type of fabric (delicates, woollens, cottons, etc), the colour of clothes, size of the load, degree of soiling, wash temperature and hardness of the water used for a long time: close the water tap and...
User Manual
Page 27
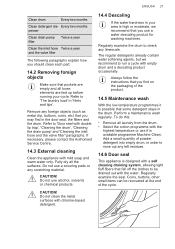
.... Add a small quantity of the cycle. Perform a maintenance wash regularly. Regularly examine the seal. Refer to check any left residues. 14.6 Door seal This appliance is designed with empty drum and a descaling product occasionally. Regularly examine the drum to 'Door seal with the highest temperature or use a water descaling product for washing machines. To do this: • Remove all the surfaces. Always follow the instructions that you should clean each part. 14.2 Removing foreign...
.... Add a small quantity of the cycle. Perform a maintenance wash regularly. Regularly examine the seal. Refer to check any left residues. 14.6 Door seal This appliance is designed with empty drum and a descaling product occasionally. Regularly examine the drum to 'Door seal with the highest temperature or use a water descaling product for washing machines. To do this: • Remove all the surfaces. Always follow the instructions that you should clean each part. 14.2 Removing foreign...
User Manual
Page 31
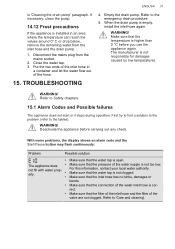
.... 15.1 Alarm Codes and Possible failures The appliance does not start or it stops during operation. Deactivate the appliance before you use the appliance again. Make sure that the connection of the water supply is installed in 'Cleaning the drain pump' paragraph. Put the two ends of the inlet hose in a container and let the water flow out of the valve are not clogged. WARNING...
.... 15.1 Alarm Codes and Possible failures The appliance does not start or it stops during operation. Deactivate the appliance before you use the appliance again. Make sure that the connection of the water supply is installed in 'Cleaning the drain pump' paragraph. Put the two ends of the inlet hose in a container and let the water flow out of the valve are not clogged. WARNING...
User Manual
Page 32
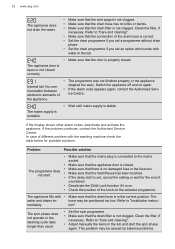
... door is closed. No com‐ stopped too early. If the display shows other alarm codes, deactivate and activate the appliance. Make sure that the drain filter is not clogged. The water and drains im‐ hose may be positioned too low. The spin phase does not operate or the washing cycle lasts longer than usual. • Set the spin programme. • Make sure that the Start...
... door is closed. No com‐ stopped too early. If the display shows other alarm codes, deactivate and activate the appliance. Make sure that the drain filter is not clogged. The water and drains im‐ hose may be positioned too low. The spin phase does not operate or the washing cycle lasts longer than usual. • Set the spin programme. • Make sure that the Start...

User Manual
Page 33
... you wash the laundry. • Make sure that the flap is correct. If the problem occurs again, contact the Authorised Service Centre. The appliance makes an unusual noise and vibrates. • Make sure the levelling of the appliance is in this user manual. gramme execution. drum during pro‐ Lavamat System load detection" in the drum. Refer to "Installation instruction". • Add more laundry in "Daily Use...
... you wash the laundry. • Make sure that the flap is correct. If the problem occurs again, contact the Authorised Service Centre. The appliance makes an unusual noise and vibrates. • Make sure the levelling of the appliance is in this user manual. gramme execution. drum during pro‐ Lavamat System load detection" in the drum. Refer to "Installation instruction". • Add more laundry in "Daily Use...
User Manual
Page 37
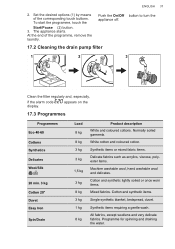
..., touch the Start/Pause (2) button. 3. Push the On/Off button to turn the appliance off. 17.2 Cleaning the drain pump filter 1 2 3 180˚ 1 2 Clean the filter regularly and, especially, if the alarm code display. Cotton and synthetic items. Single synthetic blanket, bedspread, duvet. All fabrics, except woollens and very delicate fabrics. Synthetic items requiring a gentle wash. The appliance starts. Normally soiled garments. Programme for spinning and draining the water. appears...
..., touch the Start/Pause (2) button. 3. Push the On/Off button to turn the appliance off. 17.2 Cleaning the drain pump filter 1 2 3 180˚ 1 2 Clean the filter regularly and, especially, if the alarm code display. Cotton and synthetic items. Single synthetic blanket, bedspread, duvet. All fabrics, except woollens and very delicate fabrics. Synthetic items requiring a gentle wash. The appliance starts. Normally soiled garments. Programme for spinning and draining the water. appears...


