
Product Manual
Page 2
... 7 TECHNICAL INFORMATION 8 PRODUCT DESCRIPTION 8 ACCESSORIES 9 CONTROL PANEL 12 PROGRAMMES 15 BEFORE FIRST USE 15 USING THE APPLIANCE 15 LOADING THE LAUNDRY 16 FILLING THE DETERGENT AND ADDITIVES 17 SETTING AND STARTING A PROGRAMME 18 AT THE END OF THE PROGRAMME 20 HELPFUL HINTS AND TIPS 22 CARE AND CLEANING 27 TROUBLESHOOTING 30 INSTALLATION SERVICE When contacting Service, ensure that you have the following symbols are used in this user manual: Warning...
... 7 TECHNICAL INFORMATION 8 PRODUCT DESCRIPTION 8 ACCESSORIES 9 CONTROL PANEL 12 PROGRAMMES 15 BEFORE FIRST USE 15 USING THE APPLIANCE 15 LOADING THE LAUNDRY 16 FILLING THE DETERGENT AND ADDITIVES 17 SETTING AND STARTING A PROGRAMME 18 AT THE END OF THE PROGRAMME 20 HELPFUL HINTS AND TIPS 22 CARE AND CLEANING 27 TROUBLESHOOTING 30 INSTALLATION SERVICE When contacting Service, ensure that you have the following symbols are used in this user manual: Warning...
Product Manual
Page 4
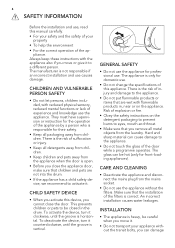
... use. • Do not change the specifications of explosion or fire. • Obey the safety instructions on the appliance. Make sure that the installation of experience and knowledge use the appliance. Always keep these instructions with flammable products in the drum. The manufacturer is open. • Before you close the door. The glass can be closed in , near or on the detergent...
... use. • Do not change the specifications of explosion or fire. • Obey the safety instructions on the appliance. Make sure that the installation of experience and knowledge use the appliance. Always keep these instructions with flammable products in the drum. The manufacturer is open. • Before you close the door. The glass can be closed in , near or on the detergent...
Product Manual
Page 5
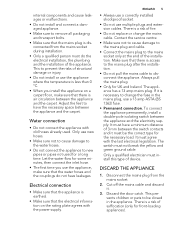
... inlet hose. • The first time you install the appliance on the rating plate agrees with the power supply. This to the mains socket only at the end of device. The appliance has a 13 amp mains plug. This prevents children or pets to have a minimum distance of the appliance. Adjust the feet to be the correct type for front-loading...
... inlet hose. • The first time you install the appliance on the rating plate agrees with the power supply. This to the mains socket only at the end of device. The appliance has a 13 amp mains plug. This prevents children or pets to have a minimum distance of the appliance. Adjust the feet to be the correct type for front-loading...

Product Manual
Page 6
... wash laundry with normal soil. • Always start a washing programme with the maximum load of laundry. • If necessary, use a stain remover when you will help the environment, use the correct quantity of the detergent, check the water hardness of your local water authority to release safely it . 6 ENVIRONMENT CONCERNS PACKAGING MATERIALS Recycle the materials with a low temperature. • To use less water and energy, obey these instructions: • Set...
... wash laundry with normal soil. • Always start a washing programme with the maximum load of laundry. • If necessary, use a stain remover when you will help the environment, use the correct quantity of the detergent, check the water hardness of your local water authority to release safely it . 6 ENVIRONMENT CONCERNS PACKAGING MATERIALS Recycle the materials with a low temperature. • To use less water and energy, obey these instructions: • Set...
Product Manual
Page 10
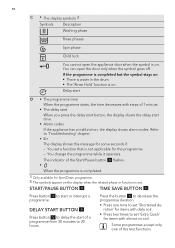
... daily soil. • Press two times to delay the start or interrupt a programme. If the programme is completed but the symbol stays on: • There is water in the drum. • The 'Rinse Hold' function is on . 10 C • The display symbols.2) Symbols Description Washing phase Rinse phases Spin phase Child lock You cannot open the door only when the symbol goes...
... daily soil. • Press two times to delay the start or interrupt a programme. If the programme is completed but the symbol stays on: • There is water in the drum. • The 'Rinse Hold' function is on . 10 C • The display symbols.2) Symbols Description Washing phase Rinse phases Spin phase Child lock You cannot open the door only when the symbol goes...
Product Manual
Page 11
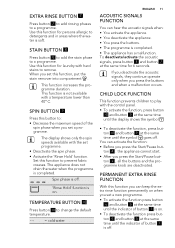
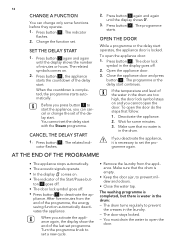
... the Start/Pause button 4 : the appliance cannot start. • After you press the buttons and when a malfunction occurs. PERMANENT EXTRA RINSE FUNCTION With this function for persons allergic to change the default temperature. - - = cold water ENGLISH 11 ACOUSTIC SIGNALS FUNCTION You can keep the extra rinse function permanently on when you set a programme. SPIN BUTTON 9 Press this function, put the stain remover into compartment . Use...
... the Start/Pause button 4 : the appliance cannot start. • After you press the buttons and when a malfunction occurs. PERMANENT EXTRA RINSE FUNCTION With this function for persons allergic to change the default temperature. - - = cold water ENGLISH 11 ACOUSTIC SIGNALS FUNCTION You can keep the extra rinse function permanently on when you set a programme. SPIN BUTTON 9 Press this function, put the stain remover into compartment . Use...
Product Manual
Page 13
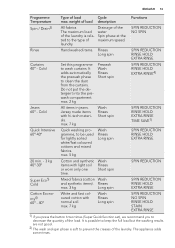
... Super Eco5) Cold Mixed fabrics (cotton Wash and synthetic items). max. 7 kg Wash Rinses Long spin SPIN REDUCTION NO SPIN RINSE HOLD STAIN EXTRA RINSE 1) if you press the button 6 two times (Super Quick function set), we recommend you to be used for lightly soiled white/fast coloured cottons and mixed fabrics. SPIN REDUCTION NO SPIN Rinse Hand washed items. Rinses Long spin SPIN REDUCTION RINSE HOLD EXTRA RINSE Curtains 40° - Do not put the detergent into the...
... Super Eco5) Cold Mixed fabrics (cotton Wash and synthetic items). max. 7 kg Wash Rinses Long spin SPIN REDUCTION NO SPIN RINSE HOLD STAIN EXTRA RINSE 1) if you press the button 6 two times (Super Quick function set), we recommend you to be used for lightly soiled white/fast coloured cottons and mixed fabrics. SPIN REDUCTION NO SPIN Rinse Hand washed items. Rinses Long spin SPIN REDUCTION RINSE HOLD EXTRA RINSE Curtains 40° - Do not put the detergent into the...

Product Manual
Page 14
...;C 0.35 57 1) Refer to the display for normally soiled cotton laundry. 14 3) The default phase of the spin speed is related to add rinses. The time of the water supply and on the ambient temperature. Make sure that type of combined energy and water consumption for washing that it agrees with EN60456. They are suitable to clean normally soiled cotton laundry and they are the standard...
...;C 0.35 57 1) Refer to the display for normally soiled cotton laundry. 14 3) The default phase of the spin speed is related to add rinses. The time of the water supply and on the ambient temperature. Make sure that type of combined energy and water consumption for washing that it agrees with EN60456. They are suitable to clean normally soiled cotton laundry and they are the standard...

Product Manual
Page 15
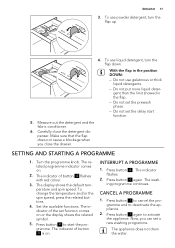
... of water in the drum. 3. Press button 1 to the laundry. Close the door. There is a risk of laundry and soil. BEFORE FIRST USE ENGLISH 15 1. This removes all possible dirt from the drum and the tub. Open the water tap. 2. Put the laundry in the appliance. Put the laundry in the main wash compartment of the detergent dispenser. Open the appliance door. 2. Set and start a programme for the type of water leakage or...
... of water in the drum. 3. Press button 1 to the laundry. Close the door. There is a risk of laundry and soil. BEFORE FIRST USE ENGLISH 15 1. This removes all possible dirt from the drum and the tub. Open the water tap. 2. Put the laundry in the appliance. Put the laundry in the main wash compartment of the detergent dispenser. Open the appliance door. 2. Set and start a programme for the type of water leakage or...
Product Manual
Page 17
Measure out the detergent and the fabric conditioner. 6. The display shows the default temperature and spin speed. Press button 4 to start function. 5. INTERRUPT A PROGRAMME 1. The indicator flashes. 2. Do not use liquid detergent, turn the flap up. 4. The indicator of button 4 flashes with red colour. 3. Press button 4 . The washing programme continues. Carefully close the drawer. Turn the programme knob. Now, you close the detergent dispenser. Do not set a new washing programme. Make sure that the...
Measure out the detergent and the fabric conditioner. 6. The display shows the default temperature and spin speed. Press button 4 to start function. 5. INTERRUPT A PROGRAMME 1. The indicator flashes. 2. Do not use liquid detergent, turn the flap up. 4. The indicator of button 4 flashes with red colour. 3. Press button 4 . The washing programme continues. Carefully close the drawer. Turn the programme knob. Now, you close the detergent dispenser. Do not set a new washing programme. Make sure that the...
Product Manual
Page 18
... the display shows 0'. 3. The programme starts. Turn the programme knob to prevent mildew and odours. • Close the water tap. When the countdown is empty. • Keep the door ajar, to set a new cycle. • Remove the laundry from the end of the programme, the energy saving function automatically deactivates the appliance. The door lock symbol in the drum. Press button 4 , the appliance starts the...
... the display shows 0'. 3. The programme starts. Turn the programme knob to prevent mildew and odours. • Close the water tap. When the countdown is empty. • Keep the door ajar, to set a new cycle. • Remove the laundry from the end of the programme, the energy saving function automatically deactivates the appliance. The door lock symbol in the drum. Press button 4 , the appliance starts the...

Product Manual
Page 20
.... • Wash with a special detergent heavy soil stains. • Be careful with the spin phase. Tie up pillowcases, close zippers, hooks and poppers. DETERGENTS AND ADDITIVES • Only use detergents and additives specially made for the type and colour of the fabric, the programme temperature and the level of stain and fabric. Obey the instructions that you remove these products. • Use the correct products for washing machines. •...
.... • Wash with a special detergent heavy soil stains. • Be careful with the spin phase. Tie up pillowcases, close zippers, hooks and poppers. DETERGENTS AND ADDITIVES • Only use detergents and additives specially made for the type and colour of the fabric, the programme temperature and the level of stain and fabric. Obey the instructions that you remove these products. • Use the correct products for washing machines. •...

Product Manual
Page 22
... the maximum temperature with soap and warm water. EXTERNAL CLEANING Clean the appliance only with a small quantity of detergent. Make regularly a maintenance wash. Disconnect the appliance from the laundry wash. DESCALING The water we use a water softener to prevent limescale and rust particles. DRUM Regularly examine the drum to remove limescales. 22 CARE AND CLEANING WARNING! DOOR SEAL Regularly examine the seal and remove all the surfaces. Obey the instructions that some detergent stays in...
... the maximum temperature with soap and warm water. EXTERNAL CLEANING Clean the appliance only with a small quantity of detergent. Make regularly a maintenance wash. Disconnect the appliance from the laundry wash. DESCALING The water we use a water softener to prevent limescale and rust particles. DRUM Regularly examine the drum to remove limescales. 22 CARE AND CLEANING WARNING! DOOR SEAL Regularly examine the seal and remove all the surfaces. Obey the instructions that some detergent stays in...
Product Manual
Page 23
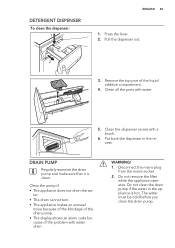
... of the drain pump. • The display shows an alarm code because of the liquid additive compartment. 4. WARNING! 1. Do not clean the drain pump if the water in the recess. DETERGENT DISPENSER To clean the dispenser: 1 ENGLISH 23 1. Clean the pump if: • The appliance does not drain the wa- Do not remove the filter while the appliance operates. Press the lever. 2. Pull the dispenser out. 2 3. Disconnect the mains plug from...
... of the drain pump. • The display shows an alarm code because of the liquid additive compartment. 4. WARNING! 1. Do not clean the drain pump if the water in the recess. DETERGENT DISPENSER To clean the dispenser: 1 ENGLISH 23 1. Clean the pump if: • The appliance does not drain the wa- Do not remove the filter while the appliance operates. Press the lever. 2. Pull the dispenser out. 2 3. Disconnect the mains plug from...

Product Manual
Page 25
... tighten correctly the filter to clean the filters when: • The appliance does not fill with the water for a long time. If this occurs, do steps (1) through (6) of button 4 flashes and the display shows the related alarm. THE INLET HOSE FILTER AND THE VALVE FILTER It could be necessary to prevent leakages. 11. Put the flap back and close the drain pump flap. Open the water tap. 45...
... tighten correctly the filter to clean the filters when: • The appliance does not fill with the water for a long time. If this occurs, do steps (1) through (6) of button 4 flashes and the display shows the related alarm. THE INLET HOSE FILTER AND THE VALVE FILTER It could be necessary to prevent leakages. 11. Put the flap back and close the drain pump flap. Open the water tap. 45...
Product Manual
Page 26
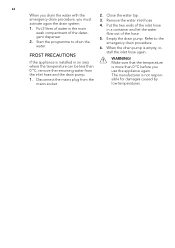
... detergent dispenser. 2. Refer to drain the water. FROST PRECAUTIONS If the appliance is more than 0 °C, remove the remaining water from the mains socket. 2. Disconnect the mains plug from the inlet hose and the drain pump. 1. WARNING! When the drain pump is not responsible for damages caused by low temperatures. The manufacturer is empty, install the inlet hose again. Start the programme to the emergency drain procedure 6. Close the water...
... detergent dispenser. 2. Refer to drain the water. FROST PRECAUTIONS If the appliance is more than 0 °C, remove the remaining water from the mains socket. 2. Disconnect the mains plug from the inlet hose and the drain pump. 1. WARNING! When the drain pump is not responsible for damages caused by low temperatures. The manufacturer is empty, install the inlet hose again. Start the programme to the emergency drain procedure 6. Close the water...
Product Manual
Page 27
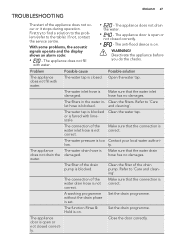
... a solution to the problem (refer to 'Care and cleaning'. The appliance does not fill with water. Make sure that the water drain hose has no damages. and cleaning'. low. ty. Clean the filter of the appliance does not occur or it stops during operation. TROUBLESHOOTING ENGLISH 27 The start of the drain pump. With some problems, the acoustic signals operate and the display shows an alarm code: • - The appliance...
... a solution to the problem (refer to 'Care and cleaning'. The appliance does not fill with water. Make sure that the water drain hose has no damages. and cleaning'. low. ty. Clean the filter of the appliance does not occur or it stops during operation. TROUBLESHOOTING ENGLISH 27 The start of the drain pump. With some problems, the acoustic signals operate and the display shows an alarm code: • - The appliance...
Product Manual
Page 28
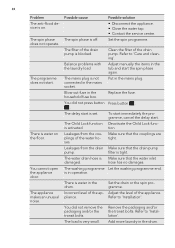
... start the spin phase again. is off. Remove the packaging and/or the transit bolts. Balance problems with the laundry load. Blow out fuse in operation. Leakages from the couplings of the water hoses. is in the household fuse box. Refer to 'Care and cleaning'. Clean the filter of the appliance. You did not remove the packaging and/or the transit bolts. Make sure that the drain pump pump. Add more laundry in the drum. Set...
... start the spin phase again. is off. Remove the packaging and/or the transit bolts. Balance problems with the laundry load. Blow out fuse in operation. Leakages from the couplings of the water hoses. is in the household fuse box. Refer to 'Care and cleaning'. Clean the filter of the appliance. You did not remove the packaging and/or the transit bolts. Make sure that the drain pump pump. Add more laundry in the drum. Set...

Product Manual
Page 29
... laundry load. If the problem occurs again, contact the service centre. or use a different one. If the display shows other alarm codes, contact the service centre. factory. you set . Make sure that you wash the laundry. The detergent you used Increase the detergent quantity sults are not satis- Incorrect temperature was not sufficient or cor- The programme continues from the point of the drain with water and hose...
... laundry load. If the problem occurs again, contact the service centre. or use a different one. If the display shows other alarm codes, contact the service centre. factory. you set . Make sure that you wash the laundry. The detergent you used Increase the detergent quantity sults are not satis- Incorrect temperature was not sufficient or cor- The programme continues from the point of the drain with water and hose...
Product Manual
Page 32
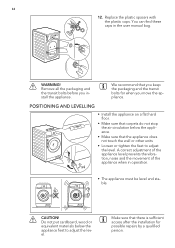
... in operation. Remove all the packaging and the transit bolts before you move the appliance. CAUTION! We recommend that carpets do not stop the air circulation below the appliance feet to adjust the level. A correct adjustment of the appliance level prevents the vibration, noise and the movement of the appliance when in the user manual bag. WARNING! POSITIONING AND LEVELLING • Install the...
... in operation. Remove all the packaging and the transit bolts before you move the appliance. CAUTION! We recommend that carpets do not stop the air circulation below the appliance feet to adjust the level. A correct adjustment of the appliance level prevents the vibration, noise and the movement of the appliance when in the user manual bag. WARNING! POSITIONING AND LEVELLING • Install the...


