

Specification Sheet
Page 1
...;Annual water consumption, l : 10999 •Energy cons. dispenser compartments no : 3 •Program list : Cotton, Synthetics, Delicate, Wool Plus, Steam Refresh, OKOPower, Antiallergy, Quick 20 Min 3 Kg, New Outdoor, Duvets •Product Partner Code : All Partn Product Description : Your favourite pieces need . Expertly protected. Cotton 60°C (kWh) : 0.46 •Time of detergent and softener is cleaned and cared for, even in shorter cycles. Every stitch. Wash clothes in...
...;Annual water consumption, l : 10999 •Energy cons. dispenser compartments no : 3 •Program list : Cotton, Synthetics, Delicate, Wool Plus, Steam Refresh, OKOPower, Antiallergy, Quick 20 Min 3 Kg, New Outdoor, Duvets •Product Partner Code : All Partn Product Description : Your favourite pieces need . Expertly protected. Cotton 60°C (kWh) : 0.46 •Time of detergent and softener is cleaned and cared for, even in shorter cycles. Every stitch. Wash clothes in...
User Manual
Page 2
INSTALLATION...5 4. PROGRAMMES ...16 8. BEFORE FIRST USE 20 9. CARE AND CLEANING 28 13. ACCESSORIES...37 FOR PERFECT RESULTS Thank you might not find on the rating plate. We have the following data available: Model, PNC, Serial Number. SAFETY INSTRUCTIONS 4 3. Visit our website for: Get usage advice, brochures, trouble shooter, service information: www.aeg.com/webselfservice Register your product for better service: www.registeraeg.com Buy Accessories, Consumables and...
INSTALLATION...5 4. PROGRAMMES ...16 8. BEFORE FIRST USE 20 9. CARE AND CLEANING 28 13. ACCESSORIES...37 FOR PERFECT RESULTS Thank you might not find on the rating plate. We have the following data available: Model, PNC, Serial Number. SAFETY INSTRUCTIONS 4 3. Visit our website for: Get usage advice, brochures, trouble shooter, service information: www.aeg.com/webselfservice Register your product for better service: www.registeraeg.com Buy Accessories, Consumables and...
User Manual
Page 3
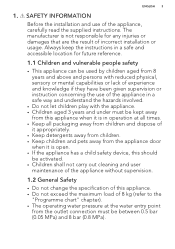
... Before the installation and use of incorrect installation or usage. The manufacturer is open. • If the appliance has a child safety device, this should be activated. • Children shall not carry out cleaning and user maintenance of the appliance without supervision. 1.2 General Safety • Do not change the specification of this appliance. • Do not exceed the maximum load of 8 kg...
... Before the installation and use of incorrect installation or usage. The manufacturer is open. • If the appliance has a child safety device, this should be activated. • Children shall not carry out cleaning and user maintenance of the appliance without supervision. 1.2 General Safety • Do not change the specification of this appliance. • Do not exceed the maximum load of 8 kg...
User Manual
Page 4
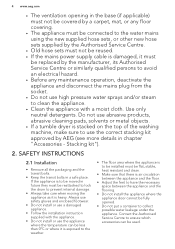
... dryer is stacked on the top of the washing machine, make sure to use the correct stacking kit approved by the manufacturer, its Authorised Service Centre or similarly qualified persons to avoid an electrical hazard. • Before any maintenance operation, deactivate the appliance and disconnect the mains plug from the socket. • Do not use high pressure water sprays and/or steam to clean the appliance. • Clean...
... dryer is stacked on the top of the washing machine, make sure to use the correct stacking kit approved by the manufacturer, its Authorised Service Centre or similarly qualified persons to avoid an electrical hazard. • Before any maintenance operation, deactivate the appliance and disconnect the mains plug from the socket. • Do not use high pressure water sprays and/or steam to clean the appliance. • Clean...
User Manual
Page 5
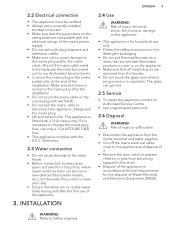
... of the installation. Risk of the appliance. 3. Directives. 2.3 Water connection • Do not cause damage to the water hoses. • Before connection to disconnect the appliance. The glass can get hot. 2.5 Service • To repair the appliance contact an Authorised Service Centre. • Use original spare parts only. 2.6 Disposal WARNING! This appliance is fitted with local requirements for a long time, where repair work has been...
... of the installation. Risk of the appliance. 3. Directives. 2.3 Water connection • Do not cause damage to the water hoses. • Before connection to disconnect the appliance. The glass can get hot. 2.5 Service • To repair the appliance contact an Authorised Service Centre. • Use original spare parts only. 2.6 Disposal WARNING! This appliance is fitted with local requirements for a long time, where repair work has been...
User Manual
Page 8
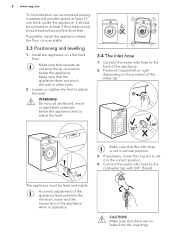
....aeg.com To limit vibration we recommend placing a waterproof wooden panel, at least 2 floor beams and should be level and stable. Connect the water inlet hose to adjust the level. Make sure that there are no leaks from the couplings. A correct adjustment of the appliance level prevents the vibration, noise and the movement of the appliance. 2. WARNING! Connect the water inlet hose to adjust the level...
....aeg.com To limit vibration we recommend placing a waterproof wooden panel, at least 2 floor beams and should be level and stable. Connect the water inlet hose to adjust the level. Make sure that there are no leaks from the couplings. A correct adjustment of the appliance level prevents the vibration, noise and the movement of the appliance. 2. WARNING! Connect the water inlet hose to adjust the level...

User Manual
Page 11
CONTROL PANEL 5.1 Control panel description 1 8 Drain hose 9 Inlet hose connection 10 Mains cable 11 Transit bolts 12 Hose support 2 3 Programme 4 Rinse only Spin only 5 Drain only 13 12 11 10 9 8 7 6 4.2 Appliance overview 1 23 4 5 6 ENGLISH 11 8 9 10 11 12 7 1 Worktop 2 Detergent dispenser 3 Control panel 4 Door handle 5 Rating plate 6 Drain pump filter 7 Feet for levelling the appliance 5.
CONTROL PANEL 5.1 Control panel description 1 8 Drain hose 9 Inlet hose connection 10 Mains cable 11 Transit bolts 12 Hose support 2 3 Programme 4 Rinse only Spin only 5 Drain only 13 12 11 10 9 8 7 6 4.2 Appliance overview 1 23 4 5 6 ENGLISH 11 8 9 10 11 12 7 1 Worktop 2 Detergent dispenser 3 Control panel 4 Door handle 5 Rating plate 6 Drain pump filter 7 Feet for levelling the appliance 5.
User Manual
Page 12
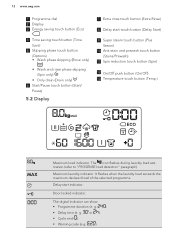
....aeg.com 1 Programme dial 2 Display 3 Energy saving touch button (Eco) 4 Time saving touch button (Time Save) 5 Skipping phase touch button (Options) • Wash phase skipping (Rinse only) • Wash and rinse phase skipping (Spin only) • Only drain (Drain only) 6 Start/Pause touch button (Start/ Pause) 5.2 Display 7 Extra rinse touch button (Extra Rinse) 8 Delay start indicator. The icon flashes during laundry load estimation (refer to "PROSENSE load detection" paragraph). Door locked indicator. It flashes when the laundry load exceeds the maximum declared load...
....aeg.com 1 Programme dial 2 Display 3 Energy saving touch button (Eco) 4 Time saving touch button (Time Save) 5 Skipping phase touch button (Options) • Wash phase skipping (Rinse only) • Wash and rinse phase skipping (Spin only) • Only drain (Drain only) 6 Start/Pause touch button (Start/ Pause) 5.2 Display 7 Extra rinse touch button (Extra Rinse) 8 Delay start indicator. The icon flashes during laundry load estimation (refer to "PROSENSE load detection" paragraph). Door locked indicator. It flashes when the laundry load exceeds the maximum declared load...
User Manual
Page 14
... time when cheaper electricity tariffs are available. You must drain the water to : • Decrease the spin speed. The drum turns regularly to reduce creasing. The door stays locked. Pour the stain remover into compartment . The display shows only the spin speeds available for use at 30 °C before the washing phase. The drum turns regularly to set programme. • Activate the Rinse Hold option . Touch the Start/Pause button...
... time when cheaper electricity tariffs are available. You must drain the water to : • Decrease the spin speed. The drum turns regularly to reduce creasing. The door stays locked. Pour the stain remover into compartment . The display shows only the spin speeds available for use at 30 °C before the washing phase. The drum turns regularly to set programme. • Activate the Rinse Hold option . Touch the Start/Pause button...
User Manual
Page 15
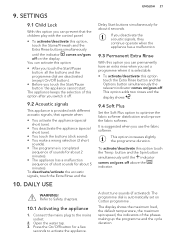
... and the indicator starts flashing. The drum performs smooth movements for about 30 minutes to the selected washing programmes. This option can also be advisable to reach better results. 6.8 Eco Set this button twice to add just one rinse. 6.7 Plus Steam This option adds a steam phase followed by saving energy. By touching any button the anti-crease movements stop and the door unlocks. The display shows the...
... and the indicator starts flashing. The drum performs smooth movements for about 30 minutes to the selected washing programmes. This option can also be advisable to reach better results. 6.8 Eco Set this button twice to add just one rinse. 6.7 Plus Steam This option adds a steam phase followed by saving energy. By touching any button the anti-crease movements stop and the door unlocks. The display shows the...

User Manual
Page 20
... wash» provided that all possible dirt from the appliance. 2. BEFORE FIRST USE 1. Make sure that you set the shortest duration, we recommend that the electrical power is available and the water tap is open. 3. Set and start a programme for drying and other laundry instructions. 20 www.aeg.com Cottons Synthetics Delicates Wool/Silk Steam OKOPower Anti-Allergy 20 min. - 3 kg Outdoor Duvet Spin...
... wash» provided that all possible dirt from the appliance. 2. BEFORE FIRST USE 1. Make sure that you set the shortest duration, we recommend that the electrical power is available and the water tap is open. 3. Set and start a programme for drying and other laundry instructions. 20 www.aeg.com Cottons Synthetics Delicates Wool/Silk Steam OKOPower Anti-Allergy 20 min. - 3 kg Outdoor Duvet Spin...
User Manual
Page 21
... sounds for a few seconds to optimise the fabric softener distribution and improve the fabric softness. The display shows the maximum load, the default temperature, the maximum spin speed, the indicators of this option after you can permanently have an extra rinse when you set on /goes off . Press the On/Off button for about 6 seconds. button and the Spin button simultaneously until the indicator comes...
... sounds for a few seconds to optimise the fabric softener distribution and improve the fabric softness. The display shows the maximum load, the default temperature, the maximum spin speed, the indicators of this option after you can permanently have an extra rinse when you set on /goes off . Press the On/Off button for about 6 seconds. button and the Spin button simultaneously until the indicator comes...
User Manual
Page 22
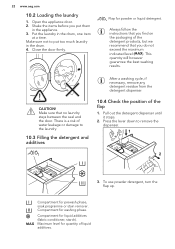
... remove the dispenser. 1 2 3. Open the appliance door. 2. This quantity will however guarantee the best washing results. Make sure that you put too much laundry in the drum, one item at a time. There is a risk of water leakage or damage to the laundry. 10.3 Filling the detergent and additives After a washing cycle, if necessary, remove any detergent residue from the detergent dispenser. 10.4 Check the position of liquid additives. Maximum level...
... remove the dispenser. 1 2 3. Open the appliance door. 2. This quantity will however guarantee the best washing results. Make sure that you put too much laundry in the drum, one item at a time. There is a risk of water leakage or damage to the laundry. 10.3 Filling the detergent and additives After a washing cycle, if necessary, remove any detergent residue from the detergent dispenser. 10.4 Check the position of liquid additives. Maximum level...
User Manual
Page 23
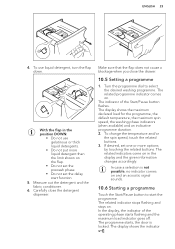
... button flashes. The indicator of the operating phase starts flashing and the maximum load indicator goes off. Carefully close the drawer. 10.5 Setting a programme 1. To change the temperature and/or the spin speed, touch the related buttons. 3. The display shows the indicator . Turn the programme dial to start function. 5. The related indicators come on . The related indicator stops flashing and stays on in the position DOWN: • Do not use liquid detergent, turn...
... button flashes. The indicator of the operating phase starts flashing and the maximum load indicator goes off. Carefully close the drawer. 10.5 Setting a programme 1. To change the temperature and/or the spin speed, touch the related buttons. 3. The display shows the indicator . Turn the programme dial to start function. 5. The related indicators come on . The related indicator stops flashing and stays on in the position DOWN: • Do not use liquid detergent, turn...
User Manual
Page 27
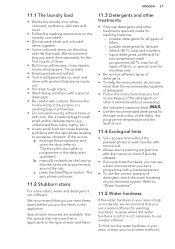
... "Opening the door when a programme or the delay start a washing programme with the maximum load of fabric, - c. Special stain removers are spaced evenly around the tub; Use the special stain remover that you find out the water hardness in the appliance. b. powder detergents for woollens only. • Do not mix different types of detergents. • To help the environment, do not use a water softener. To find on the laundry care...
... "Opening the door when a programme or the delay start a washing programme with the maximum load of fabric, - c. Special stain removers are spaced evenly around the tub; Use the special stain remover that you find out the water hardness in the appliance. b. powder detergents for woollens only. • Do not mix different types of detergents. • To help the environment, do not use a water softener. To find on the laundry care...
User Manual
Page 31
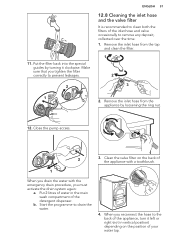
... the main wash compartment of the inlet hose and valve occasionally to clean both the filters of the detergent dispenser. Clean the valve filter on the position of the appliance with a toothbrush. 1 When you drain the water with the emergency drain procedure, you reconnect the hose to drain the water. 4. Remove the inlet hose from the tap and clean the filter. 1 2 3 1 2. b. When you must activate the drain system again: a. Close the pump access. 2 3. Put...
... the main wash compartment of the inlet hose and valve occasionally to clean both the filters of the detergent dispenser. Clean the valve filter on the position of the appliance with a toothbrush. 1 When you drain the water with the emergency drain procedure, you reconnect the hose to drain the water. 4. Remove the inlet hose from the tap and clean the filter. 1 2 3 1 2. b. When you must activate the drain system again: a. Close the pump access. 2 3. Put...
User Manual
Page 32
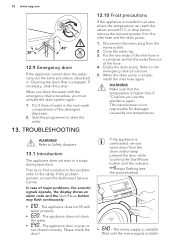
Disconnect the mains plug from the drum and/or keep pressed the door while touching the Start/Pause button until the mains supply is installed in 'Cleaning the drain filter' paragraph. Put the two ends of the inlet hose in the main wash compartment of the detergent dispenser. 2. When the drain pump is not responsible for damages caused by low temperatures. Make sure that the temperature is higher than...
Disconnect the mains plug from the drum and/or keep pressed the door while touching the Start/Pause button until the mains supply is installed in 'Cleaning the drain filter' paragraph. Put the two ends of the inlet hose in the main wash compartment of the detergent dispenser. 2. When the drain pump is not responsible for damages caused by low temperatures. Make sure that the temperature is higher than...
User Manual
Page 33
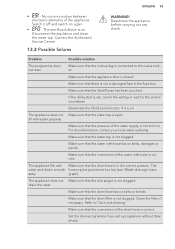
... sure that the drain hose has no kinks, damages or bends. hose may be positioned too low (see 'Water drainage' para- Problem Possible solution The programme does not start is connected to 'Care and cleaning'. If the delay start . ENGLISH 33 • - Make sure that the mains plug is set a programme without drain phase. Set the drain programme if you set , cancel the setting or wait for...
... sure that the drain hose has no kinks, damages or bends. hose may be positioned too low (see 'Water drainage' para- Problem Possible solution The programme does not start is connected to 'Care and cleaning'. If the delay start . ENGLISH 33 • - Make sure that the mains plug is set a programme without drain phase. Set the drain programme if you set , cancel the setting or wait for...
User Manual
Page 34
... by balance problems. There is finished. If you need to 'Care and cleaning'. The spin phase does not operate or the washing cycle lasts longer than usual. Clean the filter, if necessary. The appliance makes an unusual noise and vibrates. Make sure that the appliance receives electrical power. not satisfactory. Make sure that the washing programme is water on the floor. Add more laundry in the tub and start the spin phase...
... by balance problems. There is finished. If you need to 'Care and cleaning'. The spin phase does not operate or the washing cycle lasts longer than usual. Clean the filter, if necessary. The appliance makes an unusual noise and vibrates. Make sure that the appliance receives electrical power. not satisfactory. Make sure that the washing programme is water on the floor. Add more laundry in the tub and start the spin phase...
User Manual
Page 35
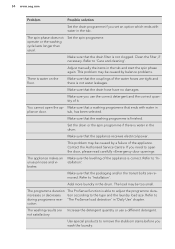
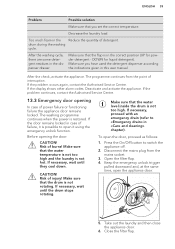
... time, open the door, proceed as follows: 1. The programme continues from the mains socket. 3. Open the filter flap. 4. ENGLISH 35 Problem Possible solution Make sure that the drum is not hot. Decrease the laundry load. If the door remains locked in this user manual. DOWN for powder detergent - If the problem occurs again, contact the Authorised Service Centre. If the display shows other alarm codes. Make sure that you have used...
... time, open the door, proceed as follows: 1. The programme continues from the mains socket. 3. Open the filter flap. 4. ENGLISH 35 Problem Possible solution Make sure that the drum is not hot. Decrease the laundry load. If the door remains locked in this user manual. DOWN for powder detergent - If the problem occurs again, contact the Authorised Service Centre. If the display shows other alarm codes. Make sure that you have used...


