Specification Sheet
Page 1
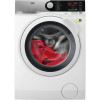
...;Ultra quick wash •Time save option •Delay start option •Pre-wash option •Extra rinse option •Aqua Control •Child safety lock •A+++ energy efficiency class • A class wash performance • B class spin performance Technical Specs : • Energy efficiency (2010/30/EC) : A+++ -50% •Spin drying efficiency (2010/30/EC) : B •Energy consumption (annual) : 97,0 •Annual water consumption, l : 10999 •Energy cons. Every thread. Wash clothes in shorter cycles...
...;Ultra quick wash •Time save option •Delay start option •Pre-wash option •Extra rinse option •Aqua Control •Child safety lock •A+++ energy efficiency class • A class wash performance • B class spin performance Technical Specs : • Energy efficiency (2010/30/EC) : A+++ -50% •Spin drying efficiency (2010/30/EC) : B •Energy consumption (annual) : 97,0 •Annual water consumption, l : 10999 •Energy cons. Every thread. Wash clothes in shorter cycles...
User Manual
Page 2
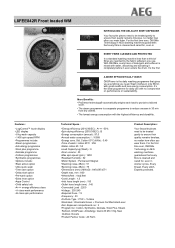
... from it to change without notice. PRODUCT DESCRIPTION 9 5. SETTINGS...19 9. Visit our website for: Get usage advice, brochures, trouble shooter, service information: www.aeg.com/webselfservice Register your appliance: www.aeg.com/shop CUSTOMER CARE AND SERVICE Always use original spare parts. When contacting our Authorised Service Centre, ensure that help make life simpler features you have the following data available: Model, PNC, Serial Number. Warning / Caution...
... from it to change without notice. PRODUCT DESCRIPTION 9 5. SETTINGS...19 9. Visit our website for: Get usage advice, brochures, trouble shooter, service information: www.aeg.com/webselfservice Register your appliance: www.aeg.com/shop CUSTOMER CARE AND SERVICE Always use original spare parts. When contacting our Authorised Service Centre, ensure that help make life simpler features you have the following data available: Model, PNC, Serial Number. Warning / Caution...
User Manual
Page 3
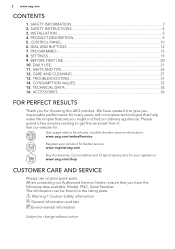
... open. • Children shall not carry out cleaning and user maintenance of the appliance without supervision. 1.2 General Safety • Do not change the specification of this appliance when it is in operation at the water entry point from the appliance door when it appropriately. • Keep detergents ...appliance. • Children aged 3 years and under must be kept away from this appliance. • Do not exceed the maximum load of the appliance, carefully read the supplied instructions. ENGLISH 3 1. SAFETY INFORMATION Before the installation and use of the appliance in a safe way...
... open. • Children shall not carry out cleaning and user maintenance of the appliance without supervision. 1.2 General Safety • Do not change the specification of this appliance when it is in operation at the water entry point from the appliance door when it appropriately. • Keep detergents ...appliance. • Children aged 3 years and under must be kept away from this appliance. • Do not exceed the maximum load of the appliance, carefully read the supplied instructions. ENGLISH 3 1. SAFETY INFORMATION Before the installation and use of the appliance in a safe way...
User Manual
Page 4
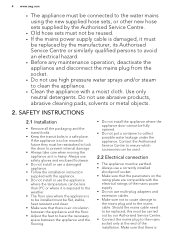
...; Make sure that the parameters on the rating plate are compatible with the electrical ratings of the installation. Use only neutral detergents. SAFETY INSTRUCTIONS 2.1 Installation • Remove all the packaging and the transit bolts. • Keep the transit bolts in future they must be reattached to lock the drum to prevent internal damage. • Always take care when moving the appliance as it is...
...; Make sure that the parameters on the rating plate are compatible with the electrical ratings of the installation. Use only neutral detergents. SAFETY INSTRUCTIONS 2.1 Installation • Remove all the packaging and the transit bolts. • Keep the transit bolts in future they must be reattached to lock the drum to prevent internal damage. • Always take care when moving the appliance as it is...
User Manual
Page 5
... the detergent packaging. 3. Refer to the appliance. • This appliance is for a long time, where repair work has been carried out or new devices fitted (water meters, etc.), let the water flow until it . • Remove the door catch to disconnect the appliance. The glass can get hot. 2.5 Service • To repair the appliance contact an Authorised Service Centre. • Use original spare parts only...
... the detergent packaging. 3. Refer to the appliance. • This appliance is for a long time, where repair work has been carried out or new devices fitted (water meters, etc.), let the water flow until it . • Remove the door catch to disconnect the appliance. The glass can get hot. 2.5 Service • To repair the appliance contact an Authorised Service Centre. • Use original spare parts only...
User Manual
Page 7
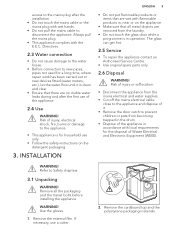
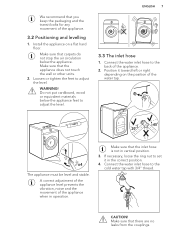
... the water inlet hose to set it toward left or right depending on a flat hard floor. Position it in vertical position. 3. If necessary, loose the ring nut to the back of the appliance when in operation. Install the appliance on the position of the appliance. 3.2 Positioning and levelling 1. WARNING! A correct adjustment of the appliance level prevents the vibration, noise and...
... the water inlet hose to set it toward left or right depending on a flat hard floor. Position it in vertical position. 3. If necessary, loose the ring nut to the back of the appliance when in operation. Install the appliance on the position of the appliance. 3.2 Positioning and levelling 1. WARNING! A correct adjustment of the appliance level prevents the vibration, noise and...

User Manual
Page 10
... Steam Delay Start Start/Pause 12 11 10 9 8 7 6 10 www.aeg.com 4.2 Appliance overview 1 23 4 5 6 8 9 10 11 12 7 1 Worktop 2 Detergent dispenser 3 Control panel 4 Door handle 5 Rating plate 6 Drain pump filter 7 Feet for levelling the appliance 5. CONTROL PANEL 5.1 Control panel description 1 8 Drain hose 9 Inlet hose connection 10 Mains cable 11 Transit bolts 12 Hose support 2 3 Programme Cottons Synthetics Delicates Wool / Silk Steam OKOPower Anti-Allergy 20 min. - 3kg Outdoor Duvet Eco Time Save 4 Drain only Stains Extra rinse 5 Spin only Prewash Rinse only...
... Steam Delay Start Start/Pause 12 11 10 9 8 7 6 10 www.aeg.com 4.2 Appliance overview 1 23 4 5 6 8 9 10 11 12 7 1 Worktop 2 Detergent dispenser 3 Control panel 4 Door handle 5 Rating plate 6 Drain pump filter 7 Feet for levelling the appliance 5. CONTROL PANEL 5.1 Control panel description 1 8 Drain hose 9 Inlet hose connection 10 Mains cable 11 Transit bolts 12 Hose support 2 3 Programme Cottons Synthetics Delicates Wool / Silk Steam OKOPower Anti-Allergy 20 min. - 3kg Outdoor Duvet Eco Time Save 4 Drain only Stains Extra rinse 5 Spin only Prewash Rinse only...
User Manual
Page 11
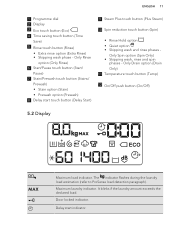
... start indicator. Delay start touch button (Delay Start) 9 Steam Plus touch button (Plus Steam) 10 Spin reduction touch button (Spin) • Rinse Hold option • Quiet option • Skipping wash and rinse phases - The indicator flashes during the laundry load estimation (refer to ProSense load detection paragraph) . It blinks if the laundry amount exceeds the declared load. ENGLISH 11 1 Programme dial 2 Display 3 Eco touch button (Eco) 4 Time saving touch button (Time Save) 5 Rinse touch button (Rinse) • Extra rinse...
... start indicator. Delay start touch button (Delay Start) 9 Steam Plus touch button (Plus Steam) 10 Spin reduction touch button (Spin) • Rinse Hold option • Quiet option • Skipping wash and rinse phases - The indicator flashes during the laundry load estimation (refer to ProSense load detection paragraph) . It blinks if the laundry amount exceeds the declared load. ENGLISH 11 1 Programme dial 2 Display 3 Eco touch button (Eco) 4 Time saving touch button (Time Save) 5 Rinse touch button (Rinse) • Extra rinse...
User Manual
Page 13
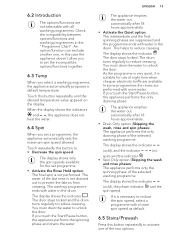
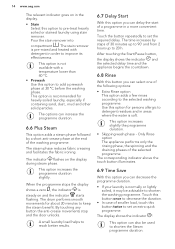
... and washing programmes in the drum. Touch repeatedly this button repeatedly until the desired temperature value appears on the display. The door stays locked and the drum turns regularly to reduce creasing. If you touch the Start/Pause button, the appliance performs the only draining phase. The door stays locked. You must drain the water to unlock the door. If you touch the Start/Pause button, the appliance performs the spinning...
... and washing programmes in the drum. Touch repeatedly this button repeatedly until the desired temperature value appears on the display. The door stays locked and the drum turns regularly to reduce creasing. If you touch the Start/Pause button, the appliance performs the only draining phase. The door stays locked. You must drain the water to unlock the door. If you touch the Start/Pause button, the appliance performs the spinning...
User Manual
Page 14
... to set an extra quick programme. Pour the stain remover into compartment . This option is normally or lightly soiled, it may be used to shorten the washing programme. The options can select one of the selected programme. By touching any button the anti-crease movements stop and the door unlocks. Only Rinse option The appliance performs only the rinsing phase, the spinning and the draining...
... to set an extra quick programme. Pour the stain remover into compartment . This option is normally or lightly soiled, it may be used to shorten the washing programme. The options can select one of the selected programme. By touching any button the anti-crease movements stop and the door unlocks. Only Rinse option The appliance performs only the rinsing phase, the spinning and the draining...
User Manual
Page 19
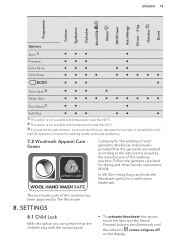
... and other laundry instructions. SETTINGS 8.1 Child Lock With this option you decrease the load size. Follow the garment care label for the washing of this washing machine. M1636 In UK, Eire, Hong Kong and India the Woolmark symbol is a certification trademark. It is possible to the instructions issued by The Woolmark 8. ENGLISH 19 Programme Cottons Synthetics Delicates Wool/Silk Steam OKOPower Anti...
... and other laundry instructions. SETTINGS 8.1 Child Lock With this option you decrease the load size. Follow the garment care label for the washing of this washing machine. M1636 In UK, Eire, Hong Kong and India the Woolmark symbol is a certification trademark. It is possible to the instructions issued by The Woolmark 8. ENGLISH 19 Programme Cottons Synthetics Delicates Wool/Silk Steam OKOPower Anti...
User Manual
Page 21
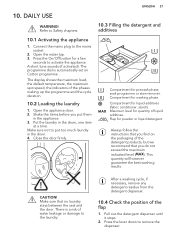
... door. After a washing cycle, if necessary, remove any detergent residue from the detergent dispenser. 10.4 Check the position of liquid additives. Press the lever down to the mains socket. 2. 10. DAILY USE WARNING! A short tune sounds (if activated). The display shows the maximum load, the default temperature, the maximum spin speed, the indicators of water leakage or damage to put them in the drum, one item at a time...
... door. After a washing cycle, if necessary, remove any detergent residue from the detergent dispenser. 10.4 Check the position of liquid additives. Press the lever down to the mains socket. 2. 10. DAILY USE WARNING! A short tune sounds (if activated). The display shows the maximum load, the default temperature, the maximum spin speed, the indicators of water leakage or damage to put them in the drum, one item at a time...
User Manual
Page 22
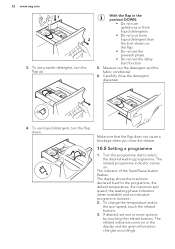
... use liquid detergent, turn the flap up. If desired, set the delay start function. 5. Measure out the detergent and the fabric conditioner. 6. To change the temperature and/or the spin speed, touch the related buttons. 3. The related indicators come on . The related programme indicator comes on in the position DOWN: • Do not use powder detergent, turn the flap down. 22 www.aeg.com 1 2 3. The display shows the maximum declared load...
... use liquid detergent, turn the flap up. If desired, set the delay start function. 5. Measure out the detergent and the fabric conditioner. 6. To change the temperature and/or the spin speed, touch the related buttons. 3. The related indicators come on . The related programme indicator comes on in the position DOWN: • Do not use powder detergent, turn the flap down. 22 www.aeg.com 1 2 3. The display shows the maximum declared load...
User Manual
Page 26
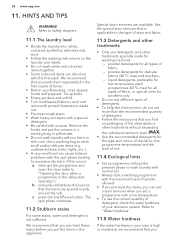
... excessive vibration. b. Special stain removers are spaced evenly around the tub; liquid detergents, preferably for low temperature wash programmes (60 °C max) for the first couple of fabric, - HINTS AND TIPS WARNING! Use the special stain remover that is high or moderate, we recommend that you wash them separately for all types of times. • Button up belts. • Empty pockets and unfold. • Turn multilayered fabrics...
... excessive vibration. b. Special stain removers are spaced evenly around the tub; liquid detergents, preferably for low temperature wash programmes (60 °C max) for the first couple of fabric, - HINTS AND TIPS WARNING! Use the special stain remover that is high or moderate, we recommend that you wash them separately for all types of times. • Button up belts. • Empty pockets and unfold. • Turn multilayered fabrics...

User Manual
Page 29
... remove the filter while the appliance operates. • Do not clean the pump if the water in the appliance is necessary, remove fluff and objects from the filter recess. 9. If it . 1 1 2 8. Squeeze the two levers and pull the 1 drainage duct forward to open it is hot. Close the drainage duct and turn the filter anti-clockwise to clean the pump: 1. If it . 2 2 1 2. Let the water...
... remove the filter while the appliance operates. • Do not clean the pump if the water in the appliance is necessary, remove fluff and objects from the filter recess. 9. If it . 1 1 2 8. Squeeze the two levers and pull the 1 drainage duct forward to open it is hot. Close the drainage duct and turn the filter anti-clockwise to clean the pump: 1. If it . 2 2 1 2. Let the water...
User Manual
Page 30
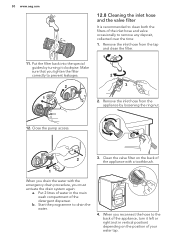
... pump access. 2 3. Start the programme to clean both the filters of your water tap. Put the filter back into the special guides by loosening the ring nut. 12. Put 2 litres of water in vertical position) depending on the back of the detergent dispenser. When you reconnect the hose to remove any deposit, collected over the time: 1. b. Make sure that you must activate the drain...
... pump access. 2 3. Start the programme to clean both the filters of your water tap. Put the filter back into the special guides by loosening the ring nut. 12. Put 2 litres of water in vertical position) depending on the back of the detergent dispenser. When you reconnect the hose to remove any deposit, collected over the time: 1. b. Make sure that you must activate the drain...
User Manual
Page 31
... to the problem (refer to drain the water. 13. In case of the detergent dispenser. 2. Please check the door! If necessary, clean the pump. WARNING! Refer to the emergency drain procedure. 5. The appliance does not drain the water. • - Wait until the indicator stops flashing (see the picture below , remove the remaining water from the inlet hose and the drain pump. 1. Put the two ends of the inlet hose in 'Cleaning the drain filter' paragraph...
... to the problem (refer to drain the water. 13. In case of the detergent dispenser. 2. Please check the door! If necessary, clean the pump. WARNING! Refer to the emergency drain procedure. 5. The appliance does not drain the water. • - Wait until the indicator stops flashing (see the picture below , remove the remaining water from the inlet hose and the drain pump. 1. Put the two ends of the inlet hose in 'Cleaning the drain filter' paragraph...
User Manual
Page 32
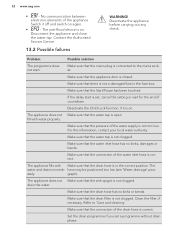
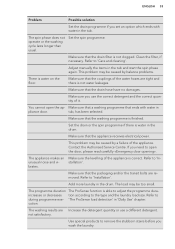
.... Problem Possible solution The programme does not start is set a programme without drain phase. Make sure that the water inlet hose has no kinks or bends. Deactivate the Child Lock function, if it off and switch on again. • - Make sure that the drain hose is connected to 'Care and cleaning'. drain the water. Disconnect the appliance and close the water tap. Contact the Authorised Service Centre...
.... Problem Possible solution The programme does not start is set a programme without drain phase. Make sure that the water inlet hose has no kinks or bends. Deactivate the Child Lock function, if it off and switch on again. • - Make sure that the drain hose is connected to 'Care and cleaning'. drain the water. Disconnect the appliance and close the water tap. Contact the Authorised Service Centre...
User Manual
Page 33
... you use a different detergent. The washing results are removed. Use special products to the type and the laundry load size. Make sure you wash the laundry. Make sure that a washing programme that the drain filter is not clogged. Add more laundry in the tub and start the spin phase again. Adjust manually the items in the drum. Refer to 'Care and cleaning'. Clean the filter, if necessary. Refer to 'Installation'. not satisfactory. This problem may be caused by balance problems. There...
... you use a different detergent. The washing results are removed. Use special products to the type and the laundry load size. Make sure you wash the laundry. Make sure that a washing programme that the drain filter is not clogged. Add more laundry in the tub and start the spin phase again. Adjust manually the items in the drum. Refer to 'Care and cleaning'. Clean the filter, if necessary. Refer to 'Installation'. not satisfactory. This problem may be caused by balance problems. There...

User Manual
Page 34
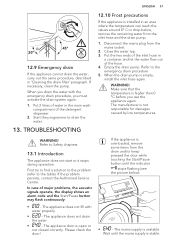
... hot. Open the filter flap. 4. Decrease the laundry load. DOWN for powder detergent - If the problem continues, contact the Authorised Service Centre. 13.3 Emergency door opening the door: CAUTION! Risk of injury! CAUTION! Disconnect the mains plug from the point of power failure or functioning failure the appliance door remains locked. Too much foam in this user manual. Make sure that the drum is restored. Make sure that the water temperature...
... hot. Open the filter flap. 4. Decrease the laundry load. DOWN for powder detergent - If the problem continues, contact the Authorised Service Centre. 13.3 Emergency door opening the door: CAUTION! Risk of injury! CAUTION! Disconnect the mains plug from the point of power failure or functioning failure the appliance door remains locked. Too much foam in this user manual. Make sure that the drum is restored. Make sure that the water temperature...


