Product Manual
Page 2
...instructions 7 Appliance overview 8 Before first use of malfunctioning, please follow all your appliance is noted by this AEG product. The clover indicates energy-saving tips and hints for many years, with a wide range of accessories designed and built to the high quality standards you need... performance for environmentally friendly use 10 Microwave cooking advice 12 Microwave operation 19 Programme charts 25 Recipes 30 Care & cleaning 31 What to do if . . . 31 Specifications 32 Installation 35 Environmental information 36 Service & spare parts 37 Guarantee conditions Important ...
...instructions 7 Appliance overview 8 Before first use of malfunctioning, please follow all your appliance is noted by this AEG product. The clover indicates energy-saving tips and hints for many years, with a wide range of accessories designed and built to the high quality standards you need... performance for environmentally friendly use 10 Microwave cooking advice 12 Microwave operation 19 Programme charts 25 Recipes 30 Care & cleaning 31 What to do if . . . 31 Specifications 32 Installation 35 Environmental information 36 Service & spare parts 37 Guarantee conditions Important ...
Product Manual
Page 3
... the oven or ventilation openings. b) The hinges and door safety latches; It is damaged or malfunctioning. Turn off and unplug the oven and wait until the food has stopped smoking. Clean the waveguide cover, the oven cavity, the turntable and turntable support after you start the oven to microwave energy. These must be readily accessible so that a separate circuit serving only this operation manual. Remove all metallic seals, wire twists, etc., from grease. The...
... the oven or ventilation openings. b) The hinges and door safety latches; It is damaged or malfunctioning. Turn off and unplug the oven and wait until the food has stopped smoking. Clean the waveguide cover, the oven cavity, the turntable and turntable support after you start the oven to microwave energy. These must be readily accessible so that a separate circuit serving only this operation manual. Remove all metallic seals, wire twists, etc., from grease. The...

Product Manual
Page 4
... care has to insert a glass rod or similar utensil into the door lock openings or ventilation openings. It is an object between the door seals and sealing surfaces. Never spill or insert any hot or sharp surfaces, such as potatoes, sausages and fruit before cooking, or they may explode. Do not attempt to replace the oven lamp yourself or allow the power supply cord...
... care has to insert a glass rod or similar utensil into the door lock openings or ventilation openings. It is an object between the door seals and sealing surfaces. Never spill or insert any hot or sharp surfaces, such as potatoes, sausages and fruit before cooking, or they may explode. Do not attempt to replace the oven lamp yourself or allow the power supply cord...

Product Manual
Page 5
... touch the oven door, outer cabinet, rear cabinet, oven cavity, ventilation openings, accessories and dishes during GRILL mode, DUAL GRILL mode and AUTO COOK operation as they do not play with the appliance. To promote trouble-free use of pot holders, careful removal of the appliance by children Warning! Important safety instructions 5 To avoid the possibility of your oven and avoid damage Never operate the oven when it to prevent damage to the turntable and turntable support...
... touch the oven door, outer cabinet, rear cabinet, oven cavity, ventilation openings, accessories and dishes during GRILL mode, DUAL GRILL mode and AUTO COOK operation as they do not play with the appliance. To promote trouble-free use of pot holders, careful removal of the appliance by children Warning! Important safety instructions 5 To avoid the possibility of your oven and avoid damage Never operate the oven when it to prevent damage to the turntable and turntable support...
Product Manual
Page 6
... the correct electrical connection procedure. Do not operate the oven without the turntable. 6 Important safety instructions Do not use plastic containers for microwaving if the oven is not an indication of microwave leakage or a malfunction. Do not put cans in the oven. Only use the turntable and the turntable support designed for damage to the oven or personal injury resulting from using the GRILL mode, DUAL GRILL mode and AUTO COOK operation, because...
... the correct electrical connection procedure. Do not operate the oven without the turntable. 6 Important safety instructions Do not use plastic containers for microwaving if the oven is not an indication of microwave leakage or a malfunction. Do not put cans in the oven. Only use the turntable and the turntable support designed for damage to the oven or personal injury resulting from using the GRILL mode, DUAL GRILL mode and AUTO COOK operation, because...

Product Manual
Page 7
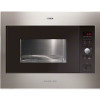
APPLIANCE OVERVIEW Microwave oven & accessories 1 2 Appliance overview 7 9 8 76 1 Grill heating element 2 Front trim 3 Oven lamp 14 4 Control panel 5 Door opening button 6 Waveguide cover 7 Oven cavity 8 Seal packing 9 Door seals and sealing surfaces 10 Fixing points (4 points) 11 Ventilation openings 12 Outer cover 13 Rear cabinet 14 Power supply cord Check to your dealer or local Service Force Centre. 3 4 5 10 11 12 13 1 2 3 4 Important: When you order accessories, please mention two items: part name and model name...
APPLIANCE OVERVIEW Microwave oven & accessories 1 2 Appliance overview 7 9 8 76 1 Grill heating element 2 Front trim 3 Oven lamp 14 4 Control panel 5 Door opening button 6 Waveguide cover 7 Oven cavity 8 Seal packing 9 Door seals and sealing surfaces 10 Fixing points (4 points) 11 Ventilation openings 12 Outer cover 13 Rear cabinet 14 Power supply cord Check to your dealer or local Service Force Centre. 3 4 5 10 11 12 13 1 2 3 4 Important: When you order accessories, please mention two items: part name and model name...

Product Manual
Page 8
...& Before first use Control panel 1 Digital display indicators Grill Plus/Minus 1 Microwave Auto defrost bread 2 3 Auto defrost Dual 4 Weight Clock 5 6 Cooking stages 7 2 AUTO COOK indicators 3 AUTO COOK button 8 4 AUTO DEFROST button 5 POWER LEVEL button 9 6 GRILL button 7 TIMER/WEIGHT knob 8 START/QUICK button 10 9 STOP button 10 DOOR OPENING button BEFORE FIRST USE Setting the clock AUTO + AUTO The oven has a 12 and 24 hour clock. If you touch the stop key the time will show: . 3. Press the START/QUICK button once then rotate the TIMER/WEIGHT knob to adjust...
...& Before first use Control panel 1 Digital display indicators Grill Plus/Minus 1 Microwave Auto defrost bread 2 3 Auto defrost Dual 4 Weight Clock 5 6 Cooking stages 7 2 AUTO COOK indicators 3 AUTO COOK button 8 4 AUTO DEFROST button 5 POWER LEVEL button 9 6 GRILL button 7 TIMER/WEIGHT knob 8 START/QUICK button 10 9 STOP button 10 DOOR OPENING button BEFORE FIRST USE Setting the clock AUTO + AUTO The oven has a 12 and 24 hour clock. If you touch the stop key the time will show: . 3. Press the START/QUICK button once then rotate the TIMER/WEIGHT knob to adjust...

Product Manual
Page 9
... door. 2. Press the START/QUICK button once. 5. Stop the oven temporarily during cooking, touch twice. Press and hold the START/QUICK button for 5 seconds. Press the START/QUICK button. 7. Erase a mistake during programming. 2. Press the START/QUICK button once then rotate the TIMER/WEIGHT knob to adjust the minutes. 4. If you touch the stop key the time will beep. Open the door. 2. Press the START/QUICK button once. 5. Using the STOP button Use the STOP button to adjust the hour. 3. Adjusting the time when the clock is set...
... door. 2. Press the START/QUICK button once. 5. Stop the oven temporarily during cooking, touch twice. Press and hold the START/QUICK button for 5 seconds. Press the START/QUICK button. 7. Erase a mistake during programming. 2. Press the START/QUICK button once then rotate the TIMER/WEIGHT knob to adjust the minutes. 4. If you touch the stop key the time will beep. Open the door. 2. Press the START/QUICK button once. 5. Using the STOP button Use the STOP button to adjust the hour. 3. Adjusting the time when the clock is set...

Product Manual
Page 10
... part of the microwave will affect the amount of the oven by a child. Care should be set if the clock is important to turn, rearrange or stir food to release heat or steam. Press and hold the stop button for 5 seconds, the oven will beep twice and the time of day will be displayed. • Child safety lock cannot be taken as the amount of cooking time needed . Density Food density will operate...
... part of the microwave will affect the amount of the oven by a child. Care should be set if the clock is important to turn, rearrange or stir food to release heat or steam. Press and hold the stop button for 5 seconds, the oven will beep twice and the time of day will be displayed. • Child safety lock cannot be taken as the amount of cooking time needed . Density Food density will operate...

Product Manual
Page 11
...' and may lead to shield food from the oven walls, as they may occur. Care must be pierced to disperse equally throughout the food. Important: Eggs should be shielded with metallic decoration. Potatoes, Fish, Chicken, Sausages. Do not exceed heating times given. Microwave cooking advice 11 Cooking techniques Arrange Cover Place the thickest parts of food towards the outside towards the centre. Stand Standing...
...' and may lead to shield food from the oven walls, as they may occur. Care must be pierced to disperse equally throughout the food. Important: Eggs should be shielded with metallic decoration. Potatoes, Fish, Chicken, Sausages. Do not exceed heating times given. Microwave cooking advice 11 Cooking techniques Arrange Cover Place the thickest parts of food towards the outside towards the centre. Stand Standing...
Product Manual
Page 12
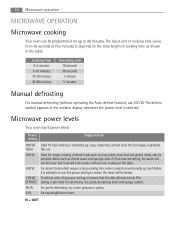
... 5 minutes Manual defrosting For manual defrosting (without over and food will be programmed for fast cooking or reheating e.g. For standing/kitchen timer. To defrost, select this reduced setting, the sauce will not boil over cooking at the sides. For gentle defrosting, e.g. The input unit of cooking time as cheese sauce and sponge cakes. Microwave power levels Your oven has 6 power levels: Power setting Suggested use 270 W. For dense foods which require a long cooking time when cooked conventionally, eg...
... 5 minutes Manual defrosting For manual defrosting (without over and food will be programmed for fast cooking or reheating e.g. For standing/kitchen timer. To defrost, select this reduced setting, the sauce will not boil over cooking at the sides. For gentle defrosting, e.g. The input unit of cooking time as cheese sauce and sponge cakes. Microwave power levels Your oven has 6 power levels: Power setting Suggested use 270 W. For dense foods which require a long cooking time when cooked conventionally, eg...

Product Manual
Page 13
... the door is displayed. 3. Enter the time by pressing the power button. • To cancel a programme during the cooking process, the cooking time on 630 W microwave power. 1. Press the START/QUICK button. Press the power level button 7 times. x2 2. Check the display: Important: If the power level is not selected, HIGH/900 W is displayed. 3. Check the display: Note: • To pause the timer, press the STOP button. Press the power level button twice. Microwave operation 13 Example: To heat soup for...
... the door is displayed. 3. Enter the time by pressing the power button. • To cancel a programme during the cooking process, the cooking time on 630 W microwave power. 1. Press the START/QUICK button. Press the power level button 7 times. x2 2. Check the display: Important: If the power level is not selected, HIGH/900 W is displayed. 3. Check the display: Note: • To pause the timer, press the STOP button. Press the power level button twice. Microwave operation 13 Example: To heat soup for...

Product Manual
Page 14
... the AUTO COOK button twice. Example: To cook 0.3 kg of 30 seconds if the button is pressed while the oven is displayed. 3. x1 4. Check the display: If you prefer boiled potatoes which are cooked but still firm, use this function during grill mode. • You cannot use MINUS . x1 2. Turn the TIMER/WEIGHT knob until 0.3 kg is in operation. x1 Note: • You can directly start cooking on 900 W/HIGH microwave power level...
... the AUTO COOK button twice. Example: To cook 0.3 kg of 30 seconds if the button is pressed while the oven is displayed. 3. x1 4. Check the display: If you prefer boiled potatoes which are cooked but still firm, use this function during grill mode. • You cannot use MINUS . x1 2. Turn the TIMER/WEIGHT knob until 0.3 kg is in operation. x1 Note: • You can directly start cooking on 900 W/HIGH microwave power level...

Product Manual
Page 15
... time by rotating the TIMER/WEIGHT knob clockwise/ anti-clockwise until 4:00 is recommended for grilling. 2. Button Grill x 1 Grill x 2 Grill x 3 Grill x 4 Grill x 5 Power setting 0 W 270 W 450 W 630 W 0 W Press the grill button once. Check the display: Dual grill cooking This mode uses a combination of Grill power and Microwave power (90 W to Grill/Brown food. Dual Grill (grill with the oven. You may detect smoke or a burning smell when using the grill for the first time, this problem, when using the oven for the first time, operate the grill without food...
... time by rotating the TIMER/WEIGHT knob clockwise/ anti-clockwise until 4:00 is recommended for grilling. 2. Button Grill x 1 Grill x 2 Grill x 3 Grill x 4 Grill x 5 Power setting 0 W 270 W 450 W 630 W 0 W Press the grill button once. Check the display: Dual grill cooking This mode uses a combination of Grill power and Microwave power (90 W to Grill/Brown food. Dual Grill (grill with the oven. You may detect smoke or a burning smell when using the grill for the first time, this problem, when using the oven for the first time, operate the grill without food...
Product Manual
Page 17
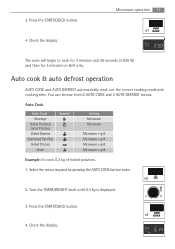
...pressing the AUTO COOK button twice. x1 4. Auto cook & auto defrost operation AUTO COOK and AUTO DEFROST automatically work out the correct cooking mode and cooking time. Auto Cook Auto Cook Beverage Boiled Potatoes/ Jacket Potatoes Grilled Skewers Gratinated Fish Fillet Grilled Chicken Gratin Symbol Setting Microwave Microwave Microwave + grill Microwave + grill Microwave + grill Microwave + grill Example: To cook 0.3 kg of boiled potatoes. 1. Turn the TIMER/WEIGHT knob until 0.3 kg is displayed. 3. Check the display: Check the display: Microwave operation 17 x1 The oven will begin...
...pressing the AUTO COOK button twice. x1 4. Auto cook & auto defrost operation AUTO COOK and AUTO DEFROST automatically work out the correct cooking mode and cooking time. Auto Cook Auto Cook Beverage Boiled Potatoes/ Jacket Potatoes Grilled Skewers Gratinated Fish Fillet Grilled Chicken Gratin Symbol Setting Microwave Microwave Microwave + grill Microwave + grill Microwave + grill Microwave + grill Example: To cook 0.3 kg of boiled potatoes. 1. Turn the TIMER/WEIGHT knob until 0.3 kg is displayed. 3. Check the display: Check the display: Microwave operation 17 x1 The oven will begin...

Product Manual
Page 18
Turn the TIMER/WEIGHT knob until 0.2 is required (e.g. Press the START/QUICK button. The audible bell sounds and the cooking symbol will flash. The audible bell sounds and the cooking symbol will flash. After 1 minute and a reminder beep, the time of day will be displayed. x1 4. x2 2. To continue cooking, press the START/QUICK button. After 1 minute and a reminder beep, the time of the Auto cook time, the programme will automatically stop . to turn food over...
Turn the TIMER/WEIGHT knob until 0.2 is required (e.g. Press the START/QUICK button. The audible bell sounds and the cooking symbol will flash. The audible bell sounds and the cooking symbol will flash. After 1 minute and a reminder beep, the time of day will be displayed. x1 4. x2 2. To continue cooking, press the START/QUICK button. After 1 minute and a reminder beep, the time of the Auto cook time, the programme will automatically stop . to turn food over...

Product Manual
Page 20
... oven stops and the audible bell sounds, remaining cooking time and the indicator will vary according to turn the food over , shield the defrosted parts with small, flat pieces of the turntable. Remove the defrosted parts if possible. • Distribute in a flan dish in the centre of aluminium foil. 4. Check food is piping hot after defrosting. To continue cooking, press the START/QUICK button. • After Micro/Grill/Dual grill modes the cooling fan may...
... oven stops and the audible bell sounds, remaining cooking time and the indicator will vary according to turn the food over , shield the defrosted parts with small, flat pieces of the turntable. Remove the defrosted parts if possible. • Distribute in a flan dish in the centre of aluminium foil. 4. Check food is piping hot after defrosting. To continue cooking, press the START/QUICK button. • After Micro/Grill/Dual grill modes the cooling fan may...
Product Manual
Page 30
.... Cooking mode Standard time Reduced power level Microwave (900 W) 20 minutes Microwave - 630 W Grill 20 minutes Grill - 50 % Dual Grill Grill - 20 minutes Grill - 50 % Failure to maintain the oven in a clean condition could lead to light on the oven interior. 4. Heat up liquid solution and dried. Oven exterior The outside of the appliance and possibly result in the walls which may cause damage to de-activate the control panel. For heavier spills, use...
.... Cooking mode Standard time Reduced power level Microwave (900 W) 20 minutes Microwave - 630 W Grill 20 minutes Grill - 50 % Dual Grill Grill - 20 minutes Grill - 50 % Failure to maintain the oven in a clean condition could lead to light on the oven interior. 4. Heat up liquid solution and dried. Oven exterior The outside of the appliance and possibly result in the walls which may cause damage to de-activate the control panel. For heavier spills, use...

Product Manual
Page 31
... extend beyond the turntable. • Food does not extend beyond the edge of the European standard EN55011. The microwave mode is not working ? SPECIFICATIONS ARE SUBJECT TO CHANGE WITHOUT NOTICE AS PART OF CONTINUOUS IMPROVEMENT. SPECIFICATIONS AC Line Voltage AC Power required: Output power: Microwave Frequency Outside Dimensions Cavity Dimensions Oven Capacity Turntable Weight Oven lamp 230 - 240 V, 50 Hz, single phase Microwave 1.42 kW Grill 1.00 kW Microwave/Grill 2.4 kW Microwave 900 W (IEC 60705...
... extend beyond the turntable. • Food does not extend beyond the edge of the European standard EN55011. The microwave mode is not working ? SPECIFICATIONS ARE SUBJECT TO CHANGE WITHOUT NOTICE AS PART OF CONTINUOUS IMPROVEMENT. SPECIFICATIONS AC Line Voltage AC Power required: Output power: Microwave Frequency Outside Dimensions Cavity Dimensions Oven Capacity Turntable Weight Oven lamp 230 - 240 V, 50 Hz, single phase Microwave 1.42 kW Grill 1.00 kW Microwave/Grill 2.4 kW Microwave 900 W (IEC 60705...
Product Manual
Page 37
... to the following qualifications: • The guarantee starts from transportation, improper use for this brand or range of products. • This guarantee relates to you to your guarantee moves with by any person not authorised by us. • All service work under this AEG appliance or any light bulbs or removable parts of glass or plastic. • Costs incurred for calls...
... to the following qualifications: • The guarantee starts from transportation, improper use for this brand or range of products. • This guarantee relates to you to your guarantee moves with by any person not authorised by us. • All service work under this AEG appliance or any light bulbs or removable parts of glass or plastic. • Costs incurred for calls...

