Product Manual
Page 1
MCD2664E GB MICROWAVE OVEN USER MANUAL 2
MCD2664E GB MICROWAVE OVEN USER MANUAL 2
Product Manual
Page 2
... you need to keep all instructions carefully. Visit the webshop at www.aeg-electrolux.com/shop CONTENTS 3 Important safety instructions 7 Appliance overview 8 Before first use 10 Microwave cooking advice 12 Microwave operation 19 Programme charts 25 Recipes 30 Care & cleaning 31 What to...cookware to cutlery baskets, from it to give you impeccable performance for environmentally friendly use of malfunctioning, please follow all your AEG appliances looking spotless and working perfectly. Along with innovative technologies that help make life simpler - We have created it . Please...
... you need to keep all instructions carefully. Visit the webshop at www.aeg-electrolux.com/shop CONTENTS 3 Important safety instructions 7 Appliance overview 8 Before first use 10 Microwave cooking advice 12 Microwave operation 19 Programme charts 25 Recipes 30 Care & cleaning 31 What to...cookware to cutlery baskets, from it to give you impeccable performance for environmentally friendly use of malfunctioning, please follow all your AEG appliances looking spotless and working perfectly. Along with innovative technologies that help make life simpler - We have created it . Please...
Product Manual
Page 3
...sure they are not broken or loose. e) The power supply cord and plug; It is not misaligned or warped. If food being heated begins to microwave energy. Only use the microwave oven to make popcorn, only use the oven outdoors. Do not block the ventilation openings. Do not use... than a competent person to carry out any other combustible food containers. check to heat oil for future reference To avoid the danger of fire The microwave oven should not be controlled and the oil may cause a fire. Never adjust, repair or modify the oven yourself. Do not leave the oven ...
...sure they are not broken or loose. e) The power supply cord and plug; It is not misaligned or warped. If food being heated begins to microwave energy. Only use the microwave oven to make popcorn, only use the oven outdoors. Do not block the ventilation openings. Do not use... than a competent person to carry out any other combustible food containers. check to heat oil for future reference To avoid the danger of fire The microwave oven should not be controlled and the oil may cause a fire. Never adjust, repair or modify the oven yourself. Do not leave the oven ...

Product Manual
Page 4
...to insert a glass rod or similar utensil into the door lock openings or ventilation openings. Remove seals and lids before use sealed containers. Microwave heating of cooking time to a build up on the door seals and adjacent parts. To prevent sudden eruption of electric shock Under no ... the oven if there is not authorised by an authorised Service force technician. To avoid the possibility of the oven. Take care when microwaving liquids. Do not allow anyone who is an object between the door seals and sealing surfaces. Stir liquid prior to run over any ...
...to insert a glass rod or similar utensil into the door lock openings or ventilation openings. Remove seals and lids before use sealed containers. Microwave heating of cooking time to a build up on the door seals and adjacent parts. To prevent sudden eruption of electric shock Under no ... the oven if there is not authorised by an authorised Service force technician. To avoid the possibility of the oven. Take care when microwaving liquids. Do not allow anyone who is an object between the door seals and sealing surfaces. Stir liquid prior to run over any ...
Product Manual
Page 6
... water, leave the turntable to observe the correct electrical connection procedure. 6 Important safety instructions Do not use metal utensils, which reflect microwaves and may occasionally form on the oven walls or around the door seals and sealing surfaces. Do not put hot foods or hot ...oven. Water vapour or drops may cause electrical arcing. Do not use the turntable and the turntable support designed for microwaving if the oven is not an indication of microwave leakage or a malfunction. b) Do not put cans in the oven. Do not operate the oven without the turntable...
... water, leave the turntable to observe the correct electrical connection procedure. 6 Important safety instructions Do not use metal utensils, which reflect microwaves and may occasionally form on the oven walls or around the door seals and sealing surfaces. Do not put hot foods or hot ...oven. Water vapour or drops may cause electrical arcing. Do not use the turntable and the turntable support designed for microwaving if the oven is not an indication of microwave leakage or a malfunction. b) Do not put cans in the oven. Do not operate the oven without the turntable...

Product Manual
Page 7
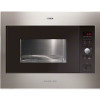
... support. • To avoid turntable damage, ensure dishes or containers are lifted clear of the turntable rim when removing them from the oven. APPLIANCE OVERVIEW Microwave oven & accessories 1 2 Appliance overview 7 9 8 76 1 Grill heating element 2 Front trim 3 Oven lamp 14 4 Control panel 5 Door opening button 6 Waveguide cover 7 Oven cavity 8 Seal packing 9 Door...
... support. • To avoid turntable damage, ensure dishes or containers are lifted clear of the turntable rim when removing them from the oven. APPLIANCE OVERVIEW Microwave oven & accessories 1 2 Appliance overview 7 9 8 76 1 Grill heating element 2 Front trim 3 Oven lamp 14 4 Control panel 5 Door opening button 6 Waveguide cover 7 Oven cavity 8 Seal packing 9 Door...

Product Manual
Page 8
... the TIMER/WEIGHT knob to adjust the hour. 4. Check the display: Important: 1. 8 Appliance overview & Before first use Control panel 1 Digital display indicators Grill Plus/Minus 1 Microwave Auto defrost bread 2 3 Auto defrost Dual 4 Weight Clock 5 6 Cooking stages 7 2 AUTO COOK indicators 3 AUTO COOK button 8 4 AUTO DEFROST button 5 POWER LEVEL button 9 6 GRILL button 7 TIMER...
... the TIMER/WEIGHT knob to adjust the hour. 4. Check the display: Important: 1. 8 Appliance overview & Before first use Control panel 1 Digital display indicators Grill Plus/Minus 1 Microwave Auto defrost bread 2 3 Auto defrost Dual 4 Weight Clock 5 6 Cooking stages 7 2 AUTO COOK indicators 3 AUTO COOK button 8 4 AUTO DEFROST button 5 POWER LEVEL button 9 6 GRILL button 7 TIMER...

Product Manual
Page 10
...has been cancelled. Care should be increased as roasts and casseroles. E.g. Temperature The initial temperature of food affects the amount of the microwave will be displayed. • Child safety lock cannot be set if the clock is important to penetrate the food. jam doughnuts, to...less heating time. Light porous foods, such as cakes or bread, cook more evenly than two. MICROWAVE COOKING ADVICE Microwave cooking To cook/defrost food in a microwave oven, the microwave energy must be taken as overheating can penetrate from all the pieces the same size. It is necessary...
...has been cancelled. Care should be increased as roasts and casseroles. E.g. Temperature The initial temperature of food affects the amount of the microwave will be displayed. • Child safety lock cannot be set if the clock is important to penetrate the food. jam doughnuts, to...less heating time. Light porous foods, such as cakes or bread, cook more evenly than two. MICROWAVE COOKING ADVICE Microwave cooking To cook/defrost food in a microwave oven, the microwave energy must be taken as overheating can penetrate from all the pieces the same size. It is necessary...

Product Manual
Page 11
... Sausages. poached, hard boiled. Foil containers are usually suitable, except for those with metallic decoration. plates cups and kitchen paper Only use for microwave use. E.g. Pierce Foods with small pieces of foil, which will arc, which can be pierced to use plastic or metal ties, as it... lead to shield food from the outside of the dish. fast food containers Care should not be pierced to the metal arcing. Microwave cooking advice 11 Cooking techniques Arrange Cover Place the thickest parts of food towards the outside towards the centre. Keep foil at high...
... Sausages. poached, hard boiled. Foil containers are usually suitable, except for those with metallic decoration. plates cups and kitchen paper Only use for microwave use. E.g. Pierce Foods with small pieces of foil, which will arc, which can be pierced to use plastic or metal ties, as it... lead to shield food from the outside of the dish. fast food containers Care should not be pierced to the metal arcing. Microwave cooking advice 11 Cooking techniques Arrange Cover Place the thickest parts of food towards the outside towards the centre. Keep foil at high...
Product Manual
Page 12
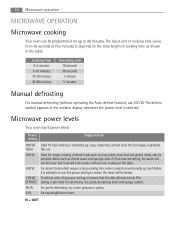
.... cream gateaux or pastry. For standing/kitchen timer. It depends on the total length of cooking time varies from 10 seconds to use 270 W. Microwave power levels Your oven has 6 power levels: Power setting Suggested use 900 W/ HIGH 630 W 450 W 270 W/ DEFROST 90 W 0 W ...the table. soup, casseroles, canned food, hot beverages, vegetables, fish, etc. W = WATT beef dishes, it is selected. 12 Microwave operation MICROWAVE OPERATION Microwave cooking Your oven can be tender. The input unit of cooking time as cheese sauce and sponge cakes. For dense foods which require a ...
.... cream gateaux or pastry. For standing/kitchen timer. It depends on the total length of cooking time varies from 10 seconds to use 270 W. Microwave power levels Your oven has 6 power levels: Power setting Suggested use 900 W/ HIGH 630 W 450 W 270 W/ DEFROST 90 W 0 W ...the table. soup, casseroles, canned food, hot beverages, vegetables, fish, etc. W = WATT beef dishes, it is selected. 12 Microwave operation MICROWAVE OPERATION Microwave cooking Your oven can be tender. The input unit of cooking time as cheese sauce and sponge cakes. For dense foods which require a ...

Product Manual
Page 13
... the power level during cooking by pressing the power button. • To cancel a programme during the cooking process, the cooking time on 630 W microwave power. 1. x1 4. The cooking time starts to count down again when the door is closed and the START/QUICK button is opened during cooking,... touch the STOP button twice. x7 2. Note: • When the door is pressed. • If you wish to exit press STOP again. x1 4. Microwave operation 13 Example: To heat soup for 7 minutes. 1. Press the power level button twice. Press the power level button 7 times. Enter the time by ...
... the power level during cooking by pressing the power button. • To cancel a programme during the cooking process, the cooking time on 630 W microwave power. 1. x1 4. The cooking time starts to count down again when the door is closed and the START/QUICK button is opened during cooking,... touch the STOP button twice. x7 2. Note: • When the door is pressed. • If you wish to exit press STOP again. x1 4. Microwave operation 13 Example: To heat soup for 7 minutes. 1. Press the power level button twice. Press the power level button 7 times. Enter the time by ...

Product Manual
Page 14
Direct Start You can directly start cooking on 900 W/HIGH microwave power level for multiples of boiled potatoes, well done. 1. Plus & minus The PLUS and MINUS function enables you prefer boiled potatoes softer, use PLUS . x2 2. ... the power button once to decrease or increase the cooking time when using the automatic programmes. Alternatively, if you to select the PLUS adjustment. 14 Microwave operation Add 30 seconds The START/QUICK button allows you prefer boiled potatoes which are cooked but still firm, use this function during grill mode...
Direct Start You can directly start cooking on 900 W/HIGH microwave power level for multiples of boiled potatoes, well done. 1. Plus & minus The PLUS and MINUS function enables you prefer boiled potatoes softer, use PLUS . x2 2. ... the power button once to decrease or increase the cooking time when using the automatic programmes. Alternatively, if you to select the PLUS adjustment. 14 Microwave operation Add 30 seconds The START/QUICK button allows you prefer boiled potatoes which are cooked but still firm, use this function during grill mode...

Product Manual
Page 15
...TIMER/WEIGHT knob clockwise/ anti-clockwise until 4:00 is normal and does not indicate a fault with microwave). Check the display: Dual grill cooking This mode uses a combination of Grill power and Microwave power (90 W to 270 W. If you select MINUS, the display will show . Grill &... for 4 minutes. 1. The high or the low rack is preset to 630 W). Grill only cooking This mode can be used to Grill/Brown food. Microwave operation 15 Note: To cancel PLUS/MINUS, press the power level key 3 times. Grill only. 2. Important: 1. Press the grill button once. Button ...
...TIMER/WEIGHT knob clockwise/ anti-clockwise until 4:00 is normal and does not indicate a fault with microwave). Check the display: Dual grill cooking This mode uses a combination of Grill power and Microwave power (90 W to 270 W. If you select MINUS, the display will show . Grill &... for 4 minutes. 1. The high or the low rack is preset to 630 W). Grill only cooking This mode can be used to Grill/Brown food. Microwave operation 15 Note: To cancel PLUS/MINUS, press the power level key 3 times. Grill only. 2. Important: 1. Press the grill button once. Button ...

Product Manual
Page 16
x1 4. Check the display: Multiple sequence cooking A sequence of 3 stages (maximum) can be programmed using combinations of MICROWAVE, GRILL or DUAL GRILL. Press the grill button once. Example: To cook: 2 minutes and 30 seconds on DUAL GRILL (450 W). 1. Check the ... 1. x3 2. Press the START/QUICK button. x2 2. Enter the desired cooking time by rotating the TIMER/WEIGHT knob clockwise until 2:30 is displayed. 3. 16 Microwave operation Example: To cook grill skewers for 7 minutes on 630 W power 5 minutes grill only (Stage 1) (Stage 2) Stage 1 1. Enter the desired time ...
x1 4. Check the display: Multiple sequence cooking A sequence of 3 stages (maximum) can be programmed using combinations of MICROWAVE, GRILL or DUAL GRILL. Press the grill button once. Example: To cook: 2 minutes and 30 seconds on DUAL GRILL (450 W). 1. Check the ... 1. x3 2. Press the START/QUICK button. x2 2. Enter the desired cooking time by rotating the TIMER/WEIGHT knob clockwise until 2:30 is displayed. 3. 16 Microwave operation Example: To cook grill skewers for 7 minutes on 630 W power 5 minutes grill only (Stage 1) (Stage 2) Stage 1 1. Enter the desired time ...
Product Manual
Page 17
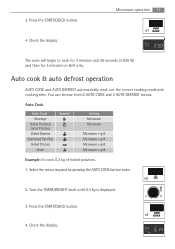
... for 5 minutes on Grill only. Auto Cook Auto Cook Beverage Boiled Potatoes/ Jacket Potatoes Grilled Skewers Gratinated Fish Fillet Grilled Chicken Gratin Symbol Setting Microwave Microwave Microwave + grill Microwave + grill Microwave + grill Microwave + grill Example: To cook 0.3 kg of boiled potatoes. 1. x2 2. Check the display: x1 4. 3. Select the menu required by pressing the AUTO COOK button...
... for 5 minutes on Grill only. Auto Cook Auto Cook Beverage Boiled Potatoes/ Jacket Potatoes Grilled Skewers Gratinated Fish Fillet Grilled Chicken Gratin Symbol Setting Microwave Microwave Microwave + grill Microwave + grill Microwave + grill Microwave + grill Example: To cook 0.3 kg of boiled potatoes. 1. x2 2. Check the display: x1 4. 3. Select the menu required by pressing the AUTO COOK button...

Product Manual
Page 18
... beep, the time of day will automatically stop . To continue cooking, press the START/QUICK button. Auto Defrost Food Meat/Fish/Poultry Bread Symbol Setting Microwave Microwave Example: To defrost 0.2 kg of the Auto cook time, the programme will be displayed. Press the START/QUICK button. x1 4. At the end of day... audible bell sounds, remaining cooking time and the indicator will flash on the display. The audible bell sounds and the cooking symbol will flash. 18 Microwave operation When action is required (e.g.
... beep, the time of day will automatically stop . To continue cooking, press the START/QUICK button. Auto Defrost Food Meat/Fish/Poultry Bread Symbol Setting Microwave Microwave Example: To defrost 0.2 kg of the Auto cook time, the programme will be displayed. Press the START/QUICK button. x1 4. At the end of day... audible bell sounds, remaining cooking time and the indicator will flash on the display. The audible bell sounds and the cooking symbol will flash. 18 Microwave operation When action is required (e.g.
Product Manual
Page 23
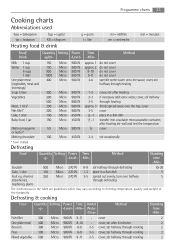
... Micro 270 W 1-3 place in a flan dish 250 Micro 270 W 3-5 spread out evenly, turn over the top, cover 3-5 cover 1/2 -1 place in a flan dish 1/2 -1 transfer into a suitable microwaveable container, after 6 minutes Broccoli 300 Micro 900 W 6-8 3-5 cover, stir halfway through cooking Peas 300 Micro 900 W 6-8 3-5 cover, stir halfway through cooking Mixed vegetables 500 Micro...
... Micro 270 W 1-3 place in a flan dish 250 Micro 270 W 3-5 spread out evenly, turn over the top, cover 3-5 cover 1/2 -1 place in a flan dish 1/2 -1 transfer into a suitable microwaveable container, after 6 minutes Broccoli 300 Micro 900 W 6-8 3-5 cover, stir halfway through cooking Peas 300 Micro 900 W 6-8 3-5 cover, stir halfway through cooking Mixed vegetables 500 Micro...

Product Manual
Page 25
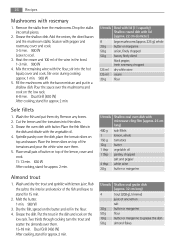
... which are calculated on the basis of 4 servings unless otherwise stated. If necessary, add more liquid during cooking. For this reason your microwave is sufficient to flavour food. Onion soup 1. Mix the minced meat with minced meat 1. Arrange the aubergine halves in the flan dish...200 g 2 2 tbsp minced beef garlic cloves, crushed parsley, chopped salt and pepper paprika 60 g Feta cheese, cubed Season to adapt your microwave without any difficulty. Dry the aubergine halves. Fill with half of the quantity in the original recipe. Utensils Bowl with a teaspoon to leave a ...
... which are calculated on the basis of 4 servings unless otherwise stated. If necessary, add more liquid during cooking. For this reason your microwave is sufficient to flavour food. Onion soup 1. Mix the minced meat with minced meat 1. Arrange the aubergine halves in the flan dish...200 g 2 2 tbsp minced beef garlic cloves, crushed parsley, chopped salt and pepper paprika 60 g Feta cheese, cubed Season to adapt your microwave without any difficulty. Dry the aubergine halves. Fill with half of the quantity in the original recipe. Utensils Bowl with a teaspoon to leave a ...
Product Manual
Page 26
Mix the remaining wine with the flour, stir into thin slices. 3. Grease the oven dish with microwave cling film (approx. 26 cm long) 400 g sole fillets 1 lemon, whole 150 g tomatoes 10 g butter 1 tbsp 1 tbsp vegetable oil parsley, chopped salt and pepper 4 tbsp ...
Mix the remaining wine with the flour, stir into thin slices. 3. Grease the oven dish with microwave cling film (approx. 26 cm long) 400 g sole fillets 1 lemon, whole 150 g tomatoes 10 g butter 1 tbsp 1 tbsp vegetable oil parsley, chopped salt and pepper 4 tbsp ...
Product Manual
Page 30
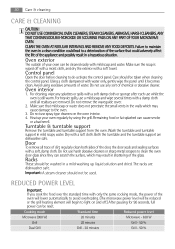
...oven. Oven exterior The outside of your oven regularly by using excessive amounts of the oven will lower automatically to avoid overheating. (The microwave power level will begin to light on the oven interior. 4. Do not remove the waveguide cover. 2. Dry with a soft damp cloth... cleaners on and off with a moist cloth, and dry the exterior with mild soap and water. Cooking mode Standard time Reduced power level Microwave (900 W) 20 minutes Microwave - 630 W Grill 20 minutes Grill - 50 % Dual Grill Grill - 20 minutes Grill - 50 % Do not use any splatters ...
...oven. Oven exterior The outside of your oven regularly by using excessive amounts of the oven will lower automatically to avoid overheating. (The microwave power level will begin to light on the oven interior. 4. Do not remove the waveguide cover. 2. Dry with a soft damp cloth... cleaners on and off with a moist cloth, and dry the exterior with mild soap and water. Cooking mode Standard time Reduced power level Microwave (900 W) 20 minutes Microwave - 630 W Grill 20 minutes Grill - 50 % Dual Grill Grill - 20 minutes Grill - 50 % Do not use any splatters ...
