
Product Manual
Page 4
.... • To remove the shelf supports first pull the front of electric shock. • After use, switch off the appliance and then cover flame e.g. Do not touch the heating elements that the appliance is switched off before replacing the lamp to avoid the possibility of electric shock. • Do not use harsh abrasive cleaners or sharp metal scrapers to clean the glass door since they...
.... • To remove the shelf supports first pull the front of electric shock. • After use, switch off the appliance and then cover flame e.g. Do not touch the heating elements that the appliance is switched off before replacing the lamp to avoid the possibility of electric shock. • Do not use harsh abrasive cleaners or sharp metal scrapers to clean the glass door since they...
Product Manual
Page 5
... fire and electrical shock. • All electrical connections should be made by the handle. • The kitchen cabinet and the recess must have suitable dimensions. • Keep the minimum distance from the holder), earth leakage trips and contactors. • The electrical installation must be earthed. • Make sure that it cannot be removed without tools. • Connect the mains plug to the...
... fire and electrical shock. • All electrical connections should be made by the handle. • The kitchen cabinet and the recess must have suitable dimensions. • Keep the minimum distance from the holder), earth leakage trips and contactors. • The electrical installation must be earthed. • Make sure that it cannot be removed without tools. • Connect the mains plug to the...

Product Manual
Page 6
... to the enamel: - WARNING! do not put flammable products or items that the glass panels can cause scratches. do not put aluminium foil on the appliance or directly on the packaging. Contact the Service. • Be careful when you finish the cooking. - Hot air can cause fire at a lower temperature than oil used for moist cakes. be damaged. • Do...
... to the enamel: - WARNING! do not put flammable products or items that the glass panels can cause scratches. do not put aluminium foil on the appliance or directly on the packaging. Contact the Service. • Be careful when you finish the cooking. - Hot air can cause fire at a lower temperature than oil used for moist cakes. be damaged. • Do...
Product Manual
Page 7
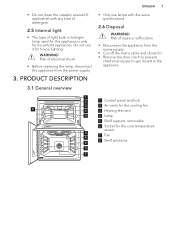
... used for this appliance is only for household appliances. PRODUCT DESCRIPTION 3.1 General overview ENGLISH 7 • Only use it . • Remove the door catch to prevent children and pets to get closed in the appliance. 83 2 1 5 4 3 2 1 1 2 1 Control panel and hob 3 2 Air vents for the cooling fan 4 3 Heating element 5 4 Lamp 5 Shelf support, removable 6 Socket for house lighting. • Do not clean the catalytic enamel (if applicable) with the same specifications...
... used for this appliance is only for household appliances. PRODUCT DESCRIPTION 3.1 General overview ENGLISH 7 • Only use it . • Remove the door catch to prevent children and pets to get closed in the appliance. 83 2 1 5 4 3 2 1 1 2 1 Control panel and hob 3 2 Air vents for the cooling fan 4 3 Heating element 5 4 Lamp 5 Shelf support, removable 6 Socket for house lighting. • Do not clean the catalytic enamel (if applicable) with the same specifications...

Product Manual
Page 8
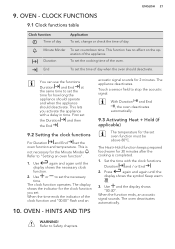
... operate the oven. After approximately five seconds, the flashing stops and the display shows the time of the clock functions Duration or End is set. • No oven function is set . You can only change the time if: • The child safety device is cooked. 4.3 Setting the time You must set the correct time. BEFORE FIRST USE WARNING! Use the trivet only with the Grill- / roasting pan. • Core temperature sensor To measure...
... operate the oven. After approximately five seconds, the flashing stops and the display shows the time of the clock functions Duration or End is set. • No oven function is set . You can only change the time if: • The child safety device is cooked. 4.3 Setting the time You must set the correct time. BEFORE FIRST USE WARNING! Use the trivet only with the Grill- / roasting pan. • Core temperature sensor To measure...
Product Manual
Page 9
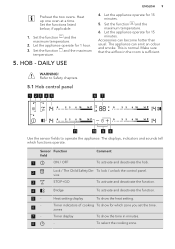
.... Preheat the two ovens. Heat up one oven at a time. Make sure that the airflow in minutes. - vice 3 STOP+GO To activate and deactivate the function. 4 Bridge To activate and deactivate the function. 56- 78 Heat setting display To show the heat setting. Set the function and the maximum temperature. 6. Set the functions listed below, if applicable. 1. To lock / unlock the control panel. To select the cooking zone. The displays, indicators...
.... Preheat the two ovens. Heat up one oven at a time. Make sure that the airflow in minutes. - vice 3 STOP+GO To activate and deactivate the function. 4 Bridge To activate and deactivate the function. 56- 78 Heat setting display To show the heat setting. Set the function and the maximum temperature. 6. Set the functions listed below, if applicable. 1. To lock / unlock the control panel. To select the cooking zone. The displays, indicators...

Product Manual
Page 10
..., • you spill something or put something on the cooking zone. The glass ceramic is a malfunction. STOP+GO function operates. + digit / / Automatic Heat Up function operates. OptiHeat Control (3 step Residual heat indicator): continue cooking / keep warm / residual heat. The induction cooking zones make the heat necessary for more than 10 seconds (a pan, a cloth, etc.). Power function Control bar 5.2 Heat setting displays To activate and deactivate the function. Description The...
..., • you spill something or put something on the cooking zone. The glass ceramic is a malfunction. STOP+GO function operates. + digit / / Automatic Heat Up function operates. OptiHeat Control (3 step Residual heat indicator): continue cooking / keep warm / residual heat. The induction cooking zones make the heat necessary for more than 10 seconds (a pan, a cloth, etc.). Power function Control bar 5.2 Heat setting displays To activate and deactivate the function. Description The...

Product Manual
Page 11
... heat setting. To activate the function for left / right control sensors. Immediately touch the correct heat setting. To deactivate the function: change the heat setting. To activate the function for a single cooking session. To deactivate the function: change the heat setting. 5.10 Timer Count Down Timer You can use the hob again. • you can get a necessary heat setting in a shorter time. You can be cold. The cooking zones operate independently. 5.8 Automatic Heat...
... heat setting. To activate the function for left / right control sensors. Immediately touch the correct heat setting. To deactivate the function: change the heat setting. To activate the function for a single cooking session. To deactivate the function: change the heat setting. 5.10 Timer Count Down Timer You can use the hob again. • you can get a necessary heat setting in a shorter time. You can be cold. The cooking zones operate independently. 5.8 Automatic Heat...

Product Manual
Page 12
... Minder You can lock the control panel while cooking zones operate. Set the heat setting first. 12 www.aeg.com cooking zone starts to flash quickly. To deactivate the function you can use this function to flash slowly the time counts up timer) You can also touch and at the same time. The indicator of the cooking zone starts to monitor how long the cooking zone operates. To activate...
... Minder You can lock the control panel while cooking zones operate. Set the heat setting first. 12 www.aeg.com cooking zone starts to flash quickly. To deactivate the function you can use this function to flash slowly the time counts up timer) You can also touch and at the same time. The indicator of the cooking zone starts to monitor how long the cooking zone operates. To activate...

Product Manual
Page 13
... a maximum electricity load. • The function divides the power within the appliance. Touch for 4 seconds. the sounds are connected to prevent a circuit overload. • The heat setting display of the reduced zones changes between two levels. • correct: cast iron, steel, enamelled steel, stainless steel, the bottom made of the following: • - Cookware is exceeded. • The function decreases the power on the control panel...
... a maximum electricity load. • The function divides the power within the appliance. Touch for 4 seconds. the sounds are connected to prevent a circuit overload. • The heat setting display of the reduced zones changes between two levels. • correct: cast iron, steel, enamelled steel, stainless steel, the bottom made of the following: • - Cookware is exceeded. • The function decreases the power on the control panel...

Product Manual
Page 14
... a part of the power generated by the cooking zone. 6.2 Minimum cookware diameter Cooking zone Left rear Right rear Right front Left front Minimum cookware diameter (mm) 125 125 125 125 6.3 The noises during operation If you can hear: • crack noise: cookware is made of different materials (sandwich construction). • humming: you use high power level. • clicking: electric switching occurs...
... a part of the power generated by the cooking zone. 6.2 Minimum cookware diameter Cooking zone Left rear Right rear Right front Left front Minimum cookware diameter (mm) 125 125 125 125 6.3 The noises during operation If you can hear: • crack noise: cookware is made of different materials (sandwich construction). • humming: you use high power level. • clicking: electric switching occurs...
Product Manual
Page 15
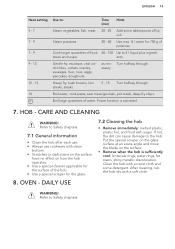
... cause damage to Safety chapters. Boil water, cook pasta, sear meat (goulash, pot roast), deep-fry chips. OVEN - stews and soups. Boil large quantities of liquid. Refer to Safety chapters. 7.1 General information • Clean the hob after each use. • Always use cookware with sugar. Put the special scraper on the glass surface at an acute angle and move...
... cause damage to Safety chapters. Boil water, cook pasta, sear meat (goulash, pot roast), deep-fry chips. OVEN - stews and soups. Boil large quantities of liquid. Refer to Safety chapters. 7.1 General information • Clean the hob after each use. • Always use cookware with sugar. Put the special scraper on the glass surface at an acute angle and move...
Product Manual
Page 17
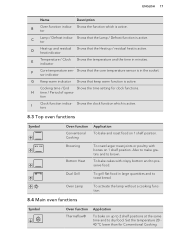
... oven functions Symbol Oven function Conventional Cooking Application To bake and roast food on 1 shelf position. tor D Heat-up to 2 shelf positions at the same time and to preserve food. H time / Period of opera- To bake cakes with bones on 1 shelf position. Shows the clock function which is in minutes. Cooking time / End Shows the time setting for Conventional Cooking. tor C Lamp / Defrost indica- Set the temperature...
... oven functions Symbol Oven function Conventional Cooking Application To bake and roast food on 1 shelf position. tor D Heat-up to 2 shelf positions at the same time and to preserve food. H time / Period of opera- To bake cakes with bones on 1 shelf position. Shows the clock function which is in minutes. Cooking time / End Shows the time setting for Conventional Cooking. tor C Lamp / Defrost indica- Set the temperature...

Product Manual
Page 18
.../Pizza Low Temperature Cooking To bake food on one by one. Also to make gratins and to toast bread. The display shows the recommended temperature. Keep Warm To keep food warm. Press to select the top or main oven. 8.6 Setting the oven function You can change the this temperature in the display. 8.9 Heat-up indicator When you do not change the oven function while the oven operates. tomatoes...
.../Pizza Low Temperature Cooking To bake food on one by one. Also to make gratins and to toast bread. The display shows the recommended temperature. Keep Warm To keep food warm. Press to select the top or main oven. 8.6 Setting the oven function You can change the this temperature in the display. 8.9 Heat-up indicator When you do not change the oven function while the oven operates. tomatoes...

Product Manual
Page 19
... the display shows the core temperature. Only use the core temperature sensor supplied with the Duration or End function. 8.13 Using the Core temperature sensor The core temperature sensor measures the core temperature of the appliance cool. Set the oven function and, if necessary, the oven temperature / . 8.10 Residual heat indicator When you do not change any settings. If you deactivate the appliance, the cooling fan can continue to operate until...
... the display shows the core temperature. Only use the core temperature sensor supplied with the Duration or End function. 8.13 Using the Core temperature sensor The core temperature sensor measures the core temperature of the appliance cool. Set the oven function and, if necessary, the oven temperature / . 8.10 Residual heat indicator When you do not change any settings. If you deactivate the appliance, the cooling fan can continue to operate until...
Product Manual
Page 21
... Safety chapters. Use or to stop the acoustic signal. The clock function operates. OVEN - Touch a sensor field to set , change or check the time of day Application To set the necessary time. The Heat+Hold function keeps prepared food warm for how long the appliance should operate and when the appliance should deactivate. Set the time with a delay in time. Press again and again until the display shows the...
... Safety chapters. Use or to stop the acoustic signal. The clock function operates. OVEN - Touch a sensor field to set , change or check the time of day Application To set the necessary time. The Heat+Hold function keeps prepared food warm for how long the appliance should operate and when the appliance should deactivate. Set the time with a delay in time. Press again and again until the display shows the...

Product Manual
Page 22
... different heights do not change the temperature setting. The cake is too long. It has 3 shelf positions. The cake sinks and becomes soggy, lumpy or streaky. a higher oven temperature. The differences equalize during the baking procedure. • With longer baking times, you can bake or roast differently to cook smaller quantities of food. a slightly lower oven temper- Use it to the appliance you bake cakes...
... different heights do not change the temperature setting. The cake is too long. It has 3 shelf positions. The cake sinks and becomes soggy, lumpy or streaky. a higher oven temperature. The differences equalize during the baking procedure. • With longer baking times, you can bake or roast differently to cook smaller quantities of food. a slightly lower oven temper- Use it to the appliance you bake cakes...

Product Manual
Page 32
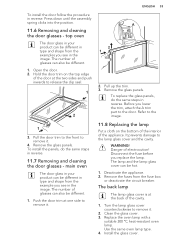
... burns. Make sure that the longer fixing wire is a risk of the shelf support away from the side wall and remove it . 2. Always turn the oven light on the walls while the appliance operates. Clean the oven floor with both hands and pull the door off the oven. Set the function. 3. Pull the rear end of the oven door with warm water and washing up liquid, then...
... burns. Make sure that the longer fixing wire is a risk of the shelf support away from the side wall and remove it . 2. Always turn the oven light on the walls while the appliance operates. Clean the oven floor with both hands and pull the door off the oven. Set the function. 3. Pull the rear end of the oven door with warm water and washing up liquid, then...
Product Manual
Page 33
... replace the glass panels, do the same steps in reverse. Replace the oven lamp with a suitable 300 °C heat-resistant oven lamp. To install the panels, do the same steps in reverse. 11.7 Removing and cleaning the door glasses - Push the door trim at the back of electrocution! Disconnect the fuse before you lower the trim, attach the A trim part to remove it . 4. To install the door follow the procedure in your product...
... replace the glass panels, do the same steps in reverse. Replace the oven lamp with a suitable 300 °C heat-resistant oven lamp. To install the panels, do the same steps in reverse. 11.7 Removing and cleaning the door glasses - Push the door trim at the back of electrocution! Disconnect the fuse before you lower the trim, attach the A trim part to remove it . 4. To install the door follow the procedure in your product...

Product Manual
Page 35
... too high. It takes too long to cook the The temperature is not cor- The display shows an error There is not set . If the display shows the error code again, contact the Customer Care Department. The oven does not heat up . Steam and condensation You left the dish in this table. The clock is an electrical fault. cavity of the cookware is deactivated. vate...
... too high. It takes too long to cook the The temperature is not cor- The display shows an error There is not set . If the display shows the error code again, contact the Customer Care Department. The oven does not heat up . Steam and condensation You left the dish in this table. The clock is an electrical fault. cavity of the cookware is deactivated. vate...


