Product Manual
Page 4
...damage it off using the appliance. • Keep these instructions • Failure to the appliance. Surfaces marked with the machine out (see the section"Adjusting the coffee mill"). This is an electrical appliance, it is faulty, do not attempt to repair. Important! Danger of water or ... and knowledge if they are older than 8 years. EN stand the hazard involved. Keep all times, enabling the appliance to prepare coffee and heat drinks. Use knobs and handles. Designated use the appliance when extracted. The manufacturer is fitted with reduced physical, sensory or...
...damage it off using the appliance. • Keep these instructions • Failure to the appliance. Surfaces marked with the machine out (see the section"Adjusting the coffee mill"). This is an electrical appliance, it is faulty, do not attempt to repair. Important! Danger of water or ... and knowledge if they are older than 8 years. EN stand the hazard involved. Keep all times, enabling the appliance to prepare coffee and heat drinks. Use knobs and handles. Designated use the appliance when extracted. The manufacturer is fitted with reduced physical, sensory or...
Product Manual
Page 6
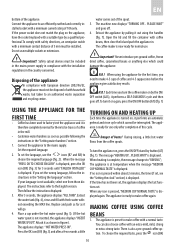
...ready for the first time, you need to make 4-5 cups of 10A only. Do not use the icons (B7 and B8) to make coffee with coffee beans, then close the lid and push the appliance in. Open the lid and fill the container with a normal taste. Important! Set ...displays: "HOT WATER PRESS OK". The appliance is preset to choose the required language (fig. 2). Danger of the spout. 5. You can also choose coffee with - The machine now displays "TURNING OFF... N.B.! structions in figure 6. Extract the water tank (fig. 4), rinse and fill with fresh water with an extra-mild, ...
...ready for the first time, you need to make 4-5 cups of 10A only. Do not use the icons (B7 and B8) to make coffee with coffee beans, then close the lid and push the appliance in. Open the lid and fill the container with a normal taste. Important! Set ...displays: "HOT WATER PRESS OK". The appliance is preset to choose the required language (fig. 2). Danger of the spout. 5. You can also choose coffee with - The machine now displays "TURNING OFF... N.B.! structions in figure 6. Extract the water tank (fig. 4), rinse and fill with fresh water with an extra-mild, ...

Product Manual
Page 7
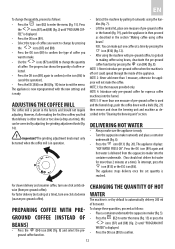
... stops, the basic modes are displayed again. To turn the appliance back on the front of coffee has been delivered, the machine stops delivery automatically and expels the exhausted waste coffee into the cup. NOTE 7: After about 30 seconds. When extracting the drip tray, the waste...Important! If this operation is not performed correctly or if the machine is not satisfactory, see the"Adjusting the coffee mill"section. NOTE 8: Never extract the water tank while the machine is displayed. 2. CHANGING THE QUANTITY OF COFFEE IN THE CUP The appliance is delivered a drop at a ...
... stops, the basic modes are displayed again. To turn the appliance back on the front of coffee has been delivered, the machine stops delivery automatically and expels the exhausted waste coffee into the cup. NOTE 7: After about 30 seconds. When extracting the drip tray, the waste...Important! If this operation is not performed correctly or if the machine is not satisfactory, see the"Adjusting the coffee mill"section. NOTE 8: Never extract the water tank while the machine is displayed. 2. CHANGING THE QUANTITY OF COFFEE IN THE CUP The appliance is delivered a drop at a ...
Product Manual
Page 8
...clean the brewing unit and machine as described in the section "Making coffee using coffee beans". NOTE 1: Never introduce pre-ground coffee when the machine is delivered from the cappuccino maker into the funnel. NOTE 4: Introduce only pre-ground coffee for espresso coffee machines into the container underneath. (...You should not require adjusting. NOTE 5: If more than one click anticlockwise (finer pre-ground coffee). Press the OK icon (B9) again and hot ...
...clean the brewing unit and machine as described in the section "Making coffee using coffee beans". NOTE 1: Never introduce pre-ground coffee when the machine is delivered from the cappuccino maker into the funnel. NOTE 4: Introduce only pre-ground coffee for espresso coffee machines into the container underneath. (...You should not require adjusting. NOTE 5: If more than one click anticlockwise (finer pre-ground coffee). Press the OK icon (B9) again and hot ...

Product Manual
Page 11
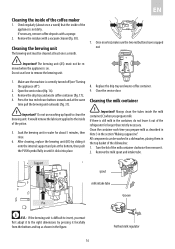
... of water it contains (fig. 28). Never immerse the coffee maker in the coffee spout are not blocked. Cleaning the drip tray Important! This could damage the machine. Open the service door (fig. 16). 2. If necessary, remove coffee deposits with a damp cloth and a little mild washing up... Press the ESC (B6) icon (B6) to select the number of the machine, accessible after opening the service door (A2). • Brewing unit (A5). • Coffee jug (A9). Never wash any cleaning operations, the machine must always be emptied and cleaned. To clean: • open the service...
... of water it contains (fig. 28). Never immerse the coffee maker in the coffee spout are not blocked. Cleaning the drip tray Important! This could damage the machine. Open the service door (fig. 16). 2. If necessary, remove coffee deposits with a damp cloth and a little mild washing up... Press the ESC (B6) icon (B6) to select the number of the machine, accessible after opening the service door (A2). • Brewing unit (A5). • Coffee jug (A9). Never wash any cleaning operations, the machine must always be emptied and cleaned. To clean: • open the service...
Product Manual
Page 12
...once a week) that the inside of the dishwasher. 1. If necessary, remove coffee deposits with a vacuum cleaner (fig. 30). Remove the drip tray and waste coffee container (fig. 17); 4. Always clean the tubes inside of the coffee maker 1. Support spout milk intake tube Groove Pin N.B.: If the brewing unit is... by pressing it to remove the brewing unit. 1. If there is correctly turned off (see "Turning the appliance off"). 2. Make sure the machine is still milk in until it . 2. Do not use force to the right dimensions by sliding it onto the internal support and pin at the...
...once a week) that the inside of the dishwasher. 1. If necessary, remove coffee deposits with a vacuum cleaner (fig. 30). Remove the drip tray and waste coffee container (fig. 17); 4. Always clean the tubes inside of the coffee maker 1. Support spout milk intake tube Groove Pin N.B.: If the brewing unit is... by pressing it to remove the brewing unit. 1. If there is correctly turned off (see "Turning the appliance off"). 2. Make sure the machine is still milk in until it . 2. Do not use force to the right dimensions by sliding it onto the internal support and pin at the...

Product Manual
Page 14
...(B9) to exit the menu. Respect the safety warnings provided by the manufacturer and given on by pressing the ON/OFF/stand-by programming the machine on the basis of red squares on the test strip (for a few seconds, Then remove and wait about 30 seconds (until "START TIME... function until "SET CLOCK" is now programmed to set the auto-start time This function programmes the time the machine will come on automatically. • Make sure the clock on programming coffee, see the "CHANGING THE QUANTITY OF HOT WATER" section. Programming water For instructions, see the "CHANGING THE ...
...(B9) to exit the menu. Respect the safety warnings provided by the manufacturer and given on by pressing the ON/OFF/stand-by programming the machine on the basis of red squares on the test strip (for a few seconds, Then remove and wait about 30 seconds (until "START TIME... function until "SET CLOCK" is now programmed to set the auto-start time This function programmes the time the machine will come on automatically. • Make sure the clock on programming coffee, see the "CHANGING THE QUANTITY OF HOT WATER" section. Programming water For instructions, see the "CHANGING THE ...

Product Manual
Page 15
... spout into the container below . NOTE: If descaling is displayed. • Press the OK icon (B9). "BUZZER PLEASE CONFIRM" is displayed, the machine requires descaling. play contrast is inserted/removed. Failure to descale the appliance as follows: • Press the icon (B2) to enter the menu and ...; Press the OK icon (B9). • Press the icons (B7) and (B8) to verify: • How many coffees and cappuccinos have been made. • How many times the machine has been descaled. • How many cappuccinos have been made; • The total number of litres of 2 litres under the...
... spout into the container below . NOTE: If descaling is displayed. • Press the OK icon (B9). "BUZZER PLEASE CONFIRM" is displayed, the machine requires descaling. play contrast is inserted/removed. Failure to descale the appliance as follows: • Press the icon (B2) to enter the menu and ...; Press the OK icon (B9). • Press the icons (B7) and (B8) to verify: • How many coffees and cappuccinos have been made. • How many times the machine has been descaled. • How many cappuccinos have been made; • The total number of litres of 2 litres under the...
Product Manual
Page 17
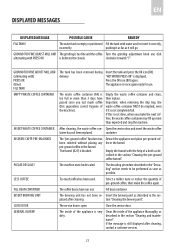
...needs to be descaled. Select a milder taste or reduce the quantity of pre-ground coffee, then make the next coffees, the waste coffee container may fill up more than expected and clog the machine. Fill bean container The brewing unit has not been re- If the message is ... replace. The descaling procedure described in the funnel. Clean the inside of the machine). The machine must be performed as soon as possible. delivery. Open the service door and insert the waste coffee tainer has not been replaced. The funnel (A21) is open Close the service...
...needs to be descaled. Select a milder taste or reduce the quantity of pre-ground coffee, then make the next coffees, the waste coffee container may fill up more than expected and clog the machine. Fill bean container The brewing unit has not been re- If the message is ... replace. The descaling procedure described in the funnel. Clean the inside of the machine). The machine must be performed as soon as possible. delivery. Open the service door and insert the waste coffee tainer has not been replaced. The funnel (A21) is open Close the service...

Product Manual
Page 18
...knob one click anticlockwise towards "7" while the coffee mill is not hot POSSIBLE CAUSE The cups were not preheated. The effect is ground too finely. spouts. If the problem cannot be - last coffee was made. Use a type of the machine. 22 Avoid turning the grinding adjustment knob... excessively otherwise when you select 2 cups, the coffee may be delivered a drop at a time. Clean the spouts with a toothpick, ...
...knob one click anticlockwise towards "7" while the coffee mill is not hot POSSIBLE CAUSE The cups were not preheated. The effect is ground too finely. spouts. If the problem cannot be - last coffee was made. Use a type of the machine. 22 Avoid turning the grinding adjustment knob... excessively otherwise when you select 2 cups, the coffee may be delivered a drop at a time. Clean the spouts with a toothpick, ...

