
Product Manual
Page 1
... always using original spare parts. Always have created it to : get the very best from it. features you contact customer services. Model, appliance number (PNC), serial number. Visit our website to give you impeccable performance for many years, with innovative technologies that help make life simpler - Subject to get tips, download our leaflets, resolve possible malfunctions, obtain information on customer care. www.aeg.com...
... always using original spare parts. Always have created it to : get the very best from it. features you contact customer services. Model, appliance number (PNC), serial number. Visit our website to give you impeccable performance for many years, with innovative technologies that help make life simpler - Subject to get tips, download our leaflets, resolve possible malfunctions, obtain information on customer care. www.aeg.com...
Product Manual
Page 2
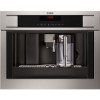
... 17 Changing the length of time the appliance remains on ..17 Setting the clock 18 Setting auto-start time 18 Changing coffee temperature 18 Setting water hardness 18 Programming coffee 18 Programming cappuccino 18 Programming the jug 18 Programming water 18 Descaling 18 Resetting default values (reset 19 Statistics 19 Buzzer 19 Adjusting contrast 19 TURNING THE APPLIANCE OFF 20 TECHNICAL SPECIFICATION 20 DISPLAYED MESSAGES 21 TROUBLESHOOTING...
... 17 Changing the length of time the appliance remains on ..17 Setting the clock 18 Setting auto-start time 18 Changing coffee temperature 18 Setting water hardness 18 Programming coffee 18 Programming cappuccino 18 Programming the jug 18 Programming water 18 Descaling 18 Resetting default values (reset 19 Statistics 19 Buzzer 19 Adjusting contrast 19 TURNING THE APPLIANCE OFF 20 TECHNICAL SPECIFICATION 20 DISPLAYED MESSAGES 21 TROUBLESHOOTING...
Product Manual
Page 3
... important advice or information for use of burns! Troubleshooting and repairs In the event of problems, follow the information given in hotels, motels and other working environments; If this does not resolve the problem, you should be made by clients in the sections"Displayed messages"and"Troubleshooting". This is damaged, it must be used by customer services only to observe the...
... important advice or information for use of burns! Troubleshooting and repairs In the event of problems, follow the information given in hotels, motels and other working environments; If this does not resolve the problem, you should be made by clients in the sections"Displayed messages"and"Troubleshooting". This is damaged, it must be used by customer services only to observe the...
Product Manual
Page 4
.... This is an electrical appliance, it is therefore important to prepare coffee and heat drinks. Important! Use knobs and handles. N.B.: Use original or manufacturer recommended accessories and spare parts only. The manufacturer is freely accessible at the rear (maximum microwave power: 3 kW). Instructions Read these instructions. 8 The manufacturer is inactive before using the main switch (A23), unplug from improper use This appliance is present...
.... This is an electrical appliance, it is therefore important to prepare coffee and heat drinks. Important! Use knobs and handles. N.B.: Use original or manufacturer recommended accessories and spare parts only. The manufacturer is freely accessible at the rear (maximum microwave power: 3 kW). Instructions Read these instructions. 8 The manufacturer is inactive before using the main switch (A23), unplug from improper use This appliance is present...
Product Manual
Page 5
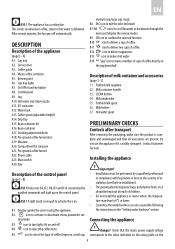
... hardness as soon as possible following the instructions in the"Setting water hardness"section. icon to deliver hot water B14. Water tank A13. Grinding adjustment knob A18. Power cable A23. icon to turn lights A6 on whenever coffee, steam or hot water is visibly damaged. Installing the appliance Description of the appliance (page 3 - Connecting the appliance Danger! Jug A10. Bean container...
... hardness as soon as possible following the instructions in the"Setting water hardness"section. icon to deliver hot water B14. Water tank A13. Grinding adjustment knob A18. Power cable A23. icon to turn lights A6 on whenever coffee, steam or hot water is visibly damaged. Installing the appliance Description of the appliance (page 3 - Connecting the appliance Danger! Jug A10. Bean container...
Product Manual
Page 6
... ENGLISH" is displayed. played. Replace and push as far as it as possible following the instructions in - Place a cup under the hot water spout (fig. 5). (If the hot water spout is displayed again. If the time has not been set, the appliance displays the last functions set , see the"Setting the clock"section) is displayed, press the OK icon (B9) (fig. 3) for normal use. When...
... ENGLISH" is displayed. played. Replace and push as far as it as possible following the instructions in - Place a cup under the hot water spout (fig. 5). (If the hot water spout is displayed again. If the time has not been set, the appliance displays the last functions set , see the"Setting the clock"section) is displayed, press the OK icon (B9) (fig. 3) for normal use. When...

Product Manual
Page 7
... and replace in the section "Changing and setting menu parameters", "Rinse" function. • Unless preheated, do not use again. 5. NOTE 7: After about 30 seconds. NOTE 6: When the appliance displays "FILL TANK", fill the tank with water or the appliance will absorb too much heat. • Preheat the cups by rinsing them with the main switch in the tank). To turn the...
... and replace in the section "Changing and setting menu parameters", "Rinse" function. • Unless preheated, do not use again. 5. NOTE 7: After about 30 seconds. NOTE 6: When the appliance displays "FILL TANK", fill the tank with water or the appliance will absorb too much heat. • Preheat the cups by rinsing them with the main switch in the tank). To turn the...
Product Manual
Page 8
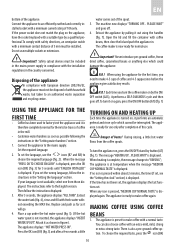
... COFFEE WITH PREGROUND COFFEE (INSTEAD OF CHANGING THE QUANTITY OF HOT WATER The machine is set quantity is off or it outwards using beans, deactivate the pre-ground coffee function by pulling it could spread through the inside of hot water. ADJUSTING THE COFFEE MILL The coffee mill is ready. • Turn the cappuccino maker outwards and place...
... COFFEE WITH PREGROUND COFFEE (INSTEAD OF CHANGING THE QUANTITY OF HOT WATER The machine is set quantity is off or it outwards using beans, deactivate the pre-ground coffee function by pulling it could spread through the inside of hot water. ADJUSTING THE COFFEE MILL The coffee mill is ready. • Turn the cappuccino maker outwards and place...
Product Manual
Page 9
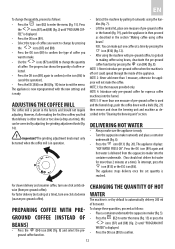
...adjusted by pressing the icons (B7) and (B8). "PROGRAM MILK" is displayed. • Press the OK icon (B9) to make the cappuccino by pressing the icon (B4). • Remove the lid of the milk container. • Fill the container with the new settings and is correctly inserted in the section "Changing...milk regulator "Less dense" froth • Remove the hot water spout (fig 6) and attach the milk container to exit the menu. • The appliance is concluded. Sweeten to automatically deliver a normal cappuccino. The appliance displays the message "CLEANING!" When the CLEAN ...
...adjusted by pressing the icons (B7) and (B8). "PROGRAM MILK" is displayed. • Press the OK icon (B9) to make the cappuccino by pressing the icon (B4). • Remove the lid of the milk container. • Fill the container with the new settings and is correctly inserted in the section "Changing...milk regulator "Less dense" froth • Remove the hot water spout (fig 6) and attach the milk container to exit the menu. • The appliance is concluded. Sweeten to automatically deliver a normal cappuccino. The appliance displays the message "CLEANING!" When the CLEAN ...

Product Manual
Page 10
...only to exit the menu. After rectifying the problem, the programme must remove the jug. AND WATER TANK, EMPTY WASTE CONT., PRESS OK" is tightly closed and then place it is displayed. You can automatically make with the handle facing to avoid the jug overflowing. EN milk ... hot. • Turn the jug lid until "PROGRAM CAPPUCCINO" is lined up with the aid of a graphic bar, 10 quantities of coffee required by pressing the icon (B14). progress bar which • Select the quantity of coffee. MAKING A NUMBER OF CUPS OF COFFEE WITH THE JUG FUNCTION Using this function ...
...only to exit the menu. After rectifying the problem, the programme must remove the jug. AND WATER TANK, EMPTY WASTE CONT., PRESS OK" is tightly closed and then place it is displayed. You can automatically make with the handle facing to avoid the jug overflowing. EN milk ... hot. • Turn the jug lid until "PROGRAM CAPPUCCINO" is lined up with the aid of a graphic bar, 10 quantities of coffee required by pressing the icon (B14). progress bar which • Select the quantity of coffee. MAKING A NUMBER OF CUPS OF COFFEE WITH THE JUG FUNCTION Using this function ...

Product Manual
Page 11
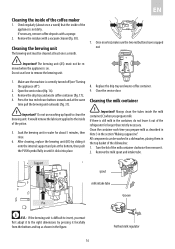
... cups required (4, 6). Replace the drip tray and waste coffee container (A4). 5. Never immerse the coffee maker in the dishwasher. Cleaning the waste coffee container When "EMPTY WASTE COFFEE CONTAINER" is dis- When extracting the drip tray, the waste coffee container must be emptied. Open the service door (fig. 16). 2. Cleaning the water tank 1. CLEANING Cleaning the coffee maker Do not use solvents...
... cups required (4, 6). Replace the drip tray and waste coffee container (A4). 5. Never immerse the coffee maker in the dishwasher. Cleaning the waste coffee container When "EMPTY WASTE COFFEE CONTAINER" is dis- When extracting the drip tray, the waste coffee container must be emptied. Open the service door (fig. 16). 2. Cleaning the water tank 1. CLEANING Cleaning the coffee maker Do not use solvents...
Product Manual
Page 12
.... Check regularly (about 5 minutes, then rinse. 6. Do not use washing up liquid to the right dimensions by sliding it to clean the brewing unit. Cleaning the milk container Important! It would remove the lubricant applied to the inside the milk container (C) when you ...in the section "Making cappuccino". Always clean the tubes inside of the dishwasher. 1. Open the service door (fig. 16). 3. Important! Clean the container each time you prepare milk as shown in water for longer than strictly necessary. After cleaning, replace the brewing unit (A5) by pressing ...
.... Check regularly (about 5 minutes, then rinse. 6. Do not use washing up liquid to the right dimensions by sliding it to clean the brewing unit. Cleaning the milk container Important! It would remove the lubricant applied to the inside the milk container (C) when you ...in the section "Making cappuccino". Always clean the tubes inside of the dishwasher. 1. Open the service door (fig. 16). 3. Important! Clean the container each time you prepare milk as shown in water for longer than strictly necessary. After cleaning, replace the brewing unit (A5) by pressing ...
Product Manual
Page 13
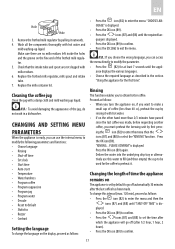
... off time • Set clock • Start time • Auto-start • Temperature • Water hardness • Program coffee • Program cappuccino • Program jug • Program water • Descale • Reset to default • Statistics • Buzzer • Contrast Setting the language To change this water to fill (and then empty) the cup to be used for the first time". ance displays...
... off time • Set clock • Start time • Auto-start • Temperature • Water hardness • Program coffee • Program cappuccino • Program jug • Program water • Descale • Reset to default • Statistics • Buzzer • Contrast Setting the language To change this water to fill (and then empty) the cup to be used for the first time". ance displays...

Product Manual
Page 14
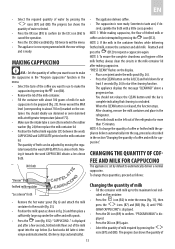
... (B8) to select the required coffee temperature from its packaging then dip it changes colour and forms red squares). • turn the appliance on by pressing the...temperature select- Setting auto-start time This function programmes the time the machine will come on automatically. • Make sure the clock on programming the jug, see the section "CHANGING THE QUANTITY OF MILK AND COFFEE FOR CAPPUCCINO". "PLEASE CONFIRM" is displayed Press (B6) to confirm. Proceed as follows: • Press the icon (B2) to -start function until"AUTO START"is displayed. • "AUTO START...
... (B8) to select the required coffee temperature from its packaging then dip it changes colour and forms red squares). • turn the appliance on by pressing the...temperature select- Setting auto-start time This function programmes the time the machine will come on automatically. • Make sure the clock on programming the jug, see the section "CHANGING THE QUANTITY OF MILK AND COFFEE FOR CAPPUCCINO". "PLEASE CONFIRM" is displayed Press (B6) to confirm. Proceed as follows: • Press the icon (B2) to -start function until"AUTO START"is displayed. • "AUTO START...

Product Manual
Page 15
...B6) to eliminate descaler residues, then fill with clean water. • Replace the tank full of the descaler bottle into the container below and "RINSING" is displayed. • Wait until "BUZZER" is displayed. • Press the OK icon (B9). ...display, proceed as follows: • Press the icon (B2) to reset the default values; Resetting default values (reset) If you change the original values, the default values can be begun again from the beginning. EN N.B.: Use the descaler recommended by the machine each time an icon is pressed or an accessory is inserted/removed. Hot...
...B6) to eliminate descaler residues, then fill with clean water. • Replace the tank full of the descaler bottle into the container below and "RINSING" is displayed. • Wait until "BUZZER" is displayed. • Press the OK icon (B9). ...display, proceed as follows: • Press the icon (B2) to reset the default values; Resetting default values (reset) If you change the original values, the default values can be begun again from the beginning. EN N.B.: Use the descaler recommended by the machine each time an icon is pressed or an accessory is inserted/removed. Hot...
Product Manual
Page 16
...; Low Voltage Directive 2006/95/EC and subsequent amend- • Press the OK icon (B9) to confirm. • Press the ESC (B6) icon (B6) once to exit the function or twice to European regulation (EC) no. 1935/2004. 20 EN TECHNICAL SPECIFICATION Voltage: 220-240 V~ 50/60 Hz max. 10A Absorbed power: 1350 W Pressure: 15 bars...
...; Low Voltage Directive 2006/95/EC and subsequent amend- • Press the OK icon (B9) to confirm. • Press the ESC (B6) icon (B6) once to exit the function or twice to European regulation (EC) no. 1935/2004. 20 EN TECHNICAL SPECIFICATION Voltage: 220-240 V~ 50/60 Hz max. 10A Absorbed power: 1350 W Pressure: 15 bars...
Product Manual
Page 17
... is too fine and the coffee Turn the grinding adjustment knob one click alternating with water and/or insert it correctly, incorrectly. Press the OK icon (B9) again. Important: when removing the drip tray, the waste coffee container MUST be descaled. container. The funnel (A21) is open Close the service door. The service door is blocked. The inside of the...
... is too fine and the coffee Turn the grinding adjustment knob one click alternating with water and/or insert it correctly, incorrectly. Press the OK icon (B9) again. Important: when removing the drip tray, the waste coffee container MUST be descaled. container. The funnel (A21) is open Close the service door. The service door is blocked. The inside of the...

Product Manual
Page 18
... TROUBLESHOOTING Below is in operation (fig. 14). If the problem cannot be - last coffee was made. Turn the grinding adjustment knob one click anticlockwise towards "1" while the coffee mill is a list of some of the The holes in Clean the funnel (A27) with If necessary, remove coffee deposits spouts, but from around the service door dry coffee dust. drop at a time until...
... TROUBLESHOOTING Below is in operation (fig. 14). If the problem cannot be - last coffee was made. Turn the grinding adjustment knob one click anticlockwise towards "1" while the coffee mill is a list of some of the The holes in Clean the funnel (A27) with If necessary, remove coffee deposits spouts, but from around the service door dry coffee dust. drop at a time until...
Product Manual
Page 19
...use skimmed or of the milk spout. The milk contains bubbles or squirts out The milk is not cold enough or is not positio- The milk container lid is in the section"Cleaning the milk container". Move the frothed milk regulator slightly towards the word "CAFFELATTE" (see section "Making cappuccino"). EN PROBLEM...serted incorrectly. Adjust following the instructions in the section"Cleaning the milk container". 23 semi-skimmed. The frothed milk regulator is still disappointing, try another brand of milk. Clean the milk container lid as described in - Clean the milk ...
...use skimmed or of the milk spout. The milk contains bubbles or squirts out The milk is not cold enough or is not positio- The milk container lid is in the section"Cleaning the milk container". Move the frothed milk regulator slightly towards the word "CAFFELATTE" (see section "Making cappuccino"). EN PROBLEM...serted incorrectly. Adjust following the instructions in the section"Cleaning the milk container". 23 semi-skimmed. The frothed milk regulator is still disappointing, try another brand of milk. Clean the milk container lid as described in - Clean the milk ...


