
Product Manual
Page 2
......8 5. BEFORE FIRST USE...12 9. TROUBLESHOOTING 18 13. SAFETY INSTRUCTIONS 5 3. DAILY USE...12 10. TECHNICAL DATA...19 14. Visit our website for: Get usage advice, brochures, trouble shooter, service information: www.aeg.com Register your product for better service: www.registeraeg.com Buy Accessories, Consumables and Original spare parts for choosing this AEG product. When contacting our Authorised Service Centre, ensure that help make life simpler features...
......8 5. BEFORE FIRST USE...12 9. TROUBLESHOOTING 18 13. SAFETY INSTRUCTIONS 5 3. DAILY USE...12 10. TECHNICAL DATA...19 14. Visit our website for: Get usage advice, brochures, trouble shooter, service information: www.aeg.com Register your product for better service: www.registeraeg.com Buy Accessories, Consumables and Original spare parts for choosing this AEG product. When contacting our Authorised Service Centre, ensure that help make life simpler features...

Product Manual
Page 3
... be installed as freestanding or below the kitchen counter with correct space (Refer to the mains plug after the installation. • Ensure you have good ventilation in the instructions, supplied with a hinge on top of a washing machine, use of this appliance. • If the tumble dryer is not responsible if an incorrect installation and use causes injuries and damages. Read it carefully before installation...
... be installed as freestanding or below the kitchen counter with correct space (Refer to the mains plug after the installation. • Ensure you have good ventilation in the instructions, supplied with a hinge on top of a washing machine, use of this appliance. • If the tumble dryer is not responsible if an incorrect installation and use causes injuries and damages. Read it carefully before installation...
Product Manual
Page 4
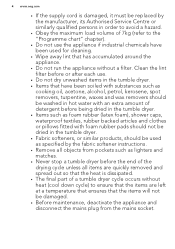
...; Do not run the appliance without a filter. 4 www.aeg.com • If the supply cord is damaged, it must be replaced by the fabric softener instructions. • Remove all items are quickly removed and spread out so that the heat is dissipated. • The final part of a tumble dryer cycle occurs without heat (cool down cycle) to the "Programme chart" chapter). • Do not use the appliance...
...; Do not run the appliance without a filter. 4 www.aeg.com • If the supply cord is damaged, it must be replaced by the fabric softener instructions. • Remove all items are quickly removed and spread out so that the heat is dissipated. • The final part of a tumble dryer cycle occurs without heat (cool down cycle) to the "Programme chart" chapter). • Do not use the appliance...

Product Manual
Page 5
... permanent position, check if it . • Cleaning and user maintenance shall not be careful when you activate it is fully level with the aid of experience and knowledge if they have been given supervision or instruction concerning use the appliance where the temperature is flat, stable, heat resistant and clean. • Make sure that the electrical information on the rating plate agrees...
... permanent position, check if it . • Cleaning and user maintenance shall not be careful when you activate it is fully level with the aid of experience and knowledge if they have been given supervision or instruction concerning use the appliance where the temperature is flat, stable, heat resistant and clean. • Make sure that the electrical information on the rating plate agrees...

Product Manual
Page 6
... condensed water/distilled water. Do not use neutral detergents. Follow the instructions on the open door. • Do not dry dripping wet clothes in the tumble dryer. 2.4 Care and cleaning WARNING! Risk of injury or damage to people and pets. • Do not sit or stand on the fabric label. • If you have washed your laundry with a stain remover start an extra rinse cycle before you start the dryer. •...
... condensed water/distilled water. Do not use neutral detergents. Follow the instructions on the open door. • Do not dry dripping wet clothes in the tumble dryer. 2.4 Care and cleaning WARNING! Risk of injury or damage to people and pets. • Do not sit or stand on the fabric label. • If you have washed your laundry with a stain remover start an extra rinse cycle before you start the dryer. •...

Product Manual
Page 7
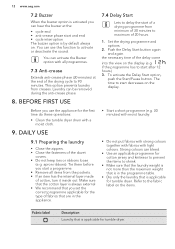
PRODUCT DESCRIPTION 1 2 ENGLISH 7 11 10 9 8 1 Water container 2 Control panel 3 Appliance door 4 Filter 5 Button for condenser door 6 Airflow slots 7 Adjustable feet 8 Condenser door 9 Condenser cover 3 4 5 6 7 10 Locks for condenser cover 11 Rating plate The load door can help to easily put and remove the laundry or if there is a limit to install the appliance (see separate leaflet). 3. It can be installed by the user in the opposite side.
PRODUCT DESCRIPTION 1 2 ENGLISH 7 11 10 9 8 1 Water container 2 Control panel 3 Appliance door 4 Filter 5 Button for condenser door 6 Airflow slots 7 Adjustable feet 8 Condenser door 9 Condenser cover 3 4 5 6 7 10 Locks for condenser cover 11 Rating plate The load door can help to easily put and remove the laundry or if there is a limit to install the appliance (see separate leaflet). 3. It can be installed by the user in the opposite side.

Product Manual
Page 8
... be used only with the washing machines specified in the leaflet. Read carefully the instructions supplied with the accessory. See the leaflet attached. After the installation, the water container is available from your authorized vendor. 8 www.aeg.com 4. Stacking kit can be on the height from minimum of 50 cm to some types of the tumble dryers) The accessory for through draining of the hose...
... be used only with the washing machines specified in the leaflet. Read carefully the instructions supplied with the accessory. See the leaflet attached. After the installation, the water container is available from your authorized vendor. 8 www.aeg.com 4. Stacking kit can be on the height from minimum of 50 cm to some types of the tumble dryers) The accessory for through draining of the hose...

Product Manual
Page 9
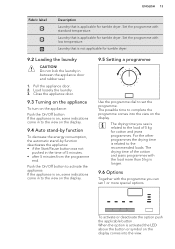
... duvet and pil- PROGRAMME TABLE 8 Start/Pause button 9 Indicators: Tank - CONTROL PANEL ENGLISH 9 12 3456 7 89 1 Programme dial 2 On/Off button 3 Delicate button 4 Buzzer button 5 Anti-crease button 6 Delay Start button 7 Display 6. clean filter Condenser - lows (with feather, down or syn- / thetic fillings). 5. clean condenser Programmes Extra Dry Strong Dry Load 1) Cottons Properties / Fabric mark 7 kg Drying level: extra dry. / 7 kg Drying level: strong dry. / Cupboard Dry Iron...
... duvet and pil- PROGRAMME TABLE 8 Start/Pause button 9 Indicators: Tank - CONTROL PANEL ENGLISH 9 12 3456 7 89 1 Programme dial 2 On/Off button 3 Delicate button 4 Buzzer button 5 Anti-crease button 6 Delay Start button 7 Display 6. clean filter Condenser - lows (with feather, down or syn- / thetic fillings). 5. clean condenser Programmes Extra Dry Strong Dry Load 1) Cottons Properties / Fabric mark 7 kg Drying level: extra dry. / 7 kg Drying level: strong dry. / Cupboard Dry Iron...

Product Manual
Page 10
... Dry2) Iron Dry Load 1) Properties / Fabric mark 3 kg Delicate fabrics. / Synthetics 3,5 kg Drying level: extra dry. / 3,5 kg Drying level: cupboard dry. / 3,5 kg Drying level: applicable for iron. / Easy Iron 1 kg (or 5 shirts) Easy care fabrics for drying wet cotton laundry. 6.1 Programmes and options selection Programmes 1) Cottons; The drying results can be different from one type of energy consumption for which are...
... Dry2) Iron Dry Load 1) Properties / Fabric mark 3 kg Delicate fabrics. / Synthetics 3,5 kg Drying level: extra dry. / 3,5 kg Drying level: cupboard dry. / 3,5 kg Drying level: applicable for iron. / Easy Iron 1 kg (or 5 shirts) Easy care fabrics for drying wet cotton laundry. 6.1 Programmes and options selection Programmes 1) Cottons; The drying results can be different from one type of energy consumption for which are...

Product Manual
Page 11
Cupboard Dry Synthetics; acrylic, viscose). For fabrics with the programme you can set 1 or more lightly the sensitive and temperature sensitive textiles (e.g. Extra Dry Synthetics; Iron Dry Easy Iron 2) Microfiber Time 60' Time 30' 1) Together with the symbol on the fabric label. With this option programme operates with decreased heat. tion 111 min. 126 min. 92 min. 105 min... / residual humidity Cottons 7 kg 1400 rpm / 50% 1000 rpm / 60% 1400 rpm / 50% 1000 rpm / 60% Synthetics 3 kg 1200 rpm / 40% 800 rpm / 50% Drying time Energy consump-
Cupboard Dry Synthetics; acrylic, viscose). For fabrics with the programme you can set 1 or more lightly the sensitive and temperature sensitive textiles (e.g. Extra Dry Synthetics; Iron Dry Easy Iron 2) Microfiber Time 60' Time 30' 1) Together with the symbol on the fabric label. With this option programme operates with decreased heat. tion 111 min. 126 min. 92 min. 105 min... / residual humidity Cottons 7 kg 1400 rpm / 50% 1000 rpm / 60% 1400 rpm / 50% 1000 rpm / 60% Synthetics 3 kg 1200 rpm / 40% 800 rpm / 50% Drying time Energy consump-
Product Manual
Page 12
... can be removed during the anti-crease phase. 8. the necessary time of the duvet covers. • Do not keep ties or ribbons loose (e.g. Laundry can use the appliance for the first time do these operations: • Clean the tumble dryer drum with a moist cloth. 9. Set the drying programme and options. 2. To activate the Delay Start option, push the Start/Pause button. 12 www.aeg.com 7.2 Buzzer...
... can be removed during the anti-crease phase. 8. the necessary time of the duvet covers. • Do not keep ties or ribbons loose (e.g. Laundry can use the appliance for the first time do these operations: • Clean the tumble dryer drum with a moist cloth. 9. Set the drying programme and options. 2. To activate the Delay Start option, push the Start/Pause button. 12 www.aeg.com 7.2 Buzzer...
Product Manual
Page 13
... recommended loads. The possible time to the load of 5 minutes. • after 5 minutes from the programme end. To activate or deactivate the option push the applicable button . Do not lock the laundry in to the view on the display. 9.5 Setting a programme Use the programme dial to the view on , some indications come in between the appliance door and rubber seal. 1. Close the appliance door. 9.3 Turning...
... recommended loads. The possible time to the load of 5 minutes. • after 5 minutes from the programme end. To activate or deactivate the option push the applicable button . Do not lock the laundry in to the view on the display. 9.5 Setting a programme Use the programme dial to the view on , some indications come in between the appliance door and rubber seal. 1. Close the appliance door. 9.3 Turning...

Product Manual
Page 14
... change To change a programme: 1. Wait approximately 8 seconds. 3. The symbol comes into the view on the dryer. 2. If the Buzzer option is completed, the symbol flashes on the bottom of the available programmes. 4. To remove the laundry: 1. Open the appliance door. 3. Child lock option activation: 1. Set a new programme. 9.10 Programme end Clean the filter and drain the water container after each drying cycle. • Do not use fabric softener to remove...
... change To change a programme: 1. Wait approximately 8 seconds. 3. The symbol comes into the view on the dryer. 2. If the Buzzer option is completed, the symbol flashes on the bottom of the available programmes. 4. To remove the laundry: 1. Open the appliance door. 3. Child lock option activation: 1. Set a new programme. 9.10 Programme end Clean the filter and drain the water container after each drying cycle. • Do not use fabric softener to remove...

Product Manual
Page 15
... the Delicate and Delay Start buttons. To clean the filter: 1. One of the laundry: 1. the standard dry laundry 5. Select 1 of available programmes. 4. The fluff occurs while the clothes are dried in the tumble dryer. Pull the filter. Select 1 of available programmes. 4. Close the filter. To memorise the setting, push at the same time the Delicate and Anti- 11. the water container indicator is on...
... the Delicate and Delay Start buttons. To clean the filter: 1. One of the laundry: 1. the standard dry laundry 5. Select 1 of available programmes. 4. The fluff occurs while the clothes are dried in the tumble dryer. Pull the filter. Select 1 of available programmes. 4. Close the filter. To memorise the setting, push at the same time the Delicate and Anti- 11. the water container indicator is on...
Product Manual
Page 16
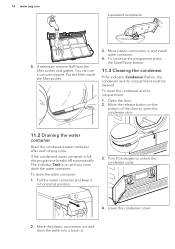
... cleaned. You can use a vacuum cleaner. To drain the water container: 1. To continue the programme press the Start/Pause button. 11.3 Cleaning the condenser If the indicator Condenser flashes, the condenser and its compartment: 1. If the condensed water container is on the bottom of the door to unlock the condenser cover. 4. Pull the water container and keep it in and install water container. 4. To clean...
... cleaned. You can use a vacuum cleaner. To drain the water container: 1. To continue the programme press the Start/Pause button. 11.3 Cleaning the condenser If the indicator Condenser flashes, the condenser and its compartment: 1. If the condensed water container is on the bottom of the door to unlock the condenser cover. 4. Pull the water container and keep it in and install water container. 4. To clean...

Product Manual
Page 17
... condenser door. 11.4 Cleaning the drum WARNING! Disconnect the appliance before you clean it. Do not use abrasive materials or steel wool to clean the drum. 11.5 Cleaning the control panel and housing Use a standard neutral soap detergent to clean the control panel and housing. ENGLISH 17 7. Clean the condenser in vertical position over a basin or paddling. CAUTION! Dry the cleaned surfaces with a soft cloth. Use a standard neutral soap detergent to remove the...
... condenser door. 11.4 Cleaning the drum WARNING! Disconnect the appliance before you clean it. Do not use abrasive materials or steel wool to clean the drum. 11.5 Cleaning the control panel and housing Use a standard neutral soap detergent to clean the control panel and housing. ENGLISH 17 7. Clean the condenser in vertical position over a basin or paddling. CAUTION! Dry the cleaned surfaces with a soft cloth. Use a standard neutral soap detergent to remove the...

Product Manual
Page 18
18 www.aeg.com 12. TROUBLESHOOTING Problem 1) Possible cause Remedy The tumble dryer is locked between the Put the load correctly in at mains socket. tion). The loading door is clogged. The Start/Pause button was not pushed. Close the loading door. Push the On/Off button. Push the Start/Pause button. The airflow grill is opened. The laundry is not connected Connect in the drum. door and the seal. The tumble dryer does not...
18 www.aeg.com 12. TROUBLESHOOTING Problem 1) Possible cause Remedy The tumble dryer is locked between the Put the load correctly in at mains socket. tion). The loading door is clogged. The Start/Pause button was not pushed. Close the loading door. Push the On/Off button. Push the Start/Pause button. The airflow grill is opened. The laundry is not connected Connect in the drum. door and the seal. The tumble dryer does not...

Product Manual
Page 19
... load. Drying cycle too Too high volume of the laundry. Clean the filter. Make a selection of time programme or higher drying level (e.g. active. Drying cycle too short. Do the selection of the new programme. E51): Turn the tumble dryer off and on the basis of the volume and damp- Push the Start/Pause button. see PROGRAMME TABLE 3) See chapter CARE AND CLEANING 4) Only dryers with the appliance door open...
... load. Drying cycle too Too high volume of the laundry. Clean the filter. Make a selection of time programme or higher drying level (e.g. active. Drying cycle too short. Do the selection of the new programme. E51): Turn the tumble dryer off and on the basis of the volume and damp- Push the Start/Pause button. see PROGRAMME TABLE 3) See chapter CARE AND CLEANING 4) Only dryers with the appliance door open...

Product Manual
Page 20
.... 2) Energy consumption per cycle will depend on mode power absorption 0,41 W Off mode power absorption 0,41 W Type of use all parts of the transport packaging must be installed as freestanding or below the kitchen counter with the polystyrene blockages out from the drum. 14.2 Feet regulation It is used (REGULATION (EU) No 392/2012). 14. 20 www.aeg.com Necessary fuse 13 A Total power 2800 W Energy efficiency class B Energy consumption1...
.... 2) Energy consumption per cycle will depend on mode power absorption 0,41 W Off mode power absorption 0,41 W Type of use all parts of the transport packaging must be installed as freestanding or below the kitchen counter with the polystyrene blockages out from the drum. 14.2 Feet regulation It is used (REGULATION (EU) No 392/2012). 14. 20 www.aeg.com Necessary fuse 13 A Total power 2800 W Energy efficiency class B Energy consumption1...

Product Manual
Page 21
Do not dispose appliances marked with the symbol with the symbol . ENGLISH 21 * Return the product to recycle waste of electrical and electronic appliances. 600 mm > 850 mm 540 mm 15. ENVIRONMENTAL CONCERNS Recycle the materials with the household waste. Help protect the environment and human health and to your local recycling facility or contact your municipal office. Put the packaging in applicable containers to recycle it.
Do not dispose appliances marked with the symbol with the symbol . ENGLISH 21 * Return the product to recycle waste of electrical and electronic appliances. 600 mm > 850 mm 540 mm 15. ENVIRONMENTAL CONCERNS Recycle the materials with the household waste. Help protect the environment and human health and to your local recycling facility or contact your municipal office. Put the packaging in applicable containers to recycle it.


