Product Manual
Page 2
... you have created it . 2 www.aeg.com CONTENTS 1. CONTROL PANEL...6 5. SETTINGS...14 9. BEFORE FIRST USE...15 10. Visit our website for: Get usage advice, brochures, trouble shooter, service information: www.aeg.com Register your product for better service: www.registeraeg.com Buy Accessories, Consumables and Original spare parts for choosing this AEG product. SAFETY INFORMATION 3 2. SAFETY INSTRUCTIONS 4 3. PROGRAMMES ...9 6. EMERGENCY DOOR OPENING 26 15. TECHNICAL DATA...27 FOR PERFECT RESULTS...
... you have created it . 2 www.aeg.com CONTENTS 1. CONTROL PANEL...6 5. SETTINGS...14 9. BEFORE FIRST USE...15 10. Visit our website for: Get usage advice, brochures, trouble shooter, service information: www.aeg.com Register your product for better service: www.registeraeg.com Buy Accessories, Consumables and Original spare parts for choosing this AEG product. SAFETY INFORMATION 3 2. SAFETY INSTRUCTIONS 4 3. PROGRAMMES ...9 6. EMERGENCY DOOR OPENING 26 15. TECHNICAL DATA...27 FOR PERFECT RESULTS...
Product Manual
Page 4
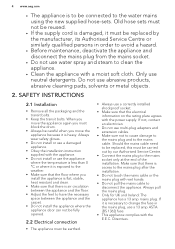
... supplied hose-sets. Directives. Should the mains cable need to be replaced, this must not be carried out by the manufacturer, its Authorised Service Centre or similarly qualified persons in the mains plug, use a 13 amp ASTA (BS 1362) fuse. • This appliance complies with the E.E.C. SAFETY INSTRUCTIONS 2.1 Installation • Remove all the packaging and the transit bolts. • Keep the transit bolts. Old hose sets...
... supplied hose-sets. Directives. Should the mains cable need to be replaced, this must not be carried out by the manufacturer, its Authorised Service Centre or similarly qualified persons in the mains plug, use a 13 amp ASTA (BS 1362) fuse. • This appliance complies with the E.E.C. SAFETY INSTRUCTIONS 2.1 Installation • Remove all the packaging and the transit bolts. • Keep the transit bolts. Old hose sets...

Product Manual
Page 5
... wet with flammable products in the appliance. 1 2 3 1 Worktop 2 Detergent dispenser 3 Control panel 4 Door handle 4 5 Rating plate 6 Drain pump filter 7 Feet for a long time, let the water flow until it . • Remove the door catch to prevent children and pets to ensure which accessories can be used for the appliance level 5 6 7 The glass can be hot. 2.5 Service • To repair the appliance contact an Authorised Service Centre. • Use original spare parts only. 2.6 Disposal WARNING...
... wet with flammable products in the appliance. 1 2 3 1 Worktop 2 Detergent dispenser 3 Control panel 4 Door handle 4 5 Rating plate 6 Drain pump filter 7 Feet for a long time, let the water flow until it . • Remove the door catch to prevent children and pets to ensure which accessories can be used for the appliance level 5 6 7 The glass can be hot. 2.5 Service • To repair the appliance contact an Authorised Service Centre. • Use original spare parts only. 2.6 Disposal WARNING...

Product Manual
Page 6
... 3 Display 4 Start/Pause button (Start/Pause) 5 Delay Start button (Delay Start ) 6 Time Save button (Time Save) 7 Extra Rinse button (Extra Rinse) 8 Stains/Prewash button (Stains/ Prewash) 9 Spin reduction button (Spin) 10 Temperature button (Temp.) To close the door. Read carefully the instructions supplied with screws, the wood panel must extend beyond the front feet. You cannot close the door, turn the device anticlockwise until the groove is more stable. 3.4 Fixing plate kit (4055171146) Available from your authorized dealer. CONTROL PANEL 4.1 Control panel...
... 3 Display 4 Start/Pause button (Start/Pause) 5 Delay Start button (Delay Start ) 6 Time Save button (Time Save) 7 Extra Rinse button (Extra Rinse) 8 Stains/Prewash button (Stains/ Prewash) 9 Spin reduction button (Spin) 10 Temperature button (Temp.) To close the door. Read carefully the instructions supplied with screws, the wood panel must extend beyond the front feet. You cannot close the door, turn the device anticlockwise until the groove is more stable. 3.4 Fixing plate kit (4055171146) Available from your authorized dealer. CONTROL PANEL 4.1 Control panel...

Product Manual
Page 8
... programme duration. Delay start time H Alarm codes If the appliance has a malfunction, the display shows alarm codes. If you try to change the washing programme while it operates. Programme time When the programme starts, the programme time decreases with the washing programme • you make a wrong selection the message Err indicates that the selection is water in the drum. Refer to the set programme. The empty...
... programme duration. Delay start time H Alarm codes If the appliance has a malfunction, the display shows alarm codes. If you try to change the washing programme while it operates. Programme time When the programme starts, the programme time decreases with the washing programme • you make a wrong selection the message Err indicates that the selection is water in the drum. Refer to the set programme. The empty...
Product Manual
Page 9
... mixed fabric items. Normal soil. Synthetic items to perform a silent cycle. The Prewash symbol comes on when this function is activated. Cold Delicates 40° C - Machine washable wool, hand washable wool and delicate fabrics with water in the tub. K The value shows the total number of load and soil level) White cotton and coloured cotton. Cold Easy Iron 60° C - ENGLISH 9 The extra rinse symbol comes...
... mixed fabric items. Normal soil. Synthetic items to perform a silent cycle. The Prewash symbol comes on when this function is activated. Cold Delicates 40° C - Machine washable wool, hand washable wool and delicate fabrics with water in the tub. K The value shows the total number of load and soil level) White cotton and coloured cotton. Cold Easy Iron 60° C - ENGLISH 9 The extra rinse symbol comes...

Product Manual
Page 10
... cycle removes odours from the laundry.8) Steam programmes7) Steam can reduce creases and odours and make your laundry more effective. Do not set a Steam programme with plastic, metal, wooden parts or alike. In this way the wash is extended. Mixed fabric (cotton and synthetic items)5). To rinse and spin the laundry. To spin the laundry and to the washing by washing or using localized stain removal. Items in the drum. Steam programmes...
... cycle removes odours from the laundry.8) Steam programmes7) Steam can reduce creases and odours and make your laundry more effective. Do not set a Steam programme with plastic, metal, wooden parts or alike. In this way the wash is extended. Mixed fabric (cotton and synthetic items)5). To rinse and spin the laundry. To spin the laundry and to the washing by washing or using localized stain removal. Items in the drum. Steam programmes...
Product Manual
Page 11
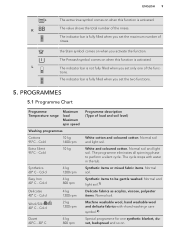
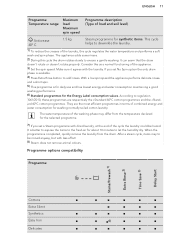
... Maximum load Maximum spin speed Programme description (Type of load and soil level) Anticrease 40° C 1.5 kg Steam programme for synthetic items. This cycle helps to dewrinkle the laundry. 1) To reduce the creases of the appliance. 3) Set the spin speed. The appliance adds some rinses. 2) During this cycle regulates the water temperature and performs a soft wash and spin phase. Consider this as a normal functioning of the laundry, this cycle the drum...
... Maximum load Maximum spin speed Programme description (Type of load and soil level) Anticrease 40° C 1.5 kg Steam programme for synthetic items. This cycle helps to dewrinkle the laundry. 1) To reduce the creases of the appliance. 3) Set the spin speed. The appliance adds some rinses. 2) During this cycle regulates the water temperature and performs a soft wash and spin phase. Consider this as a normal functioning of the laundry, this cycle the drum...
Product Manual
Page 12
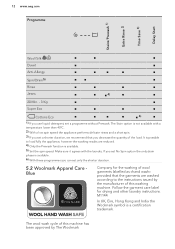
... you use liquid detergent, set only the shorter duration. 5.2 Woolmark Apparel Care Blue Company for drying and other laundry instructions. It is possible to load fully the appliance, however the washing results are washed according to the instructions issued by the manufacturer of this machine has been approved by The Woolmark The wool wash cycle of the load. Follow the garment care label for the washing of...
... you use liquid detergent, set only the shorter duration. 5.2 Woolmark Apparel Care Blue Company for drying and other laundry instructions. It is possible to load fully the appliance, however the washing results are washed according to the instructions issued by the manufacturer of this machine has been approved by The Woolmark The wool wash cycle of the load. Follow the garment care label for the washing of...

Product Manual
Page 14
... the start of the programme. SETTINGS 8.1 Acoustic signals The acoustic signals operate when: • You activate the appliance. • You deactivate the appliance. • Stains: Use this option for items with a high level of the two options. 7.4 Extra Rinse With this button two times to remove. The set 'Extra Quick' for laundry with hard stains to set of this option increases the programme duration. 7.6 Spin...
... the start of the programme. SETTINGS 8.1 Acoustic signals The acoustic signals operate when: • You activate the appliance. • You deactivate the appliance. • Stains: Use this option for items with a high level of the two options. 7.4 Extra Rinse With this button two times to remove. The set 'Extra Quick' for laundry with hard stains to set of this option increases the programme duration. 7.6 Spin...

Product Manual
Page 15
... control panel. • To activate/deactivate this option: 9. This removes all possible dirt from the drum and the tub. Press button Auto Off to the mains socket. 3. Open the appliance door 2. CAUTION! You can permanently have an extra rinse when you set a new programme. • To activate/deactivate this option press Time Save and Delay Start at the highest temperature without laundry. 10. DAILY USE...
... control panel. • To activate/deactivate this option: 9. This removes all possible dirt from the drum and the tub. Press button Auto Off to the mains socket. 3. Open the appliance door 2. CAUTION! You can permanently have an extra rinse when you set a new programme. • To activate/deactivate this option press Time Save and Delay Start at the highest temperature without laundry. 10. DAILY USE...
Product Manual
Page 16
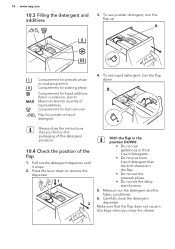
Carefully close the drawer. To use powder detergent, turn the flap down to remove the dispenser. 1 2 With the flap in the position DOWN: • Do not use liquid detergent, turn the flap up. Maximum level for powder or liquid detergent. 4. Compartment for prewash phase an soak programme. Make sure that you close the detergent dispenser. To use gelatinous or thick liquid detergents. • Do not put more liquid detergent than the limit showed in...
Carefully close the drawer. To use powder detergent, turn the flap down to remove the dispenser. 1 2 With the flap in the position DOWN: • Do not use liquid detergent, turn the flap up. Maximum level for powder or liquid detergent. 4. Compartment for prewash phase an soak programme. Make sure that you close the detergent dispenser. To use gelatinous or thick liquid detergents. • Do not put more liquid detergent than the limit showed in...

Product Manual
Page 17
Turn the programme knob. The drain pump can change only some options before they operate. 1. Press button Start/Pause. Press button Start/Pause to set . 3. Press button Delay Start repeatedly until the display shows the number of minutes or hours of the available functions. 2. Press the button Start/Pause again. 10.5 Setting a programme 1. The display shows the default temperature, the spin speed and the empty indicator bars of delay. The related...
Turn the programme knob. The drain pump can change only some options before they operate. 1. Press button Start/Pause. Press button Start/Pause to set . 3. Press button Delay Start repeatedly until the display shows the number of minutes or hours of the available functions. 2. Press the button Start/Pause again. 10.5 Setting a programme 1. The display shows the default temperature, the spin speed and the empty indicator bars of delay. The related...

Product Manual
Page 18
... door stays locked. is empty. 4. The appliance drains the water and spins. 3. 18 www.aeg.com 10.12 Opening the door If the temperature and level of the water in the drum, the AUTO OFF function doesn't deactivate the appliance to remind you to drain the water. Close the door and press button Start/Pause. In the display comes on . Make sure that ends with water in the drum are too high...
... door stays locked. is empty. 4. The appliance drains the water and spins. 3. 18 www.aeg.com 10.12 Opening the door If the temperature and level of the water in the drum, the AUTO OFF function doesn't deactivate the appliance to remind you to drain the water. Close the door and press button Start/Pause. In the display comes on . Make sure that ends with water in the drum are too high...
Product Manual
Page 19
...; Some coloured items can cause balance problems with cuts. We recommend that you put the curtains in a washing bag or pillowcase. • Do not wash in the tub and start a washing programme with the maximum load of laundry. • If necessary, use a stain remover when you set a programme with a low temperature. • To use a water softener for all types of fabric, or special for washing machines: - Tie up pillowcases, close...
...; Some coloured items can cause balance problems with cuts. We recommend that you put the curtains in a washing bag or pillowcase. • Do not wash in the tub and start a washing programme with the maximum load of laundry. • If necessary, use a stain remover when you set a programme with a low temperature. • To use a water softener for all types of fabric, or special for washing machines: - Tie up pillowcases, close...
Product Manual
Page 20
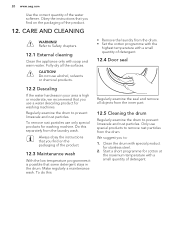
.... Regularly examine the drum to remove rust particles from the laundry wash. Obey the instructions that some detergent stays in your area is possible that you find on the packaging of detergent. 12.4 Door seal Regularly examine the seal and remove all the surfaces. CARE AND CLEANING WARNING! Clean the drum with a small quantity of the water softener. Do not use a water descaling product for washing machine. We suggest you use alcohol, solvents...
.... Regularly examine the drum to remove rust particles from the laundry wash. Obey the instructions that some detergent stays in your area is possible that you find on the packaging of detergent. 12.4 Door seal Regularly examine the seal and remove all the surfaces. CARE AND CLEANING WARNING! Clean the drum with a small quantity of the water softener. Do not use a water descaling product for washing machine. We suggest you use alcohol, solvents...

Product Manual
Page 23
... drain system: 1. 12.8 Cleaning the inlet hose and the valve filter 1. 2. 1 ENGLISH 23 2 3 3. 4. 45° 20° 12.9 Emergency drain Because of 'Cleaning the drain filter'. Refer to drain the water 12.10 Frost precautions If the appliance is not responsible for damages caused by low temperatures. Make sure that the temperature is empty, install the inlet hose again. When the drain pump is more than 0° C, remove the remaining water...
... drain system: 1. 12.8 Cleaning the inlet hose and the valve filter 1. 2. 1 ENGLISH 23 2 3 3. 4. 45° 20° 12.9 Emergency drain Because of 'Cleaning the drain filter'. Refer to drain the water 12.10 Frost precautions If the appliance is not responsible for damages caused by low temperatures. Make sure that the temperature is empty, install the inlet hose again. When the drain pump is more than 0° C, remove the remaining water...

Product Manual
Page 24
... the delay start of countdown. For this information, contact your local water authority. 24 www.aeg.com 13. Switch off and switch on . Make sure that the appliance door is open or not closed . Make sure that the filter of the inlet hose and the filter of the water supply is correct. Make sure that the pressure of the valve are not clogged. No...
... the delay start of countdown. For this information, contact your local water authority. 24 www.aeg.com 13. Switch off and switch on . Make sure that the appliance door is open or not closed . Make sure that the filter of the inlet hose and the filter of the water supply is correct. Make sure that the pressure of the valve are not clogged. No...

Product Manual
Page 25
... cannot open the door, please read carefully «Emergency door opening». Set the spin programme. The appliance makes an Make sure the levelling of the water hoses are removed. Make sure that the couplings of the appliance is correct. Make sure that the drain filter is not clogged. Make sure you need to open the ap- Contact the Authorised Service Centre. unusual noise. stallation'. This problem may be...
... cannot open the door, please read carefully «Emergency door opening». Set the spin programme. The appliance makes an Make sure the levelling of the water hoses are removed. Make sure that the couplings of the appliance is correct. Make sure that the drain filter is not clogged. Make sure you need to open the ap- Contact the Authorised Service Centre. unusual noise. stallation'. This problem may be...
Product Manual
Page 26
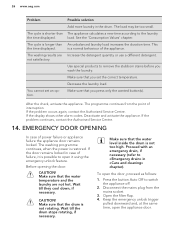
... remove the stubborn stains before you set an option. The washing results are not hot. EMERGENCY DOOR OPENING In case of failure, it using the emergency unlock feature. Keep the emergency unlock trigger pulled downward and, at the same time, open the door, proceed as follows: 1. Decrease the laundry load. After the check, activate the appliance. 26 www.aeg.com Problem Possible solution Add more laundry in «Care and cleaning...
... remove the stubborn stains before you set an option. The washing results are not hot. EMERGENCY DOOR OPENING In case of failure, it using the emergency unlock feature. Keep the emergency unlock trigger pulled downward and, at the same time, open the door, proceed as follows: 1. Decrease the laundry load. After the check, activate the appliance. 26 www.aeg.com Problem Possible solution Add more laundry in «Care and cleaning...

