
Product Manual
Page 2
... usage advice, brochures, trouble shooter, service information: www.aeg.com Register your product for better service: www.aeg.com/productregistration Buy Accessories, Consumables and Original spare parts for choosing this AEG product. Please spend a few minutes reading to get the very best from it to change without notice. Model, PNC, Serial Number. SAFETY INSTRUCTIONS 4 3. features you for your appliance: www.aeg.com/shop CUSTOMER CARE AND SERVICE We recommend the use...
... usage advice, brochures, trouble shooter, service information: www.aeg.com Register your product for better service: www.aeg.com/productregistration Buy Accessories, Consumables and Original spare parts for choosing this AEG product. Please spend a few minutes reading to get the very best from it to change without notice. Model, PNC, Serial Number. SAFETY INSTRUCTIONS 4 3. features you for your appliance: www.aeg.com/shop CUSTOMER CARE AND SERVICE We recommend the use...

Product Manual
Page 4
... that the electrical information on the rating plate agrees with wet hands. • Only for UK and Ireland. The appliance has a 13 amp mains plug. Old hose sets must be carried out by a carpet. • The appliance is to be reused. 2. Risk of the installation. Electrical connection WARNING! SAFETY INSTRUCTIONS 2.1 Installation • Remove all the packaging and the transit bolts. •...
... that the electrical information on the rating plate agrees with wet hands. • Only for UK and Ireland. The appliance has a 13 amp mains plug. Old hose sets must be carried out by a carpet. • The appliance is to be reused. 2. Risk of the installation. Electrical connection WARNING! SAFETY INSTRUCTIONS 2.1 Installation • Remove all the packaging and the transit bolts. •...

Product Manual
Page 5
... used . 2.3 Care and Cleaning WARNING! Only use abrasive products, abrasive cleaning pads, solvents or metal objects. 2.4 Disposal WARNING! The glass can be used for a long time, let the water flow until it . • Remove the door catch to prevent children and pets to the appliance. • Use this appliance in a household environment. • Do not change the specification of this appliance. • Obey the safety instructions...
... used . 2.3 Care and Cleaning WARNING! Only use abrasive products, abrasive cleaning pads, solvents or metal objects. 2.4 Disposal WARNING! The glass can be used for a long time, let the water flow until it . • Remove the door catch to prevent children and pets to the appliance. • Use this appliance in a household environment. • Do not change the specification of this appliance. • Obey the safety instructions...

Product Manual
Page 6
... drum. Follow the instructions supplied with screws, the wood panel must extend beyond the front feet. 6 www.aeg.com 3. PRODUCT DESCRIPTION 1 2 3 8 9 10 4 5 6 7 1 Worktop 2 Detergent dispenser 3 Control panel 4 Door handle 5 Rating plate 6 Drain pump 7 Feet for the appliance level 8 Water drain hose 9 Water inlet valve 10 Mains cable 11 Transit bolts 12 Feet for the appliance level 3.1 Child safety device • When you activate this device, you place a waterproof wood panel, at least 2 floor beams with the kit. 3.3 Installation...
... drum. Follow the instructions supplied with screws, the wood panel must extend beyond the front feet. 6 www.aeg.com 3. PRODUCT DESCRIPTION 1 2 3 8 9 10 4 5 6 7 1 Worktop 2 Detergent dispenser 3 Control panel 4 Door handle 5 Rating plate 6 Drain pump 7 Feet for the appliance level 8 Water drain hose 9 Water inlet valve 10 Mains cable 11 Transit bolts 12 Feet for the appliance level 3.1 Child safety device • When you activate this device, you place a waterproof wood panel, at least 2 floor beams with the kit. 3.3 Installation...

Product Manual
Page 8
... phase Washing phase Rinses phase Spin phase C The phase symbols • When a programme is on . • When the programme starts, only the symbol of the phase in operation flashes. • When the programme is completed, the symbol of the last phase is set a Steam programme. 8 www.aeg.com 4.3 Display 3 A B C D E F GH I M L K J The display shows: A The temperature of the set programme Cold water The spin speed of the cycle...
... phase Washing phase Rinses phase Spin phase C The phase symbols • When a programme is on . • When the programme starts, only the symbol of the phase in operation flashes. • When the programme is completed, the symbol of the last phase is set a Steam programme. 8 www.aeg.com 4.3 Display 3 A B C D E F GH I M L K J The display shows: A The temperature of the set programme Cold water The spin speed of the cycle...

Product Manual
Page 9
... with the washing programme. - Refer to 'Loading the laundry' paragraph • The maximum programme load The symbols shows the maximum load for some seconds when: - G The delay start symbol comes on . You can open the door only when the symbol goes off. You cannot set the delay start time. • Alarm codes I If the appliance has a malfunction, the display shows alarm codes. dry inside the drum.
... with the washing programme. - Refer to 'Loading the laundry' paragraph • The maximum programme load The symbols shows the maximum load for some seconds when: - G The delay start symbol comes on . You can open the door only when the symbol goes off. You cannot set the delay start time. • Alarm codes I If the appliance has a malfunction, the display shows alarm codes. dry inside the drum.

Product Manual
Page 11
... occurs. 4.12 Child lock function This function prevents children to add a prewash phase before the washing phase. The related symbol and the indicator bar comes on when you set programme. • Deactivate the spin phase. • Activate the 'Rinse Hold' function. To deactivate/activate the acoustic signals, press button 8 and button 7 at the same time until the display shows the symbol...
... occurs. 4.12 Child lock function This function prevents children to add a prewash phase before the washing phase. The related symbol and the indicator bar comes on when you set programme. • Deactivate the spin phase. • Activate the 'Rinse Hold' function. To deactivate/activate the acoustic signals, press button 8 and button 7 at the same time until the display shows the symbol...

Product Manual
Page 12
.... Do not use any fabric softener! 2.5 kg, 800 rpm Cotton and synthetic items with «hand washing» care symbol. 2 kg, 1200 rpm Special programme for one synthetic blanket, duvet, bedspread and so on. 3 kg, 800 rpm White cotton items. This programme removes micro-organisms thanks to drain the water in the drum. max. 3 kg, 1200 rpm Cold Extra Silent 95...
.... Do not use any fabric softener! 2.5 kg, 800 rpm Cotton and synthetic items with «hand washing» care symbol. 2 kg, 1200 rpm Special programme for one synthetic blanket, duvet, bedspread and so on. 3 kg, 800 rpm White cotton items. This programme removes micro-organisms thanks to drain the water in the drum. max. 3 kg, 1200 rpm Cold Extra Silent 95...

Product Manual
Page 13
... washing normally soiled cotton laundry. ENGLISH 13 Programme Temperature range Type of the spin speed is soft to cotton items. Set the spin speed. Normal soil. 10 kg, 1400 rpm Steam programmes Refresh Steam programme for cotton and synthetic This cycle removes odours from the temperature declared for hygiene in terms of combined energy and water consumption for the Energy Label consumption values According to decrease the time...
... washing normally soiled cotton laundry. ENGLISH 13 Programme Temperature range Type of the spin speed is soft to cotton items. Set the spin speed. Normal soil. 10 kg, 1400 rpm Steam programmes Refresh Steam programme for cotton and synthetic This cycle removes odours from the temperature declared for hygiene in terms of combined energy and water consumption for the Energy Label consumption values According to decrease the time...

Product Manual
Page 14
... duration a dot blinks in the display. 14 www.aeg.com Stains/Prewash Extra Rinse Time Save Delay Start Programme Rinse ■ ■ ■ ■ Outdoor ■ ■ ■ ■ ■ 20 Min. - 3 kg ■ ■ Super Eco ■ ■ ■ ■ Cottons Eco ■ ■ ■ ■ ■ ■ 1) If you set No Spin option the only drain phase is...
... duration a dot blinks in the display. 14 www.aeg.com Stains/Prewash Extra Rinse Time Save Delay Start Programme Rinse ■ ■ ■ ■ Outdoor ■ ■ ■ ■ ■ 20 Min. - 3 kg ■ ■ Super Eco ■ ■ ■ ■ Cottons Eco ■ ■ ■ ■ ■ ■ 1) If you set No Spin option the only drain phase is...

Product Manual
Page 15
... of spin phase. Press button 1 to the necessary programme. The programme indicator comes on. USING THE APPLIANCE For a correct operation of the weight sensor, activate the appliance and set the programme BEFORE you put 2 litre of detergent in compliance with the EU Commission regulation 1015/2010 implementing directive 2009/125/EC. 7. Set and start a programme for cotton at the highest temperature without laundry. Turn...
... of spin phase. Press button 1 to the necessary programme. The programme indicator comes on. USING THE APPLIANCE For a correct operation of the weight sensor, activate the appliance and set the programme BEFORE you put 2 litre of detergent in compliance with the EU Commission regulation 1015/2010 implementing directive 2009/125/EC. 7. Set and start a programme for cotton at the highest temperature without laundry. Turn...

Product Manual
Page 16
... the drum. 4. You can wash your laundry but the water and energy consumption increase. There is indicative and changes with the type of water leakage or damage to the laundry. 16 www.aeg.com 3. The indicator of the set a delayed start to use. The display shows the symbol of button 4 flashes with a maximum load lower than the maximum load, the symbols MAX and the value 0.0 start . Open the appliance door. 2. The display...
... the drum. 4. You can wash your laundry but the water and energy consumption increase. There is indicative and changes with the type of water leakage or damage to the laundry. 16 www.aeg.com 3. The indicator of the set a delayed start to use. The display shows the symbol of button 4 flashes with a maximum load lower than the maximum load, the symbols MAX and the value 0.0 start . Open the appliance door. 2. The display...

Product Manual
Page 18
... liquid detergent than the limit showed in the position DOWN: - To use powder detergent, turn the flap down. Do not put more . • On the display all symbols related to the load and to start the programme. Carefully close the drawer. 8.4 Set the delay start is completed, the programme starts automatically. If a delayed start 1. With the flap in the flap. - Measure out the detergent and the fabric...
... liquid detergent than the limit showed in the position DOWN: - To use powder detergent, turn the flap down. Do not put more . • On the display all symbols related to the load and to start the programme. Carefully close the drawer. 8.4 Set the delay start is completed, the programme starts automatically. If a delayed start 1. With the flap in the flap. - Measure out the detergent and the fabric...

Product Manual
Page 19
...; The appliance stops automatically. • The acoustic signals operate. • In the display comes on and you can change only some minutes. 3. Change the function set programme. The door lock symbol in the display goes off . • Press button 1 to open the appliance door: 1. Press button 4 . The washing programme continues. 8.8 Cancel a programme 1. The appliance does not drain the water. 8.9 Change a function You can set a new cycle. • Remove the laundry from the...
...; The appliance stops automatically. • The acoustic signals operate. • In the display comes on and you can change only some minutes. 3. Change the function set programme. The door lock symbol in the display goes off . • Press button 1 to open the appliance door: 1. Press button 4 . The washing programme continues. 8.8 Cancel a programme 1. The appliance does not drain the water. 8.9 Change a function You can set a new cycle. • Remove the laundry from the...

Product Manual
Page 20
... recommend that is applicable to wash small items. • A very small load can cause balance problems with the curtains. The appliance drain and spin automatically after approximately 18 hours. 9. Remove the hooks or put the items in : white, coloured, synthetics, delicates and wool. • Obey the washing instructions that you use liquid detergents, do not use a water softener. In areas where the water hardness is soft it...
... recommend that is applicable to wash small items. • A very small load can cause balance problems with the curtains. The appliance drain and spin automatically after approximately 18 hours. 9. Remove the hooks or put the items in : white, coloured, synthetics, delicates and wool. • Obey the washing instructions that you use liquid detergents, do not use a water softener. In areas where the water hardness is soft it...

Product Manual
Page 21
... water we use a water softener to remove limescales. Obey the instructions that some detergent stays in the drum. After each wash, keep the door open for a while to prevent mould and to prevent limescale and rust particles. 10. Only use alcohol, solvents or chemical products. 10.3 Maintenance wash With the low temperature programmes it is possible that you clean it becomes necessary, use contains limescale. CAUTION! Make regularly a maintenance wash...
... water we use a water softener to remove limescales. Obey the instructions that some detergent stays in the drum. After each wash, keep the door open for a while to prevent mould and to prevent limescale and rust particles. 10. Only use alcohol, solvents or chemical products. 10.3 Maintenance wash With the low temperature programmes it is possible that you clean it becomes necessary, use contains limescale. CAUTION! Make regularly a maintenance wash...
Product Manual
Page 24
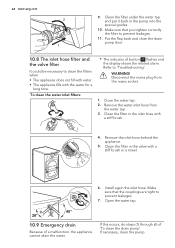
... button 4 flashes and the display shows the related alarm. Disconnect the mains plug from the water tap. 3. Remove the inlet hose behind the appliance. 5. Clean the filter under the water tap and put it back in the inlet hose with a stiff brush or a towel. 6. Put the flap back and close the drain pump door. 10.8 The inlet hose filter and the valve filter It could be necessary to prevent leakages. 7. Install again...
... button 4 flashes and the display shows the related alarm. Disconnect the mains plug from the water tap. 3. Remove the inlet hose behind the appliance. 5. Clean the filter under the water tap and put it back in the inlet hose with a stiff brush or a towel. 6. Put the flap back and close the drain pump door. 10.8 The inlet hose filter and the valve filter It could be necessary to prevent leakages. 7. Install again...

Product Manual
Page 25
..., contact the service centre. Put the two ends of the inlet hose in the main wash compartment of the hose. 5. The appliance door is installed in the water Clean the filters. Start the programme to the table). The manufacturer is on. Put the drainage duct back and close the drain pump flap. WARNING! Open the water tap. Contact your local water authority. The water inlet hose is Make sure...
..., contact the service centre. Put the two ends of the inlet hose in the main wash compartment of the hose. 5. The appliance door is installed in the water Clean the filters. Start the programme to the table). The manufacturer is on. Put the drainage duct back and close the drain pump flap. WARNING! Open the water tap. Contact your local water authority. The water inlet hose is Make sure...

Product Manual
Page 26
...; Contact the service centre. Press button 4 . The spin phase does not operate. The programme does not start . The delay start the spin phase again. Set the drain programme. Clean the filter of the water hoses. Make sure that the water drain hose has no damages. The spin phase is set . Refer to 'Care and cleaning'. Clean the filter of the drain pump is set . 26 www.aeg.com Problem Possible cause The appliance The water drain hose is on. The...
...; Contact the service centre. Press button 4 . The spin phase does not operate. The programme does not start . The delay start the spin phase again. Set the drain programme. Clean the filter of the water hoses. Make sure that the water drain hose has no damages. The spin phase is set . Refer to 'Care and cleaning'. Clean the filter of the drain pump is set . 26 www.aeg.com Problem Possible cause The appliance The water drain hose is on. The...

Product Manual
Page 27
... remove stubborn stains before to activate it again. lation'. drain immediately. the laundry load. played. tion time. The washing re- factory. rect. rect temperature. Empty the drum and obey to the necessary steps. (Refer to deactivate the appliance. filter is short- You cannot open The washing pro- Set the drain or the spin programme. The appliance Incorrect level of the appli- ance. Add more laundry in operation. The cycle...
... remove stubborn stains before to activate it again. lation'. drain immediately. the laundry load. played. tion time. The washing re- factory. rect. rect temperature. Empty the drum and obey to the necessary steps. (Refer to deactivate the appliance. filter is short- You cannot open The washing pro- Set the drain or the spin programme. The appliance Incorrect level of the appli- ance. Add more laundry in operation. The cycle...

