Product Manual
Page 2
... the rating plate. Visit our website for: Get usage advice, brochures, trouble shooter, service information: www.aeg.com Register your appliance: www.aeg.com/shop CUSTOMER CARE AND SERVICE We recommend the use of original spare parts. SAFETY INSTRUCTIONS 3 2. INSTALLATION 13 9. CONTROL PANEL 5 4. CARE AND CLEANING 9 7. features you for your product for better service: www.aeg.com/productregistration Buy Accessories, Consumables and Original spare parts for choosing this AEG product. 2 www.aeg.com...
... the rating plate. Visit our website for: Get usage advice, brochures, trouble shooter, service information: www.aeg.com Register your appliance: www.aeg.com/shop CUSTOMER CARE AND SERVICE We recommend the use of original spare parts. SAFETY INSTRUCTIONS 3 2. INSTALLATION 13 9. CONTROL PANEL 5 4. CARE AND CLEANING 9 7. features you for your product for better service: www.aeg.com/productregistration Buy Accessories, Consumables and Original spare parts for choosing this AEG product. 2 www.aeg.com...
Product Manual
Page 3
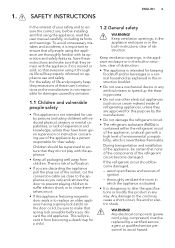
... and to alter the specifications or modify this user manual carefully, including its operation and safety features. SAFETY INSTRUCTIONS ENGLISH 3 In the interest of ignition - Children should become damaged. There is risk of suffocation. • If you discard the old appliance. Any electrical component (power cord, plug, compressor) must be supervised to the appliance as ice cream makers) inside of refrigerating appliances, unless they...
... and to alter the specifications or modify this user manual carefully, including its operation and safety features. SAFETY INSTRUCTIONS ENGLISH 3 In the interest of ignition - Children should become damaged. There is risk of suffocation. • If you discard the old appliance. Any electrical component (power cord, plug, compressor) must be supervised to the appliance as ice cream makers) inside of refrigerating appliances, unless they...
Product Manual
Page 4
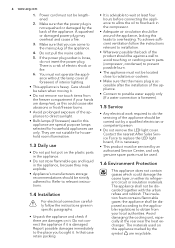
...; Connect to potable water supply only (If a water connection is heavy. Power cord must not operate the appliance without the lamp cover (if foreseen) of electric shock or fire. 6. Make sure that the mains plug is loose, do the servicing of the appliance should be against a wall to avoid touching or catching warm parts (compressor, condenser) to prevent possible burn. • The appliance must be used...
...; Connect to potable water supply only (If a water connection is heavy. Power cord must not operate the appliance without the lamp cover (if foreseen) of electric shock or fire. 6. Make sure that the mains plug is loose, do the servicing of the appliance should be against a wall to avoid touching or catching warm parts (compressor, condenser) to prevent possible burn. • The appliance must be used...
Product Manual
Page 5
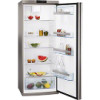
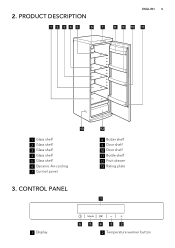
PRODUCT DESCRIPTION 1234 5 6 7 ENGLISH 5 8 9 10 11 13 1 Glass shelf 2 Glass shelf 3 Glass shelf 4 Glass shelf 5 Glass shelf 6 Dynamic Air-cooling 7 Control panel 3. CONTROL PANEL 12 8 Butter shelf 9 Door shelf 10 Door shelf 11 Bottle shelf 12 Fruit drawer 13 Rating plate 1 1 Display 6 5 4 3 2 2 Temperature warmer button 2.
PRODUCT DESCRIPTION 1234 5 6 7 ENGLISH 5 8 9 10 11 13 1 Glass shelf 2 Glass shelf 3 Glass shelf 4 Glass shelf 5 Glass shelf 6 Dynamic Air-cooling 7 Control panel 3. CONTROL PANEL 12 8 Butter shelf 9 Door shelf 10 Door shelf 11 Bottle shelf 12 Fruit drawer 13 Rating plate 1 1 Display 6 5 4 3 2 2 Temperature warmer button 2.
Product Manual
Page 6
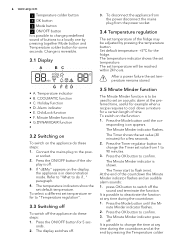
... display switches off . To disconnect the appliance from the power disconnect the mains plug from 1 to "Temperature regulation". 3.3 Switching off To switch off . 3. The set value (30 minutes) for a few seconds. 2. Press the Mode button until the Minute Minder indicator flashes. 2. press OK button to do if..." It is possible to change predefined sound of time. ChildLock function • F. onds. 2. The temperature indicator shows the set default temperature...
... display switches off . To disconnect the appliance from the power disconnect the mains plug from 1 to "Temperature regulation". 3.3 Switching off To switch off . 3. The set value (30 minutes) for a few seconds. 2. Press the Mode button until the Minute Minder indicator flashes. 2. press OK button to do if..." It is possible to change predefined sound of time. ChildLock function • F. onds. 2. The temperature indicator shows the set default temperature...
Product Manual
Page 7
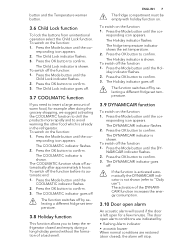
... "Daily use"). The Child Lock indicator flashes. 3. The Child Lock indicator is shown. The door open alarm An acoustic alarm will sound if the door is not shown (refer to keep the refrigerator closed ), the alarm will stop. Press the Mode button until the Holiday indicator flashes. 2. The Holiday indicator flashes. Press the Mode button until the cor- The COOLMATIC function shuts off by selecting a different fridge set temperature. 2. Press the OK button to confirm...
... "Daily use"). The Child Lock indicator flashes. 3. The Child Lock indicator is shown. The door open alarm An acoustic alarm will sound if the door is not shown (refer to keep the refrigerator closed ), the alarm will stop. Press the Mode button until the Holiday indicator flashes. 2. The Holiday indicator flashes. Press the Mode button until the cor- The COOLMATIC function shuts off by selecting a different fridge set temperature. 2. Press the OK button to confirm...
Product Manual
Page 8
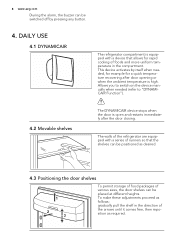
... any button. 4. To make these adjustments proceed as follows: gradually pull the shelf in the compartment. The walls of the refrigerator are equipped with a device that the shelves can be positioned as required. Allows you to switch on the device manually when needed , for example for rapid cooling of runners so that allows for a quick temperature recovering after the door closing. 8 www.aeg...
... any button. 4. To make these adjustments proceed as follows: gradually pull the shelf in the compartment. The walls of the refrigerator are equipped with a device that the shelves can be positioned as required. Allows you to switch on the device manually when needed , for example for rapid cooling of runners so that allows for a quick temperature recovering after the door closing. 8 www.aeg...
Product Manual
Page 9
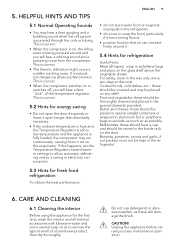
.... CARE AND CLEANING 6.1 Cleaning the interior Before using the appliance for refrigeration Useful hints: Meat (all internal accessories with lukewarm water and some neutral soap so as to allow automatic defrosting and so a saving in electricity consumption. • do not store warm food or evaporating liquids in the bottle rack on , the refrigerant is on the door. Unplug the appliance before carrying out any shelf...
.... CARE AND CLEANING 6.1 Cleaning the interior Before using the appliance for refrigeration Useful hints: Meat (all internal accessories with lukewarm water and some neutral soap so as to allow automatic defrosting and so a saving in electricity consumption. • do not store warm food or evaporating liquids in the bottle rack on , the refrigerant is on the door. Unplug the appliance before carrying out any shelf...
Product Manual
Page 10
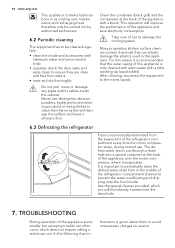
... every time the motor compressor stops, during normal use detergents, abrasive powders, highly perfumed cleaning products or wax polishes to periodically clean the defrost water drain hole in this reason it evaporates. After cleaning, reconnect the equipment to the mains supply. 6.3 Defrosting the refrigerator Frost is given about them to be cleaned regularly: • clean the inside and accessories with a brush. 10 www.aeg.com This appliance contains...
... every time the motor compressor stops, during normal use detergents, abrasive powders, highly perfumed cleaning products or wax polishes to periodically clean the defrost water drain hole in this reason it evaporates. After cleaning, reconnect the equipment to the mains supply. 6.3 Defrosting the refrigerator Frost is given about them to be cleaned regularly: • clean the inside and accessories with a brush. 10 www.aeg.com This appliance contains...
Product Manual
Page 11
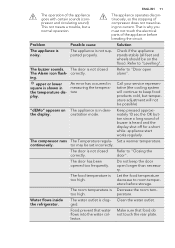
... inside the refrigerator. Make sure that water flows into the water collector. The buzzer sounds. The appliance operates discontinuously, so the stopping of the appliance goes with certain sounds (compressor and circulating sound). The water outlet is not closed The Alarm icon flash- tor may be possible) "dEMo" appears on the floor). Do not keep food products cold, but a normal operation. Clean the water outlet. The door...
... inside the refrigerator. Make sure that water flows into the water collector. The buzzer sounds. The appliance operates discontinuously, so the stopping of the appliance goes with certain sounds (compressor and circulating sound). The water outlet is not closed The Alarm icon flash- tor may be possible) "dEMo" appears on the floor). Do not keep food products cold, but a normal operation. Clean the water outlet. The door...
Product Manual
Page 12
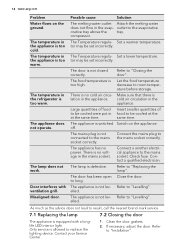
... food to replace the lighting device. Door interferes with a longlife LED interior light. compressor. The Temperature regula- There is not closed correctly. The appliance has no cold air circu- The door is no power. The temperature in the refrigerator is too warm. The temperature in the appliance is too warm. outlet to "Installation". Check fuse. The door has been open Close the door. same time. Clean the door gaskets. 2. Connect the mains plug to "Levelling". Refer...
... food to replace the lighting device. Door interferes with a longlife LED interior light. compressor. The Temperature regula- There is not closed correctly. The appliance has no cold air circu- The door is no power. The temperature in the refrigerator is too warm. The temperature in the appliance is too warm. outlet to "Installation". Check fuse. The door has been open Close the door. same time. Clean the door gaskets. 2. Connect the mains plug to "Levelling". Refer...
Product Manual
Page 13
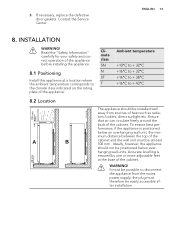
... must be installed well away from the mains power supply; Accurate levelling is positioned below overhanging wall units. If necessary, replace the defective door gaskets. ENGLISH 13 8. It must therefore be positioned below an overhanging wall unit, the minimum distance between the top of the cabinet. the plug must be possible to + 43°C 20 mm 8.2 Location 100 mm...
... must be installed well away from the mains power supply; Accurate levelling is positioned below overhanging wall units. If necessary, replace the defective door gaskets. ENGLISH 13 8. It must therefore be positioned below an overhanging wall unit, the minimum distance between the top of the cabinet. the plug must be possible to + 43°C 20 mm 8.2 Location 100 mm...
Product Manual
Page 14
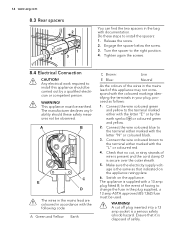
... the screw. 3. Any electrical work required to install the spacers: 1. Connect the wire coloured green and yellow to the terminal either marked with the "L" or coloured red. 4. Check that indicated on the appliance. A cut , or stray strands of having to change the fuse in the plug supplied, a 13 amp ASTA approved (BS 1362) fuse must be observed. Turn the spacer to...
... the screw. 3. Any electrical work required to install the spacers: 1. Connect the wire coloured green and yellow to the terminal either marked with the "L" or coloured red. 4. Check that indicated on the appliance. A cut , or stray strands of having to change the fuse in the plug supplied, a 13 amp ASTA approved (BS 1362) fuse must be observed. Turn the spacer to...

Product Manual
Page 15
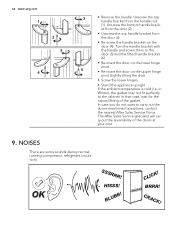
8.5 Levelling ENGLISH 15 Accurate levelling prevents the vibration and noise of the appliance during operation. To adjust the height of the appliance loosen or tighten the two adjustable front feet. 8.6 Door reversibility 3 2 1 7 6 8 5 4 To carry out the following operations, we suggest that this be made with another person that the compressor cannot touch the floor. • Remove the plinth (1). • Remove the cap (2) and position it...
8.5 Levelling ENGLISH 15 Accurate levelling prevents the vibration and noise of the appliance during operation. To adjust the height of the appliance loosen or tighten the two adjustable front feet. 8.6 Door reversibility 3 2 1 7 6 8 5 4 To carry out the following operations, we suggest that this be made with another person that the compressor cannot touch the floor. • Remove the plinth (1). • Remove the cap (2) and position it...
Product Manual
Page 16
BLUBB! Turn the handle bracket with the handle and screw them to the door (5) and the fitted handle bracket (6) • Re-insert the door on the lower hinge pivot . 6 • Re-insert the door on the door (4). The After Sales Service specialist will carry out the reversibility of the gasket. NOISES There are some sounds during normal running (compressor, refrigerant circulation). HISSS! CRACK! In that case, wait...
BLUBB! Turn the handle bracket with the handle and screw them to the door (5) and the fitted handle bracket (6) • Re-insert the door on the lower hinge pivot . 6 • Re-insert the door on the door (4). The After Sales Service specialist will carry out the reversibility of the gasket. NOISES There are some sounds during normal running (compressor, refrigerant circulation). HISSS! CRACK! In that case, wait...
Product Manual
Page 18
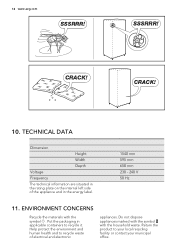
.... Put the packaging in applicable containers to recycle waste of the appliance and in the rating plate on the internal left side of electrical and electronic appliances. TECHNICAL DATA Dimension Height Width Depth Voltage Frequency The technical information are situated in the energy label. 1540 mm 595 mm 658 mm 230 - 240 V 50 Hz 11. ENVIRONMENT CONCERNS Recycle... protect the environment and human health and to recycle it. Return the product to your local recycling facility or contact your municipal office. 18 www.aeg.com SSSRRR! CRACK!
.... Put the packaging in applicable containers to recycle waste of the appliance and in the rating plate on the internal left side of electrical and electronic appliances. TECHNICAL DATA Dimension Height Width Depth Voltage Frequency The technical information are situated in the energy label. 1540 mm 595 mm 658 mm 230 - 240 V 50 Hz 11. ENVIRONMENT CONCERNS Recycle... protect the environment and human health and to recycle it. Return the product to your local recycling facility or contact your municipal office. 18 www.aeg.com SSSRRR! CRACK!


