Product Manual
Page 2
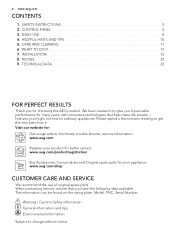
SAFETY INSTRUCTIONS 3 2. CONTROL PANEL 5 3. CARE AND CLEANING 11 6. INSTALLATION 15 8. NOISES 22 9. TECHNICAL DATA 23 FOR PERFECT RESULTS Thank you have created it . Model, PNC, Serial Number. DAILY USE 8 4. We have the following data available. features you impeccable performance for many years, with innovative technologies that you for your appliance: www.aeg.com/shop CUSTOMER CARE AND SERVICE We recommend the use of original spare parts. Please spend a few...
SAFETY INSTRUCTIONS 3 2. CONTROL PANEL 5 3. CARE AND CLEANING 11 6. INSTALLATION 15 8. NOISES 22 9. TECHNICAL DATA 23 FOR PERFECT RESULTS Thank you have created it . Model, PNC, Serial Number. DAILY USE 8 4. We have the following data available. features you impeccable performance for many years, with innovative technologies that you for your appliance: www.aeg.com/shop CUSTOMER CARE AND SERVICE We recommend the use of original spare parts. Please spend a few...
Product Manual
Page 3
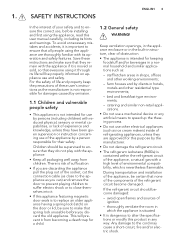
... to alter the specifications or modify this user manual carefully, including its life will prevent it . • If this appliance featuring magnetic door seals is important to the cord may cause a short-circuit, fire and/or electric shock. This will be sure to make sure that spring lock unusable before installing and first using it is to replace an older...
... to alter the specifications or modify this user manual carefully, including its life will prevent it . • If this appliance featuring magnetic door seals is important to the cord may cause a short-circuit, fire and/or electric shock. This will be sure to make sure that spring lock unusable before installing and first using it is to replace an older...
Product Manual
Page 4
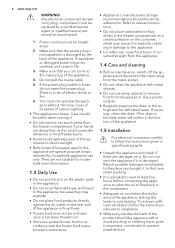
... the drain is blocked, water will collect in accordance with metal objects. • Do not use sharp objects to . Report possible damages immediately to installation. • Wherever possible the back of electric shock or fire. 6. If the power plug socket is Frost Free) • Frozen food must not be replaced by the back of the appliance. 1.5 Installation For electrical connection carefully follow the instructions...
... the drain is blocked, water will collect in accordance with metal objects. • Do not use sharp objects to . Report possible damages immediately to installation. • Wherever possible the back of electric shock or fire. 6. If the power plug socket is Frost Free) • Frozen food must not be replaced by the back of the appliance. 1.5 Installation For electrical connection carefully follow the instructions...
Product Manual
Page 5
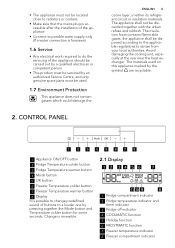
... cookers. • Make sure that the mains plug is accessible after the installation of the appliance. • Connect to potable water supply only (If a water connection is foreseen). 1.6 Service • Any electrical work required to do the servicing of buttons to a louder one by the symbol are recyclable. 12345678 1 Appliance ON/OFF button 2 Fridge Temperature colder button 3 Fridge Temperature warmer button 4 Mode button 5 OK button 6 Freezer Temperature colder button 7 Freezer Temperature warmer button 8 Display It is reversible. 2.1 Display 1 2 34 5 6 7 Off COOL MATIC min...
... cookers. • Make sure that the mains plug is accessible after the installation of the appliance. • Connect to potable water supply only (If a water connection is foreseen). 1.6 Service • Any electrical work required to do the servicing of buttons to a louder one by the symbol are recyclable. 12345678 1 Appliance ON/OFF button 2 Fridge Temperature colder button 3 Fridge Temperature warmer button 4 Mode button 5 OK button 6 Freezer Temperature colder button 7 Freezer Temperature warmer button 8 Display It is reversible. 2.1 Display 1 2 34 5 6 7 Off COOL MATIC min...
Product Manual
Page 6
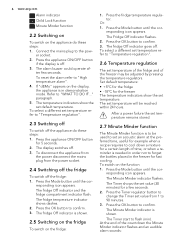
... temperature alarm". 4. Or: 1. responding icon appears. Press the appliance ON/OFF button if the display is needed in the freezer for fast cooling. The display switches off . Press the OK button to the pow- The fridge Off indicator goes off . 3. The Minute Minder indicator is shown. 2.5 Switching on the fridge To switch on the fridge: 1. Connect the mains plug to confirm. 3. The Minute Minder indicator flashes. Refer to confirm. Press the Mode button...
... temperature alarm". 4. Or: 1. responding icon appears. Press the appliance ON/OFF button if the display is needed in the freezer for fast cooling. The display switches off . Press the OK button to the pow- The fridge Off indicator goes off . 3. The Minute Minder indicator is shown. 2.5 Switching on the fridge To switch on the fridge: 1. Connect the mains plug to confirm. 3. The Minute Minder indicator flashes. Refer to confirm. Press the Mode button...
Product Manual
Page 7
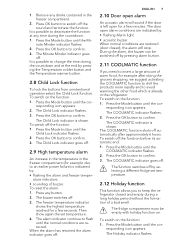
... you need to avoid warming the other food which is left open alarm An acoustic alarm will stop. The door open alarm conditions are indicated by selecting a different fridge set temperature. 4. The COOLMATIC indicator flashes. 2. The function switches off by : • flashing Alarm light • acoustic buzzer When normal conditions are restored. To switch on the function: 1. responding icon appears. nute Minder indicator flashes. 2. It is possible to keep the refrigerator closed ), the alarm will...
... you need to avoid warming the other food which is left open alarm An acoustic alarm will stop. The door open alarm conditions are indicated by selecting a different fridge set temperature. 4. The COOLMATIC indicator flashes. 2. The function switches off by : • flashing Alarm light • acoustic buzzer When normal conditions are restored. To switch on the function: 1. responding icon appears. nute Minder indicator flashes. 2. It is possible to keep the refrigerator closed ), the alarm will...
Product Manual
Page 8
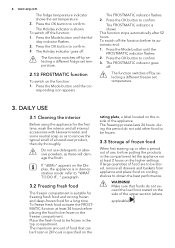
... for the first time, wash the interior and all drawers and baskets from appliance and place food on the function: 1. 8 www.aeg.com The fridge temperature indicator shows the set temperature. 2.13 FROSTMATIC function To switch on cooling shelves to obtain the best performance. To switch off by selecting a different fridge set temperature. 2. Press the Mode button until the Holiday indicator flashes. 2. The function switches off the function: 1. The maximum...
... for the first time, wash the interior and all drawers and baskets from appliance and place food on the function: 1. 8 www.aeg.com The fridge temperature indicator shows the set temperature. 2.13 FROSTMATIC function To switch on cooling shelves to obtain the best performance. To switch off by selecting a different fridge set temperature. 2. Press the Mode button until the Holiday indicator flashes. 2. The function switches off the function: 1. The maximum...
Product Manual
Page 9
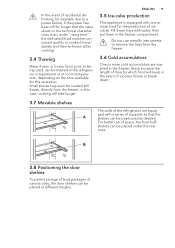
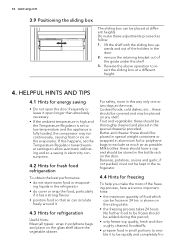
Do not use of space, the front halfshelves can be cooked still frozen, directly from the freezer: in this operation. these trays with water, then put them in the refrigerator compartment or at different heights. B 3.8 Positioning the door shelves To permit storage of food packages of various sizes, the door shelves can be placed at room temperature, depending on the time available for which...
Do not use of space, the front halfshelves can be cooked still frozen, directly from the freezer: in this operation. these trays with water, then put them in the refrigerator compartment or at different heights. B 3.8 Positioning the door shelves To permit storage of food packages of various sizes, the door shelves can be placed at room temperature, depending on the time available for which...
Product Manual
Page 10
remove the retaining bracket out of the holders in the door 2. Reverse the above the vegetable drawer. ing liquids in the refrigerator • do not store warm food or evaporat- Cooked foods, cold dishes, etc..: these should be covered and may run continuously, causing frost or ice on the evaporator. Milk bottles: these should be rapidly and completely fro- No further food...
remove the retaining bracket out of the holders in the door 2. Reverse the above the vegetable drawer. ing liquids in the refrigerator • do not store warm food or evaporat- Cooked foods, cold dishes, etc..: these should be covered and may run continuously, causing frost or ice on the evaporator. Milk bottles: these should be rapidly and completely fro- No further food...
Product Manual
Page 11
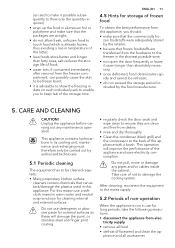
... any maintenance operation. This operation will damage the paint, or stainless steel anti finger print coating. • regularly check the door seals and wipe clean to ensure they are clean and free from the foodstore to the freezer in its cooling unit; pliance and all food • defrost (if foreseen) and clean the ap- Do not use a soft cloth rinsed in warm water and...
... any maintenance operation. This operation will damage the paint, or stainless steel anti finger print coating. • regularly check the door seals and wipe clean to ensure they are clean and free from the foodstore to the freezer in its cooling unit; pliance and all food • defrost (if foreseen) and clean the ap- Do not use a soft cloth rinsed in warm water and...
Product Manual
Page 12
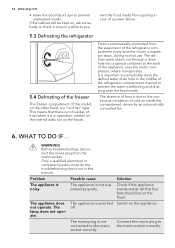
... manual. WHAT TO DO IF... The mains plug is automatically eliminated from the evaporator of frost is in the middle of cold air inside the compartment, driven by an automatically controlled fan. 6. Frost is not connected to the continuous circulation of the refrigerator compartment channel to check it evaporates. It is switched off. The appliance is important to periodically clean the defrost water drain hole in operation...
... manual. WHAT TO DO IF... The mains plug is automatically eliminated from the evaporator of frost is in the middle of cold air inside the compartment, driven by an automatically controlled fan. 6. Frost is not connected to the continuous circulation of the refrigerator compartment channel to check it evaporates. It is switched off. The appliance is important to periodically clean the defrost water drain hole in operation...
Product Manual
Page 13
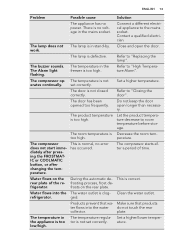
... Temperature Alarm". Refer to "Replacing the lamp". Refer to room temperature before storage. Let the product temperature decrease to "Closing the door". The compressor does not start immediately after pressing the FROSTMATIC or COOLMATIC button, or after a period of the re- Clean the water outlet. Make sure that wa- The lamp does not The lamp is in the freezer is too high. work...
... Temperature Alarm". Refer to "Replacing the lamp". Refer to room temperature before storage. Let the product temperature decrease to "Closing the door". The compressor does not start immediately after pressing the FROSTMATIC or COOLMATIC button, or after a period of the re- Clean the water outlet. Make sure that wa- The lamp does not The lamp is in the freezer is too high. work...
Product Manual
Page 14
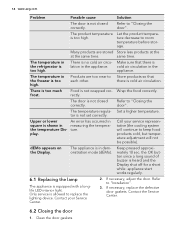
... heard and the Display shut off for a short while: appliance start works regularly. 6.1 Replacing the lamp The appliance is too much frost. Make sure that there is too high. cold air circulation in the appliance. There is equipped with a longlife LED interior light. Set a higher temperature. Contact your service representative (the cooling system will continue to replace the lighting device. Refer to "Installation". 3. Wrap the food...
... heard and the Display shut off for a short while: appliance start works regularly. 6.1 Replacing the lamp The appliance is too much frost. Make sure that there is too high. cold air circulation in the appliance. There is equipped with a longlife LED interior light. Set a higher temperature. Contact your service representative (the cooling system will continue to replace the lighting device. Refer to "Installation". 3. Wrap the food...

Product Manual
Page 15
... the "L" or coloured red. 4. Make sure the electricity supply voltage is secure over the outer sheath. 5. Any electrical work required to the terminal either marked with a 13 amp plug fitted B. The manufacturer declines any liability should be earthed. Connect the wire coloured brown to install this appliance should these safety measures not be observed. Switch on the appliance rating plate. 6. A Green and...
... the "L" or coloured red. 4. Make sure the electricity supply voltage is secure over the outer sheath. 5. Any electrical work required to the terminal either marked with a 13 amp plug fitted B. The manufacturer declines any liability should be earthed. Connect the wire coloured brown to install this appliance should these safety measures not be observed. Switch on the appliance rating plate. 6. A Green and...

Product Manual
Page 16
... middle hinge. • Remove the lower door. • Loosen and remove the lower pin. On the opposite side: • Tighten the lower pin. • Install the lower door. • Tighten the middle hinge. • Install the spacer. • Install the upper door. • Tighten the upper pin. 16 www.aeg.com 13 amp ASTA approved (BS 1362) fuse must be used. To open the door...
... middle hinge. • Remove the lower door. • Loosen and remove the lower pin. On the opposite side: • Tighten the lower pin. • Install the lower door. • Tighten the middle hinge. • Install the spacer. • Install the upper door. • Tighten the upper pin. 16 www.aeg.com 13 amp ASTA approved (BS 1362) fuse must be used. To open the door...
Product Manual
Page 18
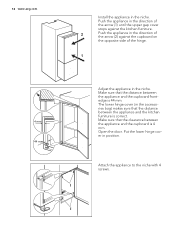
...kitchen furniture is correct. I I Open the door. 18 www.aeg.com Install the appliance in position. The lower hinge cover (in the niche. Make sure that the distance between the appliance and the cupboard frontedge is 4 mm. Attach the appliance to the niche with 4 screws. Put the lower hinge cover... (1) until the upper gap cover stops against the kitchen furniture. 2 Push the appliance in the direction of the arrow (2) against the cupboard on the opposite side of the hinge. 1 4 mm 44 mm Adjust the appliance in the accessories bag) makes sure that the clearance between...
...kitchen furniture is correct. I I Open the door. 18 www.aeg.com Install the appliance in position. The lower hinge cover (in the niche. Make sure that the distance between the appliance and the cupboard frontedge is 4 mm. Attach the appliance to the niche with 4 screws. Put the lower hinge cover... (1) until the upper gap cover stops against the kitchen furniture. 2 Push the appliance in the direction of the arrow (2) against the cupboard on the opposite side of the hinge. 1 4 mm 44 mm Adjust the appliance in the accessories bag) makes sure that the clearance between...
Product Manual
Page 19
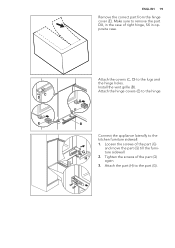
Tighten the screws of the part (G) and move the part (G) till the furniture sidewall. 2. Attach the part (H) to the kitchen furniture sidewall: 1. E B G H Connect the appliance laterally to the part (G). Attach the hinge covers (E) to the lugs and the hinge holes. Loosen the screws of the part (G) again. 3. C D E Attach the covers (C, D) to the hinge. Install the vent grille (B). ENGLISH 19 Remove the correct part from the hinge cover (E). Make sure to remove the part DX, in the case of right hinge, SX in opposite case.
Tighten the screws of the part (G) and move the part (G) till the furniture sidewall. 2. Attach the part (H) to the kitchen furniture sidewall: 1. E B G H Connect the appliance laterally to the part (G). Attach the hinge covers (E) to the lugs and the hinge holes. Loosen the screws of the part (G) again. 3. C D E Attach the covers (C, D) to the hinge. Install the vent grille (B). ENGLISH 19 Remove the correct part from the hinge cover (E). Make sure to remove the part DX, in the case of right hinge, SX in opposite case.
Product Manual
Page 21
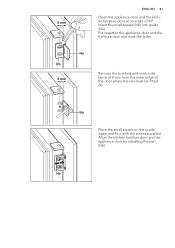
8 mm ENGLISH 21 Open the appliance door and the kitchen furniture door at an angle of the door where the nail must be fitted (K). Ha Hb 8 mm Remove the brackets and mark a distance of 8 mm from the outer edge of 90°. Insert the small square (Hb) into guide (Ha). K Ha Place the small square on the guide again and fix it with the screws supplied. Align the kitchen furniture door and the appliance door by adjusting the part (Hb). Hb Put together the appliance door and the furniture door and mark the holes.
8 mm ENGLISH 21 Open the appliance door and the kitchen furniture door at an angle of the door where the nail must be fitted (K). Ha Hb 8 mm Remove the brackets and mark a distance of 8 mm from the outer edge of 90°. Insert the small square (Hb) into guide (Ha). K Ha Place the small square on the guide again and fix it with the screws supplied. Align the kitchen furniture door and the appliance door by adjusting the part (Hb). Hb Put together the appliance door and the furniture door and mark the holes.
Product Manual
Page 22
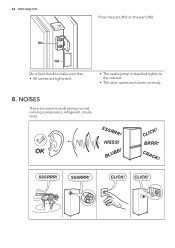
SSSRRR! HISSS! CLICK! CLICK! NOISES There are tightened. • The sealing strip is attached tightly to make sure that: • All screws are some sounds during normal running (compressor, refrigerant circulation). SSSRRR! 22 www.aeg.com Press the part (Hd) on the part (Hb). OK BLUBB! CLICK! CRACK! BRRR! SSSRRR! Hb Hd Do a final check to the cabinet. • The door opens and closes correctly. 8.
SSSRRR! HISSS! CLICK! CLICK! NOISES There are tightened. • The sealing strip is attached tightly to make sure that: • All screws are some sounds during normal running (compressor, refrigerant circulation). SSSRRR! 22 www.aeg.com Press the part (Hd) on the part (Hb). OK BLUBB! CLICK! CRACK! BRRR! SSSRRR! Hb Hd Do a final check to the cabinet. • The door opens and closes correctly. 8.
Product Manual
Page 23
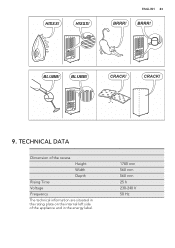
HISSS! BLUBB! CRACK! HISSS! BRRR! BLUBB! TECHNICAL DATA Dimension of the recess Height Width Depth Rising Time Voltage Frequency The technical information are situated in the rating plate on the internal left side of the appliance and in the energy label. 1780 mm 560 mm 560 mm 25 h 230-240 V 50 Hz ENGLISH 23 BRRR! CRACK! 9.
HISSS! BLUBB! CRACK! HISSS! BRRR! BLUBB! TECHNICAL DATA Dimension of the recess Height Width Depth Rising Time Voltage Frequency The technical information are situated in the rating plate on the internal left side of the appliance and in the energy label. 1780 mm 560 mm 560 mm 25 h 230-240 V 50 Hz ENGLISH 23 BRRR! CRACK! 9.


