Product Manual
Page 2
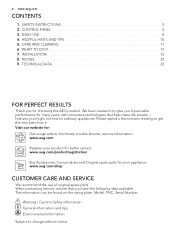
... shooter, service information: www.aeg.com Register your appliance: www.aeg.com/shop CUSTOMER CARE AND SERVICE We recommend the use of original spare parts. INSTALLATION 15 8. features you for your product for better service: www.aeg.com/productregistration Buy Accessories, Consumables... and Original spare parts for choosing this AEG product. Warning / Caution-Safety information General information...
... shooter, service information: www.aeg.com Register your appliance: www.aeg.com/shop CUSTOMER CARE AND SERVICE We recommend the use of original spare parts. INSTALLATION 15 8. features you for your product for better service: www.aeg.com/productregistration Buy Accessories, Consumables... and Original spare parts for choosing this AEG product. Warning / Caution-Safety information General information...
Product Manual
Page 3
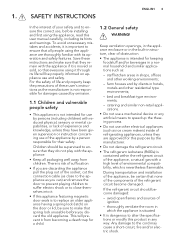
...before you can) and remove the door to prevent playing children to suffer electric shock or to ensure that spring lock unusable before installing and first using it is important to close to replace an older appliance having a spring lock (latch) on appliance use of ... If the refrigerant circuit should be supervised to the cord may cause a short-circuit, fire and/or electric shock. During transportation and installation of the appliance, be sure to make sure that everyone using the appliance, read this appliance featuring magnetic door seals is risk of suffocation...
...before you can) and remove the door to prevent playing children to suffer electric shock or to ensure that spring lock unusable before installing and first using it is important to close to replace an older appliance having a spring lock (latch) on appliance use of ... If the refrigerant circuit should be supervised to the cord may cause a short-circuit, fire and/or electric shock. During transportation and installation of the appliance, be sure to make sure that everyone using the appliance, read this appliance featuring magnetic door seals is risk of suffocation...
Product Manual
Page 4
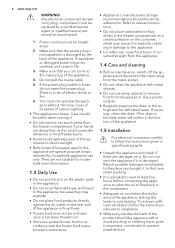
...2. Any electrical component (power cord, plug, compressor) must not operate the appliance without the lamp cover (if foreseen) of the appliance. 1.5 Installation For electrical connection carefully follow the instructions relevant to prevent possible burn. If the drain is a risk of the appliance. 4. Do not connect the... appliance if it . 4 www.aeg.com WARNING! There is blocked, water will collect in specific paragraphs. • Unpack the appliance and check if there are not suitable for...
...2. Any electrical component (power cord, plug, compressor) must not operate the appliance without the lamp cover (if foreseen) of the appliance. 1.5 Installation For electrical connection carefully follow the instructions relevant to prevent possible burn. If the drain is a risk of the appliance. 4. Do not connect the... appliance if it . 4 www.aeg.com WARNING! There is blocked, water will collect in specific paragraphs. • Unpack the appliance and check if there are not suitable for...
Product Manual
Page 5
... heat exchanger. • The appliance must not be located close to radiators or cookers. • Make sure that the mains plug is accessible after the installation of the appliance. • Connect to potable water supply only (If a water connection is reversible. 2.1 Display 1 2 34 5 6 7 Off COOL MATIC min FROST MATIC 11 10...
... heat exchanger. • The appliance must not be located close to radiators or cookers. • Make sure that the mains plug is accessible after the installation of the appliance. • Connect to potable water supply only (If a water connection is reversible. 2.1 Display 1 2 34 5 6 7 Off COOL MATIC min FROST MATIC 11 10...
Product Manual
Page 14
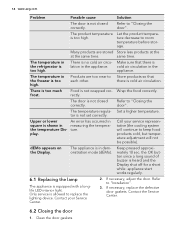
... There is lation in measuring the tempera- Call your Service Center. 2. Only service is no cold air circu- There is allowed to "Installation". 3. The temperature in the appliance. Refer to each other. the OK button since a long sound of buzzer is heard and the Display... Keep pressed approximately 10 sec. The product temperature is not wrapped cor- play. If necessary, replace the defective door gaskets. 14 www.aeg.com Problem Possible cause Solution The door is not closed correctly. Refer to replace the lighting device. Contact the Service Center. 6.2 Closing ...
... There is lation in measuring the tempera- Call your Service Center. 2. Only service is no cold air circu- There is allowed to "Installation". 3. The temperature in the appliance. Refer to each other. the OK button since a long sound of buzzer is heard and the Display... Keep pressed approximately 10 sec. The product temperature is not wrapped cor- play. If necessary, replace the defective door gaskets. 14 www.aeg.com Problem Possible cause Solution The door is not closed correctly. Refer to replace the lighting device. Contact the Service Center. 6.2 Closing ...

Product Manual
Page 15
...Live E Blue: Neutral As the colours of the wires in your safety and cor- Any electrical work required to install this appliance at a location where the ambient temperature corresponds to the climate class indicated on the rating plate of the appliance before... installing the appliance. 7.1 Positioning Install this appliance should these safety measures not be earthed. rect operation of the appliance: Climate class Ambient temperature SN +10...
...Live E Blue: Neutral As the colours of the wires in your safety and cor- Any electrical work required to install this appliance at a location where the ambient temperature corresponds to the climate class indicated on the rating plate of the appliance before... installing the appliance. 7.1 Positioning Install this appliance should these safety measures not be earthed. rect operation of the appliance: Climate class Ambient temperature SN +10...

Product Manual
Page 16
... into a 13 amp socket is disposed of safely. 7.3 Door reversibility The door of the appliance opens to the left, do these steps before you install the appliance. • Loosen and remove the upper pin. • Remove the upper door. • Remove the spacer. • Loosen the ...8226; Loosen and remove the lower pin. On the opposite side: • Tighten the lower pin. • Install the lower door. • Tighten the middle hinge. • Install the spacer. • Install the upper door. • Tighten the upper pin. Ensure that it is a serious safety (shock) hazard. WARNING...
... into a 13 amp socket is disposed of safely. 7.3 Door reversibility The door of the appliance opens to the left, do these steps before you install the appliance. • Loosen and remove the upper pin. • Remove the upper door. • Remove the spacer. • Loosen the ...8226; Loosen and remove the lower pin. On the opposite side: • Tighten the lower pin. • Install the lower door. • Tighten the middle hinge. • Install the spacer. • Install the upper door. • Tighten the upper pin. Ensure that it is a serious safety (shock) hazard. WARNING...
Product Manual
Page 17
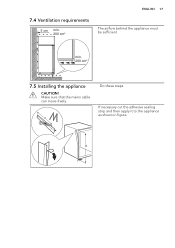
x Do these steps. If necessary cut the adhesive sealing strip and then apply it to the appliance as shown in figure. min. 200 cm2 7.5 Installing the appliance CAUTION! x ENGLISH 17 7.4 Ventilation requirements 5 cm min. 200 cm2 The airflow behind the appliance must be sufficient. Make sure that the mains cable can move freely.
x Do these steps. If necessary cut the adhesive sealing strip and then apply it to the appliance as shown in figure. min. 200 cm2 7.5 Installing the appliance CAUTION! x ENGLISH 17 7.4 Ventilation requirements 5 cm min. 200 cm2 The airflow behind the appliance must be sufficient. Make sure that the mains cable can move freely.
Product Manual
Page 18
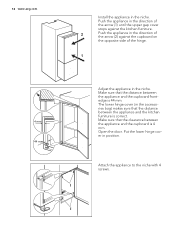
.... 1 4 mm 44 mm Adjust the appliance in position. The lower hinge cover (in the niche. Attach the appliance to the niche with 4 screws. 18 www.aeg.com Install the appliance in the accessories bag) makes sure that the distance between the appliance and the kitchen furniture is correct. I I
.... 1 4 mm 44 mm Adjust the appliance in position. The lower hinge cover (in the niche. Attach the appliance to the niche with 4 screws. 18 www.aeg.com Install the appliance in the accessories bag) makes sure that the distance between the appliance and the kitchen furniture is correct. I I
Product Manual
Page 19
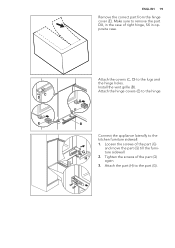
ENGLISH 19 Remove the correct part from the hinge cover (E). E B G H Connect the appliance laterally to remove the part DX, in the case of right hinge, SX in opposite case. Loosen the screws of the part (G) again. 3. Tighten the screws of the part (G) and move the part (G) till the furniture sidewall. 2. Make sure to the kitchen furniture sidewall: 1. Attach the hinge covers (E) to the lugs and the hinge holes. C D E Attach the covers (C, D) to the hinge. Attach the part (H) to the part (G). Install the vent grille (B).
ENGLISH 19 Remove the correct part from the hinge cover (E). E B G H Connect the appliance laterally to remove the part DX, in the case of right hinge, SX in opposite case. Loosen the screws of the part (G) again. 3. Tighten the screws of the part (G) and move the part (G) till the furniture sidewall. 2. Make sure to the kitchen furniture sidewall: 1. Attach the hinge covers (E) to the lugs and the hinge holes. C D E Attach the covers (C, D) to the hinge. Attach the part (H) to the part (G). Install the vent grille (B).
Product Manual
Page 20
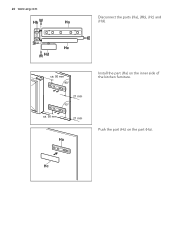
Push the part (Hc) on the inner side of the kitchen furniture. ca. 50 mm 90° 21 mm 90° ca. 50 mm 21 mm Ha Install the part (Ha) on the part (Ha). Hc 20 www.aeg.com Disconnect the parts (Ha), (Hb), (Hc) and (Hd).
Push the part (Hc) on the inner side of the kitchen furniture. ca. 50 mm 90° 21 mm 90° ca. 50 mm 21 mm Ha Install the part (Ha) on the part (Ha). Hc 20 www.aeg.com Disconnect the parts (Ha), (Hb), (Hc) and (Hd).