Product Manual
Page 2
...Visit our website for: Get usage advice, brochures, trouble shooter, service information: www.aeg.com Register your appliance: www.aeg.com/shop CUSTOMER CARE AND SERVICE We recommend the use of original spare parts. SAFETY INSTRUCTIONS 3 2. DAILY USE 8 4. WHAT TO DO IF 12 7. When ...15 8. We have the following data available. features you for your product for better service: www.aeg.com/productregistration Buy Accessories, Consumables and Original spare parts for choosing this AEG product. CARE AND CLEANING 11 6. CONTROL PANEL 5 3. TECHNICAL DATA 23 FOR PERFECT RESULTS Thank ...
...Visit our website for: Get usage advice, brochures, trouble shooter, service information: www.aeg.com Register your appliance: www.aeg.com/shop CUSTOMER CARE AND SERVICE We recommend the use of original spare parts. SAFETY INSTRUCTIONS 3 2. DAILY USE 8 4. WHAT TO DO IF 12 7. When ...15 8. We have the following data available. features you for your product for better service: www.aeg.com/productregistration Buy Accessories, Consumables and Original spare parts for choosing this AEG product. CARE AND CLEANING 11 6. CONTROL PANEL 5 3. TECHNICAL DATA 23 FOR PERFECT RESULTS Thank ...
Product Manual
Page 4
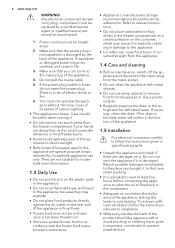
... and liquid in the appliance, because they may explode. • Do not place food products directly against a wall to avoid touching or catching warm parts (compressor, condenser) to prevent possible burn. In that case retain packing. • It is blocked, water will collect in the bottom of the appliance...to the appliance. • Ice lollies can come to . Make sure that the power plug is loose, do not insert the power plug. 4 www.aeg.com WARNING! Use a plastic scraper. • Regularly examine the drain in accordance with metal objects. • Do not use only. A squashed or ...
... and liquid in the appliance, because they may explode. • Do not place food products directly against a wall to avoid touching or catching warm parts (compressor, condenser) to prevent possible burn. In that case retain packing. • It is blocked, water will collect in the bottom of the appliance...to the appliance. • Ice lollies can come to . Make sure that the power plug is loose, do not insert the power plug. 4 www.aeg.com WARNING! Use a plastic scraper. • Regularly examine the drain in accordance with metal objects. • Do not use only. A squashed or ...
Product Manual
Page 5
... foreseen). 1.6 Service • Any electrical work required to do the servicing of buttons to a louder one by an authorized Service Centre, and only genuine spare parts must be serviced by pressing together the Mode button and Temperature colder button for some seconds.
... foreseen). 1.6 Service • Any electrical work required to do the servicing of buttons to a louder one by an authorized Service Centre, and only genuine spare parts must be serviced by pressing together the Mode button and Temperature colder button for some seconds.
Product Manual
Page 19
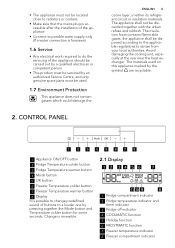
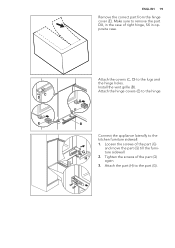
C D E Attach the covers (C, D) to the hinge. ENGLISH 19 Remove the correct part from the hinge cover (E). Tighten the screws of the part (G) and move the part (G) till the furniture sidewall. 2. Attach the hinge covers (E) to the lugs and the hinge holes. Install the vent grille (B). E B G H Connect the appliance laterally to the part (G). Attach the part (H) to the kitchen furniture sidewall: 1. Loosen the screws of the part (G) again. 3. Make sure to remove the part DX, in the case of right hinge, SX in opposite case.
C D E Attach the covers (C, D) to the hinge. ENGLISH 19 Remove the correct part from the hinge cover (E). Tighten the screws of the part (G) and move the part (G) till the furniture sidewall. 2. Attach the hinge covers (E) to the lugs and the hinge holes. Install the vent grille (B). E B G H Connect the appliance laterally to the part (G). Attach the part (H) to the kitchen furniture sidewall: 1. Loosen the screws of the part (G) again. 3. Make sure to remove the part DX, in the case of right hinge, SX in opposite case.
Product Manual
Page 20
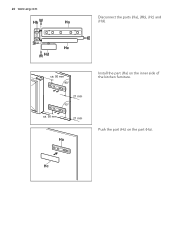
ca. 50 mm 90° 21 mm 90° ca. 50 mm 21 mm Ha Install the part (Ha) on the part (Ha). Push the part (Hc) on the inner side of the kitchen furniture. Hc 20 www.aeg.com Disconnect the parts (Ha), (Hb), (Hc) and (Hd).
ca. 50 mm 90° 21 mm 90° ca. 50 mm 21 mm Ha Install the part (Ha) on the part (Ha). Push the part (Hc) on the inner side of the kitchen furniture. Hc 20 www.aeg.com Disconnect the parts (Ha), (Hb), (Hc) and (Hd).
Product Manual
Page 21
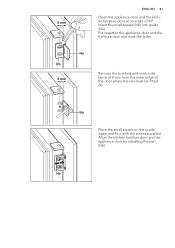
Ha Hb 8 mm Remove the brackets and mark a distance of 8 mm from the outer edge of 90°. Insert the small square (Hb) into guide (Ha). Align the kitchen furniture door and the appliance door by adjusting the part (Hb). Hb K Ha Place the small square on the guide again and fix it with the screws supplied. 8 mm ENGLISH 21 Open the appliance door and the kitchen furniture door at an angle of the door where the nail must be fitted (K). Put together the appliance door and the furniture door and mark the holes.
Ha Hb 8 mm Remove the brackets and mark a distance of 8 mm from the outer edge of 90°. Insert the small square (Hb) into guide (Ha). Align the kitchen furniture door and the appliance door by adjusting the part (Hb). Hb K Ha Place the small square on the guide again and fix it with the screws supplied. 8 mm ENGLISH 21 Open the appliance door and the kitchen furniture door at an angle of the door where the nail must be fitted (K). Put together the appliance door and the furniture door and mark the holes.
Product Manual
Page 22
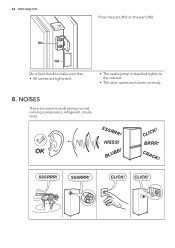
HISSS! SSSRRR! CLICK! CRACK! SSSRRR! CLICK! 22 www.aeg.com Press the part (Hd) on the part (Hb). Hb Hd Do a final check to the cabinet. • The door opens and closes correctly. 8. SSSRRR! NOISES There are tightened. • The sealing strip is attached tightly to make sure that: • All screws are some sounds during normal running (compressor, refrigerant circulation). OK BLUBB! BRRR! CLICK!
HISSS! SSSRRR! CLICK! CRACK! SSSRRR! CLICK! 22 www.aeg.com Press the part (Hd) on the part (Hb). Hb Hd Do a final check to the cabinet. • The door opens and closes correctly. 8. SSSRRR! NOISES There are tightened. • The sealing strip is attached tightly to make sure that: • All screws are some sounds during normal running (compressor, refrigerant circulation). OK BLUBB! BRRR! CLICK!