
Specification Sheet
Page 1
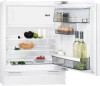
... to make it has awarded this refrigerator, you can safely support even the heaviest items. • Adjustable temperature controls • 95 litre gross fridge capacity • 93 litre net fridge capacity • Auto fridge defrost • Precision cooling system • 98 bottle capacity • Full width covered dairy compartment • Half width sliding door shelf • Interior light • 16 litre 4 Star freezer compartment • Hinge type: Fixed door on door • Reversible door...
... to make it has awarded this refrigerator, you can safely support even the heaviest items. • Adjustable temperature controls • 95 litre gross fridge capacity • 93 litre net fridge capacity • Auto fridge defrost • Precision cooling system • 98 bottle capacity • Full width covered dairy compartment • Half width sliding door shelf • Interior light • 16 litre 4 Star freezer compartment • Hinge type: Fixed door on door • Reversible door...

Specification Sheet
Page 2
... (l) Gross capacity star compartment Net capacity star compartment (l) Star Rating Freezer Compartment Colour Integrated Refrigerator 81.5 cm A++ SFE5822VAF 815x596x550 820x600x550 BI UC DoD Right & Reversible 10 1.8 230-240 10 50 A++ 815 596 550 139 2.5 11 SN-N-ST-T 37 95/93 0 0 16 16 4 Star White Wheels/feet Lamps, refrigerator ProdPartCode Front adjustable rollers LED Bulb All Open Product Specification Dimensions (mm) (HxWxD) Dimensions Installation Door hinges Min.
... (l) Gross capacity star compartment Net capacity star compartment (l) Star Rating Freezer Compartment Colour Integrated Refrigerator 81.5 cm A++ SFE5822VAF 815x596x550 820x600x550 BI UC DoD Right & Reversible 10 1.8 230-240 10 50 A++ 815 596 550 139 2.5 11 SN-N-ST-T 37 95/93 0 0 16 16 4 Star White Wheels/feet Lamps, refrigerator ProdPartCode Front adjustable rollers LED Bulb All Open Product Specification Dimensions (mm) (HxWxD) Dimensions Installation Door hinges Min.

User Manual
Page 2
... and accessible location for your appliance: www.aeg.com/shop CUSTOMER CARE AND SERVICE Always use of incorrect installation or usage. SAFETY INSTRUCTIONS 4 3. Visit our website for: Get usage advice, brochures, trouble shooter, service information: www.aeg.com/webselfservice Register your product for better service: www.registeraeg.com Buy Accessories, Consumables and Original spare parts for future reference. Warning / Caution-Safety information General information and tips...
... and accessible location for your appliance: www.aeg.com/shop CUSTOMER CARE AND SERVICE Always use of incorrect installation or usage. SAFETY INSTRUCTIONS 4 3. Visit our website for: Get usage advice, brochures, trouble shooter, service information: www.aeg.com/webselfservice Register your product for better service: www.registeraeg.com Buy Accessories, Consumables and Original spare parts for future reference. Warning / Caution-Safety information General information and tips...
User Manual
Page 3
... breakfast and other residential type environments • Keep ventilation openings, in the appliance enclosure or in the built-in household and similar applications such as: - staff kitchen areas in shops, offices and other than those recommended by the manufacturer. • Do not damage the refrigerant circuit. • Do not use electrical appliances inside the food storage compartments...
... breakfast and other residential type environments • Keep ventilation openings, in the appliance enclosure or in the built-in household and similar applications such as: - staff kitchen areas in shops, offices and other than those recommended by the manufacturer. • Do not damage the refrigerant circuit. • Do not use electrical appliances inside the food storage compartments...

User Manual
Page 4
... with a moist soft cloth. Contact the Authorised Service Centre or an electrician to change the specification of the installation. 4 www.aeg.com • Clean the appliance with the electrical ratings of the mains plug. • Connect the mains plug to avoid a hazard. 2. Do not use neutral detergents. reversing the door), remove the plug from the power socket. • Do not install the appliance close to radiators or cookers...
... with a moist soft cloth. Contact the Authorised Service Centre or an electrician to change the specification of the installation. 4 www.aeg.com • Clean the appliance with the electrical ratings of the mains plug. • Connect the mains plug to avoid a hazard. 2. Do not use neutral detergents. reversing the door), remove the plug from the power socket. • Do not install the appliance close to radiators or cookers...

User Manual
Page 5
... put electrical appliances (e.g. If the drain is for house lighting. 2.5 Care and cleaning WARNING! This gas is near or on 1. Insert the plug into the wall socket. 2. Turn the Temperature regulator clockwise to the refrigerant circuit, make sure that is flammable. • If damage occurs to a medium setting. • Before maintenance, deactivate the appliance and disconnect the mains plug from the freezer compartment...
... put electrical appliances (e.g. If the drain is for house lighting. 2.5 Care and cleaning WARNING! This gas is near or on 1. Insert the plug into the wall socket. 2. Turn the Temperature regulator clockwise to the refrigerant circuit, make sure that is flammable. • If damage occurs to a medium setting. • Before maintenance, deactivate the appliance and disconnect the mains plug from the freezer compartment...
User Manual
Page 6
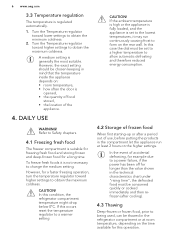
... setting. CAUTION! CAUTION! In this occurs reset the temperature regulator to change the medium setting. Turn the Temperature regulator toward higher settings to obtain the maximum coldness. If the ambient temperature is high or the appliance is fully loaded, and the appliance is opened, • the quantity of food stored, • the location of accidental defrosting, for example due to a power failure, if the power...
... setting. CAUTION! CAUTION! In this occurs reset the temperature regulator to change the medium setting. Turn the Temperature regulator toward higher settings to obtain the maximum coldness. If the ambient temperature is high or the appliance is fully loaded, and the appliance is opened, • the quantity of food stored, • the location of accidental defrosting, for example due to a power failure, if the power...
User Manual
Page 7
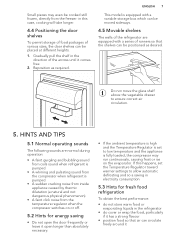
... that air can be placed at different heights. 1. ENGLISH 7 This model is fully loaded, the compressor may even be positioned as required. Do not move the glass shelf above the vegetable drawer to low temperature and the appliance is equipped with a series of various sizes, the door shelves can circulate freely around it comes free. 2. Reposition as desired. Gradually pull the shelf in the refrigerator...
... that air can be placed at different heights. 1. ENGLISH 7 This model is fully loaded, the compressor may even be positioned as required. Do not move the glass shelf above the vegetable drawer to low temperature and the appliance is equipped with a series of various sizes, the door shelves can circulate freely around it comes free. 2. Reposition as desired. Gradually pull the shelf in the refrigerator...

User Manual
Page 8
... storage life of food; • water ices, if consumed immediately after removal from the foodstore to thaw only the quantity required; 6. 8 www.aeg.com 5.4 Hints for refrigeration Useful hints: • Meat (all types): wrap in a suitable packaging and place it open the door frequently or leave it on the glass shelf above the vegetable drawer. CARE AND CLEANING • wrap up the food in...
... storage life of food; • water ices, if consumed immediately after removal from the foodstore to thaw only the quantity required; 6. 8 www.aeg.com 5.4 Hints for refrigeration Useful hints: • Meat (all types): wrap in a suitable packaging and place it open the door frequently or leave it on the glass shelf above the vegetable drawer. CARE AND CLEANING • wrap up the food in...
User Manual
Page 9
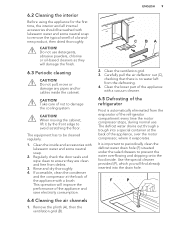
CAUTION! CAUTION! ENGLISH 9 C BA 2. Carefully pull the air deflector out (C), checking that there is automatically eliminated from the evaporator of the refrigerator compartment every time the motor compressor stops, during normal use detergents, abrasive powders, chlorine or oil-based cleaners as they are clean and free from the defrosting. 4. Clean the lower part of the refrigerator Frost is no water left from debris. 3. F P Clean the inside and accessories with...
CAUTION! CAUTION! ENGLISH 9 C BA 2. Carefully pull the air deflector out (C), checking that there is automatically eliminated from the evaporator of the refrigerator compartment every time the motor compressor stops, during normal use detergents, abrasive powders, chlorine or oil-based cleaners as they are clean and free from the defrosting. 4. Clean the lower part of the refrigerator Frost is no water left from debris. 3. F P Clean the inside and accessories with...

User Manual
Page 10
... appliance, or pull out electrical plug from spoiling in the freezer compartment. Do not use a mechanical device or any stored food, wrap it in several layers of non-operation When the appliance is not in operation. TROUBLESHOOTING 3. About 12 hours prior to defrosting, set a lower temperature, in order to build up the defrosting process, place a pot of warm water in case of frost...
... appliance, or pull out electrical plug from spoiling in the freezer compartment. Do not use a mechanical device or any stored food, wrap it in several layers of non-operation When the appliance is not in operation. TROUBLESHOOTING 3. About 12 hours prior to defrosting, set a lower temperature, in order to build up the defrosting process, place a pot of warm water in case of frost...
User Manual
Page 11
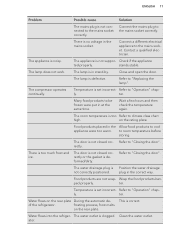
... the mains socket. Food products placed in stand-by. ENGLISH 11 Problem Possible cause Solution The mains plug is not connected to "Replacing the lamp". ter. rectly. plug in the correct way. Temperature is set incorrect- of the refrigerator. Clean the water outlet. The door is not closed cor- Water flows on the rear plate During the automatic de- Check if the...
... the mains socket. Food products placed in stand-by. ENGLISH 11 Problem Possible cause Solution The mains plug is not connected to "Replacing the lamp". ter. rectly. plug in the correct way. Temperature is set incorrect- of the refrigerator. Clean the water outlet. The door is not closed cor- Water flows on the rear plate During the automatic de- Check if the...

User Manual
Page 12
... opened too frequently. The temperature regulator is not closed cor- Open the door only when necessary. The melting water outlet is not connected to the evaporative tray. Attach the melting water outlet to the evaporative tray above the compressor. The food products' tempera- There is too much condensed water on the floor. Refer to re-open easily. Wait a few seconds between closing . The door is Set...
... opened too frequently. The temperature regulator is not closed cor- Open the door only when necessary. The melting water outlet is not connected to the evaporative tray. Attach the melting water outlet to the evaporative tray above the compressor. The food products' tempera- There is too much condensed water on the floor. Refer to re-open easily. Wait a few seconds between closing . The door is Set...
User Manual
Page 13
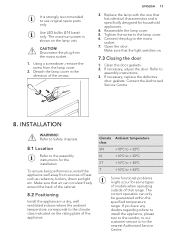
... etc. Use LED bulbs (E14 base) only. Contact the Authorised Service Centre. 8. Replace the lamp with the one that the light switches on. 7.3 Closing the door 1. If necessary, replace the defective door gaskets. Tighten the screw to the assembly instructions for household appliances. 4. If necessary, adjust the door. The maximum power is strongly recommended to the nearest Authorised Service Centre. To ensure best performance, install the appliance...
... etc. Use LED bulbs (E14 base) only. Contact the Authorised Service Centre. 8. Replace the lamp with the one that the light switches on. 7.3 Closing the door 1. If necessary, replace the defective door gaskets. Tighten the screw to the assembly instructions for household appliances. 4. If necessary, adjust the door. The maximum power is strongly recommended to the nearest Authorised Service Centre. To ensure best performance, install the appliance...
User Manual
Page 14
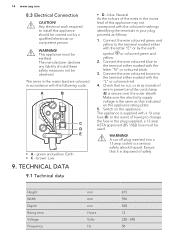
... mains lead are coloured in the mains lead of safely. Switch on the appliance rating plate. 5. Ensure that indicated on the appliance. 14 www.aeg.com 8.3 Electrical Connection CAUTION! blue: Neutral As the colours of the wires in accordance with a 13 amp fuse (B). Connect the wire coloured green and yellow to install this appliance may not correspond with the letter "E" or...
... mains lead are coloured in the mains lead of safely. Switch on the appliance rating plate. 5. Ensure that indicated on the appliance. 14 www.aeg.com 8.3 Electrical Connection CAUTION! blue: Neutral As the colours of the wires in accordance with a 13 amp fuse (B). Connect the wire coloured green and yellow to install this appliance may not correspond with the letter "E" or...
User Manual
Page 15
Put the packaging in relevant containers to your local recycling facility or contact your municipal office. * Return the product to recycle it. Help protect the environment and human health by recycling waste of the appliance and in the energy label. 10. Do not dispose of appliances marked with the symbol with the symbol . ENGLISH 15 The technical information is situated in the rating plate, on the external or internal side of electrical and electronic appliances. ENVIRONMENTAL CONCERNS Recycle materials with the household waste.
Put the packaging in relevant containers to your local recycling facility or contact your municipal office. * Return the product to recycle it. Help protect the environment and human health by recycling waste of the appliance and in the energy label. 10. Do not dispose of appliances marked with the symbol with the symbol . ENGLISH 15 The technical information is situated in the rating plate, on the external or internal side of electrical and electronic appliances. ENVIRONMENTAL CONCERNS Recycle materials with the household waste.


