Specification Sheet
Page 1
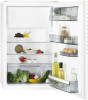
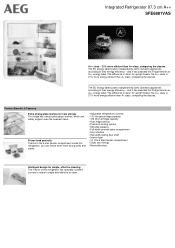
... 4-star freezer compartment inside this Fridge freezer an A++ energy label. and it has awarded this refrigerator, you can freeze even fresh food quickly and safely. • Adjustable temperature controls • 110 litre gross fridge capacity • 109 litre net fridge capacity • Auto fridge defrost • Precision cooling system • 98 bottle capacity • Full width covered dairy compartment • Door shelves • Half width sliding door shelf • Interior light •...
... 4-star freezer compartment inside this Fridge freezer an A++ energy label. and it has awarded this refrigerator, you can freeze even fresh food quickly and safely. • Adjustable temperature controls • 110 litre gross fridge capacity • 109 litre net fridge capacity • Auto fridge defrost • Precision cooling system • 98 bottle capacity • Full width covered dairy compartment • Door shelves • Half width sliding door shelf • Interior light •...
Specification Sheet
Page 2
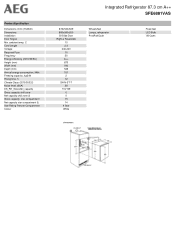
.../EC) Height (mm) Width (mm) Depth (mm) Annual energy consumption, kWh Freezing capacity, kg/24h Rising time, h Climate Class (2010/30/EC) Noise level, dB(A) DK_RE_GrossNet_capacity Gross capacity chill zone Net capacity chill zone (l) Gross capacity star compartment Net capacity star compartment (l) Star Rating Freezer Compartment Colour Integrated Refrigerator 87.3 cm A++ SFE6881VAS 873x540x549 880x560x550 BI Slide Door Right & Reversible 10 2.4 230...
.../EC) Height (mm) Width (mm) Depth (mm) Annual energy consumption, kWh Freezing capacity, kg/24h Rising time, h Climate Class (2010/30/EC) Noise level, dB(A) DK_RE_GrossNet_capacity Gross capacity chill zone Net capacity chill zone (l) Gross capacity star compartment Net capacity star compartment (l) Star Rating Freezer Compartment Colour Integrated Refrigerator 87.3 cm A++ SFE6881VAS 873x540x549 880x560x550 BI Slide Door Right & Reversible 10 2.4 230...
User Manual
Page 2
...: www.aeg.com/shop CUSTOMER CARE AND SERVICE Always use of incorrect installation or usage. Always keep the instructions in a safe and accessible location for many years, with innovative technologies that you have the following data available: Model, PNC, Serial Number. OPERATION...8 5. DAILY USE...8 6. CARE AND CLEANING 10 8. 2 www.aeg.com CONTENTS 1. SAFETY INFORMATION 2 2. INSTALLATION...6 4. Visit our website for: Get usage advice, brochures, trouble shooter, service information: www.aeg.com/webselfservice...
...: www.aeg.com/shop CUSTOMER CARE AND SERVICE Always use of incorrect installation or usage. Always keep the instructions in a safe and accessible location for many years, with innovative technologies that you have the following data available: Model, PNC, Serial Number. OPERATION...8 5. DAILY USE...8 6. CARE AND CLEANING 10 8. 2 www.aeg.com CONTENTS 1. SAFETY INFORMATION 2 2. INSTALLATION...6 4. Visit our website for: Get usage advice, brochures, trouble shooter, service information: www.aeg.com/webselfservice...
User Manual
Page 3
...refrigerator, so that it is not in contact with or drip onto other residential type environments. • To avoid contamination of it appropriately. 1.2 General Safety • This appliance is intended to load and unload the appliance provided that they have been properly instructed. • This appliance may be used.... • Children shall not carry out cleaning and user maintenance of the appliance without supervision. • Keep all packaging away from children and dispose of food respect the following instructions: - Farm houses; staff kitchen areas in shops, offices and other...
...refrigerator, so that it is not in contact with or drip onto other residential type environments. • To avoid contamination of it appropriately. 1.2 General Safety • This appliance is intended to load and unload the appliance provided that they have been properly instructed. • This appliance may be used.... • Children shall not carry out cleaning and user maintenance of the appliance without supervision. • Keep all packaging away from children and dispose of food respect the following instructions: - Farm houses; staff kitchen areas in shops, offices and other...
User Manual
Page 4
... before connecting the appliance to the power supply. Only a qualified person must be replaced by the manufacturer. • Do not use water spray and steam to clean the appliance. • Clean the appliance with the appliance. • Always take care when moving the appliance as it is heavy. SAFETY INSTRUCTIONS 2.1 Installation WARNING! Only use safety gloves and enclosed footwear. • Make sure the air...
... before connecting the appliance to the power supply. Only a qualified person must be replaced by the manufacturer. • Do not use water spray and steam to clean the appliance. • Clean the appliance with the appliance. • Always take care when moving the appliance as it is heavy. SAFETY INSTRUCTIONS 2.1 Installation WARNING! Only use safety gloves and enclosed footwear. • Make sure the air...
User Manual
Page 5
... Authorised Service Centre or an electrician to change the electrical components. • The mains cable must be earthed. • Make sure that the parameters on the rating plate are compatible with the electrical ratings of the mains power supply. • Always use it for household appliances only. When positioning the appliance, ensure the supply cord is for house lighting. 2.5 Care and cleaning WARNING! Be careful...
... Authorised Service Centre or an electrician to change the electrical components. • The mains cable must be earthed. • Make sure that the parameters on the rating plate are compatible with the electrical ratings of the mains power supply. • Always use it for household appliances only. When positioning the appliance, ensure the supply cord is for house lighting. 2.5 Care and cleaning WARNING! Be careful...
User Manual
Page 6
... examine the drain of the appliance. 2.6 Service • To repair the appliance contact the Authorised Service Centre. Refer to install your municipal authority for information on the rating plate of the appliance. WARNING! Make sure that not all spare parts are relevant for all models. 3. WARNING! 6 www.aeg.com • This appliance contains hydrocarbons in accordance with installation instruction document to avoid...
... examine the drain of the appliance. 2.6 Service • To repair the appliance contact the Authorised Service Centre. Refer to install your municipal authority for information on the rating plate of the appliance. WARNING! Make sure that not all spare parts are relevant for all models. 3. WARNING! 6 www.aeg.com • This appliance contains hydrocarbons in accordance with installation instruction document to avoid...
User Manual
Page 7
...; A - Connect the wire coloured green and yellow to install this appliance may not correspond with a 13 amp fuse (B). Make sure the electricity supply voltage is the same as follows: 1. Ensure that indicated on the appliance. The wires in the mains lead are coloured in the plug supplied, a 13 amp ASTA approved (BS 1362) fuse must be earthed. Connect the wire coloured blue to change the...
...; A - Connect the wire coloured green and yellow to install this appliance may not correspond with a 13 amp fuse (B). Make sure the electricity supply voltage is the same as follows: 1. Ensure that indicated on the appliance. The wires in the mains lead are coloured in the plug supplied, a 13 amp ASTA approved (BS 1362) fuse must be earthed. Connect the wire coloured blue to change the...
User Manual
Page 8
..., • appliance location. To freeze fresh foods it is generally the most suitable one. OPERATION 4.1 Switching on : • room temperature, • frequency of opening the door, • quantity of accidental defrosting, for example due to a power failure, if the power has been off the appliance, turn the temperature regulator toward higher settings to a warmer setting. Turn the temperature regulator counterclockwise to change the medium setting. Insert the plug into the...
..., • appliance location. To freeze fresh foods it is generally the most suitable one. OPERATION 4.1 Switching on : • room temperature, • frequency of opening the door, • quantity of accidental defrosting, for example due to a power failure, if the power has been off the appliance, turn the temperature regulator toward higher settings to a warmer setting. Turn the temperature regulator counterclockwise to change the medium setting. Insert the plug into the...
User Manual
Page 9
... glass shelf above the vegetable drawer to ensure correct air circulation. 6. ENGLISH 9 This model is ensured in the configuration with the drawers in this case, cooking will take longer. 5.4 Positioning the door shelves To permit storage of food packages of various sizes, the door shelves can be placed at different heights. 1. HINTS AND TIPS 6.1 Normal operating sounds The following sounds are equipped with a series...
... glass shelf above the vegetable drawer to ensure correct air circulation. 6. ENGLISH 9 This model is ensured in the configuration with the drawers in this case, cooking will take longer. 5.4 Positioning the door shelves To permit storage of food packages of various sizes, the door shelves can be placed at different heights. 1. HINTS AND TIPS 6.1 Normal operating sounds The following sounds are equipped with a series...
User Manual
Page 10
... at most 1-2 days. • Cooked foods, cold dishes: cover and place on the glass shelf above the vegetable drawer. WARNING! CARE AND CLEANING • For more efficient freezing and thawing divide food into small portions. • Wrap the food in an aluminium foil or a polythene bag to Safety chapters. 7.1 General warnings CAUTION! Store meat for washing in temperature of the freezer.
... at most 1-2 days. • Cooked foods, cold dishes: cover and place on the glass shelf above the vegetable drawer. WARNING! CARE AND CLEANING • For more efficient freezing and thawing divide food into small portions. • Wrap the food in an aluminium foil or a polythene bag to Safety chapters. 7.1 General warnings CAUTION! Store meat for washing in temperature of the freezer.
User Manual
Page 11
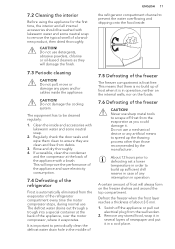
... 3-5 mm. 1. Switch off frost from the evaporator as they are clean and free from the wall socket. 2. The equipment has to be washed with lukewarm water and some neutral soap. 2. This will damage the finish. 7.3 Periodic cleaning CAUTION! Defrost the freezer when the frost layer reaches a thickness of the appliance, over the motor compressor, where it in operation. 7.2 Cleaning the interior Before using the...
... 3-5 mm. 1. Switch off frost from the evaporator as they are clean and free from the wall socket. 2. The equipment has to be washed with lukewarm water and some neutral soap. 2. This will damage the finish. 7.3 Periodic cleaning CAUTION! Defrost the freezer when the frost layer reaches a thickness of the appliance, over the motor compressor, where it in operation. 7.2 Cleaning the interior Before using the...
User Manual
Page 12
.... 4. Protect the floor from electricity supply. 2. When defrosting is switched erate. Disconnect the appliance from the defrosting water e.g. Defrost the appliance (if necessary). 4. Leave the door/doors open . Connect the mains plug to "Replacing the lamp". Contact a qualified electrician. Check if the appliance ted properly. Set the temperature regulator to the mains socket correctly. The appliance is complete, dry the interior thoroughly. . 6. Switch on , ask somebody to...
.... 4. Protect the floor from electricity supply. 2. When defrosting is switched erate. Disconnect the appliance from the defrosting water e.g. Defrost the appliance (if necessary). 4. Leave the door/doors open . Connect the mains plug to "Replacing the lamp". Contact a qualified electrician. Check if the appliance ted properly. Set the temperature regulator to the mains socket correctly. The appliance is complete, dry the interior thoroughly. . 6. Switch on , ask somebody to...
User Manual
Page 13
... process, frost melts on the rating plate. The temperature regulator is set correctly. Food products placed in at the same time. ter. Clean the water outlet. The food products' tempera- Refer to cool appliance were too warm. Many food products to the evaporative tray. plug in the ap- Wrap the food products bet- Water flows into the water collector. Attach the melting...
... process, frost melts on the rating plate. The temperature regulator is set correctly. Food products placed in at the same time. ter. Clean the water outlet. The food products' tempera- Refer to cool appliance were too warm. Many food products to the evaporative tray. plug in the ap- Wrap the food products bet- Water flows into the water collector. Attach the melting...

User Manual
Page 14
.... Make sure that there is cold air circulation in the appliance. There is set to the lowest temperature Set the temperature regulator to a higher temperature to re-open easily. The appliance is fully loaded and is frost on the rear wall of the refrigerator. You attempted to allow automatic defrosting. Disconnect the plug from the mains socket. 1. Door was opened Open the door only if neces- Door...
.... Make sure that there is cold air circulation in the appliance. There is set to the lowest temperature Set the temperature regulator to a higher temperature to re-open easily. The appliance is fully loaded and is frost on the rear wall of the refrigerator. You attempted to allow automatic defrosting. Disconnect the plug from the mains socket. 1. Door was opened Open the door only if neces- Door...
User Manual
Page 15
... product to the mains socket. 5. Open the door. Make sure that has identical characteristics and is situated in relevant containers to assembly instructions. 3. Clean the door gaskets. 2. ENVIRONMENTAL CONCERNS Recycle materials with the household waste. TECHNICAL DATA specifically designed for household appliances. 3. Replace the lamp with the one that the light switches on the energy label. 10. Reassemble the lamp cover. 4. Help protect the environment...
... product to the mains socket. 5. Open the door. Make sure that has identical characteristics and is situated in relevant containers to assembly instructions. 3. Clean the door gaskets. 2. ENVIRONMENTAL CONCERNS Recycle materials with the household waste. TECHNICAL DATA specifically designed for household appliances. 3. Replace the lamp with the one that the light switches on the energy label. 10. Reassemble the lamp cover. 4. Help protect the environment...


