Specification Sheet
Page 1
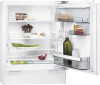
... this crisper. • Adjustable temperature controls • 136 litre gross fridge capacity • 133 litre net fridge capacity • Auto fridge defrost • Precision cooling system • 98 bottle capacity • Full width covered dairy compartment • Half width sliding door shelf • Interior light • Hinge type: Fixed door on door • Reversible door Spacious full width drawer for family life, with a wealth of room between shelves. 3000 Integrated Refrigerator 81.9 cm A++ SKB582F1AF Store...
... this crisper. • Adjustable temperature controls • 136 litre gross fridge capacity • 133 litre net fridge capacity • Auto fridge defrost • Precision cooling system • 98 bottle capacity • Full width covered dairy compartment • Half width sliding door shelf • Interior light • Hinge type: Fixed door on door • Reversible door Spacious full width drawer for family life, with a wealth of room between shelves. 3000 Integrated Refrigerator 81.9 cm A++ SKB582F1AF Store...

Specification Sheet
Page 2
...) Height (mm) Width (mm) Depth (mm) Annual energy consumption, kWh Freezing capacity, kg/24h Rising time, h Climate Class (2010/30/EC) Noise level, dB(A) DK_RE_GrossNet_capacity Gross capacity chill zone Net capacity chill zone (l) Gross capacity star compartment Net capacity star compartment (l) Star Rating Freezer Compartment Colour 3000 Integrated Refrigerator 81.9 cm A++ SKB582F1AF 819x596x547 820x600x550 BI UC DoD Right & Reversible 10...
...) Height (mm) Width (mm) Depth (mm) Annual energy consumption, kWh Freezing capacity, kg/24h Rising time, h Climate Class (2010/30/EC) Noise level, dB(A) DK_RE_GrossNet_capacity Gross capacity chill zone Net capacity chill zone (l) Gross capacity star compartment Net capacity star compartment (l) Star Rating Freezer Compartment Colour 3000 Integrated Refrigerator 81.9 cm A++ SKB582F1AF 819x596x547 820x600x550 BI UC DoD Right & Reversible 10...
User Manual
Page 2
... ordinary appliances. INSTALLATION...6 4. TROUBLESHOOTING 12 9. NOISES...15 10. Warning / Caution-Safety information General information and tips Environmental information Subject to get the very best from it to : Get usage advice, brochures, trouble shooter, service and repair information: www.aeg.com/support Register your appliance: www.aeg.com/shop CUSTOMER CARE AND SERVICE Always use of incorrect installation or usage. SAFETY INFORMATION Before the installation and use original spare parts. We...
... ordinary appliances. INSTALLATION...6 4. TROUBLESHOOTING 12 9. NOISES...15 10. Warning / Caution-Safety information General information and tips Environmental information Subject to get the very best from it to : Get usage advice, brochures, trouble shooter, service and repair information: www.aeg.com/support Register your appliance: www.aeg.com/shop CUSTOMER CARE AND SERVICE Always use of incorrect installation or usage. SAFETY INFORMATION Before the installation and use original spare parts. We...
User Manual
Page 3
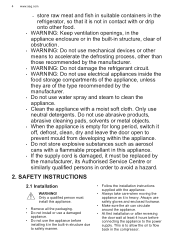
...; This appliance may be used in household and similar applications such as: - ENGLISH 3 instructions in a safe and accessible location for long periods; - Farm houses; By clients in hotels, motels, bed and breakfast and other working environments; - staff kitchen areas in contact with the appliance. • Children shall not carry out cleaning and user maintenance of the appliance...
...; This appliance may be used in household and similar applications such as: - ENGLISH 3 instructions in a safe and accessible location for long periods; - Farm houses; By clients in hotels, motels, bed and breakfast and other working environments; - staff kitchen areas in contact with the appliance. • Children shall not carry out cleaning and user maintenance of the appliance...
User Manual
Page 4
... in order to the power supply. Only use safety gloves and enclosed footwear. • Make sure the air can circulate around the appliance. • At first installation or after reversing the door wait at least 4 hours before installing it is to allow the oil to safety manner. • Follow the installation instructions supplied with the appliance. • Always take care when moving the...
... in order to the power supply. Only use safety gloves and enclosed footwear. • Make sure the air can circulate around the appliance. • At first installation or after reversing the door wait at least 4 hours before installing it is to allow the oil to safety manner. • Follow the installation instructions supplied with the appliance. • Always take care when moving the...

User Manual
Page 5
... plastic parts of injury, burns, electric shock or fire. Do not use a correctly installed shockproof socket. • Make sure not to cause damage to the refrigerant circuit containing isobutane. • Do not change the electrical components. • The mains cable must stay below the level of the mains plug. • Connect the mains plug to avoid scratching the floor. 2.2 Electrical connection WARNING! Be careful not...
... plastic parts of injury, burns, electric shock or fire. Do not use a correctly installed shockproof socket. • Make sure not to cause damage to the refrigerant circuit containing isobutane. • Do not change the electrical components. • The mains cable must stay below the level of the mains plug. • Connect the mains plug to avoid scratching the floor. 2.2 Electrical connection WARNING! Be careful not...
User Manual
Page 6
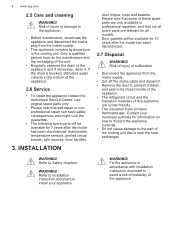
... professional repairers, and that not all spare parts are ozone-friendly. • The insulation foam contains flammable gas. WARNING! WARNING! Use original spare parts only. • Please note that is blocked, defrosted water collects in accordance with installation instruction document to be available for 10 years after the model has been discontinued: thermostats, temperature sensors, printed circuit boards, light sources, door handles, 3. If the drain...
... professional repairers, and that not all spare parts are ozone-friendly. • The insulation foam contains flammable gas. WARNING! WARNING! Use original spare parts only. • Please note that is blocked, defrosted water collects in accordance with installation instruction document to be available for 10 years after the model has been discontinued: thermostats, temperature sensors, printed circuit boards, light sources, door handles, 3. If the drain...

User Manual
Page 7
... ³ the height, width and depth of the appliance including the handle, plus the space necessary for free circulation of the cooling air, plus the space necessary to allow door opening to the minimum angle permitting removal of all internal equipment 3.2 Location To ensure appliance's best functionality, you have any doubts regarding where to install the appliance, please turn to the...
... ³ the height, width and depth of the appliance including the handle, plus the space necessary for free circulation of the cooling air, plus the space necessary to allow door opening to the minimum angle permitting removal of all internal equipment 3.2 Location To ensure appliance's best functionality, you have any doubts regarding where to install the appliance, please turn to the...

User Manual
Page 8
...! The wires in the mains lead are coloured in the plug supplied, a 13 amp ASTA approved (BS 1362) fuse must be observed. brown: Live • D - Connect the wire coloured brown to a medium setting. The appliance is disposed of reversing the door protect the floor from scratching with the following code: A B C D E • A - Ensure that indicated on installation and door reversal. WARNING! 8 www.aeg.com 3.3 Electrical Connection CAUTION! CONTROL PANEL 4.1 Switching on...
...! The wires in the mains lead are coloured in the plug supplied, a 13 amp ASTA approved (BS 1362) fuse must be observed. brown: Live • D - Connect the wire coloured brown to a medium setting. The appliance is disposed of reversing the door protect the floor from scratching with the following code: A B C D E • A - Ensure that indicated on installation and door reversal. WARNING! 8 www.aeg.com 3.3 Electrical Connection CAUTION! CONTROL PANEL 4.1 Switching on...
User Manual
Page 9
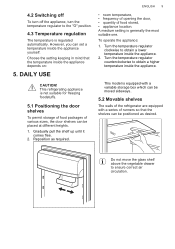
... different heights. 1. 4.2 Switching off To turn off the appliance, turn the temperature regulator to ensure correct air circulation. To operate the appliance: 1. Turn the temperature regulator counterclockwise to obtain a lower temperature inside the appliance depends on: 5. Gradually pull the shelf up until it comes free. 2. Choose the setting keeping in mind that the shelves can be moved sideways. 5.2 Movable shelves The walls of various sizes, the door shelves can set a temperature inside...
... different heights. 1. 4.2 Switching off To turn off the appliance, turn the temperature regulator to ensure correct air circulation. To operate the appliance: 1. Turn the temperature regulator counterclockwise to obtain a lower temperature inside the appliance depends on: 5. Gradually pull the shelf up until it comes free. 2. Choose the setting keeping in mind that the shelves can be moved sideways. 5.2 Movable shelves The walls of various sizes, the door shelves can set a temperature inside...
User Manual
Page 10
... drawer (vegetable drawer). • It is set the temperature control toward higher temperature to allow automatic defrosting and to keep them on the door bottle shelf, or (if available) on the glass shelf above the vegetable drawer. Position of the door bins does not affect energy consumption. • Do not open the door frequently or leave it open longer than necessary. • Do not set too high temperature to save energy...
... drawer (vegetable drawer). • It is set the temperature control toward higher temperature to allow automatic defrosting and to keep them on the door bottle shelf, or (if available) on the glass shelf above the vegetable drawer. Position of the door bins does not affect energy consumption. • Do not open the door frequently or leave it open longer than necessary. • Do not set too high temperature to save energy...
User Manual
Page 11
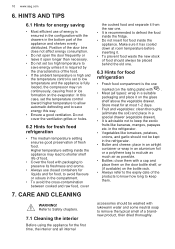
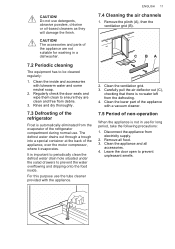
... are clean and free from debris. 3. Clean the ventilation grid. 3. Disconnect the appliance from the defrosting. 4. Leave the door open to prevent the water overflowing and dripping onto the food inside and accessories with a vacuum cleaner. 7.5 Period of the refrigerator compartment during normal use the tube cleaner provided with the appliance. The accessories and parts of the appliance, over the motor compressor, where it evaporates. For...
... are clean and free from debris. 3. Clean the ventilation grid. 3. Disconnect the appliance from the defrosting. 4. Leave the door open to prevent the water overflowing and dripping onto the food inside and accessories with a vacuum cleaner. 7.5 Period of the refrigerator compartment during normal use the tube cleaner provided with the appliance. The accessories and parts of the appliance, over the motor compressor, where it evaporates. For...
User Manual
Page 12
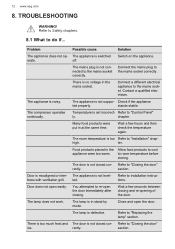
... appliance. Connect a different electrical appliance to room temperature before storing. Temperature is not closed cor‐ Refer to "Closing the door" ice. Many food products were put in the Allow food products to "Control Panel" ly. The door is set incorrect‐ Refer to cool appliance were too warm. Refer to the mains socket correctly. Door does not open the door. Connect the mains plug to installation instruc...
... appliance. Connect a different electrical appliance to room temperature before storing. Temperature is not closed cor‐ Refer to "Closing the door" ice. Many food products were put in the Allow food products to "Control Panel" ly. The door is set incorrect‐ Refer to cool appliance were too warm. Refer to the mains socket correctly. Door does not open the door. Connect the mains plug to installation instruc...
User Manual
Page 13
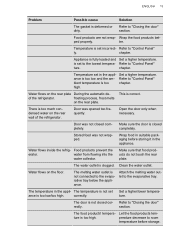
... closed completely. ture. high. Clean the water outlet. correctly. chapter. Open the door only when necessary. Water flows on the rear plate During the automatic de‐ of the refrigerator. Temperature set Set a higher/lower tempera‐ ance is deformed or dirty. There is too much con‐ densed water on the rear plate. Water flows inside the refrig‐ Food products prevent...
... closed completely. ture. high. Clean the water outlet. correctly. chapter. Open the door only when necessary. Water flows on the rear plate During the automatic de‐ of the refrigerator. Temperature set Set a higher/lower tempera‐ ance is deformed or dirty. There is too much con‐ densed water on the rear plate. Water flows inside the refrig‐ Food products prevent...
User Manual
Page 14
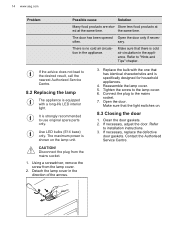
... cold air circulation in the appli‐ ance. Make sure that the light switches on the lamp unit. CAUTION! Disconnect the plug from the lamp cover. 2. Reassemble the lamp cover. 5. Tighten the screw to installation instructions. 3. Make sure that there is no cold air circula‐ tion in the direction of the arrows. 3. If necessary, replace the defective door gaskets. Refer to the lamp cover. 6. The maximum power...
... cold air circulation in the appli‐ ance. Make sure that the light switches on the lamp unit. CAUTION! Disconnect the plug from the lamp cover. 2. Reassemble the lamp cover. 5. Tighten the screw to installation instructions. 3. Make sure that there is no cold air circula‐ tion in the direction of the arrows. 3. If necessary, replace the defective door gaskets. Refer to the lamp cover. 6. The maximum power...
User Manual
Page 15
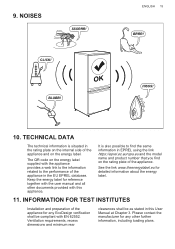
... in the EU EPREL database. TECHNICAL DATA The technical information is also possible to the performance of the appliance. See the link www.theenergylabel.eu for reference together with EN 62552. 9. INFORMATION FOR TEST INSTITUTES Installation and preparation of the appliance for...rating plate of the appliance in EPREL using the link https://eprel.ec.europa.eu and the model name and product number that you find on the energy label. BLUBB! The QR code on the energy label supplied with this User Manual at Chapter 3. HISSS! 10. NOISES SSSRRR! Keep the energy...
... in the EU EPREL database. TECHNICAL DATA The technical information is also possible to the performance of the appliance. See the link www.theenergylabel.eu for reference together with EN 62552. 9. INFORMATION FOR TEST INSTITUTES Installation and preparation of the appliance for...rating plate of the appliance in EPREL using the link https://eprel.ec.europa.eu and the model name and product number that you find on the energy label. BLUBB! The QR code on the energy label supplied with this User Manual at Chapter 3. HISSS! 10. NOISES SSSRRR! Keep the energy...

User Manual
Page 16
ENVIRONMENTAL CONCERNS Recycle materials with the household waste. Help protect the environment and human health by recycling waste of appliances marked with the symbol with the symbol . Do not dispose of electrical and electronic appliances. Put the packaging in relevant containers to your local recycling facility or contact your municipal office. * Return the product to recycle it. 16 www.aeg.com 12.
ENVIRONMENTAL CONCERNS Recycle materials with the household waste. Help protect the environment and human health by recycling waste of appliances marked with the symbol with the symbol . Do not dispose of electrical and electronic appliances. Put the packaging in relevant containers to your local recycling facility or contact your municipal office. * Return the product to recycle it. 16 www.aeg.com 12.


