Specification Sheet
Page 1
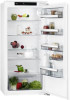
... quiet experience when closing door hinges help to prevent an accidently open indicator • 205 litre gross fridge capacity • 202 litre net fridge capacity • Auto fridge defrost • Precision cooling system • 98 bottle capacity • Full width covered dairy compartment • Door shelves • Half width sliding door shelf • Hinge type: Fixed door on door • Reversible door Fine-tune settings with electronic touch control Take complete command of...
... quiet experience when closing door hinges help to prevent an accidently open indicator • 205 litre gross fridge capacity • 202 litre net fridge capacity • Auto fridge defrost • Precision cooling system • 98 bottle capacity • Full width covered dairy compartment • Door shelves • Half width sliding door shelf • Hinge type: Fixed door on door • Reversible door Fine-tune settings with electronic touch control Take complete command of...
Specification Sheet
Page 2
...) Height (mm) Width (mm) Depth (mm) Annual energy consumption, kWh Freezing capacity, kg/24h Rising time, h Climate Class (2010/30/EC) Noise level, dB(A) DK_RE_GrossNet_capacity Gross capacity chill zone Net capacity chill zone (l) Gross capacity star compartment Net capacity star compartment (l) Star Rating Freezer Compartment Colour Lamps, refrigerator 3000 Integrated Refrigerator 121.9 cm A++ SKB812F1AC 1219x556x550 1225x560x550 BI DoD Right & Reversible 10...
...) Height (mm) Width (mm) Depth (mm) Annual energy consumption, kWh Freezing capacity, kg/24h Rising time, h Climate Class (2010/30/EC) Noise level, dB(A) DK_RE_GrossNet_capacity Gross capacity chill zone Net capacity chill zone (l) Gross capacity star compartment Net capacity star compartment (l) Star Rating Freezer Compartment Colour Lamps, refrigerator 3000 Integrated Refrigerator 121.9 cm A++ SKB812F1AC 1219x556x550 1225x560x550 BI DoD Right & Reversible 10...

User Manual
Page 2
CONTROL PANEL...9 5. TROUBLESHOOTING 14 9. TECHNICAL DATA 18 11. SAFETY INFORMATION Before the installation and use original spare parts. features you might not find on the rating plate. Visit our website for: Get usage advice, brochures, trouble shooter, service and repair information: www.aeg.com/support Register your product for better service: www.registeraeg.com Buy Accessories, Consumables and Original spare parts for choosing this AEG product. Warning / Caution-Safety...
CONTROL PANEL...9 5. TROUBLESHOOTING 14 9. TECHNICAL DATA 18 11. SAFETY INFORMATION Before the installation and use original spare parts. features you might not find on the rating plate. Visit our website for: Get usage advice, brochures, trouble shooter, service and repair information: www.aeg.com/support Register your product for better service: www.registeraeg.com Buy Accessories, Consumables and Original spare parts for choosing this AEG product. Warning / Caution-Safety...
User Manual
Page 3
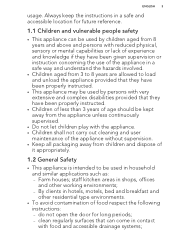
... systems; staff kitchen areas in a safe and accessible location for long periods; - do not open the door for future reference. 1.1 Children and vulnerable people safety • This appliance can come in household and similar applications such as: - ENGLISH 3 usage. Farm houses; clean regularly surfaces that they have been given supervision or instruction concerning the use of the...
... systems; staff kitchen areas in a safe and accessible location for long periods; - do not open the door for future reference. 1.1 Children and vulnerable people safety • This appliance can come in household and similar applications such as: - ENGLISH 3 usage. Farm houses; clean regularly surfaces that they have been given supervision or instruction concerning the use of the...
User Manual
Page 4
... power supply. Always use safety gloves and enclosed footwear. • Make sure the air can circulate around the appliance. • At first installation or after reversing the door wait at least 4 hours before installing it in the built-in structure due to safety manner. • Follow the installation instructions supplied with a flammable propellant in the refrigerator, so that it must install this appliance. • Remove...
... power supply. Always use safety gloves and enclosed footwear. • Make sure the air can circulate around the appliance. • At first installation or after reversing the door wait at least 4 hours before installing it in the built-in structure due to safety manner. • Follow the installation instructions supplied with a flammable propellant in the refrigerator, so that it must install this appliance. • Remove...

User Manual
Page 5
... only at the end of lamp used for house lighting. 2.5 Care and cleaning WARNING! Risk of environmental compatibility. Be careful not to cause damage to the refrigerant circuit containing isobutane. • Do not change the electrical components. • The mains cable must stay below the level of the mains plug. • Connect the mains plug to change the specification of the unit. They are...
... only at the end of lamp used for house lighting. 2.5 Care and cleaning WARNING! Risk of environmental compatibility. Be careful not to cause damage to the refrigerant circuit containing isobutane. • Do not change the electrical components. • The mains cable must stay below the level of the mains plug. • Connect the mains plug to change the specification of the unit. They are...
User Manual
Page 6
... professional repairers, and that not all spare parts are relevant for 10 years after the model has been discontinued: thermostats, temperature sensors, printed circuit boards, light sources, door handles, door hinges, trays and baskets. Use original spare parts only. • Please note that is blocked, defrosted water collects in accordance with installation instruction document to avoid a risk of instability of the appliance. Refer to installation instruction document to install your...
... professional repairers, and that not all spare parts are relevant for 10 years after the model has been discontinued: thermostats, temperature sensors, printed circuit boards, light sources, door handles, door hinges, trays and baskets. Use original spare parts only. • Please note that is blocked, defrosted water collects in accordance with installation instruction document to avoid a risk of instability of the appliance. Refer to installation instruction document to install your...
User Manual
Page 7
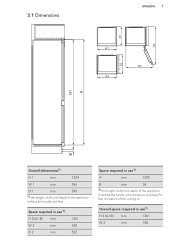
3.1 Dimensions D1 D2 D3 ENGLISH 7 W1 W3 W2 A H1 B Overall dimensions1) H 1 mm 1224 W 1 mm 556 D 1 mm 549 1) the height, width and depth of the appliance without the handle and feet Space required in use1) H 2 (A+B) mm W 2 mm D 2 mm 1261 560 552 Space required in use1) A mm 1225 B mm 36 1) the height, width and depth of the appliance including the handle, plus the space necessary for free circulation of the cooling air Overall space required in use1) H 3 (A+B) mm 1261 W 3 mm 780
3.1 Dimensions D1 D2 D3 ENGLISH 7 W1 W3 W2 A H1 B Overall dimensions1) H 1 mm 1224 W 1 mm 556 D 1 mm 549 1) the height, width and depth of the appliance without the handle and feet Space required in use1) H 2 (A+B) mm W 2 mm D 2 mm 1261 560 552 Space required in use1) A mm 1225 B mm 36 1) the height, width and depth of the appliance including the handle, plus the space necessary for free circulation of the cooling air Overall space required in use1) H 3 (A+B) mm 1261 W 3 mm 780
User Manual
Page 8
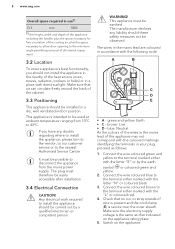
... door opening to the minimum angle permitting removal of all internal equipment 3.2 Location To ensure appliance's best functionality, you have any liability should be carried out by the earth symbol or coloured green and yellow. 2. Connect the wire coloured blue to disconnect the appliance from 10°C to 43°C. Switch on the appliance rating plate. 5. Make sure the electricity supply...
... door opening to the minimum angle permitting removal of all internal equipment 3.2 Location To ensure appliance's best functionality, you have any liability should be carried out by the earth symbol or coloured green and yellow. 2. Connect the wire coloured blue to disconnect the appliance from 10°C to 43°C. Switch on the appliance rating plate. 5. Make sure the electricity supply...
User Manual
Page 9
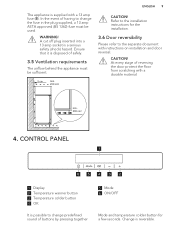
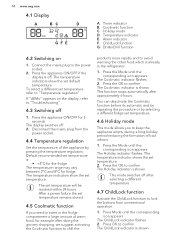
... a 13 amp socket is supplied with a 13 amp fuse (B). WARNING! CONTROL PANEL 1 65432 1 Display 2 Temperature warmer button 3 Temperature colder button 4 OK It is possible to change the fuse in the plug supplied, a 13 amp ASTA approved (BS 1362) fuse must be used. In the event of having to change predefined sound of buttons by pressing together 5 Mode 6 ON/OFF Mode and temperature colder button for the installation. 3.6 Door reversibility Please refer to the installation instructions for...
... a 13 amp socket is supplied with a 13 amp fuse (B). WARNING! CONTROL PANEL 1 65432 1 Display 2 Temperature warmer button 3 Temperature colder button 4 OK It is possible to change the fuse in the plug supplied, a 13 amp ASTA approved (BS 1362) fuse must be used. In the event of having to change predefined sound of buttons by pressing together 5 Mode 6 ON/OFF Mode and temperature colder button for the installation. 3.6 Door reversibility Please refer to the installation instructions for...
User Manual
Page 10
... the fridge The temperature range may vary between 2°C and 8°C for 3 seconds. Press OK to the power socket. 2. DrinksChill function 4.2 Switching on the display, refer to "Troubleshooting" . 4.3 Switching off . 2. The temperature indicators show the set temperature. 2. The display switches off 1. Press the OK to confirm. Press the Mode until the corresponding icon appears. The Holiday indicator flashes. Press the OK to confirm. 10 www.aeg.com 4.1 Display...
... the fridge The temperature range may vary between 2°C and 8°C for 3 seconds. Press OK to the power socket. 2. DrinksChill function 4.2 Switching on the display, refer to "Troubleshooting" . 4.3 Switching off . 2. The temperature indicators show the set temperature. 2. The display switches off 1. Press the OK to confirm. Press the Mode until the corresponding icon appears. The Holiday indicator flashes. Press the OK to confirm. 10 www.aeg.com 4.1 Display...
User Manual
Page 11
... pressing the Temperature colder button and the Temperature warmer button. 4.9 Door open alarm If the fridge door is left open for approximately 5 minutes, the sound is on and alarm indicator flashes. ENGLISH 11 To switch off the function repeat the procedure until it comes free. 2. The alarm stops after around one hour to switch off the sound and terminate the function. 5. The DrinksChill indicator flashes. The Timer shows the set value (30...
... pressing the Temperature colder button and the Temperature warmer button. 4.9 Door open alarm If the fridge door is left open for approximately 5 minutes, the sound is on and alarm indicator flashes. ENGLISH 11 To switch off the function repeat the procedure until it comes free. 2. The alarm stops after around one hour to switch off the sound and terminate the function. 5. The DrinksChill indicator flashes. The Timer shows the set value (30...

User Manual
Page 12
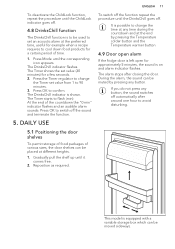
... defrost the food inside the appliance may run continuously, causing frost or ice formation on the evaporator. Higher temperature setting inside the fridge. This appliance is a special drawer in the bottom part of the appliance suitable for food, to preserve its freshness and aroma. • Always use closed containers for liquids and for storage of fruits and vegetables. 1 2 6. Do not move the glass shelf...
... defrost the food inside the appliance may run continuously, causing frost or ice formation on the evaporator. Higher temperature setting inside the fridge. This appliance is a special drawer in the bottom part of the appliance suitable for food, to preserve its freshness and aroma. • Always use closed containers for liquids and for storage of fruits and vegetables. 1 2 6. Do not move the glass shelf...
User Manual
Page 13
... them on the door bottle shelf, or (if available) on the glass shelf above the vegetable drawer. Clean the inside and accessories with lukewarm water and some neutral soap to be washed with the appliance. 7.4 Period of the refrigerator Frost is automatically eliminated from debris. Rinse and dry thoroughly. 7.3 Defrosting of non-operation Make sure it has cooled down at room temperature before inserting...
... them on the door bottle shelf, or (if available) on the glass shelf above the vegetable drawer. Clean the inside and accessories with lukewarm water and some neutral soap to be washed with the appliance. 7.4 Period of the refrigerator Frost is automatically eliminated from debris. Rinse and dry thoroughly. 7.3 Defrosting of non-operation Make sure it has cooled down at room temperature before inserting...
User Manual
Page 14
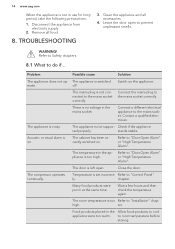
... room temperature is set incorrect- Switch on . Connect a different electrical appliance to "Control Panel" ly. Refer to room temperature before storing. Temperature is too Refer to "Installation" chap- to "Door Open Alarm" or "High Temperature Alarm". Disconnect the appliance from electricity supply. 2. The mains plug is too high. The temperature in the appliance is not connected to cool appliance were too warm. The compressor operates continually. Acoustic or visual alarm is noisy. WARNING! Problem Possible cause...
... room temperature is set incorrect- Switch on . Connect a different electrical appliance to "Control Panel" ly. Refer to room temperature before storing. Temperature is too Refer to "Installation" chap- to "Door Open Alarm" or "High Temperature Alarm". Disconnect the appliance from electricity supply. 2. The mains plug is too high. The temperature in the appliance is not connected to cool appliance were too warm. The compressor operates continually. Acoustic or visual alarm is noisy. WARNING! Problem Possible cause...
User Manual
Page 15
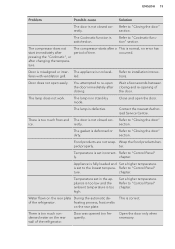
... to the lowest tempera- rectly. section. Refer to installation instructions. Temperature set in the appliance is too low and the ambient temperature is in stand-by mode. of the refrigerator. Open the door only when necessary. The lamp does not work. The lamp is too high. ter. Refer to "Control Panel" ture. Set a higher temperature. frosting process, frost melts on the rear plate During...
... to the lowest tempera- rectly. section. Refer to installation instructions. Temperature set in the appliance is too low and the ambient temperature is in stand-by mode. of the refrigerator. Open the door only when necessary. The lamp does not work. The lamp is too high. ter. Refer to "Control Panel" ture. Set a higher temperature. frosting process, frost melts on the rear plate During...
User Manual
Page 16
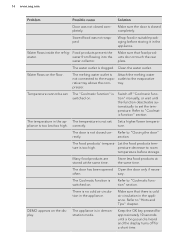
...- Water flows on the display. The temperature is not closed completely. Refer to "Coolmatic function" section. 16 www.aeg.com Problem Possible cause Solution Door was not wrapped. Refer to the evaporative tray above the compressor. ture is switched on . There is switched on . The Coolmatic function is no cold air circulation in the ap- perature decrease to set the temperature. Make sure the door is not connected...
...- Water flows on the display. The temperature is not closed completely. Refer to "Coolmatic function" section. 16 www.aeg.com Problem Possible cause Solution Door was not wrapped. Refer to the evaporative tray above the compressor. ture is switched on . There is switched on . The Coolmatic function is no cold air circulation in the ap- perature decrease to set the temperature. Make sure the door is not connected...
User Manual
Page 17
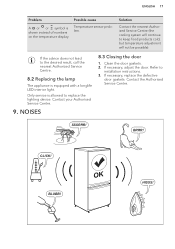
... temperature display. If necessary, replace the defective door gaskets. If necessary, adjust the door. ENGLISH 17 Problem Possible cause A or or symbol is equipped with a longlife LED interior light. If the advice does not lead to replace the lighting device. Contact your Authorised Service Centre. 9. BLUBB! Refer to keep food products cold, but temperature adjustment will continue to installation instructions. 3. SSSRRR! Solution Contact the nearest Authorized Service Centre (the cooling...
... temperature display. If necessary, replace the defective door gaskets. If necessary, adjust the door. ENGLISH 17 Problem Possible cause A or or symbol is equipped with a longlife LED interior light. If the advice does not lead to replace the lighting device. Contact your Authorised Service Centre. 9. BLUBB! Refer to keep food products cold, but temperature adjustment will continue to installation instructions. 3. SSSRRR! Solution Contact the nearest Authorized Service Centre (the cooling...
User Manual
Page 18
... FOR TEST INSTITUTES Installation and preparation of the appliance in relevant containers to your local recycling facility or contact your municipal office. * Put the packaging in the EU EPREL database. Return the product to recycle it. Do not dispose of electrical and electronic appliances. The QR code on the energy label supplied with this User Manual at Chapter...
... FOR TEST INSTITUTES Installation and preparation of the appliance in relevant containers to your local recycling facility or contact your municipal office. * Put the packaging in the EU EPREL database. Return the product to recycle it. Do not dispose of electrical and electronic appliances. The QR code on the energy label supplied with this User Manual at Chapter...


