Product Manual
Page 2
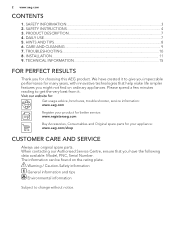
... minutes reading to get the very best from it to change without notice. TROUBLESHOOTING 10 8. Warning / Caution-Safety information General information and tips Environmental information Subject to give you impeccable performance for many years, with innovative technologies that you for your appliance: www.aeg.com/shop CUSTOMER CARE AND SERVICE Always use original spare parts. DAILY USE...7 5. INSTALLATION...11 9. SAFETY INFORMATION 3 2.
... minutes reading to get the very best from it to change without notice. TROUBLESHOOTING 10 8. Warning / Caution-Safety information General information and tips Environmental information Subject to give you impeccable performance for many years, with innovative technologies that you for your appliance: www.aeg.com/shop CUSTOMER CARE AND SERVICE Always use original spare parts. DAILY USE...7 5. INSTALLATION...11 9. SAFETY INFORMATION 3 2.
Product Manual
Page 3
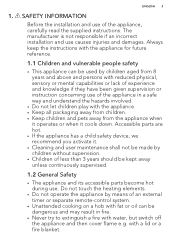
... and then cover flame e.g. The manufacturer is not responsible if an incorrect installation and use of the appliance, carefully read the supplied instructions. Always keep the instructions with the appliance for future reference. 1.1 Children and vulnerable people safety • This appliance can be used by means of an external timer or separate remote-control system. • Unattended cooking on a hob with...
... and then cover flame e.g. The manufacturer is not responsible if an incorrect installation and use of the appliance, carefully read the supplied instructions. Always keep the instructions with the appliance for future reference. 1.1 Children and vulnerable people safety • This appliance can be used by means of an external timer or separate remote-control system. • Unattended cooking on a hob with...
Product Manual
Page 4
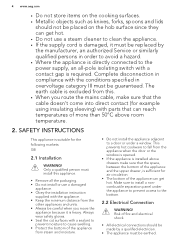
... that can get hot. • Do not use a damaged appliance. • Obey the installation instruction supplied with parts that the space, between the bottom of the appliance and the upper drawer, is heavy. Make sure to install a noncombustile separation panel under a window. Risk of fire and electrical shock. • All electrical connections should not be placed on the cooking surfaces. • Metallic...
... that can get hot. • Do not use a damaged appliance. • Obey the installation instruction supplied with parts that the space, between the bottom of the appliance and the upper drawer, is heavy. Make sure to install a noncombustile separation panel under a window. Risk of fire and electrical shock. • All electrical connections should not be placed on the cooking surfaces. • Metallic...
Product Manual
Page 5
... not use the appliance as a work surface or as a storage surface. • When you connect the appliance to the near sockets • Do not use . • Do not put cutlery or saucepan lids on the cooking zones. Make sure to connect the appliance according to requirements regarding adequate ventilation. 2.4 Use WARNING! Risk of injury, burns and electrical shock. • Remove all poles...
... not use the appliance as a work surface or as a storage surface. • When you connect the appliance to the near sockets • Do not use . • Do not put cutlery or saucepan lids on the cooking zones. Make sure to connect the appliance according to requirements regarding adequate ventilation. 2.4 Use WARNING! Risk of injury, burns and electrical shock. • Remove all poles...

Product Manual
Page 6
... dimensions of the burners. • Make sure the flame does not go out when you quickly turn the knob from the maximum to clean the appliance. • Clean the appliance with a moist soft cloth. 6 www.aeg.com heated objects away from fats and oils when you cook with them. • The vapours that very hot oil releases can cause spontaneous combustion. • Used...
... dimensions of the burners. • Make sure the flame does not go out when you quickly turn the knob from the maximum to clean the appliance. • Clean the appliance with a moist soft cloth. 6 www.aeg.com heated objects away from fats and oils when you cook with them. • The vapours that very hot oil releases can cause spontaneous combustion. • Used...
Product Manual
Page 7
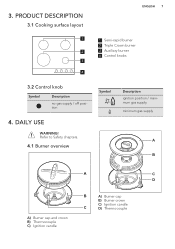
PRODUCT DESCRIPTION 3.1 Cooking surface layout 1 2 3 4 3.2 Control knob Symbol Description no gas supply / off position 4. 3. DAILY USE WARNING! Refer to Safety chapters. 4.1 Burner overview ENGLISH 7 1 Semi-rapid burner 2 Triple Crown burner 3 Auxiliary burner 4 Control knobs Symbol Description ignition position / maximum gas supply minimum gas supply A B A C D A) Burner cap and crown B) Thermocouple C) Ignition candle B A) Burner cap B) Burner crown C) Ignition candle C D) Thermocouple
PRODUCT DESCRIPTION 3.1 Cooking surface layout 1 2 3 4 3.2 Control knob Symbol Description no gas supply / off position 4. 3. DAILY USE WARNING! Refer to Safety chapters. 4.1 Burner overview ENGLISH 7 1 Semi-rapid burner 2 Triple Crown burner 3 Auxiliary burner 4 Control knobs Symbol Description ignition position / maximum gas supply minimum gas supply A B A C D A) Burner cap and crown B) Thermocouple C) Ignition candle B A) Burner cap B) Burner crown C) Ignition candle C D) Thermocouple
Product Manual
Page 8
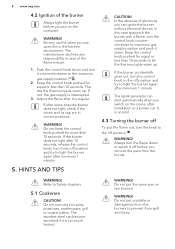
... the kitchen environment. Adjust the flame after minimum 1 minute. 5. If the burner does not light after 15 seconds, release the control knob, turn the control knob to light the burner again after it into off before you can ignite the burner without electrical device; The stainless steel can start automatically when you use cast iron pans, potstones, earthenware, grill or toaster plates. 8 www.aeg.com 4.2 Ignition of the burner Always light the burner before you remove the pans...
... the kitchen environment. Adjust the flame after minimum 1 minute. 5. If the burner does not light after 15 seconds, release the control knob, turn the control knob to light the burner again after it into off before you can ignite the burner without electrical device; The stainless steel can start automatically when you use cast iron pans, potstones, earthenware, grill or toaster plates. 8 www.aeg.com 4.2 Ignition of the burner Always light the burner before you remove the pans...
Product Manual
Page 9
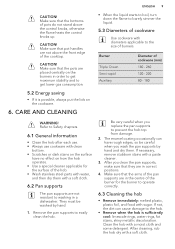
...: melted plastic, plastic foil, and food with a soft cloth. If necessary, remove stubborn stains with diameters applicable to barely simmer the liquid. 5.3 Diameters of the cooktop. CARE AND CLEANING • When the liquid starts to boil, turn down the flame to the size of the hob. • Wash stainless steel parts with water, and then dry them . If not, the dirt can...
...: melted plastic, plastic foil, and food with a soft cloth. If necessary, remove stubborn stains with diameters applicable to barely simmer the liquid. 5.3 Diameters of the cooktop. CARE AND CLEANING • When the liquid starts to boil, turn down the flame to the size of the hob. • Wash stainless steel parts with water, and then dry them . If not, the dirt can...
Product Manual
Page 10
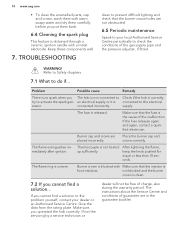
... that the fuse is uneven. The flame extinguishes immediately after ignition. The instructions about the Service Centre and conditions of the malfunction. Make sure that the injector is not heated up sufficiently. Place the burner cap and crown correctly. connected incorrectly. If not the servicing by a service technician or dealer will not be free of the gas supply pipe and the pressure adjuster, if fitted...
... that the fuse is uneven. The flame extinguishes immediately after ignition. The instructions about the Service Centre and conditions of the malfunction. Make sure that the injector is not heated up sufficiently. Place the burner cap and crown correctly. connected incorrectly. If not the servicing by a service technician or dealer will not be free of the gas supply pipe and the pressure adjuster, if fitted...
Product Manual
Page 11
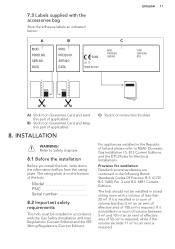
... on Guarantee Card and send this part (if applicable). 8. C) Stick it is installed in a room of volume between 5 m³ and 10 m³ an air vent of effective area of the hob. SER.NO. Model PNC Serial number 8.2 Important safety requirements This hob must be installed in accordance with the Gas Safety (Installation and Use) Regulations (Current Edition) and the IEE Wiring Regulations (Current Edition). PROD.NO. PROD...
... on Guarantee Card and send this part (if applicable). 8. C) Stick it is installed in a room of volume between 5 m³ and 10 m³ an air vent of effective area of the hob. SER.NO. Model PNC Serial number 8.2 Important safety requirements This hob must be installed in accordance with the Gas Safety (Installation and Use) Regulations (Current Edition) and the IEE Wiring Regulations (Current Edition). PROD.NO. PROD...

Product Manual
Page 12
... shower room. Screw the parts together without using metal rigid pipes (copper with the shoulder on the hob and installation. Be careful they are other safety instructions incorporated in the Republic of Ireland please refer to ISO 10380 and ISO 10807 standards. For appliances installed in line with the edges of Appliance. 8.3 Gas Connection WARNING! The minimum distance combustible material can...
... shower room. Screw the parts together without using metal rigid pipes (copper with the shoulder on the hob and installation. Be careful they are other safety instructions incorporated in the Republic of Ireland please refer to ISO 10380 and ISO 10807 standards. For appliances installed in line with the edges of Appliance. 8.3 Gas Connection WARNING! The minimum distance combustible material can...
Product Manual
Page 13
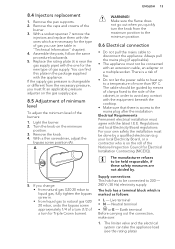
.... Electrical Requirements Permanent electrical installation must not be connected to the side of the National Inspection Council for the type of the burners: 1. Light the burner. 2. Remove the pan supports. 2. The hob has a terminal block which are not abided by a qualified electrician (e.g. ENGLISH 13 WARNING! your own safety the installation must fit an applicable pressure adjuster on the gas supply pipe. 8.5 Adjustment of minimum level To adjust the minimum level of gas you...
.... Electrical Requirements Permanent electrical installation must not be connected to the side of the National Inspection Council for the type of the burners: 1. Light the burner. 2. Remove the pan supports. 2. The hob has a terminal block which are not abided by a qualified electrician (e.g. ENGLISH 13 WARNING! your own safety the installation must fit an applicable pressure adjuster on the gas supply pipe. 8.5 Adjustment of minimum level To adjust the minimum level of gas you...
Product Manual
Page 14
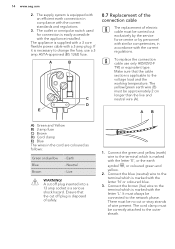
... working temperature. Make sure that the cut off plug is marked with the current standards and regulations 3. Connect the blue (neutral) wire to change the fuse, use only H05V2V2-F T90 or equivalent type. AB A) Green and Yellow B) 3 amp fuse C) Brown D) Cord clamp E) Blue The wires in compliance with the letter 'E', or the earth symbol , or coloured green and yellow. 2. The outlet or omnipolar switch used...
... working temperature. Make sure that the cut off plug is marked with the current standards and regulations 3. Connect the blue (neutral) wire to change the fuse, use only H05V2V2-F T90 or equivalent type. AB A) Green and Yellow B) 3 amp fuse C) Brown D) Cord clamp E) Blue The wires in compliance with the letter 'E', or the earth symbol , or coloured green and yellow. 2. The outlet or omnipolar switch used...
Product Manual
Page 15
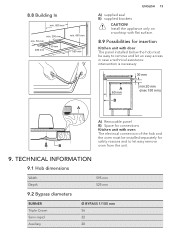
... (max 150 mm) A) Removable panel B) Space for connections Kitchen unit with oven The electrical connection of the hob and the oven must be installed separately for safety reasons and to let easy remove B oven from the unit. 9. 8.8 Building In min. 600 mm min. 200 mm min. 55 mm 480 mm 30 mm min. 650 mm 560 mm A ENGLISH 15 A) supplied seal B) supplied brackets CAUTION!
... (max 150 mm) A) Removable panel B) Space for connections Kitchen unit with oven The electrical connection of the hob and the oven must be installed separately for safety reasons and to let easy remove B oven from the unit. 9. 8.8 Building In min. 600 mm min. 200 mm min. 55 mm 480 mm 30 mm min. 650 mm 560 mm A ENGLISH 15 A) supplied seal B) supplied brackets CAUTION!
Product Manual
Page 16
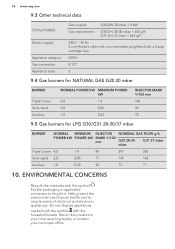
....aeg.com 9.3 Other technical data TOTAL POWER: Electric supply: Appliance category: Gas connection: Appliance class: Gas original: G20 (2H) 20 mbar = 9 kW Gas replacement: G30 (3+) 28-30 mbar = 654 g/h G31 (3+) 37 mbar = 643 g/h 230 V ~ 50 Hz 3 core flexible cable with non rewireable plug fitted with the symbol . ENVIRONMENTAL CONCERNS Recycle the materials with a 3 amp cartridge fuse II2H3+ R 1/2" 3 9.4 Gas burners for NATURAL GAS G20 20 mbar BURNER...
....aeg.com 9.3 Other technical data TOTAL POWER: Electric supply: Appliance category: Gas connection: Appliance class: Gas original: G20 (2H) 20 mbar = 9 kW Gas replacement: G30 (3+) 28-30 mbar = 654 g/h G31 (3+) 37 mbar = 643 g/h 230 V ~ 50 Hz 3 core flexible cable with non rewireable plug fitted with the symbol . ENVIRONMENTAL CONCERNS Recycle the materials with a 3 amp cartridge fuse II2H3+ R 1/2" 3 9.4 Gas burners for NATURAL GAS G20 20 mbar BURNER...


