Product Manual
Page 2
... USE...9 5. INSTALLATION...18 9. SAFETY INSTRUCTIONS 4 3. HINTS AND TIPS...12 6. We have created it . Please spend a few minutes reading to get the very best from it to change without notice. Visit our website for: Get usage advice, brochures, trouble shooter, service information: www.aeg.com Register your product for better service: www.registeraeg.com Buy Accessories, Consumables and Original spare parts...
... USE...9 5. INSTALLATION...18 9. SAFETY INSTRUCTIONS 4 3. HINTS AND TIPS...12 6. We have created it . Please spend a few minutes reading to get the very best from it to change without notice. Visit our website for: Get usage advice, brochures, trouble shooter, service information: www.aeg.com Register your product for better service: www.registeraeg.com Buy Accessories, Consumables and Original spare parts...

Product Manual
Page 3
... . • Cleaning and user maintenance shall not be kept away unless continuously supervised. 1.2 General Safety • The appliance and its accessible parts become hot during use of the appliance, carefully read the supplied instructions. Do not touch the heating elements. • Do not operate the appliance by means of an external timer or separate remote-control system. • Unattended cooking on a hob with...
... . • Cleaning and user maintenance shall not be kept away unless continuously supervised. 1.2 General Safety • The appliance and its accessible parts become hot during use of the appliance, carefully read the supplied instructions. Do not touch the heating elements. • Do not operate the appliance by means of an external timer or separate remote-control system. • Unattended cooking on a hob with...
Product Manual
Page 4
... is directly connected to the power supply, an all the packaging. • Do not install or use a damaged appliance. do not rely on the hob surface since they can reach temperatures of hotplate glass breakage: - Only a qualified person must be placed on the pan detector. • If the glass ceramic surface / glass surface is damaged, it must be replaced by the manufacturer, an authorized Service or...
... is directly connected to the power supply, an all the packaging. • Do not install or use a damaged appliance. do not rely on the hob surface since they can reach temperatures of hotplate glass breakage: - Only a qualified person must be placed on the pan detector. • If the glass ceramic surface / glass surface is damaged, it must be replaced by the manufacturer, an authorized Service or...
Product Manual
Page 5
... become too hot. • Use the correct electricity mains cable. Make sure to install a noncombustile separation panel under a window. Loose and incorrect electricity mains cable or plug (if applicable) can get hot. The isolation device must be earthed. • Before carrying out any operation make sure that the local distribution conditions (nature of the gas and gas pressure) and the adjustment of the...
... become too hot. • Use the correct electricity mains cable. Make sure to install a noncombustile separation panel under a window. Loose and incorrect electricity mains cable or plug (if applicable) can get hot. The isolation device must be earthed. • Before carrying out any operation make sure that the local distribution conditions (nature of the gas and gas pressure) and the adjustment of the...
Product Manual
Page 6
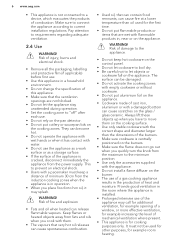
... you quickly turn the knob from the maximum to the minimum position. • Use only the accessories supplied with the appliance. • Do not install a flame diffuser on the burner. • The use of a gas cooking appliance results in the production of heat and moisture. They can cause fire at a lower temperature than the dimensions of the burners. • Make sure cookware is not connected...
... you quickly turn the knob from the maximum to the minimum position. • Use only the accessories supplied with the appliance. • Do not install a flame diffuser on the burner. • The use of a gas cooking appliance results in the production of heat and moisture. They can cause fire at a lower temperature than the dimensions of the burners. • Make sure cookware is not connected...
Product Manual
Page 7
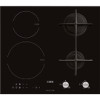
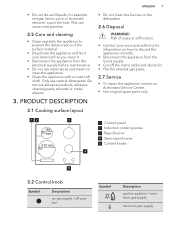
...; Use original spare parts only. 3.1 Cooking surface layout 12 140 mm 210 mm 3 1 Control panel 2 Induction cooking zones 3 Rapid burner 4 Semi-rapid burner 5 Control knobs 4 5 3.2 Control knob Symbol Description no gas supply / off position Symbol Description ignition position / maximum gas supply minimum gas supply ENGLISH 7 • Do not let acid liquids, for information on how to discard the appliance correctly. • Disconnect the appliance from the electrical supply before you clean...
...; Use original spare parts only. 3.1 Cooking surface layout 12 140 mm 210 mm 3 1 Control panel 2 Induction cooking zones 3 Rapid burner 4 Semi-rapid burner 5 Control knobs 4 5 3.2 Control knob Symbol Description no gas supply / off position Symbol Description ignition position / maximum gas supply minimum gas supply ENGLISH 7 • Do not let acid liquids, for information on how to discard the appliance correctly. • Disconnect the appliance from the electrical supply before you clean...
Product Manual
Page 9
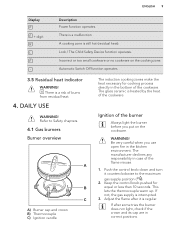
... still hot (residual heat). Push the control knob down and turn it is heated by the heat of the flame misuse. 1. This lets the thermocouple warm up. Adjust the flame after some tries the burner does not light, check if the crown and its cap are in the kitchen environment. Keep the control knob pushed for cooking process directly in the bottom of the burner Always light the burner before you use...
... still hot (residual heat). Push the control knob down and turn it is heated by the heat of the flame misuse. 1. This lets the thermocouple warm up. Adjust the flame after some tries the burner does not light, check if the crown and its cap are in the kitchen environment. Keep the control knob pushed for cooking process directly in the bottom of the burner Always light the burner before you use...

Product Manual
Page 10
... gas supply position and push it down. WARNING! The spark generator can ignite the burner without electrical device; If the burner does not light after 6 hours 5 hours 4 hours 1.5 hour The heat setting Touch to deactivate the cooking zone. Let the cooking zone cool down or switch it into off position . 10 www.aeg.com WARNING! Always turn the control knob to the off before you use the hob...
... gas supply position and push it down. WARNING! The spark generator can ignite the burner without electrical device; If the burner does not light after 6 hours 5 hours 4 hours 1.5 hour The heat setting Touch to deactivate the cooking zone. Let the cooking zone cool down or switch it into off position . 10 www.aeg.com WARNING! Always turn the control knob to the off before you use the hob...
Product Manual
Page 12
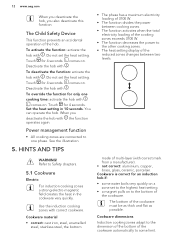
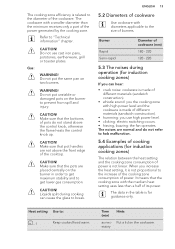
To activate the function: activate the hob with . To deactivate the function: activate the hob with . To override the function for 4 seconds. Set the heat setting in the cookware very quickly. Use the induction cooking zones with correct mark from a manufacturer). • not correct: aluminium, copper, brass, glass, ceramic, porcelain. The bottom of the hob. Do not set the heat setting. Touch for only one phase...
To activate the function: activate the hob with . To deactivate the function: activate the hob with . To override the function for 4 seconds. Set the heat setting in the cookware very quickly. Use the induction cooking zones with correct mark from a manufacturer). • not correct: aluminium, copper, brass, glass, ceramic, porcelain. The bottom of the hob. Do not set the heat setting. Touch for only one phase...
Product Manual
Page 13
... to the size of burners. Do not put the same pan on the cookware. Make sure that the cooking zone with the medium heat setting uses less than the minimum receives only a part of the power generated by the cooking zone. The cooking zone efficiency is made of different materials (sandwich construction). • whistle sound: you the cooking zone with high power level and the...
... to the size of burners. Do not put the same pan on the cookware. Make sure that the cooking zone with the medium heat setting uses less than the minimum receives only a part of the power generated by the cooking zone. The cooking zone efficiency is made of different materials (sandwich construction). • whistle sound: you the cooking zone with high power level and the...
Product Manual
Page 14
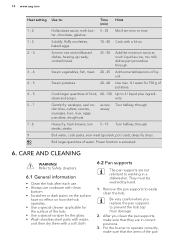
... each use. • Always use cookware with clean bottom. • Scratches or dark stains on the surface have no effect on . For the burner to washing in correct positions. 3. 14 www.aeg.com Heat setting 1 - 2. 1 - 2. 2. - 3. 3. - 4. 4. - 5. 4. - 5. 5. - 7 7 - 8 9 Use to: Time (min) Hints Hollandaise sauce, melt: but- 5 - 25 ter, chocolate, gelatine. Steam potatoes. 20 - 60 Use max. ¼ l water for the glass. • Wash stainless steel parts...
... each use. • Always use cookware with clean bottom. • Scratches or dark stains on the surface have no effect on . For the burner to washing in correct positions. 3. 14 www.aeg.com Heat setting 1 - 2. 1 - 2. 2. - 3. 3. - 4. 4. - 5. 4. - 5. 5. - 7 7 - 8 9 Use to: Time (min) Hints Hollandaise sauce, melt: but- 5 - 25 ter, chocolate, gelatine. Steam potatoes. 20 - 60 Use max. ¼ l water for the glass. • Wash stainless steel parts...
Product Manual
Page 15
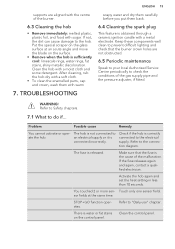
.... Clean the control panel. Clean the hob with warm 7. Refer to Safety chapters. 7.1 What to the hob. Check if the hob is released. There is obtained through a ceramic ignition candle with sugar. After cleaning, rub the hob dry with a soft cloth. • To clean the enamelled parts, cap and crown, wash them back. 6.4 Cleaning the spark plug This feature is water or fat stains on the glass surface at...
.... Clean the control panel. Clean the hob with warm 7. Refer to Safety chapters. 7.1 What to the hob. Check if the hob is released. There is obtained through a ceramic ignition candle with sugar. After cleaning, rub the hob dry with a soft cloth. • To clean the enamelled parts, cap and crown, wash them back. 6.4 Cleaning the spark plug This feature is water or fat stains on the glass surface at...
Product Manual
Page 16
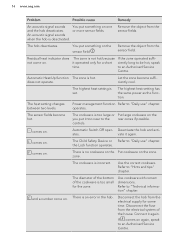
... power as the function. The cookware is set. Refer to "Daily use " chapter. Disconnect the fuse from the sensor field. Connect it again. Residual heat indicator does not come on. Let the zone become hot. comes on . vate it again. zone. There is deactivated. An acoustic signal sounds when the hob is an error in the hob. Remove the object from the electrical...
... power as the function. The cookware is set. Refer to "Daily use " chapter. Disconnect the fuse from the sensor field. Connect it again. Residual heat indicator does not come on. Let the zone become hot. comes on . vate it again. zone. There is deactivated. An acoustic signal sounds when the hob is an error in the hob. Remove the object from the electrical...
Product Manual
Page 17
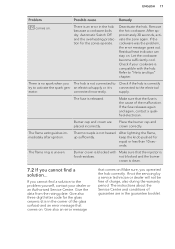
... the warranty period. not blocked and the burner crown is clean. 7.2 If you The hob is not connected to the electrical erator. If not the servicing by a service technician or dealer will not be free of the malfunction. If the cookware was the problem, the error message goes out. Let the cookware become sufficiently cool. After lightning the flame, keep the knob pushed...
... the warranty period. not blocked and the burner crown is clean. 7.2 If you The hob is not connected to the electrical erator. If not the servicing by a service technician or dealer will not be free of the malfunction. If the cookware was the problem, the error message goes out. Let the cookware become sufficiently cool. After lightning the flame, keep the knob pushed...
Product Manual
Page 18
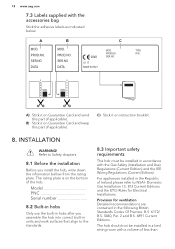
... this part (if applicable). INSTALLATION WARNING! Refer to the standards. 8.3 Important safety requirements This hob must be installed in a bed sitting room with the accessories bag Stick the adhesive labels as indicated below: A B C MOD. Model PNC Serial number 8.2 Built-in hobs Only use the built-in hobs after you assemble the hob into correct built-in accordance with the Gas Safety (Installation and Use) Regulations (Current Edition) and the IEE Wiring Regulations...
... this part (if applicable). INSTALLATION WARNING! Refer to the standards. 8.3 Important safety requirements This hob must be installed in a bed sitting room with the accessories bag Stick the adhesive labels as indicated below: A B C MOD. Model PNC Serial number 8.2 Built-in hobs Only use the built-in hobs after you assemble the hob into correct built-in accordance with the Gas Safety (Installation and Use) Regulations (Current Edition) and the IEE Wiring Regulations...
Product Manual
Page 19
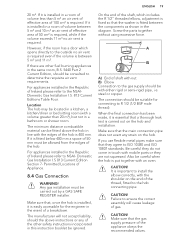
... room has a door which includes the R 1/2" threaded elbow, adjustment is required. Location The hob may be careful when the hob is put together with a volume greater than 5 m³ an air vent of effective area of the shaft, which opens directly to NSAI- Screw the parts together without using excessive force. Also be located in a bathroom or shower room. On the end of...
... room has a door which includes the R 1/2" threaded elbow, adjustment is required. Location The hob may be careful when the hob is put together with a volume greater than 5 m³ an air vent of effective area of the shaft, which opens directly to NSAI- Screw the parts together without using excessive force. Also be located in a bathroom or shower room. On the end of...

Product Manual
Page 20
... not let the power cable to heat up to the mains plug after the installation. If the supply gas pressure is equipped with the appliance. If you change: • from natural gas G20 20 mbar to 230 - 240 V ( 50 Hz) electricity supply. The manufacturer refuses to be connected to liquid gas, fully tighten the bypass screw in Remove the pan supports. 2. Remove the knob. 4. The supply system...
... not let the power cable to heat up to the mains plug after the installation. If the supply gas pressure is equipped with the appliance. If you change: • from natural gas G20 20 mbar to 230 - 240 V ( 50 Hz) electricity supply. The manufacturer refuses to be connected to liquid gas, fully tighten the bypass screw in Remove the pan supports. 2. Remove the knob. 4. The supply system...
Product Manual
Page 21
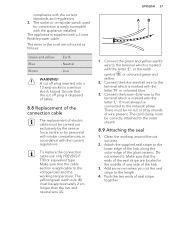
... omnipolar switch used for connection is disposed of safely. 8.8 Replacement of the connection cable The replacement of wire present. The appliance is applicable to the lower edge of the hob along the outer edge of seal stripe together. Live WARNING! Attach the supplied seal stripe to the voltage load and the working temperature. Make sure that the cut off plug inserted into a 13 amp...
... omnipolar switch used for connection is disposed of safely. 8.8 Replacement of the connection cable The replacement of wire present. The appliance is applicable to the lower edge of the hob along the outer edge of seal stripe together. Live WARNING! Attach the supplied seal stripe to the voltage load and the working temperature. Make sure that the cut off plug inserted into a 13 amp...
Product Manual
Page 24
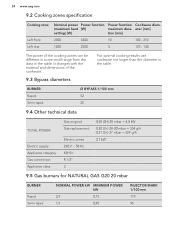
... For optimal cooking results use cookware not larger than the diameter in the table. 24 www.aeg.com 9.2 Cooking zones specification Cooking zone Left front Left rear Nominal power Power function Power function Cookware diam- (maximum heat [W] maximum dura- BURNER Rapid Semi-rapid Ø BYPASS 1/100 mm 52 32 9.4 Other technical data TOTAL POWER: Electric supply: Appliance category: Gas connection: Appliance class: Gas original: Gas replacement: Electric zones: 230...
... For optimal cooking results use cookware not larger than the diameter in the table. 24 www.aeg.com 9.2 Cooking zones specification Cooking zone Left front Left rear Nominal power Power function Power function Cookware diam- (maximum heat [W] maximum dura- BURNER Rapid Semi-rapid Ø BYPASS 1/100 mm 52 32 9.4 Other technical data TOTAL POWER: Electric supply: Appliance category: Gas connection: Appliance class: Gas original: Gas replacement: Electric zones: 230...
Product Manual
Page 25
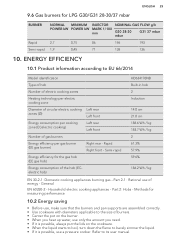
... BURNER Rapid Semi-rapid NORMAL MINIMUM INJECTOR NOMINAL GAS FLOW g/h POWER kW POWER kW MARK 1/100 mm G30 28-30 mbar G31 37 mbar 2,7 0,75 86 196 193 1,9 0,45 71 138 136 10. Part 2-1 : Rational use a pressure cooker. Rapid Right front - General EN 60350-2 - Part 2: Hobs - ENERGY EFFICIENCY 10.1 Product information according to EU 66/2014 Model identification Type of hob HD634170NB Built-in hob Number of electric cooking zones Heating...
... BURNER Rapid Semi-rapid NORMAL MINIMUM INJECTOR NOMINAL GAS FLOW g/h POWER kW POWER kW MARK 1/100 mm G30 28-30 mbar G31 37 mbar 2,7 0,75 86 196 193 1,9 0,45 71 138 136 10. Part 2-1 : Rational use a pressure cooker. Rapid Right front - General EN 60350-2 - Part 2: Hobs - ENERGY EFFICIENCY 10.1 Product information according to EU 66/2014 Model identification Type of hob HD634170NB Built-in hob Number of electric cooking zones Heating...


