Specification Sheet
Page 1
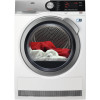
... to unnecessary heat. Redefining tumble drying for every fabric in energy used. •Heat pump condenser dryer •ProTex soft drum •Delay start option •Sensor dryer •Time controlled drying •Bed linen programme •Cotton programmes •Synthetics programmes •Easy iron programme •Wool care programme •Sports programme •Reverse tumble action •Child safety •Optional stacking kit available Technical Specs : • Energy efficiency (2010...
... to unnecessary heat. Redefining tumble drying for every fabric in energy used. •Heat pump condenser dryer •ProTex soft drum •Delay start option •Sensor dryer •Time controlled drying •Bed linen programme •Cotton programmes •Synthetics programmes •Easy iron programme •Wool care programme •Sports programme •Reverse tumble action •Child safety •Optional stacking kit available Technical Specs : • Energy efficiency (2010...
User Manual
Page 2
... not find on the rating plate. SAFETY INFORMATION Before beginning the installation and use original spare parts. SAFETY INSTRUCTIONS 5 3. CARE AND CLEANING 16 11. TROUBLESHOOTING 19 12. PROGRAMME...9 6. TECHNICAL DATA 20 13. 2 www.aeg.com CONTENTS 1. PRODUCT DESCRIPTION 7 4. Please spend a few minutes reading to change without notice. 1. Visit our website for: Get usage advice, brochures, trouble shooter, service information: www.aeg.com/webselfservice Register...
... not find on the rating plate. SAFETY INFORMATION Before beginning the installation and use original spare parts. SAFETY INSTRUCTIONS 5 3. CARE AND CLEANING 16 11. TROUBLESHOOTING 19 12. PROGRAMME...9 6. TECHNICAL DATA 20 13. 2 www.aeg.com CONTENTS 1. PRODUCT DESCRIPTION 7 4. Please spend a few minutes reading to change without notice. 1. Visit our website for: Get usage advice, brochures, trouble shooter, service information: www.aeg.com/webselfservice Register...
User Manual
Page 3
The stacking kit, available from your authorized vendor, can be activated. • Children shall not carry out cleaning and user maintenance of the appliance without supervision. 1.2 General Safety • Do not change the specification of this appliance. • If the tumble dryer is not responsible for future reference. - ENGLISH 3 manufacturer is put on top of a washing machine, use of the appliance...
The stacking kit, available from your authorized vendor, can be activated. • Children shall not carry out cleaning and user maintenance of the appliance without supervision. 1.2 General Safety • Do not change the specification of this appliance. • If the tumble dryer is not responsible for future reference. - ENGLISH 3 manufacturer is put on top of a washing machine, use of the appliance...

User Manual
Page 4
... "Programme chart" chapter). • Do not use . • Do not dry unwashed items in the tumble dryer. 4 www.aeg.com • The appliance can be installed as timer, or connected to a circuit that has accumulated around the appliance. • Do not run the appliance without a filter. Make sure that the mains plug is accessible after each use the appliance if items have been...
... "Programme chart" chapter). • Do not use . • Do not dry unwashed items in the tumble dryer. 4 www.aeg.com • The appliance can be installed as timer, or connected to a circuit that has accumulated around the appliance. • Do not run the appliance without a filter. Make sure that the mains plug is accessible after each use the appliance if items have been...
User Manual
Page 5
... care when moving the appliance as it is not, adjust the feet accordingly. 2.2 Electrical connection WARNING! ENGLISH 5 • Items that the items will not be washed in hot water with an extra amount of detergent before the end of fire and electrical shock. SAFETY INSTRUCTIONS 2.1 Installation • Remove all the packaging. • Do not install or use the appliance where the temperature...
... care when moving the appliance as it is not, adjust the feet accordingly. 2.2 Electrical connection WARNING! ENGLISH 5 • Items that the items will not be washed in hot water with an extra amount of detergent before the end of fire and electrical shock. SAFETY INSTRUCTIONS 2.1 Installation • Remove all the packaging. • Do not install or use the appliance where the temperature...
User Manual
Page 6
... replace the internal light, contact the Authorised Service Centre. 2.5 Care and cleaning WARNING! Risk of the mains power supply. • Always use a correctly installed shockproof socket. • Do not use any abrasive products, abrasive cleaning pads, solvents or metal objects. • To prevent damage to the cooling system be careful when you start the dryer. • Do not drink or prepare food with a stain remover start...
... replace the internal light, contact the Authorised Service Centre. 2.5 Care and cleaning WARNING! Risk of the mains power supply. • Always use a correctly installed shockproof socket. • Do not use any abrasive products, abrasive cleaning pads, solvents or metal objects. • To prevent damage to the cooling system be careful when you start the dryer. • Do not drink or prepare food with a stain remover start...

User Manual
Page 7
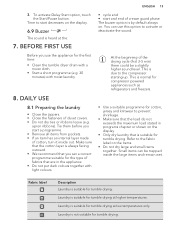
PRODUCT DESCRIPTION 1 2 ENGLISH 7 3 4 5 6 7 10 8 9 1 Water container 2 Control panel 3 Internal light 4 Appliance door 5 Filter 6 Rating plate For ease of loading laundry or ease of installation the door is reversible. (see separate leaflet). 7 Airflow slots 8 Condenser lid 9 Condenser cover 10 Adjustable feet 3.
PRODUCT DESCRIPTION 1 2 ENGLISH 7 3 4 5 6 7 10 8 9 1 Water container 2 Control panel 3 Internal light 4 Appliance door 5 Filter 6 Rating plate For ease of loading laundry or ease of installation the door is reversible. (see separate leaflet). 7 Airflow slots 8 Condenser lid 9 Condenser cover 10 Adjustable feet 3.
User Manual
Page 9
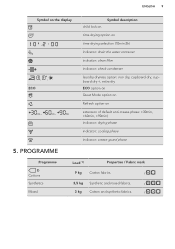
... the display - ,, , ECO , , child lock on Symbol description time drying option on time drying selection (10min-2h) indicator: drain the water container indicator: clean filter indicator: check condenser laundry dryness option: iron dry, cupboard dry, cupboard dry +, extra dry ECO option on Quiet Mode option on Refresh option on extension of default anti-crease phase: +30min, +60min, +90min) indicator: drying phase indicator: cooling phase indicator: crease...
... the display - ,, , ECO , , child lock on Symbol description time drying option on time drying selection (10min-2h) indicator: drain the water container indicator: clean filter indicator: check condenser laundry dryness option: iron dry, cupboard dry, cupboard dry +, extra dry ECO option on Quiet Mode option on Refresh option on extension of default anti-crease phase: +30min, +60min, +90min) indicator: drying phase indicator: cooling phase indicator: crease...
User Manual
Page 10
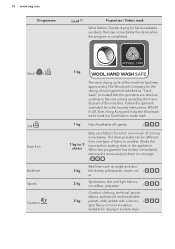
... garments labelled as single and double sheets, pillowcases, duvet cov- / er. 2 kg Sportswear, thin and light fabrics, microfiber, polyester. / 2 kg Outdoor clothing, technical, sports fabrics, waterproof and breathable jackets, shell jackets with a remov- / able fleece or inner insulation. The drying results can be different from one type of fabric to the instructions issued by The Woolmark Company for...
... garments labelled as single and double sheets, pillowcases, duvet cov- / er. 2 kg Sportswear, thin and light fabrics, microfiber, polyester. / 2 kg Outdoor clothing, technical, sports fabrics, waterproof and breathable jackets, shell jackets with a remov- / able fleece or inner insulation. The drying results can be different from one type of fabric to the instructions issued by The Woolmark Company for...
User Manual
Page 12
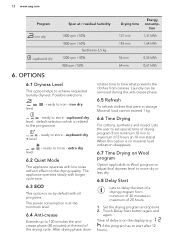
... load cannot exceed 1 kg. 6.6 Time Drying For cottons, synthetics and mixed. Set the drying program and options. 2. The appliance operates slowly with longer cycle time. 6.3 ECO This option is on by default with low noise without effect on Wool program Option applicable to Wool program to adjust final dryness level to more dry or less dry. 6.8 Delay Start Lets to delay the start...
... load cannot exceed 1 kg. 6.6 Time Drying For cottons, synthetics and mixed. Set the drying program and options. 2. The appliance operates slowly with longer cycle time. 6.3 ECO This option is on by default with low noise without effect on Wool program Option applicable to Wool program to adjust final dryness level to more dry or less dry. 6.8 Delay Start Lets to delay the start...
User Manual
Page 13
... for compressor powered appliances such as refrigerators and freezers. • Use a suitable programme for cotton, jersey and knitwear to prevent shrinkage. • Make sure that is suitable for the first time: • Clean the tumble dryer drum with a moist cloth. • Start a short programme (e.g. 30 minutes) with light colours. 3. Time to the compressor starting up. Tie them before you start and end...
... for compressor powered appliances such as refrigerators and freezers. • Use a suitable programme for cotton, jersey and knitwear to prevent shrinkage. • Make sure that is suitable for the first time: • Clean the tumble dryer drum with a moist cloth. • Start a short programme (e.g. 30 minutes) with light colours. 3. Time to the compressor starting up. Tie them before you start and end...

User Manual
Page 14
... complete the program comes into the view on the appliance. The drying time you can set 1 or more than 5 kg is related to set the program. When the option is related to the view on the display. Pull open the appliance door. 2. Push the On/Off button to turn on the display. 8.4 Auto Off function To decrease the energy consumption, the Auto...
... complete the program comes into the view on the appliance. The drying time you can set 1 or more than 5 kg is related to set the program. When the option is related to the view on the display. Pull open the appliance door. 2. Push the On/Off button to turn on the display. 8.4 Auto Off function To decrease the energy consumption, the Auto...
User Manual
Page 15
.... 2. Turn the dryer on the display. 4. Touch and hold down 2 buttons at the same time. Set a new program. 8.10 Program end Clean the filter and drain the water container after each drying cycle. (See chapter CARE AND CLEANING.) If the drying cycle is unavailable. Laundry can be set to turn on . 8.9 Program change To change a program: 1. The child lock option locks all programs). the appliance cannot start the program: Touch the Start/Pause button...
.... 2. Turn the dryer on the display. 4. Touch and hold down 2 buttons at the same time. Set a new program. 8.10 Program end Clean the filter and drain the water container after each drying cycle. (See chapter CARE AND CLEANING.) If the drying cycle is unavailable. Laundry can be set to turn on . 8.9 Program change To change a program: 1. The child lock option locks all programs). the appliance cannot start the program: Touch the Start/Pause button...

User Manual
Page 16
... draining kit is installed the water container is off if the symbol appears - Touch and hold down the Quiet Mode and Refresh buttons at the same time. Open the door. CARE AND CLEANING 10.1 Cleaning the filter At the end of each cycle the Filter symbol comes on the display and you reach the desired dryness level. It illuminates at the end of the drying cycle...
... draining kit is installed the water container is off if the symbol appears - Touch and hold down the Quiet Mode and Refresh buttons at the same time. Open the door. CARE AND CLEANING 10.1 Cleaning the filter At the end of each cycle the Filter symbol comes on the display and you reach the desired dryness level. It illuminates at the end of the drying cycle...
User Manual
Page 17
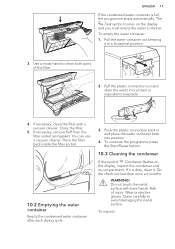
.... Clean carefully to clean both parts of injury. To empty the water container: 1. Pull the plastic connection out and drain the water into position. 4. If necessary, clean the filter with bare hands. Do not touch the metal surface with a vacuum cleaner. Use a moist hand to avoid damaging the metal surface. You can use a vacuum cleaner. To continue the programme press the Start...
.... Clean carefully to clean both parts of injury. To empty the water container: 1. Pull the plastic connection out and drain the water into position. 4. If necessary, clean the filter with bare hands. Do not touch the metal surface with a vacuum cleaner. Use a moist hand to avoid damaging the metal surface. You can use a vacuum cleaner. To continue the programme press the Start...
User Manual
Page 18
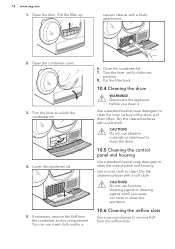
Open the door. vacuum cleaner with a soft cloth. If necessary, remove the fluff from the airflow slots. Put the filter back. 10.4 Cleaning the drum WARNING! Dry the cleaned surfaces with a brush attachment. 2. CAUTION! Open the condenser cover. 3. Turn the lever to clean the inner surface of the drum and drum lifters. You can cause corrosion to clean the appliance. 10.6 Cleaning the airflow slots Use a vacuum cleaner to...
Open the door. vacuum cleaner with a soft cloth. If necessary, remove the fluff from the airflow slots. Put the filter back. 10.4 Cleaning the drum WARNING! Dry the cleaned surfaces with a brush attachment. 2. CAUTION! Open the condenser cover. 3. Turn the lever to clean the inner surface of the drum and drum lifters. You can cause corrosion to clean the appliance. 10.6 Cleaning the airflow slots Use a vacuum cleaner to...
User Manual
Page 19
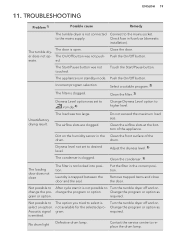
... replace the drum lamp. The tumble dryer does not operate. Touch the Start/Pause button. The airflow slots are clogged. Dirt on . drum. Remove trapped items and close The filter is clogged. change the program or option. No drum light Defective drum lamp. Check fuse in the correct position. Close the door. Incorrect program selection. Clean the filter. 3) Dryness Level option was not touched. Put the filter in fuse box (domestic installation...
... replace the drum lamp. The tumble dryer does not operate. Touch the Start/Pause button. The airflow slots are clogged. Dirt on . drum. Remove trapped items and close The filter is clogged. change the program or option. No drum light Defective drum lamp. Check fuse in the correct position. Close the door. Incorrect program selection. Clean the filter. 3) Dryness Level option was not touched. Put the filter in fuse box (domestic installation...
User Manual
Page 20
... maximum load size. Spin the laundry well. Optimal room temperature to the load. see PROGRAMS chapter 3) See chapter CARE AND CLEANING 4) Only dryers with the appliance door open Adjustable height Drum volume 850 x 600 x 630 mm (maximal 660 mm) 1100 mm 950 mm 850 mm (+ 15 mm - this is clogged. If the appliance does not operate contact the service centre and provide the error code...
... maximum load size. Spin the laundry well. Optimal room temperature to the load. see PROGRAMS chapter 3) See chapter CARE AND CLEANING 4) Only dryers with the appliance door open Adjustable height Drum volume 850 x 600 x 630 mm (maximal 660 mm) 1100 mm 950 mm 850 mm (+ 15 mm - this is clogged. If the appliance does not operate contact the service centre and provide the error code...
User Manual
Page 21
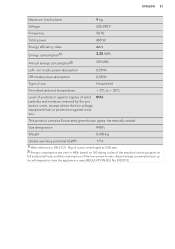
...Gas designation R407c Weight 0,430 kg Global-warming potential (GWP) 1774 1) With reference to EN 61121. 9kg of cotton centrifuged at 1000 rpm. 2) Energy consumption per cycle will depend on 160 drying cycles of the standard cotton program at full and partial load, and the consumption of the low-power modes. Actual energy... consumption per year in kWh, based on how the appliance is used (REGULATION ...
...Gas designation R407c Weight 0,430 kg Global-warming potential (GWP) 1774 1) With reference to EN 61121. 9kg of cotton centrifuged at 1000 rpm. 2) Energy consumption per cycle will depend on 160 drying cycles of the standard cotton program at full and partial load, and the consumption of the low-power modes. Actual energy... consumption per year in kWh, based on how the appliance is used (REGULATION ...
User Manual
Page 22
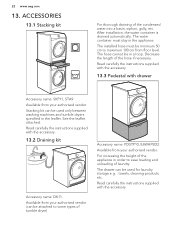
... www.aeg.com 13. The hose cannot be used for laundry storage e.g. : towels, cleaning products etc. Read carefully the instructions supplied with the accessory. 13.3 Pedestal with drawer Accessory name: SKP11, STA9 Available from your authorised vendor. Read carefully the instructions supplied with the accessory. 13.2 Draining kit Accessory name: DK11. Available from floor level. Decrease the length of the condensed water...
... www.aeg.com 13. The hose cannot be used for laundry storage e.g. : towels, cleaning products etc. Read carefully the instructions supplied with the accessory. 13.3 Pedestal with drawer Accessory name: SKP11, STA9 Available from your authorised vendor. Read carefully the instructions supplied with the accessory. 13.2 Draining kit Accessory name: DK11. Available from floor level. Decrease the length of the condensed water...
