Specification Sheet
Page 1
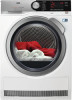
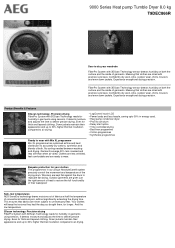
... of heat to restore the full functionality of garments. Outdoor garments are dried with precision and care. Bespoke protection for humidity in our unique AbsoluteCare® system precisely control the movement and temperature of the drying drum. Precision drying FiberPro System with 3DScan Technology reads for longer. 9000 Series Heat pump Tumble Dryer 8.0 kg T9DEC866R Dare to dry your clothes The programmes in garments using sensors.
... of heat to restore the full functionality of garments. Outdoor garments are dried with precision and care. Bespoke protection for humidity in our unique AbsoluteCare® system precisely control the movement and temperature of the drying drum. Precision drying FiberPro System with 3DScan Technology reads for longer. 9000 Series Heat pump Tumble Dryer 8.0 kg T9DEC866R Dare to dry your clothes The programmes in garments using sensors.
Specification Sheet
Page 2
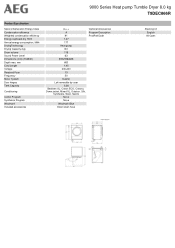
9000 Series Heat pump Tumble Dryer 8.0 kg T9DEC866R Product Specification Second Generation Energy Class Condensation efficiency Weighted condensation efficiency Energy cupboard dry 1000 Annual energy consumption, kWh DryingTechnology Drying Capacity (kg) Drum volume Sound Power Level Dimensions (mm) (HxWxD) Depth max, mm Cord Length Voltage Required Fuse Frequency Motor System Door hinges Tank Capacity Conditioning Cotton Program Synthetics Program Woolmark Included accessories A+++ A 91 1.47 177 Heat pump 8.0 118 63 850x596x638 663 1.45 230...
9000 Series Heat pump Tumble Dryer 8.0 kg T9DEC866R Product Specification Second Generation Energy Class Condensation efficiency Weighted condensation efficiency Energy cupboard dry 1000 Annual energy consumption, kWh DryingTechnology Drying Capacity (kg) Drum volume Sound Power Level Dimensions (mm) (HxWxD) Depth max, mm Cord Length Voltage Required Fuse Frequency Motor System Door hinges Tank Capacity Conditioning Cotton Program Synthetics Program Woolmark Included accessories A+++ A 91 1.47 177 Heat pump 8.0 118 63 850x596x638 663 1.45 230...
User Manual
Page 2
... minutes reading to get the very best from it to change without notice. 2/52 Visit our website for: Get usage advice, brochures, trouble shooter, service information: www.aeg.com/webselfservice Register your product for better service: www.registeraeg.com Buy Accessories, Consumables and Original spare parts for your appliance: www.aeg.com/shop CUSTOMER CARE AND SERVICE Always use original spare...
... minutes reading to get the very best from it to change without notice. 2/52 Visit our website for: Get usage advice, brochures, trouble shooter, service information: www.aeg.com/webselfservice Register your product for better service: www.registeraeg.com Buy Accessories, Consumables and Original spare parts for your appliance: www.aeg.com/shop CUSTOMER CARE AND SERVICE Always use original spare...
User Manual
Page 3
CONTENTS 1. CONTROL PANEL 12 4.1 Display 12 5. DAILY USE 23 8.1 Preparing the laundry 23 8.2 Loading the laundry 24 8.3 Turning on Wool program 21 6.8 Delay Start 21 6.9 Buzzer 21 7. BEFORE FIRST USE 22 8. SAFETY INSTRUCTIONS 8 2.1 Installation 8 2.2 Electrical connection 8 2.3 Use 9 2.4 Internal lighting 9 2.5 Care and cleaning 10 2.6 Compressor 10 2.7 Disposal 10 3. PROGRAMMES 14 5.1 Programmes and options selection compatibility........... 17 5.2 Consumption data 18 6. PRODUCT DESCRIPTION 11 4. SAFETY INFORMATION 5 1.1 Children and ...
CONTENTS 1. CONTROL PANEL 12 4.1 Display 12 5. DAILY USE 23 8.1 Preparing the laundry 23 8.2 Loading the laundry 24 8.3 Turning on Wool program 21 6.8 Delay Start 21 6.9 Buzzer 21 7. BEFORE FIRST USE 22 8. SAFETY INSTRUCTIONS 8 2.1 Installation 8 2.2 Electrical connection 8 2.3 Use 9 2.4 Internal lighting 9 2.5 Care and cleaning 10 2.6 Compressor 10 2.7 Disposal 10 3. PROGRAMMES 14 5.1 Programmes and options selection compatibility........... 17 5.2 Consumption data 18 6. PRODUCT DESCRIPTION 11 4. SAFETY INFORMATION 5 1.1 Children and ...
User Manual
Page 4
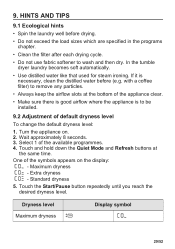
... 13.1 Stacking kit 45 13.2 Draining kit 45 13.3 Pedestal with drawer 46 14. HINTS AND TIPS 29 9.1 Ecological hints 29 9.2 Adjustment of default dryness level 29 9.3 Deactivating the tank indicator 30 10. CARE AND CLEANING 31 10.1 Cleaning the filter 31 10.2 Emptying the water container 32 10.3 Cleaning the condenser 33 10.4 Cleaning the drum 35 10.5 Cleaning the control panel and housing...
... 13.1 Stacking kit 45 13.2 Draining kit 45 13.3 Pedestal with drawer 46 14. HINTS AND TIPS 29 9.1 Ecological hints 29 9.2 Adjustment of default dryness level 29 9.3 Deactivating the tank indicator 30 10. CARE AND CLEANING 31 10.1 Cleaning the filter 31 10.2 Emptying the water container 32 10.3 Cleaning the condenser 33 10.4 Cleaning the drum 35 10.5 Cleaning the control panel and housing...

User Manual
Page 5
...activated. • Children shall not carry out cleaning and user maintenance of incorrect installation or usage. Read the supplied instructions. 1.1 Children and vulnerable people safety WARNING! 1. The manufacturer is open. • If the appliance has a child safety device, it appropriately. • Keep ...if they have been given supervision or instruction concerning the use of this appliance, carefully read the supplied instructions. SAFETY INFORMATION Before beginning the installation and use of the appliance in a safe and accessible location for any injuries or damage that ...
...activated. • Children shall not carry out cleaning and user maintenance of incorrect installation or usage. Read the supplied instructions. 1.1 Children and vulnerable people safety WARNING! 1. The manufacturer is open. • If the appliance has a child safety device, it appropriately. • Keep ...if they have been given supervision or instruction concerning the use of this appliance, carefully read the supplied instructions. SAFETY INFORMATION Before beginning the installation and use of the appliance in a safe and accessible location for any injuries or damage that ...
User Manual
Page 6
... appliance door from your authorized vendor, can be used only with industrial chemicals. • Wipe away lint or packaging debris that is put on top of the installation process. SAFETY INFORMATION 1.2 General Safety • Do not change the specification of this appliance. • If the tumble dryer is regularly switched on and off by the manufacturer, its Authorised Service Centre...
... appliance door from your authorized vendor, can be used only with industrial chemicals. • Wipe away lint or packaging debris that is put on top of the installation process. SAFETY INFORMATION 1.2 General Safety • Do not change the specification of this appliance. • If the tumble dryer is regularly switched on and off by the manufacturer, its Authorised Service Centre...
User Manual
Page 7
... be used as specified by the product manufacturer's instructions. • Remove all objects from items that could be a source of fire ignition such as lighters or matches. • WARNING: Never stop a tumble dryer before the end of the drying cycle unless all items are quickly removed and spread out so that the heat is dissipated. • Before any maintenance operation...
... be used as specified by the product manufacturer's instructions. • Remove all objects from items that could be a source of fire ignition such as lighters or matches. • WARNING: Never stop a tumble dryer before the end of the drying cycle unless all items are quickly removed and spread out so that the heat is dissipated. • Before any maintenance operation...
User Manual
Page 8
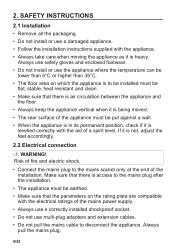
...; Make sure that there is air circulation between the appliance and the floor. • Always keep the appliance vertical when it is not, adjust the feet accordingly. 2.2 Electrical connection WARNING! Always pull the mains plug. 8/52 SAFETY INSTRUCTIONS 2.1 Installation • Remove all the packaging. • Do not install or use the appliance where the temperature can be lower than 5°...
...; Make sure that there is air circulation between the appliance and the floor. • Always keep the appliance vertical when it is not, adjust the feet accordingly. 2.2 Electrical connection WARNING! Always pull the mains plug. 8/52 SAFETY INSTRUCTIONS 2.1 Installation • Remove all the packaging. • Do not install or use the appliance where the temperature can be lower than 5°...
User Manual
Page 9
... replace the internal lighting, contact the Authorised Service Centre. 9/52 Follow the cleaning instruction on the open door of injury, electric shock, fire, burns or damage to change the mains plug fuse, use only. • Do not dry damaged (torn, frayed) items that contain padding or fillings. • If laundry has been washed with a stain remover, carry out an additional rinse cycle before starting a drying cycle. • Dry only...
... replace the internal lighting, contact the Authorised Service Centre. 9/52 Follow the cleaning instruction on the open door of injury, electric shock, fire, burns or damage to change the mains plug fuse, use only. • Do not dry damaged (torn, frayed) items that contain padding or fillings. • If laundry has been washed with a stain remover, carry out an additional rinse cycle before starting a drying cycle. • Dry only...
User Manual
Page 10
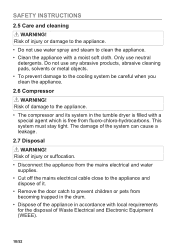
... and steam to clean the appliance. • Clean the appliance with a moist soft cloth. Risk of injury or suffocation. • Disconnect the appliance from the mains electrical and water supplies. • Cut off the mains electrical cable close to the appliance and dispose of it. • Remove the door catch to prevent children or pets from becoming trapped in the drum...
... and steam to clean the appliance. • Clean the appliance with a moist soft cloth. Risk of injury or suffocation. • Disconnect the appliance from the mains electrical and water supplies. • Cut off the mains electrical cable close to the appliance and dispose of it. • Remove the door catch to prevent children or pets from becoming trapped in the drum...
User Manual
Page 11
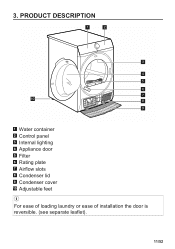
PRODUCT DESCRIPTION 1 2 3 4 5 6 7 10 8 9 1 Water container 2 Control panel 3 Internal lighting 4 Appliance door 5 Filter 6 Rating plate 7 Airflow slots 8 Condenser lid 9 Condenser cover 10 Adjustable feet For ease of loading laundry or ease of installation the door is reversible. (see separate leaflet). 11/52 3.
PRODUCT DESCRIPTION 1 2 3 4 5 6 7 10 8 9 1 Water container 2 Control panel 3 Internal lighting 4 Appliance door 5 Filter 6 Rating plate 7 Airflow slots 8 Condenser lid 9 Condenser cover 10 Adjustable feet For ease of loading laundry or ease of installation the door is reversible. (see separate leaflet). 11/52 3.

User Manual
Page 27
... On/Off button to turn on the display. Set a new program. 8.10 Program end Clean the filter and drain the water container after each drying cycle. (See chapter CARE AND CLEANING.) If the drying cycle is activated, the acoustic signal sounds intermittently for 1 minute. If the Buzzer option is finished, the symbol appears on the appliance. 3. If you do not turn the appliance...
... On/Off button to turn on the display. Set a new program. 8.10 Program end Clean the filter and drain the water container after each drying cycle. (See chapter CARE AND CLEANING.) If the drying cycle is activated, the acoustic signal sounds intermittently for 1 minute. If the Buzzer option is finished, the symbol appears on the appliance. 3. If you do not turn the appliance...
User Manual
Page 29
... drying. • Do not exceed the load sizes which are specified in the programs chapter. • Clean the filter after each drying cycle. • Do not use fabric softener to remove any particles. • Always keep the airflow slots at the same time. Wait approximately 8 seconds. 3. Maximum dryness - In the tumble dryer laundry becomes soft automatically. • Use distilled water like that used for steam...
... drying. • Do not exceed the load sizes which are specified in the programs chapter. • Clean the filter after each drying cycle. • Do not use fabric softener to remove any particles. • Always keep the airflow slots at the same time. Wait approximately 8 seconds. 3. Maximum dryness - In the tumble dryer laundry becomes soft automatically. • Use distilled water like that used for steam...
User Manual
Page 31
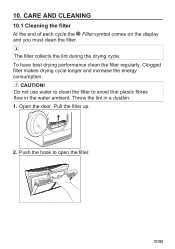
To have best drying performance clean the filter regularly. Open the door. Do not use water to clean the filter to open the filter. 31/52 Push the hook to avoid that plastic fibres flow in a dustbin. 1. The filter collects the lint during the drying cycle. Throw the lint in the water ambient. Pull the filter up. 2. CARE AND CLEANING 10.1 Cleaning the filter At the end of each cycle the Filter symbol comes on the display and you must clean the filter. CAUTION! 10. Clogged filter makes drying cycle longer and increase the energy consumption.
To have best drying performance clean the filter regularly. Open the door. Do not use water to clean the filter to open the filter. 31/52 Push the hook to avoid that plastic fibres flow in a dustbin. 1. The filter collects the lint during the drying cycle. Throw the lint in the water ambient. Pull the filter up. 2. CARE AND CLEANING 10.1 Cleaning the filter At the end of each cycle the Filter symbol comes on the display and you must clean the filter. CAUTION! 10. Clogged filter makes drying cycle longer and increase the energy consumption.

User Manual
Page 37
The On/Off button was not touched. The Start/Pause button was not pushed. The appliance is in the fuse box (domes‐ tic installation). Remedy Connect it to the mains supply. Push the On/Off button. The tumble dryer does not oper‐ ate. Touch the Start/Pause button. Push the On/Off button. 37/52 11. Check the fuse in standby mode. Close the door. TROUBLESHOOTING Problem 1) Possible cause The tumble dryer is open. The door is not connected to the mains socket.
The On/Off button was not touched. The Start/Pause button was not pushed. The appliance is in the fuse box (domes‐ tic installation). Remedy Connect it to the mains supply. Push the On/Off button. The tumble dryer does not oper‐ ate. Touch the Start/Pause button. Push the On/Off button. 37/52 11. Check the fuse in standby mode. Close the door. TROUBLESHOOTING Problem 1) Possible cause The tumble dryer is open. The door is not connected to the mains socket.

User Manual
Page 38
... dryness level was too large. The load‐ ing door does not close the door. 38/52 Remove trapped items and close The filter is some dirt on the humidity sensor in the cor‐ rect position. There is not locked into position. Clean the airflow slots at the bottom of the drum. result. gramme. 2) The filter is clogged. Put the...
... dryness level was too large. The load‐ ing door does not close the door. 38/52 Remove trapped items and close The filter is some dirt on the humidity sensor in the cor‐ rect position. There is not locked into position. Clean the airflow slots at the bottom of the drum. result. gramme. 2) The filter is clogged. Put the...

User Manual
Page 39
.... Turn the tumble dryer off and on . drum light Contact the service cen‐ tre to change the pro‐ gramme or option. The drying duration is emitted. Drain the water contain‐ er, push the Start/Pause button. 3) 39/52 After a cycle starts it is not possible to load size and damp‐ ness. It is not possible to replace the drum lamp. Turn the tumble dryer...
.... Turn the tumble dryer off and on . drum light Contact the service cen‐ tre to change the pro‐ gramme or option. The drying duration is emitted. Drain the water contain‐ er, push the Start/Pause button. 3) 39/52 After a cycle starts it is not possible to load size and damp‐ ness. It is not possible to replace the drum lamp. Turn the tumble dryer...
User Manual
Page 41
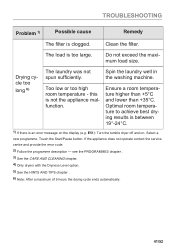
... large. Touch the Start/Pause button. If the appliance does not operate contact the service centre and provide the error code. 2) Follow the programme description - The load is not the appliance mal‐ function. Drying cy‐ cle too long 6) The laundry was not spun sufficiently. see the PROGRAMMES chapter . 3) See the CARE AND CLEANING chapter. 4) Only dryers with the Dryness Level...
... large. Touch the Start/Pause button. If the appliance does not operate contact the service centre and provide the error code. 2) Follow the programme description - The load is not the appliance mal‐ function. Drying cy‐ cle too long 6) The laundry was not spun sufficiently. see the PROGRAMMES chapter . 3) See the CARE AND CLEANING chapter. 4) Only dryers with the Dryness Level...

User Manual
Page 47
... standard cotton programme at full and partial load, and the consumption of the left on mode in kWh per year, based on how the appliance is used. 14. REGULATION 1369/2017 Product Information Sheet Trade Mark Model Rated capacity in kg Air vented or condenser tumble dryer Energy efficiency class Energy consumption in minutes AEG T9DEC866R, PNC916098626 8,0 Condenser A+++ 176,5 Automatic 1,47 0,83 0,05...
... standard cotton programme at full and partial load, and the consumption of the left on mode in kWh per year, based on how the appliance is used. 14. REGULATION 1369/2017 Product Information Sheet Trade Mark Model Rated capacity in kg Air vented or condenser tumble dryer Energy efficiency class Energy consumption in minutes AEG T9DEC866R, PNC916098626 8,0 Condenser A+++ 176,5 Automatic 1,47 0,83 0,05...