
Product Manual
Page 2
... the rating plate. When contacting our Authorised Service Centre, ensure that help make life simpler features you for your appliance: www.aeg.com/shop CUSTOMER CARE AND SERVICE Always use original spare parts. SAFETY INFORMATION 3 2. CARE AND CLEANING 15 7. Visit our website for: Get usage advice, brochures, trouble shooter, service information: www.aeg.com Register your product for better service: www.registeraeg.com Buy Accessories...
... the rating plate. When contacting our Authorised Service Centre, ensure that help make life simpler features you for your appliance: www.aeg.com/shop CUSTOMER CARE AND SERVICE Always use original spare parts. SAFETY INFORMATION 3 2. CARE AND CLEANING 15 7. Visit our website for: Get usage advice, brochures, trouble shooter, service information: www.aeg.com Register your product for better service: www.registeraeg.com Buy Accessories...

Product Manual
Page 3
... incorrect installation and use . SAFETY INFORMATION Before the installation and use of the appliance, carefully read the supplied instructions. Do not touch the heating elements. • Do not operate the appliance by children without supervision. • Children of an external timer or separate remote-control system. • Unattended cooking on a hob with water, but switch off the appliance and then cover flame e.g. Accessible parts are hot...
... incorrect installation and use . SAFETY INFORMATION Before the installation and use of the appliance, carefully read the supplied instructions. Do not touch the heating elements. • Do not operate the appliance by children without supervision. • Children of an external timer or separate remote-control system. • Unattended cooking on a hob with water, but switch off the appliance and then cover flame e.g. Accessible parts are hot...
Product Manual
Page 4
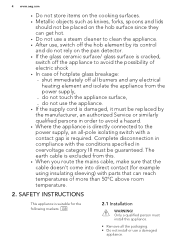
... appliance is directly connected to avoid the possibility of electric shock • In case of more than 50°C above room temperature. 2. SAFETY INSTRUCTIONS This appliance is suitable for example using insulating sleeving) with parts that can get hot. • Do not use a steam cleaner to clean the appliance. • After use, switch off the hob element by the manufacturer, an authorized Service or...
... appliance is directly connected to avoid the possibility of electric shock • In case of more than 50°C above room temperature. 2. SAFETY INSTRUCTIONS This appliance is suitable for example using insulating sleeving) with parts that can get hot. • Do not use a steam cleaner to clean the appliance. • After use, switch off the hob element by the manufacturer, an authorized Service or...
Product Manual
Page 5
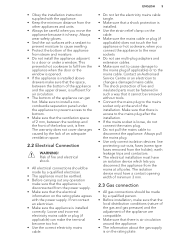
... bottom of the installation. Always pull the mains plug. • Use only correct isolation devices: line protecting cut surfaces with the power supply. This prevents hot cookware to the bottom. • Make sure that the local distribution conditions (nature of the gas and gas pressure) and the adjustment of an adequate ventilation space. 2.2 Electrical Connection WARNING! Risk of fire and electrical shock. • All electrical connections should be...
... bottom of the installation. Always pull the mains plug. • Use only correct isolation devices: line protecting cut surfaces with the power supply. This prevents hot cookware to the bottom. • Make sure that the local distribution conditions (nature of the gas and gas pressure) and the adjustment of an adequate ventilation space. 2.2 Electrical Connection WARNING! Risk of fire and electrical shock. • All electrical connections should be...
Product Manual
Page 6
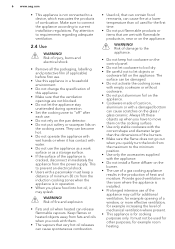
... in operation. • When you quickly turn the knob from the power supply. Pay attention to current installation regulations. This to prevent an electrical shock. • Users with them on the cooking zones. Make sure to connect the appliance according to requirements regarding adequate ventilation. 2.4 Use WARNING! Risk of fire and explosion • Fats and oil when heated can cause fire at a lower...
... in operation. • When you quickly turn the knob from the power supply. Pay attention to current installation regulations. This to prevent an electrical shock. • Users with them on the cooking zones. Make sure to connect the appliance according to requirements regarding adequate ventilation. 2.4 Use WARNING! Risk of fire and explosion • Fats and oil when heated can cause fire at a lower...
Product Manual
Page 7
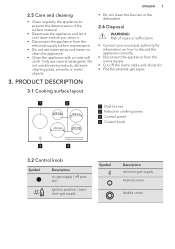
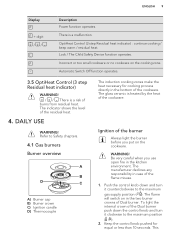
... from the mains supply. • Cut off the mains cable and discard it. • Flat the external gas pipes. 1 2 145 mm 180 mm 210 mm 145 mm 1 Dual burner 2 Induction cooking zones 3 Control panel 4 Control knob 4 3 3.2 Control knob Symbol Description no gas supply / off position ignition position / maximum gas supply Symbol Description minimum gas supply internal crown double crown 2.5 Care and cleaning • Clean regularly the appliance to prevent...
... from the mains supply. • Cut off the mains cable and discard it. • Flat the external gas pipes. 1 2 145 mm 180 mm 210 mm 145 mm 1 Dual burner 2 Induction cooking zones 3 Control panel 4 Control knob 4 3 3.2 Control knob Symbol Description no gas supply / off position ignition position / maximum gas supply Symbol Description minimum gas supply internal crown double crown 2.5 Care and cleaning • Clean regularly the appliance to prevent...
Product Manual
Page 9
... the control knob down the control knob and turn it clockwise to the maximum gas supply position ( ). DAILY USE WARNING! WARNING! Be very careful when you put on the cooking zone. Keep the control knob pushed for cooking process directly in the two burner crowns of the cookware. OptiHeat Control (3 step Residual heat indicator) : continue cooking / keep warm / residual heat. The manufacturer declines any responsibility in the kitchen environment. Automatic Switch Off...
... the control knob down the control knob and turn it clockwise to the maximum gas supply position ( ). DAILY USE WARNING! WARNING! Be very careful when you put on the cooking zone. Keep the control knob pushed for cooking process directly in the two burner crowns of the cookware. OptiHeat Control (3 step Residual heat indicator) : continue cooking / keep warm / residual heat. The manufacturer declines any responsibility in the kitchen environment. Automatic Switch Off...

Product Manual
Page 10
... out, turn the control knob to the off position and try to let the thermocouple warm up . WARNING! Remove the object or clean the control panel. • The hob gets too hot (e.g. Keep the control knob pushed for more than 10 seconds (a pan, a cloth, etc.). The spark generator can ignite the burner without electrical device; Turning the burner off To put something on the plate fixed to the glass. 4.2 Induction cooking zones...
... out, turn the control knob to the off position and try to let the thermocouple warm up . WARNING! Remove the object or clean the control panel. • The hob gets too hot (e.g. Keep the control knob pushed for more than 10 seconds (a pan, a cloth, etc.). The spark generator can ignite the burner without electrical device; Turning the burner off To put something on the plate fixed to the glass. 4.2 Induction cooking zones...
Product Manual
Page 13
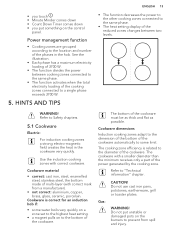
... unstable or damaged pots on the burners to prevent from a manufacturer). • not correct: aluminium, copper, brass, glass, ceramic, porcelain. Use the induction cooking zones with a smaller diameter than the minimum receives only a part of the cookware. Gas: CAUTION! Refer to Safety chapters. 5.1 Cookware Electric: For induction cooking zones a strong electro-magnetic field creates the heat in the hob. The bottom of 3700 W. •...
... unstable or damaged pots on the burners to prevent from a manufacturer). • not correct: aluminium, copper, brass, glass, ceramic, porcelain. Use the induction cooking zones with a smaller diameter than the minimum receives only a part of the cookware. Gas: CAUTION! Refer to Safety chapters. 5.1 Cookware Electric: For induction cooking zones a strong electro-magnetic field creates the heat in the hob. The bottom of 3700 W. •...
Product Manual
Page 14
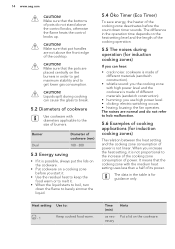
... stability and to hob malfunction. 5.6 Examples of cooking applications (for induction cooking zones) The relation between the heat setting and the cooking zone consumption of power is made of burners. Make sure that the bottoms of its power. 14 www.aeg.com CAUTION! Liquids spilt during operation (for guidance only. When you use high power level. • clicking: electric switching occurs. • hissing, buzzing: the fan operates. Time...
... stability and to hob malfunction. 5.6 Examples of cooking applications (for induction cooking zones) The relation between the heat setting and the cooking zone consumption of power is made of burners. Make sure that the bottoms of its power. 14 www.aeg.com CAUTION! Liquids spilt during operation (for guidance only. When you use high power level. • clicking: electric switching occurs. • hissing, buzzing: the fan operates. Time...
Product Manual
Page 15
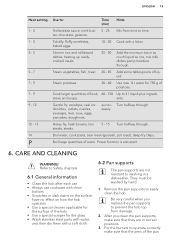
... rice, mix milk dishes part procedure through . Power function is activated. 6. Be very careful when you clean the pan supports, make sure that they are not resistant to Safety chapters. 6.1 General information • Clean the hob after each use. • Always use cookware with a lid on how the hob operates. • Use a special cleaner applicable for the surface of the hob. • Use a special scraper for...
... rice, mix milk dishes part procedure through . Power function is activated. 6. Be very careful when you clean the pan supports, make sure that they are not resistant to Safety chapters. 6.1 General information • Clean the hob after each use. • Always use cookware with a lid on how the hob operates. • Use a special cleaner applicable for the surface of the hob. • Use a special scraper for...
Product Manual
Page 16
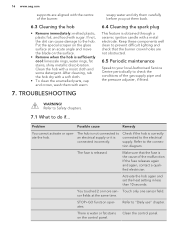
16 www.aeg.com supports are not obstructed. 6.5 Periodic maintenance Speak to your local Authorised Service Centre periodically to the electrical supply. Put the special scraper on the glass surface at the same time. Check if the hob is correctly connected to check the conditions of the gas supply pipe and the pressure adjuster, if fitted. Make sure that the burner crown holes...
16 www.aeg.com supports are not obstructed. 6.5 Periodic maintenance Speak to your local Authorised Service Centre periodically to the electrical supply. Put the special scraper on the glass surface at the same time. Check if the hob is correctly connected to check the conditions of the gas supply pipe and the pressure adjuster, if fitted. Make sure that the burner crown holes...

Product Manual
Page 17
... acoustic signal sounds when the hob is hot. Remove the object from the sensor fields. Power management function Refer to "Daily use " chapter. controls. ates. the Lock function operates. comes on the zone. Use cookware with correct dimensions. The hob deactivates. Automatic Heat Up function The zone is...Service Centre. The zone is too large or Put large cookware on . Let the zone become hot. The heat setting changes between two levels. The cookware is not hot because it operated only for the zone. Refer to "Daily use" chapter. The highest heat setting...
... acoustic signal sounds when the hob is hot. Remove the object from the sensor fields. Power management function Refer to "Daily use " chapter. controls. ates. the Lock function operates. comes on the zone. Use cookware with correct dimensions. The hob deactivates. Automatic Heat Up function The zone is...Service Centre. The zone is too large or Put large cookware on . Let the zone become hot. The heat setting changes between two levels. The cookware is not hot because it operated only for the zone. Refer to "Daily use" chapter. The highest heat setting...
Product Manual
Page 18
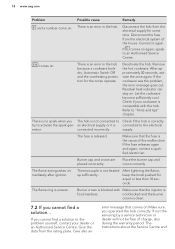
... hob. Thermocouple is released. The flame ring is an error in the hob because a cookware boils dry. If not the servicing by a service technician or dealer will not be free of the house. comes on . Burner cap and crown are placed incorrectly. Let the cookware become sufficiently cool. supply. Give the data from the electrical system of charge, also during the warranty...
... hob. Thermocouple is released. The flame ring is an error in the hob because a cookware boils dry. If not the servicing by a service technician or dealer will not be free of the house. comes on . Burner cap and crown are placed incorrectly. Let the cookware become sufficiently cool. supply. Give the data from the electrical system of charge, also during the warranty...
Product Manual
Page 19
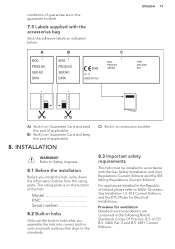
... Card and keep this part (if applicable). Model PNC Serial number 8.2 Built-in hobs Only use the built-in hobs after you assemble the hob into correct built-in the following British Standards Codes Of Practice: B.S. 6172/ B.S. 5440, Par. 2 and B.S. 6891 Current Editions. Refer to the standards. For appliances installed in the Republic of guarantee are contained in units and work surfaces that align to...
... Card and keep this part (if applicable). Model PNC Serial number 8.2 Built-in hobs Only use the built-in hobs after you assemble the hob into correct built-in the following British Standards Codes Of Practice: B.S. 6172/ B.S. 5440, Par. 2 and B.S. 6891 Current Editions. Refer to the standards. For appliances installed in the Republic of guarantee are contained in units and work surfaces that align to...
Product Manual
Page 20
... air vent of effective area of 100 cm² is required. Any gas installation must be carried out by a GAS SAFE REGISTER installer. On the end of the shaft, which opens directly to the NSAIDomestic Gas Installation I .S 813 Current Edition Section 7- steel or copper. Permitted Locations of the hob is installed in a bed sitting room with the shoulder on the hob. Screw the parts together without using...
... air vent of effective area of 100 cm² is required. Any gas installation must be carried out by a GAS SAFE REGISTER installer. On the end of the shaft, which opens directly to the NSAIDomestic Gas Installation I .S 813 Current Edition Section 7- steel or copper. Permitted Locations of the hob is installed in a bed sitting room with the shoulder on the hob. Screw the parts together without using...
Product Manual
Page 21
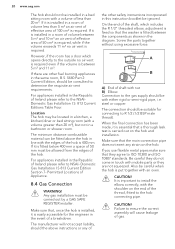
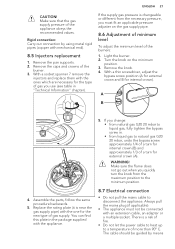
... gas pressure is changeable or different from the necessary pressure, you change: • from natural gas G20 20 mbar to a temperature of a turn for the type of gas you quickly turn the knob from liquid gas to disconnect the appliance. Make sure that the gas supply pressure of the burner. 3. Rigid connection: Carry out connection by means Turn the knob on the gas supply pipe. 8.6 Adjustment of minimum level To adjust the minimum level of gas...
... gas pressure is changeable or different from the necessary pressure, you change: • from natural gas G20 20 mbar to a temperature of a turn for the type of gas you quickly turn the knob from liquid gas to disconnect the appliance. Make sure that the gas supply pressure of the burner. 3. Rigid connection: Carry out connection by means Turn the knob on the gas supply pipe. 8.6 Adjustment of minimum level To adjust the minimum level of gas...
Product Manual
Page 22
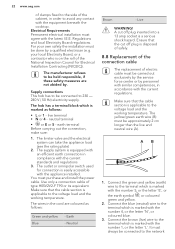
... out the connection, make sure: 1. The limiter valve and the electrical system can take the appliance load (see the rating plate) 2. The outlet or omnipolar switch used for Electrical Installation Contracting [NICEIC]). Make sure that the cable section is marked with the number 4, or the letter 'N', or coloured blue. 3. Live WARNING! The yellow/green earth wire (B) must be connected to 230...
... out the connection, make sure: 1. The limiter valve and the electrical system can take the appliance load (see the rating plate) 2. The outlet or omnipolar switch used for Electrical Installation Contracting [NICEIC]). Make sure that the cable section is marked with the number 4, or the letter 'N', or coloured blue. 3. Live WARNING! The yellow/green earth wire (B) must be connected to 230...
Product Manual
Page 23
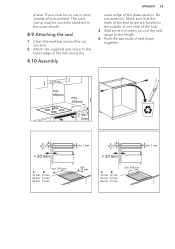
... lower edge of the hob along the 8.10 Assembly ENGLISH 23 outer edge of wire present. There must be no cut out area. 2. Make sure that the ends of the seal stripe are located in the middle of one side of seal stripe together. Clean the worktop around the cut or stray strands of the glass ceramic. phase. min. 650mm...
... lower edge of the hob along the 8.10 Assembly ENGLISH 23 outer edge of wire present. There must be no cut out area. 2. Make sure that the ends of the seal stripe are located in the middle of one side of seal stripe together. Clean the worktop around the cut or stray strands of the glass ceramic. phase. min. 650mm...
Product Manual
Page 25
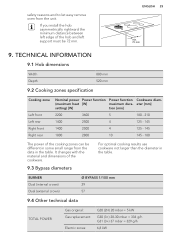
... diameters For optimal cooking results use cookware not larger than the diameter in the table. It changes with the material and dimensions of the hob and left support must be different in some small range from the unit. BURNER Dual (internal crown) Dual (external crown) Ø BYPASS 1/100 mm 29 57 9.4 Other technical data TOTAL POWER: Gas original: Gas replacement: Electric zones: G20...
... diameters For optimal cooking results use cookware not larger than the diameter in the table. It changes with the material and dimensions of the hob and left support must be different in some small range from the unit. BURNER Dual (internal crown) Dual (external crown) Ø BYPASS 1/100 mm 29 57 9.4 Other technical data TOTAL POWER: Gas original: Gas replacement: Electric zones: G20...


