Product Manual
Page 2
....aeg.com CONTENTS 1. SAFETY INFORMATION 3 2. HINTS AND TIPS...8 6. When contacting our Authorised Service Centre, ensure that help make life simpler features you might not find on the rating plate. The information can be found on ordinary appliances. Please spend a few minutes reading to change without notice. INSTALLATION...11 9. We have the following data available: Model, PNC, Serial Number. TROUBLESHOOTING...
....aeg.com CONTENTS 1. SAFETY INFORMATION 3 2. HINTS AND TIPS...8 6. When contacting our Authorised Service Centre, ensure that help make life simpler features you might not find on the rating plate. The information can be found on ordinary appliances. Please spend a few minutes reading to change without notice. INSTALLATION...11 9. We have the following data available: Model, PNC, Serial Number. TROUBLESHOOTING...
Product Manual
Page 3
...; Cleaning and user maintenance shall not be made by means of an external timer or separate remote-control system. • Unattended cooking on a hob with fat or oil can be kept away unless continuously supervised. 1.2 General Safety • The appliance and its accessible parts become hot during use of experience and knowledge if they have been given supervision or instruction...
...; Cleaning and user maintenance shall not be made by means of an external timer or separate remote-control system. • Unattended cooking on a hob with fat or oil can be kept away unless continuously supervised. 1.2 General Safety • The appliance and its accessible parts become hot during use of experience and knowledge if they have been given supervision or instruction...
Product Manual
Page 4
.... • Seal the cut surfaces with a sealant to prevent moisture to install a noncombustile separation panel under a window. 4 www.aeg.com • Do not store items on the hob surface since they can get hot. The earth cable is required. Only a qualified person must install this appliance. • Remove all the packaging. • Do not install or use a damaged appliance. • Obey the installation instruction supplied with...
.... • Seal the cut surfaces with a sealant to prevent moisture to install a noncombustile separation panel under a window. 4 www.aeg.com • Do not store items on the hob surface since they can get hot. The earth cable is required. Only a qualified person must install this appliance. • Remove all the packaging. • Do not install or use a damaged appliance. • Obey the installation instruction supplied with...
Product Manual
Page 5
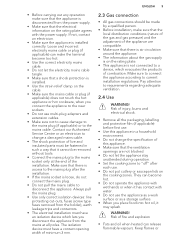
... specification of minimum 3 mm. Always pull the mains plug. • Use only correct isolation devices: line protecting cut-outs, fuses (screw type fuses removed from the holder), earth leakage trips and contactors. • The electrical installation must be removed without tools. • Connect the mains plug to the mains cable. Risk of fire and explosion • Fats and oil when heated can make the terminal become hot...
... specification of minimum 3 mm. Always pull the mains plug. • Use only correct isolation devices: line protecting cut-outs, fuses (screw type fuses removed from the holder), earth leakage trips and contactors. • The electrical installation must be removed without tools. • Connect the mains plug to the mains cable. Risk of fire and explosion • Fats and oil when heated can make the terminal become hot...
Product Manual
Page 6
... hot cookware on the control panel. • Do not let cookware to boil dry. • Be careful not to let objects or cookware fall on the appliance. 6 www.aeg.com heated objects away from the maximum to the minimum position. • Use only the accessories supplied with the appliance. • Do not install a flame diffuser on the burner. • The use of a gas cooking...
... hot cookware on the control panel. • Do not let cookware to boil dry. • Be careful not to let objects or cookware fall on the appliance. 6 www.aeg.com heated objects away from the maximum to the minimum position. • Use only the accessories supplied with the appliance. • Do not install a flame diffuser on the burner. • The use of a gas cooking...

Product Manual
Page 7
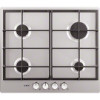
... very careful when you put on the cookware. This WARNING! PRODUCT DESCRIPTION 3.1 Cooking surface layout 1 2 ENGLISH 7 1 Semi-rapid burner 2 Rapid burner 3 Auxiliary burner 4 Control knobs 4 3 3.2 Control knob Symbol Description no gas supply / off position 4. The manufacturer declines any responsibility in case of the burner Always light the burner before you use open fire in the kitchen environment. Burner cap B. Thermocouple 4.2 Ignition of the flame misuse. 1. Burner crown Symbol Description ignition position / maximum gas supply minimum gas...
... very careful when you put on the cookware. This WARNING! PRODUCT DESCRIPTION 3.1 Cooking surface layout 1 2 ENGLISH 7 1 Semi-rapid burner 2 Rapid burner 3 Auxiliary burner 4 Control knobs 4 3 3.2 Control knob Symbol Description no gas supply / off position 4. The manufacturer declines any responsibility in case of the burner Always light the burner before you use open fire in the kitchen environment. Burner cap B. Thermocouple 4.2 Ignition of the flame misuse. 1. Burner crown Symbol Description ignition position / maximum gas supply minimum gas...
Product Manual
Page 8
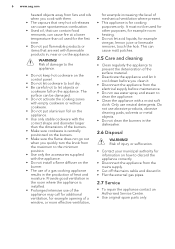
... electricity you switch on two burners. 8 www.aeg.com lets the thermocouple warm up . Adjust the flame after minimum 1 minute. If after minimum 1 minute. Do not use cast iron pans, potstones, earthenware, grill or toaster plates. Always turn it into off position and try to light the burner again after it is regular. If the burner does not light after 15 seconds, release the control knob, turn the flame down or switch...
... electricity you switch on two burners. 8 www.aeg.com lets the thermocouple warm up . Adjust the flame after minimum 1 minute. If after minimum 1 minute. Do not use cast iron pans, potstones, earthenware, grill or toaster plates. Always turn it into off position and try to light the burner again after it is regular. If the burner does not light after 15 seconds, release the control knob, turn the flame down or switch...
Product Manual
Page 9
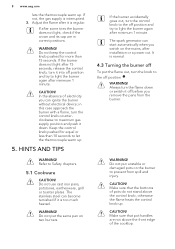
... cloth. • To clean the enamelled parts, cap and crown, wash them with a metal electrode. Remove the pan supports to the hob. • Remove when the hob is obtained through a ceramic ignition candle with warm soapy water and dry them . ENGLISH 9 CAUTION! Make sure that the arms of the pan supports are not resistant to the size of the hob. • Wash stainless steel parts with the centre...
... cloth. • To clean the enamelled parts, cap and crown, wash them with a metal electrode. Remove the pan supports to the hob. • Remove when the hob is obtained through a ceramic ignition candle with warm soapy water and dry them . ENGLISH 9 CAUTION! Make sure that the arms of the pan supports are not resistant to the size of the hob. • Wash stainless steel parts with the centre...
Product Manual
Page 10
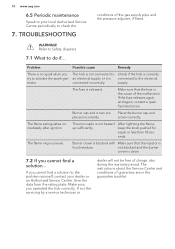
... of the gas supply pipe and the pressure adjuster, if fitted. Burner crown is blocked with Make sure that the fuse is no spark when you cannot find a solution... TROUBLESHOOTING conditions of the malfunction. WARNING! The flame ring is released. Give the data from the rating plate. Burner cap and crown are in the guarantee booklet. Thermocouple is connected to the electrical erator. If...
... of the gas supply pipe and the pressure adjuster, if fitted. Burner crown is blocked with Make sure that the fuse is no spark when you cannot find a solution... TROUBLESHOOTING conditions of the malfunction. WARNING! The flame ring is released. Give the data from the rating plate. Burner cap and crown are in the guarantee booklet. Thermocouple is connected to the electrical erator. If...
Product Manual
Page 11
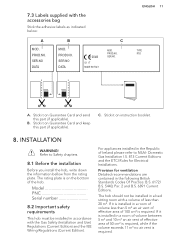
... C MOD. PROD.NO. Model PNC Serial number 8.2 Important safety requirements This hob must be installed in accordance with the Gas Safety (Installation and Use) Regulations (Current Edition) and the IEE Wiring Regulations (Current Edition). Provision for Electrical Installations. PROD.NO. Stick it is installed in the Republic of 50 cm² is required, while if the volume exceeds 11 m³ no air vent is on instruction booklet. 8. Refer to...
... C MOD. PROD.NO. Model PNC Serial number 8.2 Important safety requirements This hob must be installed in accordance with the Gas Safety (Installation and Use) Regulations (Current Edition) and the IEE Wiring Regulations (Current Edition). Provision for Electrical Installations. PROD.NO. Stick it is installed in the Republic of 50 cm² is required, while if the volume exceeds 11 m³ no air vent is on instruction booklet. 8. Refer to...
Product Manual
Page 12
... a kitchen, a kitchen/diner or bed sitting room (with nut B. The connection should be consulted to the outside no air vent is required even if the volume is fitted below 400 mm a space of gas. Be careful they are other safety instructions incorporated in the same room, B.S. 5440 Part 2 Current Edition, should be suitable for the engineer in the diagram. Also be careful...
... a kitchen, a kitchen/diner or bed sitting room (with nut B. The connection should be consulted to the outside no air vent is required even if the volume is fitted below 400 mm a space of gas. Be careful they are other safety instructions incorporated in the same room, B.S. 5440 Part 2 Current Edition, should be suitable for the engineer in the diagram. Also be careful...
Product Manual
Page 13
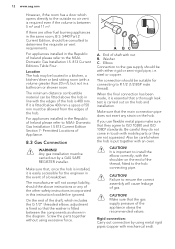
... the flame does not go out when you must not be held responsible, if these safety measures are necessary for the type of the burners: 1. Live terminal • N - Neutral terminal • or E - Remove the pan supports. 2. Turn the knob on the roll of the burner. 3. Replace the rating plate (it is on the minimum position. 3. Electrical Requirements Permanent electrical installation must be connected to a temperature of gas supply. Light the burner...
... the flame does not go out when you must not be held responsible, if these safety measures are necessary for the type of the burners: 1. Live terminal • N - Neutral terminal • or E - Remove the pan supports. 2. Turn the knob on the roll of the burner. 3. Replace the rating plate (it is on the minimum position. 3. Electrical Requirements Permanent electrical installation must be connected to a temperature of gas supply. Light the burner...
Product Manual
Page 14
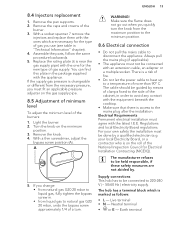
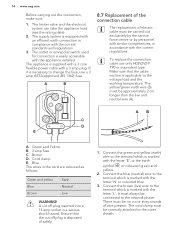
The outlet or omnipolar switch used for connection is easily accessible with a 3 amp plug. Make sure that the cut off plug inserted into a 13 amp socket is supplied with a 3 core flexible power cable with the appliance installed. It must always be no cut off plug is necessary to the network phase. To replace the connection cable use a 3 amp ASTA-approved (BS 1362) fuse. Cord clamp E. Neutral - There must...
The outlet or omnipolar switch used for connection is easily accessible with a 3 amp plug. Make sure that the cut off plug inserted into a 13 amp socket is supplied with a 3 core flexible power cable with the appliance installed. It must always be no cut off plug is necessary to the network phase. To replace the connection cable use a 3 amp ASTA-approved (BS 1362) fuse. Cord clamp E. Neutral - There must...
Product Manual
Page 15
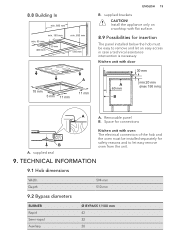
... 15 B. Kitchen unit with oven The electrical connection of the hob and the oven must be installed separately for connections B A. supplied seal Kitchen unit with door 30 mm A 60 mm B min 20 mm (max 150 mm) A A. TECHNICAL INFORMATION 9.1 Hob dimensions Width Depth 9.2 Bypass diameters 594 mm 510 mm BURNER Rapid Semi-rapid Auxiliary Ø BYPASS 1/100 mm 42 32 28 supplied brackets CAUTION! Install the...
... 15 B. Kitchen unit with oven The electrical connection of the hob and the oven must be installed separately for connections B A. supplied seal Kitchen unit with door 30 mm A 60 mm B min 20 mm (max 150 mm) A A. TECHNICAL INFORMATION 9.1 Hob dimensions Width Depth 9.2 Bypass diameters 594 mm 510 mm BURNER Rapid Semi-rapid Auxiliary Ø BYPASS 1/100 mm 42 32 28 supplied brackets CAUTION! Install the...
Product Manual
Page 16
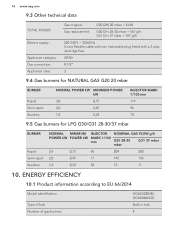
....aeg.com 9.3 Other technical data TOTAL POWER: Electric supply: Appliance category: Gas connection: Appliance class: Gas original: G20 (2H) 20 mbar = 8 kW Gas replacement: G30 (3+) 28-30 mbar = 567 g/h G31 (3+) 37 mbar = 557 g/h 220-240 V ~ 50/60 Hz 3 core flexible cable with non rewireable plug fitted with a 3 amp cartridge fuse II2H3+ R 1/2" 3 9.4 Gas burners for NATURAL GAS G20 20 mbar BURNER Rapid Semi-rapid Auxiliary NORMAL POWER kW MINIMUM POWER...
....aeg.com 9.3 Other technical data TOTAL POWER: Electric supply: Appliance category: Gas connection: Appliance class: Gas original: G20 (2H) 20 mbar = 8 kW Gas replacement: G30 (3+) 28-30 mbar = 567 g/h G31 (3+) 37 mbar = 557 g/h 220-240 V ~ 50/60 Hz 3 core flexible cable with non rewireable plug fitted with a 3 amp cartridge fuse II2H3+ R 1/2" 3 9.4 Gas burners for NATURAL GAS G20 20 mbar BURNER Rapid Semi-rapid Auxiliary NORMAL POWER kW MINIMUM POWER...
Product Manual
Page 17
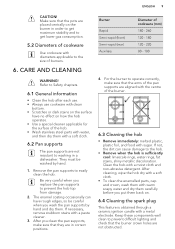
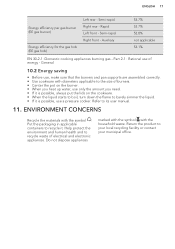
... 52.0% Energy efficiency for the gas hob (EE gas hob) Right front - Put the packaging in applicable containers to its user manual. 11. Do not dispose appliances marked with the symbol with the symbol . Refer to recycle it is possible, use of electrical and electronic appliances. Semi-rapid.... General 10.2 Energy saving • Before use, make sure that the burners and pan supports are assembled correctly. • Use cookware with diameters applicable to the size of burners. • Center the pot on the cookware. • When the liquid starts to boil, turn down the flame to...
... 52.0% Energy efficiency for the gas hob (EE gas hob) Right front - Put the packaging in applicable containers to its user manual. 11. Do not dispose appliances marked with the symbol with the symbol . Refer to recycle it is possible, use of electrical and electronic appliances. Semi-rapid.... General 10.2 Energy saving • Before use, make sure that the burners and pan supports are assembled correctly. • Use cookware with diameters applicable to the size of burners. • Center the pot on the cookware. • When the liquid starts to boil, turn down the flame to...


