
Product Manual
Page 2
... the rating plate. Visit our website for: Get usage advice, brochures, trouble shooter, service information: www.aeg.com Register your product for better service: www.registeraeg.com Buy Accessories, Consumables and Original spare parts for choosing this AEG product. CARE AND CLEANING 10 7. 2 www.aeg.com CONTENTS 1. INSTALLATION...12 9. Please spend a few minutes reading to change without notice. Warning / Caution-Safety information General information...
... the rating plate. Visit our website for: Get usage advice, brochures, trouble shooter, service information: www.aeg.com Register your product for better service: www.registeraeg.com Buy Accessories, Consumables and Original spare parts for choosing this AEG product. CARE AND CLEANING 10 7. 2 www.aeg.com CONTENTS 1. INSTALLATION...12 9. Please spend a few minutes reading to change without notice. Warning / Caution-Safety information General information...
Product Manual
Page 3
... the instructions with the appliance for future reference. 1.1 Children and vulnerable people safety • This appliance can be used by children aged from the appliance when it operates or when it . • Cleaning and user maintenance shall not be kept away unless continuously supervised. 1.2 General Safety • The appliance and its accessible parts become hot during use causes...
... the instructions with the appliance for future reference. 1.1 Children and vulnerable people safety • This appliance can be used by children aged from the appliance when it operates or when it . • Cleaning and user maintenance shall not be kept away unless continuously supervised. 1.2 General Safety • The appliance and its accessible parts become hot during use causes...
Product Manual
Page 4
... cord is damaged, it must be replaced by the manufacturer, an authorized Service or similarly qualified persons in order to avoid a hazard. • Where the appliance is directly connected to clean the appliance. • If the glass ceramic surface / glass surface is required. The earth cable is excluded from this appliance. • Remove all burners and any electrical heating element and isolate the appliance from the...
... cord is damaged, it must be replaced by the manufacturer, an authorized Service or similarly qualified persons in order to avoid a hazard. • Where the appliance is directly connected to clean the appliance. • If the glass ceramic surface / glass surface is required. The earth cable is excluded from this appliance. • Remove all burners and any electrical heating element and isolate the appliance from the...
Product Manual
Page 5
... requirements regarding adequate ventilation. 2.4 Use WARNING! Risk of the appliance can get hot. Contact our Authorised Service Centre or an electrician to change a damaged mains cable. • The shock protection of live and insulated parts must be earthed. • Before carrying out any operation make sure that the local distribution conditions (nature of the gas and gas pressure) and the adjustment...
... requirements regarding adequate ventilation. 2.4 Use WARNING! Risk of the appliance can get hot. Contact our Authorised Service Centre or an electrician to change a damaged mains cable. • The shock protection of live and insulated parts must be earthed. • Before carrying out any operation make sure that the local distribution conditions (nature of the gas and gas pressure) and the adjustment...
Product Manual
Page 6
..., solvents or metal objects. The surface can cause matt patches. 2.5 Care and cleaning • Clean regularly the appliance to prevent the deterioration of heat and moisture. Always lift these objects up when you quickly turn the knob from the electrical supply before maintenance. • Do not use water spray and steam to clean the appliance. • Clean the appliance with flammable products...
..., solvents or metal objects. The surface can cause matt patches. 2.5 Care and cleaning • Clean regularly the appliance to prevent the deterioration of heat and moisture. Always lift these objects up when you quickly turn the knob from the electrical supply before maintenance. • Do not use water spray and steam to clean the appliance. • Clean the appliance with flammable products...
Product Manual
Page 7
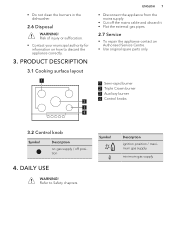
PRODUCT DESCRIPTION 3.1 Cooking surface layout 1 2 3 4 ENGLISH 7 • Disconnect the appliance from the mains supply. • Cut off the mains cable and discard it. • Flat the external gas pipes. 2.7 Service • To repair the appliance contact an Authorised Service Centre. • Use original spare parts only. 1 Semi-rapid burner 2 Triple Crown burner 3 Auxiliary burner 4 Control knobs 3.2 Control knob Symbol Description no gas supply / off position 4. Risk of injury...
PRODUCT DESCRIPTION 3.1 Cooking surface layout 1 2 3 4 ENGLISH 7 • Disconnect the appliance from the mains supply. • Cut off the mains cable and discard it. • Flat the external gas pipes. 2.7 Service • To repair the appliance contact an Authorised Service Centre. • Use original spare parts only. 1 Semi-rapid burner 2 Triple Crown burner 3 Auxiliary burner 4 Control knobs 3.2 Control knob Symbol Description no gas supply / off position 4. Risk of injury...
Product Manual
Page 8
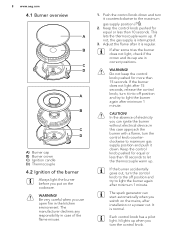
... declines any responsibility in the kitchen environment. Keep the control knob pushed for equal or less than 15 seconds. Each control knob has a pilot light. This lets the thermocouple warm up. 8 www.aeg.com 4.1 Burner overview A B C D A B C D A) Burner cap B) Burner crown C) Ignition candle D) Thermocouple 4.2 Ignition of the burner Always light the burner before you put on the mains, after installation or a power cut. If after it down and turn it into off position...
... declines any responsibility in the kitchen environment. Keep the control knob pushed for equal or less than 15 seconds. Each control knob has a pilot light. This lets the thermocouple warm up. 8 www.aeg.com 4.1 Burner overview A B C D A B C D A) Burner cap B) Burner crown C) Ignition candle D) Thermocouple 4.2 Ignition of the burner Always light the burner before you put on the mains, after installation or a power cut. If after it down and turn it into off position...
Product Manual
Page 9
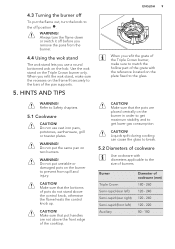
... above the front edge of pots do not stand above the control knob, otherwise the flame heats the control knob up. Do not use a round bottomed wok on the frame fit securely to the off before you remove the pans from spill and injury. CAUTION! WARNING! WARNING! Always turn the knob to the bars of cookware (mm) 180 - 260 120 - 240 120...
... above the front edge of pots do not stand above the control knob, otherwise the flame heats the control knob up. Do not use a round bottomed wok on the frame fit securely to the off before you remove the pans from spill and injury. CAUTION! WARNING! WARNING! Always turn the knob to the bars of cookware (mm) 180 - 260 120 - 240 120...
Product Manual
Page 10
... surface of the glass or between the rims of the burners and the frame (if applicable). • Wash stainless steel parts with water, and then dry them back on how the hob operates. • Use a special cleaner applicable for the surface of the gas supply pipe and the pressure adjuster, if fitted. If not, the dirt can have no effect on . 6.4 Cleaning the spark plug...
... surface of the glass or between the rims of the burners and the frame (if applicable). • Wash stainless steel parts with water, and then dry them back on how the hob operates. • Use a special cleaner applicable for the surface of the gas supply pipe and the pressure adjuster, if fitted. If not, the dirt can have no effect on . 6.4 Cleaning the spark plug...
Product Manual
Page 11
... to activate the spark gen- If not the servicing by a service technician or dealer will not be free of guarantee are placed incorrectly. Make sure that the injector is the cause of the malfunction. Burner cap and crown are in the guarantee booklet. The flame ring is clean. 7.2 If you The hob is not connected to the problem yourself, contact your...
... to activate the spark gen- If not the servicing by a service technician or dealer will not be free of guarantee are placed incorrectly. Make sure that the injector is the cause of the malfunction. Burner cap and crown are in the guarantee booklet. The flame ring is clean. 7.2 If you The hob is not connected to the problem yourself, contact your...
Product Manual
Page 12
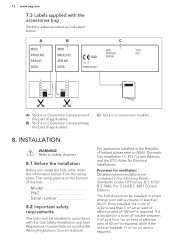
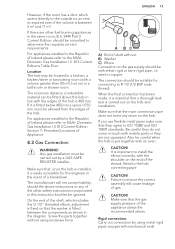
... Gas Installation I.S. 813 Current Editions and the ETCI Rules for ventilation Detailed recommendations are contained in a bed sitting room with a volume of less than 5 m³ an air vent of effective area of the hob. If it on Guarantee Card and send this part (if applicable). Model PNC Serial number 8.2 Important safety requirements This hob must be installed in the following British Standards Codes...
... Gas Installation I.S. 813 Current Editions and the ETCI Rules for ventilation Detailed recommendations are contained in a bed sitting room with a volume of less than 5 m³ an air vent of effective area of the hob. If it on Guarantee Card and send this part (if applicable). Model PNC Serial number 8.2 Important safety requirements This hob must be installed in the following British Standards Codes...
Product Manual
Page 13
... of the appliance obeys the recommended values. steel or copper. When the final connection has been made, it is carried out on the hob. Make sure that the gas supply pressure of the shaft, which opens directly to the outside no air vent is required even if the volume is important to install the elbow correctly, with either rigid or...
... of the appliance obeys the recommended values. steel or copper. When the final connection has been made, it is carried out on the hob. Make sure that the gas supply pressure of the shaft, which opens directly to the outside no air vent is required even if the volume is important to install the elbow correctly, with either rigid or...
Product Manual
Page 14
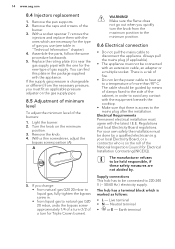
... the minimum position. 8.6 Electrical connection • Do not pull the mains cable to be held responsible, if these safety measures are necessary for the type of gas you quickly turn for Electrical Installation Contracting [NICEIC]). If the supply gas pressure is near the gas supply pipe) with the latest I.E.E. Turn the knob on the gas supply pipe. 8.5 Adjustment of minimum level To adjust the minimum level of gas supply. A 5. WARNING! Electrical Requirements Permanent electrical installation...
... the minimum position. 8.6 Electrical connection • Do not pull the mains cable to be held responsible, if these safety measures are necessary for the type of gas you quickly turn for Electrical Installation Contracting [NICEIC]). If the supply gas pressure is near the gas supply pipe) with the latest I.E.E. Turn the knob on the gas supply pipe. 8.5 Adjustment of minimum level To adjust the minimum level of gas supply. A 5. WARNING! Electrical Requirements Permanent electrical installation...
Product Manual
Page 15
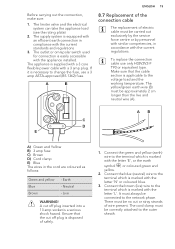
...working temperature. Make sure that the cut off plug inserted into a 13 amp socket is disposed of wire present. A cut or stray strands of safely. 1. It must be correctly attached to the outer sheath. The supply system is applicable to change the fuse, use only H03V2V2-F T90 or equivalent type. C D E AB A) Green and Yellow B) 3 amp fuse... limiter valve and the electrical system can take the appliance load (see the rating plate) 2. The outlet or omnipolar switch used for connection is marked with the current regulations. Connect the blue (neutral) wire to the...
...working temperature. Make sure that the cut off plug inserted into a 13 amp socket is disposed of wire present. A cut or stray strands of safely. 1. It must be correctly attached to the outer sheath. The supply system is applicable to change the fuse, use only H03V2V2-F T90 or equivalent type. C D E AB A) Green and Yellow B) 3 amp fuse... limiter valve and the electrical system can take the appliance load (see the rating plate) 2. The outlet or omnipolar switch used for connection is marked with the current regulations. Connect the blue (neutral) wire to the...
Product Manual
Page 16
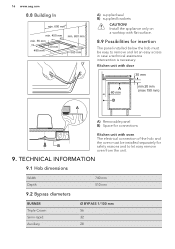
... mm) A) Removable panel B) Space for connections Kitchen unit with flat surface. 8.9 Possibilities for B safety reasons and to remove and let an easy access in case a technical assistance intervention is necessary. Install the appliance only on a worktop with oven The electrical connection of the hob and the oven must be installed separately for insertion The panel installed below the hob must be easy to let easy remove oven from...
... mm) A) Removable panel B) Space for connections Kitchen unit with flat surface. 8.9 Possibilities for B safety reasons and to remove and let an easy access in case a technical assistance intervention is necessary. Install the appliance only on a worktop with oven The electrical connection of the hob and the oven must be installed separately for insertion The panel installed below the hob must be easy to let easy remove oven from...
Product Manual
Page 17
... 17 TOTAL POWER: Electric supply: Appliance category: Gas connection: Appliance class: Gas original: G20 (2H) 20 mbar = 10,5 kW Gas replacement: G30 (3+) 28-30 mbar = 763 g/h G31 (3+) 37 mbar = 750 g/h 220-240 V ~ 50/60 Hz 3 core flexible cable with non rewireable plug fitted with a 3 amp cartridge fuse II2H3+ R 1/2" 3 9.4 Gas burners for NATURAL GAS G20 20 mbar BURNER Triple Crown Semi-rapid Auxiliary NORMAL POWER kW MINIMUM POWER kW...
... 17 TOTAL POWER: Electric supply: Appliance category: Gas connection: Appliance class: Gas original: G20 (2H) 20 mbar = 10,5 kW Gas replacement: G30 (3+) 28-30 mbar = 763 g/h G31 (3+) 37 mbar = 750 g/h 220-240 V ~ 50/60 Hz 3 core flexible cable with non rewireable plug fitted with a 3 amp cartridge fuse II2H3+ R 1/2" 3 9.4 Gas burners for NATURAL GAS G20 20 mbar BURNER Triple Crown Semi-rapid Auxiliary NORMAL POWER kW MINIMUM POWER kW...
Product Manual
Page 18
... electrical and electronic appliances. Semi-rapid Right rear - Semi-rapid Centre Middle - General 10.2 Energy saving • Before use, make sure that the burners and pan supports are assembled correctly. • Use cookware with diameters applicable to the size of burners. • Center the pot on the cookware. • When the liquid starts to boil, turn down the flame to its user manual...
... electrical and electronic appliances. Semi-rapid Right rear - Semi-rapid Centre Middle - General 10.2 Energy saving • Before use, make sure that the burners and pan supports are assembled correctly. • Use cookware with diameters applicable to the size of burners. • Center the pot on the cookware. • When the liquid starts to boil, turn down the flame to its user manual...


