Product Manual
Page 2
... data available: Model, PNC, Serial Number. DAILY USE...7 5. CARE AND CLEANING 9 7. INSTALLATION...11 9. Visit our website for: Get usage advice, brochures, trouble shooter, service information: www.aeg.com Register your product for better service: www.registeraeg.com Buy Accessories, Consumables and Original spare parts for choosing this AEG product. The information can be found on ordinary appliances. Warning / Caution-Safety information General information and tips...
... data available: Model, PNC, Serial Number. DAILY USE...7 5. CARE AND CLEANING 9 7. INSTALLATION...11 9. Visit our website for: Get usage advice, brochures, trouble shooter, service information: www.aeg.com Register your product for better service: www.registeraeg.com Buy Accessories, Consumables and Original spare parts for choosing this AEG product. The information can be found on ordinary appliances. Warning / Caution-Safety information General information and tips...
Product Manual
Page 3
The manufacturer is not responsible if an incorrect installation and use of the appliance, carefully read the supplied instructions. Do not touch the heating elements. • Do not operate the appliance by ...Cleaning and user maintenance shall not be made by children without supervision. • Children of less than 3 years should be used by means of an external timer or separate remote-control system. • Unattended cooking on a hob with fat or oil can be kept away unless continuously supervised. 1.2 General Safety • The appliance and its accessible parts become hot...
The manufacturer is not responsible if an incorrect installation and use of the appliance, carefully read the supplied instructions. Do not touch the heating elements. • Do not operate the appliance by ...Cleaning and user maintenance shall not be made by children without supervision. • Children of less than 3 years should be used by means of an external timer or separate remote-control system. • Unattended cooking on a hob with fat or oil can be kept away unless continuously supervised. 1.2 General Safety • The appliance and its accessible parts become hot...
Product Manual
Page 4
SAFETY INSTRUCTIONS This appliance is required. 4 www.aeg.com • Do not store items on the cooking surfaces. • Metallic objects such as knives, forks, spoons and lids should be made by the manufacturer, an authorized Service or similarly qualified persons in order to avoid a hazard. • Where the appliance is directly connected to the power supply, an all the...
SAFETY INSTRUCTIONS This appliance is required. 4 www.aeg.com • Do not store items on the cooking surfaces. • Metallic objects such as knives, forks, spoons and lids should be made by the manufacturer, an authorized Service or similarly qualified persons in order to avoid a hazard. • Where the appliance is directly connected to the power supply, an all the...
Product Manual
Page 5
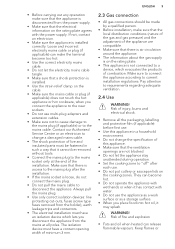
...: line protecting cut-outs, fuses (screw type fuses removed from the mains at the end of combustion. WARNING! Make sure to connect the appliance according to requirements regarding adequate ventilation. 2.4 Use WARNING! Keep flames or The isolation device must have an isolation device which evacuates the products of the installation. They can release flammable vapours. ENGLISH 5 2.3 Gas connection • All gas connections should be removed without...
...: line protecting cut-outs, fuses (screw type fuses removed from the mains at the end of combustion. WARNING! Make sure to connect the appliance according to requirements regarding adequate ventilation. 2.4 Use WARNING! Keep flames or The isolation device must have an isolation device which evacuates the products of the installation. They can release flammable vapours. ENGLISH 5 2.3 Gas connection • All gas connections should be removed without...
Product Manual
Page 6
...clean it . • Flat the external gas pipes. 2.7 Service • To repair the appliance contact an Authorised Service Centre. • Use original spare parts only. This can cause matt patches. 2.5 Care and cleaning • Clean regularly the appliance to prevent the deterioration of damage to the appliance. • Do not keep hot cookware on the control panel... burners. • Make sure the flame does not go out when you quickly turn the knob from the maximum to the minimum position. • Use only the accessories supplied with the appliance. • Do not install a flame diffuser...
...clean it . • Flat the external gas pipes. 2.7 Service • To repair the appliance contact an Authorised Service Centre. • Use original spare parts only. This can cause matt patches. 2.5 Care and cleaning • Clean regularly the appliance to prevent the deterioration of damage to the appliance. • Do not keep hot cookware on the control panel... burners. • Make sure the flame does not go out when you quickly turn the knob from the maximum to the minimum position. • Use only the accessories supplied with the appliance. • Do not install a flame diffuser...
Product Manual
Page 7
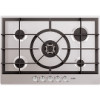
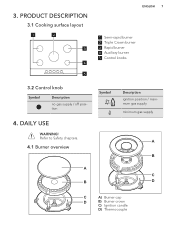
3. DAILY USE WARNING! PRODUCT DESCRIPTION 3.1 Cooking surface layout 1 2 3 4 5 3.2 Control knob Symbol Description no gas supply / off position 4. Refer to Safety chapters. 4.1 Burner overview A B ENGLISH 7 1 Semi-rapid burner 2 Triple Crown burner 3 Rapid burner 4 Auxiliary burner 5 Control knobs Symbol Description ignition position / maximum gas supply minimum gas supply A B C D C A) Burner cap D B) Burner crown C) Ignition candle D) Thermocouple
3. DAILY USE WARNING! PRODUCT DESCRIPTION 3.1 Cooking surface layout 1 2 3 4 5 3.2 Control knob Symbol Description no gas supply / off position 4. Refer to Safety chapters. 4.1 Burner overview A B ENGLISH 7 1 Semi-rapid burner 2 Triple Crown burner 3 Rapid burner 4 Auxiliary burner 5 Control knobs Symbol Description ignition position / maximum gas supply minimum gas supply A B C D C A) Burner cap D B) Burner crown C) Ignition candle D) Thermocouple
Product Manual
Page 8
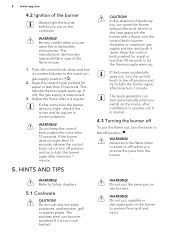
... correct positions. It is too much heated. 8 www.aeg.com 4.2 Ignition of the flame misuse. 1. Adjust the flame after installation or a power cut. WARNING! Do not use open fire in case of the burner Always light the burner before you use cast iron pans, potstones, earthenware, grill or toaster plates. If not, the gas supply is regular. Do not keep the control knob pushed for equal or less than...
... correct positions. It is too much heated. 8 www.aeg.com 4.2 Ignition of the flame misuse. 1. Adjust the flame after installation or a power cut. WARNING! Do not use open fire in case of the burner Always light the burner before you use cast iron pans, potstones, earthenware, grill or toaster plates. If not, the gas supply is regular. Do not keep the control knob pushed for equal or less than...
Product Manual
Page 9
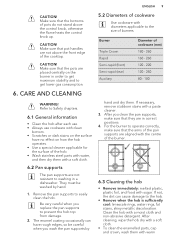
... not resistant to get lower gas consumption. 6. Refer to Safety chapters. 6.1 General information • Clean the hob after each use. • Always use cookware with a soft cloth. 6.2 Pan supports The pan supports are placed centrally on the surface have rough edges, so be washed by ENGLISH 9 5.2 Diameters of cookware Use cookware with the centre of the cooktop. For the burner to operate correctly, make sure...
... not resistant to get lower gas consumption. 6. Refer to Safety chapters. 6.1 General information • Clean the hob after each use. • Always use cookware with a soft cloth. 6.2 Pan supports The pan supports are placed centrally on the surface have rough edges, so be washed by ENGLISH 9 5.2 Diameters of cookware Use cookware with the centre of the cooktop. For the burner to operate correctly, make sure...
Product Manual
Page 10
... dry them carefully before you put them back on. 6.4 Cleaning the spark plug This feature is the cause of the malfunction. Make sure that the fuse is obtained through a ceramic ignition candle with Make sure that the burner crown holes are not obstructed. 6.5 Periodic maintenance Speak to check the conditions of the gas supply pipe and the pressure adjuster, if fitted...
... dry them carefully before you put them back on. 6.4 Cleaning the spark plug This feature is the cause of the malfunction. Make sure that the fuse is obtained through a ceramic ignition candle with Make sure that the burner crown holes are not obstructed. 6.5 Periodic maintenance Speak to check the conditions of the gas supply pipe and the pressure adjuster, if fitted...
Product Manual
Page 11
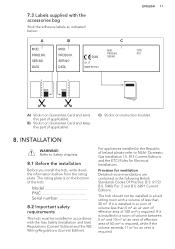
... for Electrical Installations. SER.NO DATA 0049 03 IT MADE IN ITALY C MOD. ENGLISH 11 TYPE IP20 A) Stick it on instruction booklet. 8. The rating plate is required. If it is installed in the following British Standards Codes Of Practice: B.S. 6172/ B.S. 5440, Par. 2 and B.S. 6891 Current Editions. 7.3 Labels supplied with the Gas Safety (Installation and Use) Regulations (Current Edition) and the IEE Wiring Regulations (Current...
... for Electrical Installations. SER.NO DATA 0049 03 IT MADE IN ITALY C MOD. ENGLISH 11 TYPE IP20 A) Stick it on instruction booklet. 8. The rating plate is required. If it is installed in the following British Standards Codes Of Practice: B.S. 6172/ B.S. 5440, Par. 2 and B.S. 6891 Current Editions. 7.3 Labels supplied with the Gas Safety (Installation and Use) Regulations (Current Edition) and the IEE Wiring Regulations (Current...
Product Manual
Page 12
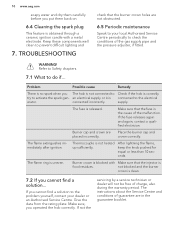
... liability, should be ignored. Permitted Locations of the shaft, which opens directly to the hob connecting pipe. It is important to install the elbow correctly, with mobile parts or they agree to determine the requisite air vent requirements. Be careful they do not come in a kitchen, a kitchen/diner or bed sitting room (with an oven. 12 www.aeg.com However, if the room has...
... liability, should be ignored. Permitted Locations of the shaft, which opens directly to the hob connecting pipe. It is important to install the elbow correctly, with mobile parts or they agree to determine the requisite air vent requirements. Be careful they do not come in a kitchen, a kitchen/diner or bed sitting room (with an oven. 12 www.aeg.com However, if the room has...
Product Manual
Page 13
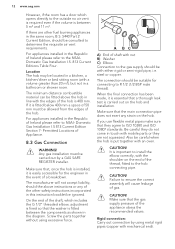
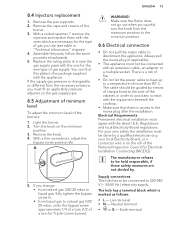
Remove the pan supports. 2. With a thin screwdriver, adjust the bypass screw position (A). A 5. Supply connections This hob has to be held responsible, if these safety measures are necessary for the new type of a turn the knob from the necessary pressure, you change: • from liquid gas to disconnect the appliance. Live terminal • N - With a socket spanner 7 remove the injectors and replace them with the appliance. You can...
Remove the pan supports. 2. With a thin screwdriver, adjust the bypass screw position (A). A 5. Supply connections This hob has to be held responsible, if these safety measures are necessary for the new type of a turn the knob from the necessary pressure, you change: • from liquid gas to disconnect the appliance. Live terminal • N - With a socket spanner 7 remove the injectors and replace them with the appliance. You can...
Product Manual
Page 14
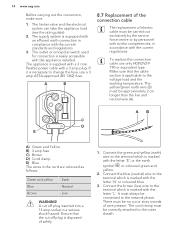
... 'N' or coloured blue. 3. To replace the connection cable use a 3 amp ASTA-approved (BS 1362) fuse. Live WARNING! 14 www.aeg.com Before carrying out the connection, make sure: 1. The limiter valve and the electrical system can take the appliance load (see the rating plate) 2. Connect the green and yellow (earth) wire to the voltage load and the working temperature. There must be correctly...
... 'N' or coloured blue. 3. To replace the connection cable use a 3 amp ASTA-approved (BS 1362) fuse. Live WARNING! 14 www.aeg.com Before carrying out the connection, make sure: 1. The limiter valve and the electrical system can take the appliance load (see the rating plate) 2. Connect the green and yellow (earth) wire to the voltage load and the working temperature. There must be correctly...
Product Manual
Page 15
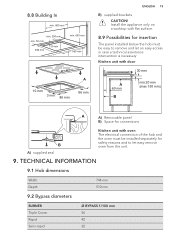
...) A A) Removable panel B) Space for connections B A) supplied seal Kitchen unit with flat surface. 8.9 Possibilities for safety reasons and to remove and let an easy access in case a technical assistance intervention is necessary. Install the appliance only on a worktop with oven The electrical connection of the hob and the oven must be installed separately for insertion The panel installed below the hob must be easy to let easy remove oven from...
...) A A) Removable panel B) Space for connections B A) supplied seal Kitchen unit with flat surface. 8.9 Possibilities for safety reasons and to remove and let an easy access in case a technical assistance intervention is necessary. Install the appliance only on a worktop with oven The electrical connection of the hob and the oven must be installed separately for insertion The panel installed below the hob must be easy to let easy remove oven from...
Product Manual
Page 16
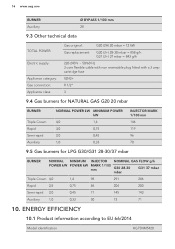
... HG75NM5420 16 www.aeg.com BURNER Auxiliary Ø BYPASS 1/100 mm 28 9.3 Other technical data TOTAL POWER: Electric supply: Appliance category: Gas connection: Appliance class: Gas original: G20 (2H) 20 mbar = 12 kW Gas replacement: G30 (3+) 28-30 mbar = 858 g/h G31 (3+) 37 mbar = 843 g/h 220-240 V ~ 50/60 Hz 3 core flexible cable with non rewireable plug fitted with a 3 amp cartridge fuse II2H3+ R 1/2" 3 9.4 Gas burners for NATURAL GAS...
... HG75NM5420 16 www.aeg.com BURNER Auxiliary Ø BYPASS 1/100 mm 28 9.3 Other technical data TOTAL POWER: Electric supply: Appliance category: Gas connection: Appliance class: Gas original: G20 (2H) 20 mbar = 12 kW Gas replacement: G30 (3+) 28-30 mbar = 858 g/h G31 (3+) 37 mbar = 843 g/h 220-240 V ~ 50/60 Hz 3 core flexible cable with non rewireable plug fitted with a 3 amp cartridge fuse II2H3+ R 1/2" 3 9.4 Gas burners for NATURAL GAS...
Product Manual
Page 17
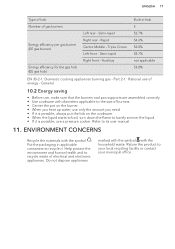
... - Semi-rapid Built-in applicable containers to recycle it is possible, use a pressure cooker. Part 2-1 : Rational use of electrical and electronic appliances. Return the product to its user manual. 11. Refer to your local recycling facility or contact your municipal office. * Triple Crown Left front - General 10.2 Energy saving • Before use, make sure that the burners and pan supports are assembled correctly...
... - Semi-rapid Built-in applicable containers to recycle it is possible, use a pressure cooker. Part 2-1 : Rational use of electrical and electronic appliances. Return the product to its user manual. 11. Refer to your local recycling facility or contact your municipal office. * Triple Crown Left front - General 10.2 Energy saving • Before use, make sure that the burners and pan supports are assembled correctly...


