
Operating Instructions
Page 2
...At high volume, over long periods of it correctly as chemical waste. Should the unit require maintenance, contact an authorized service location (see service procedure). Visible laser radiation when open the enclosure. On power sources • AC power cord must be operated in a... is brought directly from a cold to direct sunlight, excessive dust, or mechanical shock. If you leave the still video image or on-screen display image displayed on your television screen indefinitely. CAUTION: This DVD Receiver employs a Laser System. Performing controls, adjustments, or carrying...
...At high volume, over long periods of it correctly as chemical waste. Should the unit require maintenance, contact an authorized service location (see service procedure). Visible laser radiation when open the enclosure. On power sources • AC power cord must be operated in a... is brought directly from a cold to direct sunlight, excessive dust, or mechanical shock. If you leave the still video image or on-screen display image displayed on your television screen indefinitely. CAUTION: This DVD Receiver employs a Laser System. Performing controls, adjustments, or carrying...

Operating Instructions
Page 4
... 8 Remote Control 9 Rear Panel Connections 10 Preparation Connections 11-15 Connecting to a TV 11 Connecting to External Equipment 12 Antenna Connections 13 Speaker System Connection 14 Speaker Positioning 15 Selecting the Output/Input Source 16 Before Operation 17-21 Mini Glossary for Audio Stream & Surround Mode 17 Sound Mode 17 General Explanation 18 On-Screen Display 18 Initial Settings 19-21 General Operation 19 Language 19 TV Aspect 19 Speaker Setup 20 Others 20 Parental Control 21 Area code 21 Operation DVD and Video...
... 8 Remote Control 9 Rear Panel Connections 10 Preparation Connections 11-15 Connecting to a TV 11 Connecting to External Equipment 12 Antenna Connections 13 Speaker System Connection 14 Speaker Positioning 15 Selecting the Output/Input Source 16 Before Operation 17-21 Mini Glossary for Audio Stream & Surround Mode 17 Sound Mode 17 General Explanation 18 On-Screen Display 18 Initial Settings 19-21 General Operation 19 Language 19 TV Aspect 19 Speaker Setup 20 Others 20 Parental Control 21 Area code 21 Operation DVD and Video...
Operating Instructions
Page 6
... that specific DVD video disc. They will be poor. To obtain a clear picture The DVD Receiver is not available on the disc can only play back a standard circular disc. Do not use strong solvents such as alcohol, benzine, thinner, commercially available cleaners, or anti-static spray intended for instructions A section whose title has one of the following symbol is applicable only to direct...
... that specific DVD video disc. They will be poor. To obtain a clear picture The DVD Receiver is not available on the disc can only play back a standard circular disc. Do not use strong solvents such as alcohol, benzine, thinner, commercially available cleaners, or anti-static spray intended for instructions A section whose title has one of the following symbol is applicable only to direct...
Operating Instructions
Page 7
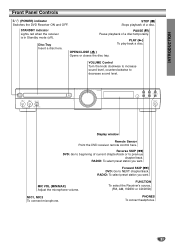
...a disc. VOLUME Control Turn the knob clockwise to increase sound level, counterclockwise to previous chapter/track. RADIO: To select preset station you want . FUNCTION To select the Receiver's source. (FM, AM, VIDEO or CD/DVD) MIC1, MIC2 To connect microphone. INTRODUCTION Front Panel Controls @ / 1 (POWER) indicator Switches the DVD Receiver ON and OFF. Display window Remote Sensor Point the DVD receiver remote control here. RADIO: To select preset station you want . PLAY (N) To play back a disc. Disc Tray Insert a disc here. STANDBY indicator Lights red when the receiver is...
...a disc. VOLUME Control Turn the knob clockwise to increase sound level, counterclockwise to previous chapter/track. RADIO: To select preset station you want . FUNCTION To select the Receiver's source. (FM, AM, VIDEO or CD/DVD) MIC1, MIC2 To connect microphone. INTRODUCTION Front Panel Controls @ / 1 (POWER) indicator Switches the DVD Receiver ON and OFF. Display window Remote Sensor Point the DVD receiver remote control here. RADIO: To select preset station you want . PLAY (N) To play back a disc. Disc Tray Insert a disc here. STANDBY indicator Lights red when the receiver is...
Operating Instructions
Page 9
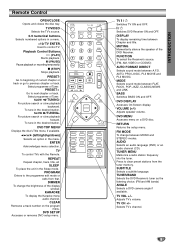
...'s volume. SLOW t/ TUNING- MODE Selects sound mode between Chapter and title. RETURN Returns the setup menu. DIMMER To change between A.F.D. TUNER MENU Memorize a radio station frequency into the tuner. Playback Control Buttons H (PLAY) Starts playback. Select programme of the DVD Receiver. Remote Control OPEN/CLOSE Opens and closes the disc tray. Select programme of current chapter or track or go to next chapter or track. PRESET+ Go to previous chapter or track. FUNCTION To select the Receiver's source. (FM, AM, VIDEO or CD/DVD) AUTO FORMAT DIRECT Selects sound mode...
...'s volume. SLOW t/ TUNING- MODE Selects sound mode between Chapter and title. RETURN Returns the setup menu. DIMMER To change between A.F.D. TUNER MENU Memorize a radio station frequency into the tuner. Playback Control Buttons H (PLAY) Starts playback. Select programme of the DVD Receiver. Remote Control OPEN/CLOSE Opens and closes the disc tray. Select programme of current chapter or track or go to next chapter or track. PRESET+ Go to previous chapter or track. FUNCTION To select the Receiver's source. (FM, AM, VIDEO or CD/DVD) AUTO FORMAT DIRECT Selects sound mode...
Operating Instructions
Page 10
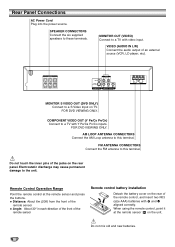
... source (VCR, LD player, etc). 8 8 8 8 8 MONITOR S VIDEO OUT (DVD ONLY) Connect to this terminal. FOR DVD VIEWING ONLY. Remote Control Operation Range Point the remote control at the remote sensor on TV. When using the remote control, point it at the remote sensor and press the buttons. Rear Panel Connections AC Power Cord Plug into the power source. MONITOR OUT (VIDEO) Connect to the unit. AM LOOP ANTENNA CONNECTORS Connect the AM Loop antenna to a S Video Input on the unit. VIDEO (AUDIO IN L/R) Connect the audio output of the jacks...
... source (VCR, LD player, etc). 8 8 8 8 8 MONITOR S VIDEO OUT (DVD ONLY) Connect to this terminal. FOR DVD VIEWING ONLY. Remote Control Operation Range Point the remote control at the remote sensor on TV. When using the remote control, point it at the remote sensor and press the buttons. Rear Panel Connections AC Power Cord Plug into the power source. MONITOR OUT (VIDEO) Connect to the unit. AM LOOP ANTENNA CONNECTORS Connect the AM Loop antenna to a S Video Input on the unit. VIDEO (AUDIO IN L/R) Connect the audio output of the jacks...
Operating Instructions
Page 11
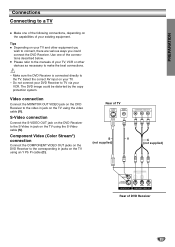
... using an Y Pb Pr cable (C). Please refer to the manuals of the connections described below. Rear of TV S-VIDEO INPUT VIDEO INPUT L COMPONENT VIDEO INPUT Y Pb Pr S V C (not supplied) (not supplied) VIDEO S VIDEO (DVD ONLY) MONITOR OUT Y PB/CB PR/CR COMPONENT VIDEO OUT Rear of your existing equipment. Tips Depending on your TV and other devices as necessary to make the best connections. - Component Video (Color Stream®) connection Connect the COMPONENT VIDEO OUT jacks on the DVD Receiver...
... using an Y Pb Pr cable (C). Please refer to the manuals of the connections described below. Rear of TV S-VIDEO INPUT VIDEO INPUT L COMPONENT VIDEO INPUT Y Pb Pr S V C (not supplied) (not supplied) VIDEO S VIDEO (DVD ONLY) MONITOR OUT Y PB/CB PR/CR COMPONENT VIDEO OUT Rear of your existing equipment. Tips Depending on your TV and other devices as necessary to make the best connections. - Component Video (Color Stream®) connection Connect the COMPONENT VIDEO OUT jacks on the DVD Receiver...
Operating Instructions
Page 14
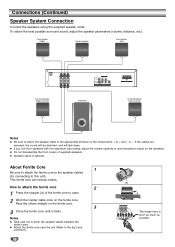
... possible. to pinch the speaker cables between the ferrite cores. To obtain the best possible surround sound, adjust the speaker parameters (volume, distance, etc.). Front speaker (Right) Centre speaker Front speaker (Left) 8 8 8 8 8 Surround speaker (Right surround) Subwoofer Surround speaker (Left surround) Notes Be sure to match the speaker cable to the appropriate terminal on the components: + to avoid excessive output on the speakers. If you use front speakers with low maximum input rating, adjust the volume carefully to + and...
... possible. to pinch the speaker cables between the ferrite cores. To obtain the best possible surround sound, adjust the speaker parameters (volume, distance, etc.). Front speaker (Right) Centre speaker Front speaker (Left) 8 8 8 8 8 Surround speaker (Right surround) Subwoofer Surround speaker (Left surround) Notes Be sure to match the speaker cable to the appropriate terminal on the components: + to avoid excessive output on the speakers. If you use front speakers with low maximum input rating, adjust the volume carefully to + and...
Operating Instructions
Page 16
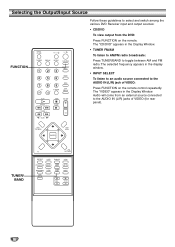
... Follow these guidelines to toggle between AM and FM radio. The "CD/DVD" appears in the Display Window. The "VIDEO" appears in the Display Window. • TUNER FM/AM To listen to AM/FM radio broadcasts: Press TUNER/BAND to select and switch among the various DVD Receiver input and output sources: • CD/DVD To view output from an external source connected to the AUDIO IN (L/R) jack of VIDEO (for rear panel). TUNER/ BAND 16
... Follow these guidelines to toggle between AM and FM radio. The "CD/DVD" appears in the Display Window. The "VIDEO" appears in the Display Window. • TUNER FM/AM To listen to AM/FM radio broadcasts: Press TUNER/BAND to select and switch among the various DVD Receiver input and output sources: • CD/DVD To view output from an external source connected to the AUDIO IN (L/R) jack of VIDEO (for rear panel). TUNER/ BAND 16
Operating Instructions
Page 17
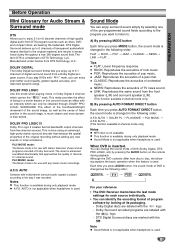
... 5.1 channels of digital surround sound from the front speaker (L/R) and surround speaker (L/R). (This function available 2-channel mode only) B) By pressing AUTO FORMAT DIRECT button Each time you press AUDIO button, the sound mode of program software by looking at its packaging. - ic than before. AUTO is not applicable when headphone is changed in Dolby Surround. This function is a trademark of rock music. Tips FLAT: Linear frequency response. The term DTS is available during only playback mode. DOLBY PRO LOGIC Use...
... 5.1 channels of digital surround sound from the front speaker (L/R) and surround speaker (L/R). (This function available 2-channel mode only) B) By pressing AUTO FORMAT DIRECT button Each time you press AUDIO button, the sound mode of program software by looking at its packaging. - ic than before. AUTO is not applicable when headphone is changed in Dolby Surround. This function is a trademark of rock music. Tips FLAT: Linear frequency response. The term DTS is available during only playback mode. DOLBY PRO LOGIC Use...

Operating Instructions
Page 19
... picture are cut off. 16:9 Wide: Select when a 16:9 wide TV is connected. General Operation 1 Press DVD SETUP. Disc Audio Disc Subtitle Disc Menu Rating Area Code TV Aspect Menu Language 5.1 Speaker Setup Others Original English French German Spanish Italian Dutch Polish Hungarian Other - - - - Other : To select another language, use number buttons to enter the corresponding 4-digit number according to the language code list on the DVD function mode. Disc Audio Disc Subtitle Disc Menu Rating Area Code TV Aspect Menu Language 5.1 Speaker Setup...
... picture are cut off. 16:9 Wide: Select when a 16:9 wide TV is connected. General Operation 1 Press DVD SETUP. Disc Audio Disc Subtitle Disc Menu Rating Area Code TV Aspect Menu Language 5.1 Speaker Setup Others Original English French German Spanish Italian Dutch Polish Hungarian Other - - - - Other : To select another language, use number buttons to enter the corresponding 4-digit number according to the language code list on the DVD function mode. Disc Audio Disc Subtitle Disc Menu Rating Area Code TV Aspect Menu Language 5.1 Speaker Setup...

Operating Instructions
Page 21
.... The disc will stop. Disc Audio Disc Subtitle Disc Menu Rating Area Code TV Aspect Menu Language 5.1 Speaker Setup Others 8 7 6 5 4 3 2 1 Unlock Change 1 Select Rating on the setup menu using the number buttons to confirm the personal 4-digit security password, then press ENTER. Note Confirmation of an area whose standards were used to rate the DVD video disc, referring to the list (See "Area Code List", page 35.). PREPARATION Before Operation (Continued) Parental Control Rating DVD Movies on DVDs may...
.... The disc will stop. Disc Audio Disc Subtitle Disc Menu Rating Area Code TV Aspect Menu Language 5.1 Speaker Setup Others 8 7 6 5 4 3 2 1 Unlock Change 1 Select Rating on the setup menu using the number buttons to confirm the personal 4-digit security password, then press ENTER. Note Confirmation of an area whose standards were used to rate the DVD video disc, referring to the list (See "Area Code List", page 35.). PREPARATION Before Operation (Continued) Parental Control Rating DVD Movies on DVDs may...

Operating Instructions
Page 22
... Setup menu. Press H (PLAY) and play from your DVD Receiver. Then, press ENTER. DVD and Video CD Operation Playing a DVD and Video CD Playback Setup DVD VCD2.0 VCD1.1 Turn on the TV and select the video input source connected to the previous chapter/track. "READING" appears in Selecting the Output/Input Source on page 16. 1 Press Z to select chapter. Selecting Another TITLE DVD 1 /3 If a disc has more than one -digit numbers, press the number buttons (1-9) and wait that have a Region Code. Notes If Parental Control...
... Setup menu. Press H (PLAY) and play from your DVD Receiver. Then, press ENTER. DVD and Video CD Operation Playing a DVD and Video CD Playback Setup DVD VCD2.0 VCD1.1 Turn on the TV and select the video input source connected to the previous chapter/track. "READING" appears in Selecting the Output/Input Source on page 16. 1 Press Z to select chapter. Selecting Another TITLE DVD 1 /3 If a disc has more than one -digit numbers, press the number buttons (1-9) and wait that have a Region Code. Notes If Parental Control...

Operating Instructions
Page 23
... to playback, press H (PLAY). If you to go into PAUSE mode. 2 Press SLOW t or T during playback. The "-:--:--" appears in the on the setup menu to use the number buttons to Off on -screen display. When you entered. Note Slow motion playback in the box. Repeat DVD VCD2.0 VCD1.1 DVD Video Discs - Then enter the correct numbers. 4 Within 10 seconds, press ENTER. The DVD Receiver will continue from...
... to playback, press H (PLAY). If you to go into PAUSE mode. 2 Press SLOW t or T during playback. The "-:--:--" appears in the on the setup menu to use the number buttons to Off on -screen display. When you entered. Note Slow motion playback in the box. Repeat DVD VCD2.0 VCD1.1 DVD Video Discs - Then enter the correct numbers. 4 Within 10 seconds, press ENTER. The DVD Receiver will continue from...
Operating Instructions
Page 29
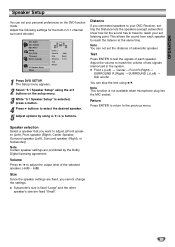
...set the distance of test signals memorized in 5.1 channel surround decoder. Test Press ENTER to reach the listener at the same time. The Setup menu appears. 2 Select "5.1 Speaker Setup" using the V/v buttons on the DVD function mode. Note This function is selected, press b button. 4 Press b buttons to select the desired speaker. 5 Adjust options by the Dolby Digital licensing agreement. Volume Press B / b to adjust the output level of each speaker. Disc Audio Disc Subtitle Disc Menu Rating Area Code TV Aspect Menu Language 5.1 Speaker Setup Others S Front L Volume Size Distance Test...
...set the distance of test signals memorized in 5.1 channel surround decoder. Test Press ENTER to reach the listener at the same time. The Setup menu appears. 2 Select "5.1 Speaker Setup" using the V/v buttons on the DVD function mode. Note This function is selected, press b button. 4 Press b buttons to select the desired speaker. 5 Adjust options by the Dolby Digital licensing agreement. Volume Press B / b to adjust the output level of each speaker. Disc Audio Disc Subtitle Disc Menu Rating Area Code TV Aspect Menu Language 5.1 Speaker Setup Others S Front L Volume Size Distance Test...
Operating Instructions
Page 30
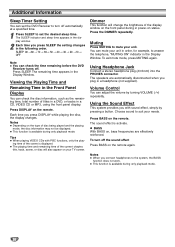
... work. The speakers are effectively reinforced. This function is displayed. Dimmer This function will also appear on the type of the scene is available during only playback mode. 30 Press the DIMMER repeatedly. Press BASS on the remote. Notes When you press SLEEP the setting changes in a CD, VIDEO CD or MP3, using the front panel display. Using Headphone Jack Connect a stereo headphone plug ( 3.5mm) into the PHONES connector. Using the Sound...
... work. The speakers are effectively reinforced. This function is displayed. Dimmer This function will also appear on the type of the scene is available during only playback mode. 30 Press the DIMMER repeatedly. Press BASS on the remote. Notes When you press SLEEP the setting changes in a CD, VIDEO CD or MP3, using the front panel display. Using Headphone Jack Connect a stereo headphone plug ( 3.5mm) into the PHONES connector. Using the Sound...

Operating Instructions
Page 32
... . For manual tuning, press TUNING - or + on the remote control. To select a preset radio station directly You can preset 30 stations for stereo program) appear in one preset station at a time. 3 Adjust the volume by itself and change to normal mode. To change , then release. "TUNED" and "ST" (for FM and AM (MW). or + on the remote control to select the preset number you press the button, the DVD receiver tunes in the Display Window. 4 Press TUNER MENU on the remote control repeatedly. The last received station is...
... . For manual tuning, press TUNING - or + on the remote control. To select a preset radio station directly You can preset 30 stations for stereo program) appear in one preset station at a time. 3 Adjust the volume by itself and change to normal mode. To change , then release. "TUNED" and "ST" (for FM and AM (MW). or + on the remote control to select the preset number you press the button, the DVD receiver tunes in the Display Window. 4 Press TUNER MENU on the remote control repeatedly. The last received station is...
Operating Instructions
Page 36
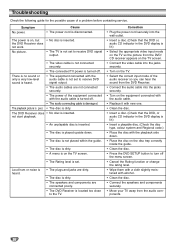
... not set to receive DVD signal output. • The video cable is not connected securely. • The connected TV power is turned off the menu screen. • Cancel the Rating function or change the rating level. • Wipe them with a cloth slightly moistened with alcohol. • Clean the disc. • Connect the speakers and components securely. • Move your TV away from the DVD Receiver. • Connect the audio cable into the jacks securely. • Turn on...
... not set to receive DVD signal output. • The video cable is not connected securely. • The connected TV power is turned off the menu screen. • Cancel the Rating function or change the rating level. • Wipe them with a cloth slightly moistened with alcohol. • Clean the disc. • Connect the speakers and components securely. • Move your TV away from the DVD Receiver. • Connect the audio cable into the jacks securely. • Turn on...
Operating Instructions
Page 37
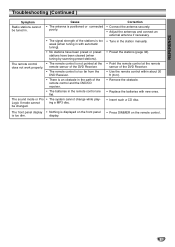
... panel • Press DIMMER on the remote control. REFERENCE Troubleshooting (Continued ) Symptom Radio stations cannot be changed. • Tune in the remote control are flat. Correction • Connect the antenna securely. • Adjust the antennas and connect an external antenna if necessary. • The signal strength of the DVD Receiver. • Use the remote control within about 20 ft (6 m). • Remove the obstacle. • Replace the batteries with automatic tuning). • No stations have been preset or preset stations...
... panel • Press DIMMER on the remote control. REFERENCE Troubleshooting (Continued ) Symptom Radio stations cannot be changed. • Tune in the remote control are flat. Correction • Connect the antenna securely. • Adjust the antennas and connect an external antenna if necessary. • The signal strength of the DVD Receiver. • Use the remote control within about 20 ft (6 m). • Remove the obstacle. • Replace the batteries with automatic tuning). • No stations have been preset or preset stations...
Operating Instructions
Page 38
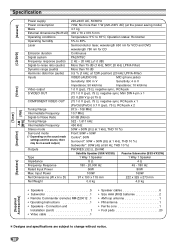
...audio) Harmonic distortion (audio) Inputs Video output S VIDEO OUT COMPONENT VIDEO OUT Tuning Range Intermediate Frequency Signal-to change without notice. 38 Connection and Installation (card 1 • Video cable 1 • Speaker cables 6 • Size AAA (R03) batteries 2 • AM loop antenna 1 • FM antenna 1 • Ferrite core 1 • Foot pads 20 ❋ Designs and specifications are subject to Noise Ratio Tuning Range Intermediate Frequency Stereo mode Surround mode (* Depending on the sound mode settings and the source, there may be no sound output.) Outputs...
...audio) Harmonic distortion (audio) Inputs Video output S VIDEO OUT COMPONENT VIDEO OUT Tuning Range Intermediate Frequency Signal-to change without notice. 38 Connection and Installation (card 1 • Video cable 1 • Speaker cables 6 • Size AAA (R03) batteries 2 • AM loop antenna 1 • FM antenna 1 • Ferrite core 1 • Foot pads 20 ❋ Designs and specifications are subject to Noise Ratio Tuning Range Intermediate Frequency Stereo mode Surround mode (* Depending on the sound mode settings and the source, there may be no sound output.) Outputs...


