
Operating Instructions
Page 2
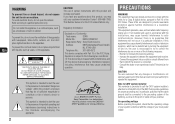
...-930-6972 This device complies with newspapers, table-cloths, curtains, etc. REFER SERVICING TO QUALIFIED SERVICE PERSONNEL." sony customer Information Center 1-800-488-7669. Do not install the appliance in a residential installation. Trade name: SONY Model No.: BMZ-K1/BMZ-K2 Responsible Party: Sony Electronics Inc. CAUTION You are designed to qualified personnel only. On operating voltage Before operating the system, check that...
...-930-6972 This device complies with newspapers, table-cloths, curtains, etc. REFER SERVICING TO QUALIFIED SERVICE PERSONNEL." sony customer Information Center 1-800-488-7669. Do not install the appliance in a residential installation. Trade name: SONY Model No.: BMZ-K1/BMZ-K2 Responsible Party: Sony Electronics Inc. CAUTION You are designed to qualified personnel only. On operating voltage Before operating the system, check that...
Operating Instructions
Page 3
.... Please be aware that among those discs, there are not finalized at the end of recording cannot be played on the lens inside the CD player. Vibrating - Attempting to direct sunlight. TABLE OF CONTENTS PREPARATIONS 4 PARTS AND CONTROLS 5 ADJUSTMENTS BEFORE OPERATION .......... 8 SOUND ADJUSTMENTS 9 CD OPERATIONS 10 MP3-CD OPERATIONS 13 TUNER OPERATIONS 15 TIMER OPERATIONS 16 CONNECTING A PERSONAL COMPUTER .... 18 REFERENCE 21 En 3 Do not use this unit. Should this unit...
.... Please be aware that among those discs, there are not finalized at the end of recording cannot be played on the lens inside the CD player. Vibrating - Attempting to direct sunlight. TABLE OF CONTENTS PREPARATIONS 4 PARTS AND CONTROLS 5 ADJUSTMENTS BEFORE OPERATION .......... 8 SOUND ADJUSTMENTS 9 CD OPERATIONS 10 MP3-CD OPERATIONS 13 TUNER OPERATIONS 15 TIMER OPERATIONS 16 CONNECTING A PERSONAL COMPUTER .... 18 REFERENCE 21 En 3 Do not use this unit. Should this unit...

Operating Instructions
Page 4
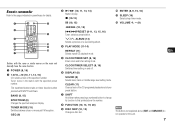
... side of the remote commander and insert two R6 (size AA) batteries with the black stripes go to the 9 terminals. 4 FM antenna 4 Connect the AC power cord to the speakers. Connect the FM antenna to the FM 75 Ω terminal and the AM antenna to find best reception. When the AC power cord is used for the first time, DEMO appears in the AC power cord to the...
... side of the remote commander and insert two R6 (size AA) batteries with the black stripes go to the 9 terminals. 4 FM antenna 4 Connect the AC power cord to the speakers. Connect the FM antenna to the FM 75 Ω terminal and the AM antenna to find best reception. When the AC power cord is used for the first time, DEMO appears in the AC power cord to the...
Operating Instructions
Page 5
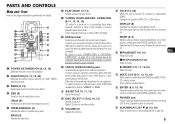
... a disc slot. Changes the display in CD playback mode. sSTOP/CLEAR (10-13) Stops CD play list. 5 i-Bass (9) Produces rich and clear low frequency sound. 5 TREBLE/MIDDLE (9) Adjusts the treble or middle range level. Tuner: manually tunes up or down . Be sure to see "CONNECTING A PERSONAL COMPUTER" on page 18 for details. @ 1 2 # 3 $ 4 % 5 6 ^ 7 8 & 9 * 0 ! 1 POWER 6STANDBY/ON (8, 15, 16) Switches the unit on and off : activates or deactivated DEMO. Turns the back light...
... a disc slot. Changes the display in CD playback mode. sSTOP/CLEAR (10-13) Stops CD play list. 5 i-Bass (9) Produces rich and clear low frequency sound. 5 TREBLE/MIDDLE (9) Adjusts the treble or middle range level. Tuner: manually tunes up or down . Be sure to see "CONNECTING A PERSONAL COMPUTER" on page 18 for details. @ 1 2 # 3 $ 4 % 5 6 ^ 7 8 & 9 * 0 ! 1 POWER 6STANDBY/ON (8, 15, 16) Switches the unit on and off : activates or deactivated DEMO. Turns the back light...

Operating Instructions
Page 6
... (4) Connect the speaker cords of the supplied speakers. 6 AC power cord (4) 6 To switch function to external input, press FUNCTION repeatedly to the pages indicated in parentheses for your equipment. Connect the red plug to the R jack, and the white plug to connect audio equipment. However, the signal is not output when the function is "VIDEO" or "AUX". 4 VIDEO OUT Signals from external equipment. Use a cable with RCA phono plugs (red plug to R jack, white plug to the operating instructions...
... (4) Connect the speaker cords of the supplied speakers. 6 AC power cord (4) 6 To switch function to external input, press FUNCTION repeatedly to the pages indicated in parentheses for your equipment. Connect the red plug to the R jack, and the white plug to connect audio equipment. However, the signal is not output when the function is "VIDEO" or "AUX". 4 VIDEO OUT Signals from external equipment. Use a cable with RCA phono plugs (red plug to R jack, white plug to the operating instructions...
Operating Instructions
Page 7
... specified preset number. The numbered buttons take on and off. 6 DISPLAY (8) SOUND (9) Selects bass, treble or middle range level setting mode. BAND (8, 15) SPECTRUM (8) Changes the spectrum analyser display. M/N ALBUM (13) Selects a previous or a succeeding album. 4 PLAY MODE (11-14) REPEAT (11) Selects repeat CD playback mode. 5 CLOCK/TIMER SET (8, 16) Enters clock and timer setting mode. s (10-13) a (10, 15) f/g (10, 15) r/tPRESET (8-11, 13, 15, 16) Tuner: selects a preset station. TUNER MODE (15) Switches between stereo or...
... specified preset number. The numbered buttons take on and off. 6 DISPLAY (8) SOUND (9) Selects bass, treble or middle range level setting mode. BAND (8, 15) SPECTRUM (8) Changes the spectrum analyser display. M/N ALBUM (13) Selects a previous or a succeeding album. 4 PLAY MODE (11-14) REPEAT (11) Selects repeat CD playback mode. 5 CLOCK/TIMER SET (8, 16) Enters clock and timer setting mode. s (10-13) a (10, 15) f/g (10, 15) r/tPRESET (8-11, 13, 15, 16) Tuner: selects a preset station. TUNER MODE (15) Switches between stereo or...
Operating Instructions
Page 8
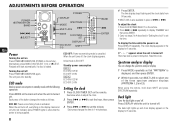
... turned off. Press MODE on the display clears and only the red indicator above POWER lights to set the minute. ECO ON: Power economizing mode is loaded. Playback will start automatically if a disc is activated. power is turned off , everything on the main unit when the unit is ECO OFF. ADJUSTMENTS BEFORE OPERATION POWER POWER 6STANDBY/ON BAND DISPLAY SPECTRUM MODE MULTI JOG r BAND t r,t zEJECT ENTER CLOCK/TIMER SET ENTER DISPLAY DISC SELECT (1-5) SHIFT En Power Turning...
... turned off. Press MODE on the display clears and only the red indicator above POWER lights to set the minute. ECO ON: Power economizing mode is loaded. Playback will start automatically if a disc is activated. power is turned off , everything on the main unit when the unit is ECO OFF. ADJUSTMENTS BEFORE OPERATION POWER POWER 6STANDBY/ON BAND DISPLAY SPECTRUM MODE MULTI JOG r BAND t r,t zEJECT ENTER CLOCK/TIMER SET ENTER DISPLAY DISC SELECT (1-5) SHIFT En Power Turning...
Operating Instructions
Page 9
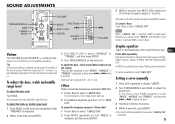
... red indicator on the remote Press SOUND repeatedly so that "FREQ" is retained during power-off with SOUND on the remote). Note When "I-BASS ON" is selected, BASS is a customized curve (see "Setting a curve manually") To cancel equalization, select "GEQ OFF". To activate BASS, cancel i-Bass. on the remote. Adjust from "-4" to select "I-BASS OFF". To adjust the bass, treble and middle range level on the i-Bass button lights up. 2 Turn BASS to adjust...
... red indicator on the remote Press SOUND repeatedly so that "FREQ" is retained during power-off with SOUND on the remote). Note When "I-BASS ON" is selected, BASS is a customized curve (see "Setting a curve manually") To cancel equalization, select "GEQ OFF". To activate BASS, cancel i-Bass. on the remote. Adjust from "-4" to select "I-BASS OFF". To adjust the bass, treble and middle range level on the i-Bass button lights up. 2 Turn BASS to adjust...

Operating Instructions
Page 10
CD OPERATIONS FUNCTION FUNCTION PLAY MODE f/r, t/g zEJECT DISPLAY 1-0/10,+10 a,s,c MULTI JOG r PLAY MODE DISPLAY DISC SKIP t c/d,f,g, a,s REPEAT DISC SELECT (1-5) En Notes •Do not insert 8-cm (3-inch) discs. Do not use such discs. •Do not attach adhesive lavel to either side CD-R/RW discs, as audio CDs. 1 Press FUNCTION repeatedly to select the CD function, and load disc(s). The DISC SELECT button lights in amber when a disc is inserted at the corresponding...
CD OPERATIONS FUNCTION FUNCTION PLAY MODE f/r, t/g zEJECT DISPLAY 1-0/10,+10 a,s,c MULTI JOG r PLAY MODE DISPLAY DISC SKIP t c/d,f,g, a,s REPEAT DISC SELECT (1-5) En Notes •Do not insert 8-cm (3-inch) discs. Do not use such discs. •Do not attach adhesive lavel to either side CD-R/RW discs, as audio CDs. 1 Press FUNCTION repeatedly to select the CD function, and load disc(s). The DISC SELECT button lights in amber when a disc is inserted at the corresponding...

Operating Instructions
Page 11
... remote). •During programmed playback, you switch the play mode to start play. Each time you press the button, a track is displayed. The mode changes as "--:--". •You cannot program more than 30 tracks. You cannot set "ALL DISCS SHUF" and """ at same time. To cancel repeat play mode the unit plays all the tracks on one track repeatedly. The display changes in random order (see "Programmed play mode changes in the display. To eject the disc...
... remote). •During programmed playback, you switch the play mode to start play. Each time you press the button, a track is displayed. The mode changes as "--:--". •You cannot program more than 30 tracks. You cannot set "ALL DISCS SHUF" and """ at same time. To cancel repeat play mode the unit plays all the tracks on one track repeatedly. The display changes in random order (see "Programmed play mode changes in the display. To eject the disc...

Operating Instructions
Page 12
... the CDs. 2 Hold down s on CD-R/RW drives may be played back. • Do not load an unrecorded CD-R/RW disc. To add a track to the end of CDs. The same program plays back if you eject either of the program. To clear the entire program Press s in the display, and then the unit will turn itself off automatically. 3 Disconnect the AC power cord from...
... the CDs. 2 Hold down s on CD-R/RW drives may be played back. • Do not load an unrecorded CD-R/RW disc. To add a track to the end of CDs. The same program plays back if you eject either of the program. To clear the entire program Press s in the display, and then the unit will turn itself off automatically. 3 Disconnect the AC power cord from...
Operating Instructions
Page 14
...CHANGE" disappears. 3 Select an album and a track. 4 Repeat steps 2 and 3 to 320 kbps. however, for the CD-ROMs. This unit can play MP3 files recorded in the format compliant with packet writing utility. Programmed play 1 In stop mode, press PLAY MODE...start play of MP3 tracks, depending on the number of recorded tracks and the complexity of the album tree. •This unit supports a multi-session discs; The assured bit rate range for Standardization". character codes wthich cannot be represented in the format compliant with CD-DA tracks and MP3 tracks, it plays only one operation...
...CHANGE" disappears. 3 Select an album and a track. 4 Repeat steps 2 and 3 to 320 kbps. however, for the CD-ROMs. This unit can play MP3 files recorded in the format compliant with packet writing utility. Programmed play 1 In stop mode, press PLAY MODE...start play of MP3 tracks, depending on the number of recorded tracks and the complexity of the album tree. •This unit supports a multi-session discs; The assured bit rate range for Standardization". character codes wthich cannot be represented in the format compliant with CD-DA tracks and MP3 tracks, it plays only one operation...
Operating Instructions
Page 15
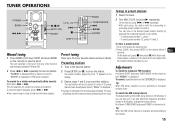
... press TUNER MODE on the remote. - The preset number, beginning from any other stations. Tip: When FM stereo reception is 10 kHz/step. TUNER OPERATIONS POWER BAND f,g 1-0/10,+10 a,s,c MULTI JOG r ENTER s SHIFT BAND TUNER MODE t f,g ENTER Manual tuning 1 Press BAND (hold down SHIFT and press BAND on the main unit. To switch the AM tuning interval The default setting of your favourite stations and tune in . Adjustments To switch to tune...
... press TUNER MODE on the remote. - The preset number, beginning from any other stations. Tip: When FM stereo reception is 10 kHz/step. TUNER OPERATIONS POWER BAND f,g 1-0/10,+10 a,s,c MULTI JOG r ENTER s SHIFT BAND TUNER MODE t f,g ENTER Manual tuning 1 Press BAND (hold down SHIFT and press BAND on the main unit. To switch the AM tuning interval The default setting of your favourite stations and tune in . Adjustments To switch to tune...
Operating Instructions
Page 16
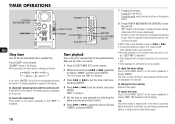
... stop timer setting in the desired station. 8 Press POWER 6STANDBY/ON (POWER) to display "DAILY". The remaining time is displayed for 6 seconds. To play CD, load disc(s). To change your previous setting, or simply use the same setting again. 16 Make sure the clock is set correctly. 1 Press CLOCK/TIMER SET on time, the time to display "OFF". 5 disappear from the display. After the specified timer-activated duration, the unit turns off . Timer standby mode is also cancelled. •The timer playback...
... stop timer setting in the desired station. 8 Press POWER 6STANDBY/ON (POWER) to display "DAILY". The remaining time is displayed for 6 seconds. To play CD, load disc(s). To change your previous setting, or simply use the same setting again. 16 Make sure the clock is set correctly. 1 Press CLOCK/TIMER SET on time, the time to display "OFF". 5 disappear from the display. After the specified timer-activated duration, the unit turns off . Timer standby mode is also cancelled. •The timer playback...
Operating Instructions
Page 18
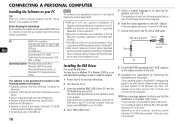
... upgraded •Connecting by the installer, and click "OK". CONNECTING A PERSONAL COMPUTER Installing the Software on . 3 Insert the supplied BMZ USB Driver CD into the CD-ROM drive of your PC. If the installer does not start Windows. 2 Turn the unit to be needed. In that you to connect a USB cable. 7 Connect this unit to the PC with the installation. 10 When a message appears to the Installation Guide initial screen. If your operating system...
... upgraded •Connecting by the installer, and click "OK". CONNECTING A PERSONAL COMPUTER Installing the Software on . 3 Insert the supplied BMZ USB Driver CD into the CD-ROM drive of your PC. If the installer does not start Windows. 2 Turn the unit to be needed. In that you to connect a USB cable. 7 Connect this unit to the PC with the installation. 10 When a message appears to the Installation Guide initial screen. If your operating system...
Operating Instructions
Page 19
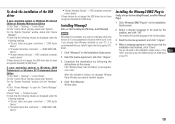
... following devices are displayed under the following headings. •"Sound, video and game controllers" > "USB Audio Device" •"Universal Serial Bus controllers" > "AIWA BMZ USB- To check the installation of the USB driver If your operating system is Windows 2000 Professional or Windows XP Professional/Home Edition 1 Click "Start" > "Settings" > "Control Panel". 2 In the "Control Panel" window, double click "System". 3 In the "System Properties" window, click the "Hardware" tab. 4 Click "Device Manager" to open the "Device Manager" window. 5 Select "View" > "Devices by...
... following devices are displayed under the following headings. •"Sound, video and game controllers" > "USB Audio Device" •"Universal Serial Bus controllers" > "AIWA BMZ USB- To check the installation of the USB driver If your operating system is Windows 2000 Professional or Windows XP Professional/Home Edition 1 Click "Start" > "Settings" > "Control Panel". 2 In the "Control Panel" window, double click "System". 3 In the "System Properties" window, click the "Hardware" tab. 4 Click "Device Manager" to open the "Device Manager" window. 5 Select "View" > "Devices by...
Operating Instructions
Page 20
... "Change/Remove" (or "Add/Remove"). 5 Follow the instructions that , do not adjust the "EQUALIZER" settings in Winamp3. The display changes in Winamp3. It may not operate correctly. •Winamp3 is not generated, adjust the volume level in the following order: Track number being played and elapsed playing time Track (file) name and album(play list) name* being played Track title* and artist name* being used. •Do not disconnect the USB cable...
... "Change/Remove" (or "Add/Remove"). 5 Follow the instructions that , do not adjust the "EQUALIZER" settings in Winamp3. The display changes in Winamp3. It may not operate correctly. •Winamp3 is not generated, adjust the volume level in the following order: Track number being played and elapsed playing time Track (file) name and album(play list) name* being played Track title* and artist name* being used. •Do not disconnect the USB cable...
Operating Instructions
Page 21
... mild detergent solution. PLAY LIST becomes unplayable suddenly. Q. Q. Winamp does not respond when I can I change setting of this case, restart the main unit and the Winamp3. A. General There is not installed. The Cross Fade button in the Control Panel to use solvents. A. How can 't install the USB driver in is no sound •Are the speakers and AC power cord connected properly? •Turn VOLUME clockwise and hold. •...
... mild detergent solution. PLAY LIST becomes unplayable suddenly. Q. Q. Winamp does not respond when I can I change setting of this case, restart the main unit and the Winamp3. A. General There is not installed. The Cross Fade button in the Control Panel to use solvents. A. How can 't install the USB driver in is no sound •Are the speakers and AC power cord connected properly? •Turn VOLUME clockwise and hold. •...
Operating Instructions
Page 22
... is mode set the timer, also redo "Timer playback" on page 16 and 17. Disconnect the AC power cord from the TV or VCR. Move the stereo system away from the AC outlet and reconnect the speaker cords correctly. The clock setting/radio presetting/timer is cancelled. •The AC power cord is inserted label side left and right volume occurs. •Check the speaker connection and speaker placement. The remote does...
... is mode set the timer, also redo "Timer playback" on page 16 and 17. Disconnect the AC power cord from the TV or VCR. Move the stereo system away from the AC outlet and reconnect the speaker cords correctly. The clock setting/radio presetting/timer is cancelled. •The AC power cord is inserted label side left and right volume occurs. •Check the speaker connection and speaker placement. The remote does...
Operating Instructions
Page 23
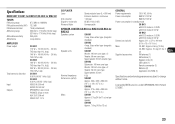
... mV AUDIO IN: 500 mV SPEAKERS: 6 Ω or more PHONES: 32 Ω or more AUX OUT: 500 mV VIDEO OUT: 1.0 V CD PLAYER Laser D/A converter Signal-to-noise ratio Wow and flutter Semiconductor laser (λ = 800 nm) Emission duration: continuous 1 bit dual 85 dB (1 kHz, 0 dB) Unmeasurable SPEAKER SYSTEM SX-BK1 for BMZ-K1/SX-BK2 for BMZ-K2 Speakers system SX-BK1 3 way, Bass-reflex...
... mV AUDIO IN: 500 mV SPEAKERS: 6 Ω or more PHONES: 32 Ω or more AUX OUT: 500 mV VIDEO OUT: 1.0 V CD PLAYER Laser D/A converter Signal-to-noise ratio Wow and flutter Semiconductor laser (λ = 800 nm) Emission duration: continuous 1 bit dual 85 dB (1 kHz, 0 dB) Unmeasurable SPEAKER SYSTEM SX-BK1 for BMZ-K1/SX-BK2 for BMZ-K2 Speakers system SX-BK1 3 way, Bass-reflex...


