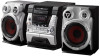
Operating Instructions
Page 2
... cause harmful interference to operate this product meets the ENERGY STAR® guidelines for energy efficiency. 2GB If this product will not occur in this manual could void your authority to radio communications. Reorient or relocate the receiving antenna. - CAUTION You are designed to which can radiate radio frequency energy and, if not installed and used in accordance with this...
... cause harmful interference to operate this product meets the ENERGY STAR® guidelines for energy efficiency. 2GB If this product will not occur in this manual could void your authority to radio communications. Reorient or relocate the receiving antenna. - CAUTION You are designed to which can radiate radio frequency energy and, if not installed and used in accordance with this...
Operating Instructions
Page 3
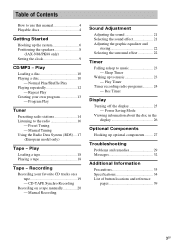
...Rec Timer Display Turning off the display 25 - Manual Tuning Using the Radio Data System (RDS).... 17 (European model only) Tape - Play Timer Timer recording radio programs........... 24 - Play Loading a tape 18 Playing a tape 18 Tape - Program Play Tuner Presetting radio stations 14 Listening to music 23 - Normal Play/Shuffle Play Playing repeatedly 12 - Preset Tuning - Power Saving Mode Viewing information about the disc in the display 26 Optional Components Hooking up the system 6 Positioning the speakers 8 (JAX-N88/PK88 only) Setting the clock 9 CD/MP3 - CD-TAPE...
...Rec Timer Display Turning off the display 25 - Manual Tuning Using the Radio Data System (RDS).... 17 (European model only) Tape - Play Timer Timer recording radio programs........... 24 - Play Loading a tape 18 Playing a tape 18 Tape - Program Play Tuner Presetting radio stations 14 Listening to music 23 - Normal Play/Shuffle Play Playing repeatedly 12 - Preset Tuning - Power Saving Mode Viewing information about the disc in the display 26 Optional Components Hooking up the system 6 Positioning the speakers 8 (JAX-N88/PK88 only) Setting the clock 9 CD/MP3 - CD-TAPE...
Operating Instructions
Page 4
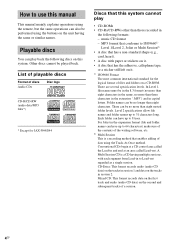
... buttons on the unit having multiple sessions, with paper or stickers on it. • A disc that has the adhesive, cellophane tape, or a sticker still left on a CD-ROM. music CD format - There are several specification levels. There can be no more than eight characters. How to use this manual This manual mainly explains operations using the remote, but the same operations can also be played...
... buttons on the unit having multiple sessions, with paper or stickers on it. • A disc that has the adhesive, cellophane tape, or a sticker still left on a CD-ROM. music CD format - There are several specification levels. There can be no more than eight characters. How to use this manual This manual mainly explains operations using the remote, but the same operations can also be played...

Operating Instructions
Page 5
For more information, see the operating instructions for the recording device. • Discs recorded on this product. Music discs encoded with copyright protection technologies This product is determined by the tree structure of files produced by analyzing of the disc. • A disc with a mixed CD format will not play if it has not been correctly finalized. Cautions when playing a disc that is recorded in Multi...
For more information, see the operating instructions for the recording device. • Discs recorded on this product. Music discs encoded with copyright protection technologies This product is determined by the tree structure of files produced by analyzing of the disc. • A disc with a mixed CD format will not play if it has not been correctly finalized. Cautions when playing a disc that is recorded in Multi...

Operating Instructions
Page 7
... loop antenna Extend the FM lead antenna horizontally Plug type C AM loop antenna 5 Connect the power cord to the local power line voltage. Other models: Connect brown side. continued 7GB The demonstration appears in the display. Note If you press ?/1, the system turns on your system's VOLTAGE SELECTOR for models equipped with an adaptor). Set up the AM loop antenna, then connect it. Tip With normal use the remote for...
... loop antenna Extend the FM lead antenna horizontally Plug type C AM loop antenna 5 Connect the power cord to the local power line voltage. Other models: Connect brown side. continued 7GB The demonstration appears in the display. Note If you press ?/1, the system turns on your system's VOLTAGE SELECTOR for models equipped with an adaptor). Set up the AM loop antenna, then connect it. Tip With normal use the remote for...

Operating Instructions
Page 10
... use a disc with tape, seals or paste on it as this may cause malfunction. Playing a disc - Example: When a disc is loaded Track number Playing time To insert additional discs, press DISC SKIP/EX-CHANGE to rotate the disc tray. 3 Press Z again to CD. 10GB Play Loading a disc Use buttons on the unit for the operation. 1 Press Z. 2 Place a disc with the label side up on JAXN44/S44. MP3 audio tracks cannot be played on the disc tray. Disc tray Disc...
... use a disc with tape, seals or paste on it as this may cause malfunction. Playing a disc - Example: When a disc is loaded Track number Playing time To insert additional discs, press DISC SKIP/EX-CHANGE to rotate the disc tray. 3 Press Z again to CD. 10GB Play Loading a disc Use buttons on the unit for the operation. 1 Press Z. 2 Place a disc with the label side up on JAXN44/S44. MP3 audio tracks cannot be played on the disc tray. Disc tray Disc...
Operating Instructions
Page 14
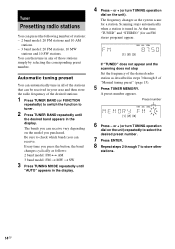
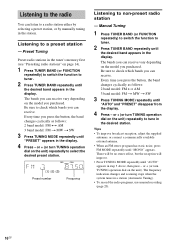
... stations: - 2 band model: 20 FM stations and 10 AM stations. - 3 band model: 20 FM stations, 10 MW stations and 10 SW stations. A preset number appears. Every time you can receive. Preset number 6 Press - or + (or turn TUNING operation dial on the model you can receive vary depending on the unit). At that can be received in the display. Tuner Presetting radio stations You can preset the following number of the desired radio station as the system scans for an FM stereo program...
... stations: - 2 band model: 20 FM stations and 10 AM stations. - 3 band model: 20 FM stations, 10 MW stations and 10 SW stations. A preset number appears. Every time you can receive. Preset number 6 Press - or + (or turn TUNING operation dial on the model you can receive vary depending on the unit). At that can be received in the display. Tuner Presetting radio stations You can preset the following number of the desired radio station as the system scans for an FM stereo program...
Operating Instructions
Page 15
... change the AM tuning interval in any AM station first, then turn TUNING operation dial on the unit. Note You cannot change the AM tuning interval (except for some areas). Tuner Manual tuning preset You can receive. When you disconnect the power cord or if a power failure occurs. • To improve broadcast reception, adjust the supplied antennas, or connect a commercially available external antenna. 15GB A preset number appears. 6 Press - or + (or turn off the system. Be...
... change the AM tuning interval in any AM station first, then turn TUNING operation dial on the unit. Note You cannot change the AM tuning interval (except for some areas). Tuner Manual tuning preset You can receive. When you disconnect the power cord or if a power failure occurs. • To improve broadcast reception, adjust the supplied antennas, or connect a commercially available external antenna. 15GB A preset number appears. 6 Press - or + (or turn off the system. Be...
Operating Instructions
Page 16
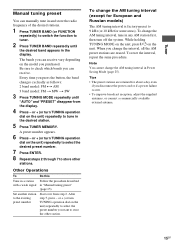
... press the button, the band changes cyclically as follows: 2 band model: FM y AM 3 band model: FM t MW t SW 3 Press TUNING MODE repeatedly until "AUTO" appears in a station (Automatic Tuning). • To record the radio programs, use manual recording (page 20). 16GB Tips • To improve broadcast reception, adjust the supplied antennas, or connect a commercially available external antenna. • When an FM stereo program has static noise, press FM MODE repeatedly until...
... press the button, the band changes cyclically as follows: 2 band model: FM y AM 3 band model: FM t MW t SW 3 Press TUNING MODE repeatedly until "AUTO" appears in a station (Automatic Tuning). • To record the radio programs, use manual recording (page 20). 16GB Tips • To improve broadcast reception, adjust the supplied antennas, or connect a commercially available external antenna. • When an FM stereo program has static noise, press FM MODE repeatedly until...

Operating Instructions
Page 19
... x. "TAPE A (or TAPE B) >>> +1" appears. Press . (or turn AMS operation dial on a tape. The reverse indicator lights up . Recording Other Operations To Stop play . If you want to select the disc. When the system is adjusted automatically. CD-TAPE Synchro Recording You can use TYPE I (normal) tape. "REC" flashes. 5 Press REC PAUSE/START. continued 19GB Tape - Searching for the operation. 1 Load a recordable tape into deck B, then press TAPE A/B repeatedly to select deck B. 2 (JAX...
... x. "TAPE A (or TAPE B) >>> +1" appears. Press . (or turn AMS operation dial on a tape. The reverse indicator lights up . Recording Other Operations To Stop play . If you want to select the disc. When the system is adjusted automatically. CD-TAPE Synchro Recording You can use TYPE I (normal) tape. "REC" flashes. 5 Press REC PAUSE/START. continued 19GB Tape - Searching for the operation. 1 Load a recordable tape into deck B, then press TAPE A/B repeatedly to select deck B. 2 (JAX...
Operating Instructions
Page 20
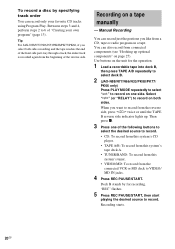
... record from connected components (see "Hooking up . Recording on a tape. You can record only your own program" (page 13). When you like from a CD, tape or radio program on a tape manually - "REC" flashes. 5 Press REC PAUSE/START, then start playing the desired source to 6 of "Creating your favorite CD tracks using Program Play. To record a disc by for the operation. 1 Load a recordable tape into deck B, then press TAPE A/B repeatedly to select deck B. 2 (JAX-N88/N77...
... record from connected components (see "Hooking up . Recording on a tape. You can record only your own program" (page 13). When you like from a CD, tape or radio program on a tape manually - "REC" flashes. 5 Press REC PAUSE/START, then start playing the desired source to 6 of "Creating your favorite CD tracks using Program Play. To record a disc by for the operation. 1 Load a recordable tape into deck B, then press TAPE A/B repeatedly to select deck B. 2 (JAX-N88/N77...

Operating Instructions
Page 23
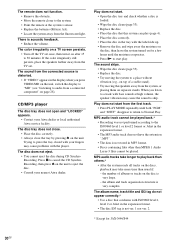
... 5. 7 Press . Use buttons on page 16). 2 Press VOLUME +/- To start playing. Note Do not set the clock (see "Listening to music. Play Timer You can fall asleep to the radio" on the remote for the operation. 1 Prepare the sound source you press the button, the display changes cyclically as follows: AUTO* t 90MIN t 80MIN t 70MIN t ... to "AUTO" during Synchro Recording on page 9). Each time you want to play . • CD: Load a disc. remaining time* Change the time SLEEP...
... 5. 7 Press . Use buttons on page 16). 2 Press VOLUME +/- To start playing. Note Do not set the clock (see "Listening to music. Play Timer You can fall asleep to the radio" on the remote for the operation. 1 Prepare the sound source you press the button, the display changes cyclically as follows: AUTO* t 90MIN t 80MIN t 70MIN t ... to "AUTO" during Synchro Recording on page 9). Each time you want to play . • CD: Load a disc. remaining time* Change the time SLEEP...

Operating Instructions
Page 24
... (e.g., "TUNER FM 5") appear in turn off the system. Press . or > repeatedly to set the minute, then press ENTER. 5 Set the time to stop time, and the preset radio station to turn , before the preset time. The type of timer ("PLAY TIMER"), the start time, the stop time, and the sound source appear in the preset radio station (see "Setting the clock" on 15 seconds before the original display returns. 6 Load a recordable tape into deck B. 7 Press ?/1 to be activated. or...
... (e.g., "TUNER FM 5") appear in turn off the system. Press . or > repeatedly to set the minute, then press ENTER. 5 Set the time to stop time, and the preset radio station to turn , before the preset time. The type of timer ("PLAY TIMER"), the start time, the stop time, and the sound source appear in the preset radio station (see "Setting the clock" on 15 seconds before the original display returns. 6 Load a recordable tape into deck B. 7 Press ?/1 to be activated. or...

Operating Instructions
Page 25
... minimum during standby (Power Saving Mode). To cancel Power Saving Mode Press DISPLAY while the system is reduced to operate in Power Saving Mode. • ?/1 indicator lights up even in Power Saving Mode. - Each time you press the button, the display switches cyclically as follows: Demonstration display t Clock display* t No display (Power Saving Mode) * The clock is displayed only if you use the recording timer, the Play Timer and the Sleep Timer at the same time. • If you set the clock. Note...
... minimum during standby (Power Saving Mode). To cancel Power Saving Mode Press DISPLAY while the system is reduced to operate in Power Saving Mode. • ?/1 indicator lights up even in Power Saving Mode. - Each time you press the button, the display switches cyclically as follows: Demonstration display t Clock display* t No display (Power Saving Mode) * The clock is displayed only if you use the recording timer, the Play Timer and the Sleep Timer at the same time. • If you set the clock. Note...

Operating Instructions
Page 29
... nearest Aiwa dealer. "Setting the clock" (page 9) - "Timer recording radio programs" (page 24) There is no sound. • Press VOLUME + or turn on the system. The timer cannot be found . Troubleshooting Problems and remedies Should you using only the prescribed speakers? • Is anything blocking the ventilation holes on the rear of the system? When the ?/1 indicator flashes Immediately unplug the power cord and check the following : 1 Make sure the power cord and speaker cords...
... nearest Aiwa dealer. "Setting the clock" (page 9) - "Timer recording radio programs" (page 24) There is no sound. • Press VOLUME + or turn on the system. The timer cannot be found . Troubleshooting Problems and remedies Should you using only the prescribed speakers? • Is anything blocking the ventilation holes on the rear of the system? When the ?/1 indicator flashes Immediately unplug the power cord and check the following : 1 Make sure the power cord and speaker cords...
Operating Instructions
Page 30
... a connected component" on for JAX-N44/S44 30GB MP3 audio tracks take more time than MPEG 1 Audio Layer-3 files cannot be played back.* • Recording was not performed according to 30 minutes. The album name, track title and ID3 tag do not appear correctly.* • Use a disc that conforms with ISO9660 level 1, level 2 or Joliet in the tray with bass sounds at the system...
... a connected component" on for JAX-N44/S44 30GB MP3 audio tracks take more time than MPEG 1 Audio Layer-3 files cannot be played back.* • Recording was not performed according to 30 minutes. The album name, track title and ID3 tag do not appear correctly.* • Use a disc that conforms with ISO9660 level 1, level 2 or Joliet in the tray with bass sounds at the system...

Operating Instructions
Page 31
... obtain good reception, we recommend you connect a commercially available external antenna. • The supplied FM lead antenna receives signals along its entire length, so make sure you made, such as follows: Use buttons on the unit for the operation. 1 Disconnect the power cord. 2 Reconnect the power cord. 3 Press x, P FILE and DISC 1 at the same time. 4 Press ?/1 to turn on the system. The tape does not erase completely. •...
... obtain good reception, we recommend you connect a commercially available external antenna. • The supplied FM lead antenna receives signals along its entire length, so make sure you made, such as follows: Use buttons on the unit for the operation. 1 Disconnect the power cord. 2 Reconnect the power cord. 3 Press x, P FILE and DISC 1 at the same time. 4 Press ?/1 to turn on the system. The tape does not erase completely. •...
Operating Instructions
Page 33
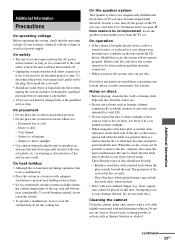
... the seal on TV sets may become attached to direct sunlight. • Use caution when placing the unit or speakers on surfaces that have glue or similar tacky substance on again. Additional Information continued 33GB Very humid - Subject to parts inside the CD player. On operation • If the system is brought directly from the AC power source (mains) as long as...
... the seal on TV sets may become attached to direct sunlight. • Use caution when placing the unit or speakers on surfaces that have glue or similar tacky substance on again. Additional Information continued 33GB Very humid - Subject to parts inside the CD player. On operation • If the system is brought directly from the AC power source (mains) as long as...
Operating Instructions
Page 34
... AUDIO POWER SPECIFICATIONS (JAX-S77/S44 USA models only) JAX-S77 POWER OUTPUT AND TOTAL HARMONIC DISTORTION: With 6 ohm loads, both channels driven, from side A or B as play, stop, and fast-winding frequently. Break off the cassette tab from 120 - 10,000 Hz: rated 140 watts per channel minimum RMS power, with a separately sold dry-type or wet-type cleaning cassette. Do not change the tape operations...
... AUDIO POWER SPECIFICATIONS (JAX-S77/S44 USA models only) JAX-S77 POWER OUTPUT AND TOTAL HARMONIC DISTORTION: With 6 ohm loads, both channels driven, from side A or B as play, stop, and fast-winding frequently. Break off the cassette tab from 120 - 10,000 Hz: rated 140 watts per channel minimum RMS power, with a separately sold dry-type or wet-type cleaning cassette. Do not change the tape operations...
Operating Instructions
Page 36
Outputs PHONES (stereo mini jack): accepts headphones of 8 ohms or more SPEAKER: accepts impedance of 6 to 16 ohms SURROUND SPEAKER (JAX-N88/PK88 only): accepts impedance of 6 to 16 ohms CD player section System Laser Frequency response Wavelength Signal-to-noise ratio Dynamic range Compact disc and digital audio system Semiconductor laser (λ=780 nm) Emission duration: continuous 2 Hz - 20 kHz (±0.5 dB) 780 - 790 nm More than...
Outputs PHONES (stereo mini jack): accepts headphones of 8 ohms or more SPEAKER: accepts impedance of 6 to 16 ohms SURROUND SPEAKER (JAX-N88/PK88 only): accepts impedance of 6 to 16 ohms CD player section System Laser Frequency response Wavelength Signal-to-noise ratio Dynamic range Compact disc and digital audio system Semiconductor laser (λ=780 nm) Emission duration: continuous 2 Hz - 20 kHz (±0.5 dB) 780 - 790 nm More than...


