
Operating Instructions
Page 3
... following the operating instructions. this can fall onto such power lines or circuits. OWNER'S RECORD For your convenience, record the model number and serial number (you move it from the wall outlet and disconnect the antenna or cable system. Outdoor Antenna Power lines - Antenna Grounding According to rain or water. 4) If the unit does not operate normally when following conditions: 1) When the power cord or plug is damaged...
... following the operating instructions. this can fall onto such power lines or circuits. OWNER'S RECORD For your convenience, record the model number and serial number (you move it from the wall outlet and disconnect the antenna or cable system. Outdoor Antenna Power lines - Antenna Grounding According to rain or water. 4) If the unit does not operate normally when following conditions: 1) When the power cord or plug is damaged...

Operating Instructions
Page 4
... 12 Basic operations Watching a TV program 13 Selecting the closed caption is manufactured under license from Gemstar Development Corporation. Closed Caption The subtitles can be played back quickly with VCR Plus+® system .......25 Setting the timer manually 27 Dubbing 28 Other functions Setting the V-chip 29 Multichannel TV Sound (MTS) and Hi-Fi audio sound system 31 On-screen display 32 Additional information Troubleshooting 33 Specifications 34 Parts and controls 35 3 ENGLISH Welcome Thank...
... 12 Basic operations Watching a TV program 13 Selecting the closed caption is manufactured under license from Gemstar Development Corporation. Closed Caption The subtitles can be played back quickly with VCR Plus+® system .......25 Setting the timer manually 27 Dubbing 28 Other functions Setting the V-chip 29 Multichannel TV Sound (MTS) and Hi-Fi audio sound system 31 On-screen display 32 Additional information Troubleshooting 33 Specifications 34 Parts and controls 35 3 ENGLISH Welcome Thank...
Operating Instructions
Page 8
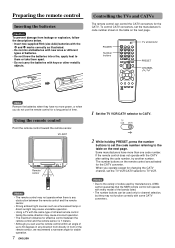
... brands listed. • The number buttons can control the CATV converters for changing the CATV channel, set the manufacturer's code number shown in any direction from leakage or explosion, follow the descriptions below. • Insert two supplied R03 (size AAA) batteries with the 0 and 9 marks correctly as a fluorescent lamp or direct sunlight may cause unreliable operation. • Using a TV with the same type of infrared remote control facing...
... brands listed. • The number buttons can control the CATV converters for changing the CATV channel, set the manufacturer's code number shown in any direction from leakage or explosion, follow the descriptions below. • Insert two supplied R03 (size AAA) batteries with the 0 and 9 marks correctly as a fluorescent lamp or direct sunlight may cause unreliable operation. • Using a TV with the same type of infrared remote control facing...

Operating Instructions
Page 10
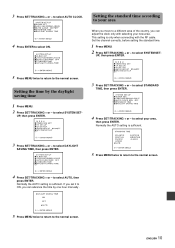
... starting Set the TV VCR/CATV selector to select CLOCK SET, then press ENTER. 4 Press SET/TRACKING + or - The normal screen returns. Reset the digits using the SET/TRACKING + or - to TV VCR. 1 Press MENU. The day of the week will be set automatically if the unit receives the clock adjustment signal. Setting the Auto Clock The unit automatically corrects the clock setting once you set to the AC wall...
... starting Set the TV VCR/CATV selector to select CLOCK SET, then press ENTER. 4 Press SET/TRACKING + or - The normal screen returns. Reset the digits using the SET/TRACKING + or - to TV VCR. 1 Press MENU. The day of the week will be set automatically if the unit receives the clock adjustment signal. Setting the Auto Clock The unit automatically corrects the clock setting once you set to the AC wall...
Operating Instructions
Page 11
... RF cable. Set the channel correctly, before setting the standard time. 1 Press MENU. 2 Press SET/TRACKING + or - UP, then press ENTER. 3 Press SET/TRACKING + or - Normally the AUTO setting is sufficient. 3 Press SET/TRACKING + or - to select AUTO CLOCK. to select STANDARD TIME, then press ENTER. 4 Press SET/TRACKING + or - to a different area of the country, you move to select SYSTEM SET- Setting the time by one hour manually . 5 Press MENU twice...
... RF cable. Set the channel correctly, before setting the standard time. 1 Press MENU. 2 Press SET/TRACKING + or - UP, then press ENTER. 3 Press SET/TRACKING + or - Normally the AUTO setting is sufficient. 3 Press SET/TRACKING + or - to select AUTO CLOCK. to select STANDARD TIME, then press ENTER. 4 Press SET/TRACKING + or - to a different area of the country, you move to select SYSTEM SET- Setting the time by one hour manually . 5 Press MENU twice...

Operating Instructions
Page 12
... the connections to be canceled. Adding or erasing the channels manually If the Auto Channel Memory does not set , DEL appears in red. 4 Press SET/TRACKING + or - to select the channel number to the antenna connector 4 Press SET/TRACKING + or - Setting the channels Before Auto Channel Memory, this unit can receive all channels in TV mode. • Set the TV VCR/CATV selector to TV VCR. 1 Press MENU. 2 Press SET/TRACKING + or - TV VCR/CATV Number buttons MENU SET...
... the connections to be canceled. Adding or erasing the channels manually If the Auto Channel Memory does not set , DEL appears in red. 4 Press SET/TRACKING + or - to select the channel number to the antenna connector 4 Press SET/TRACKING + or - Setting the channels Before Auto Channel Memory, this unit can receive all channels in TV mode. • Set the TV VCR/CATV selector to TV VCR. 1 Press MENU. 2 Press SET/TRACKING + or - TV VCR/CATV Number buttons MENU SET...
Operating Instructions
Page 13
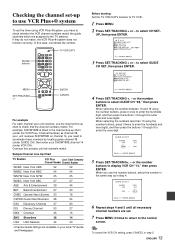
... correctly. to display VCR CH "14," then press ENTER. When selecting the number between 10 and 19 using the number buttons, press 0 once to enter the hundreds digit, and then press the buttons 1 through 9 to enter the ones digit. 5 Press SET/TRACKING+, - or the number buttons to select GUIDE CH SET, then press ENTER. ENGLISH 12 In this process until all necessary channel numbers are set the timer using the number buttons, press 0 twice...
... correctly. to display VCR CH "14," then press ENTER. When selecting the number between 10 and 19 using the number buttons, press 0 once to enter the hundreds digit, and then press the buttons 1 through 9 to enter the ones digit. 5 Press SET/TRACKING+, - or the number buttons to select GUIDE CH SET, then press ENTER. ENGLISH 12 In this process until all necessary channel numbers are set the timer using the number buttons, press 0 twice...

Operating Instructions
Page 14
... sleep time Press SLEEP once. When selecting the numbers less than 10, press 0 to enter the tens digits, and then press the buttons 1 through the headphones, insert headphones (not supplied) with a stereo mini plug into the headphones jack on the front lights. 2 Press CHANNEL N or M repeatedly, or the number buttons to turn off . 0 10 100 110 120 SLEEP 120 Headphones jack VOLUME POWER +/- POWER indicator CHANNEL N/M 1 Press POWER to enter tens and ones digits. To select CATV broadcast using...
... sleep time Press SLEEP once. When selecting the numbers less than 10, press 0 to enter the tens digits, and then press the buttons 1 through the headphones, insert headphones (not supplied) with a stereo mini plug into the headphones jack on the front lights. 2 Press CHANNEL N or M repeatedly, or the number buttons to turn off . 0 10 100 110 120 SLEEP 120 Headphones jack VOLUME POWER +/- POWER indicator CHANNEL N/M 1 Press POWER to enter tens and ones digits. To select CATV broadcast using...

Operating Instructions
Page 15
Selecting the closed captions mode This unit can follow the dialogue. • If no caption signal is changed , the captions might be a short delay before the closed captions which scroll onto the screen. Notes • After selecting a closed caption mode, it will stay in English or another language. In this case, adjust the antenna for better reception or use an outdoor antenna. • When activating the closed captioned decoder, there will usually show...
Selecting the closed captions mode This unit can follow the dialogue. • If no caption signal is changed , the captions might be a short delay before the closed captions which scroll onto the screen. Notes • After selecting a closed caption mode, it will stay in English or another language. In this case, adjust the antenna for better reception or use an outdoor antenna. • When activating the closed captioned decoder, there will usually show...
Operating Instructions
Page 16
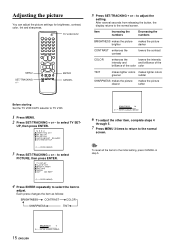
... changes the item as follows: BRIGHTNESS CONTRAST COLOR SHARPNESS TINT 15 ENGLISH UP, then press ENTER. 6 To adjust the other item, complete steps 4 through 5. 7 Press MENU 3 times to return to adjust the setting. Tip To reset all the items to the initial setting, press CANCEL in step 5. 4 Press ENTER repeatedly to select the item to TV VCR. 1 Press MENU. 2 Press SET/TRACKING + or - Adjusting the picture...
... changes the item as follows: BRIGHTNESS CONTRAST COLOR SHARPNESS TINT 15 ENGLISH UP, then press ENTER. 6 To adjust the other item, complete steps 4 through 5. 7 Press MENU 3 times to return to adjust the setting. Tip To reset all the items to the initial setting, press CANCEL in step 5. 4 Press ENTER repeatedly to select the item to TV VCR. 1 Press MENU. 2 Press SET/TRACKING + or - Adjusting the picture...

Operating Instructions
Page 18
... Friday. ENTER VX-S207 6 Press SET/TRACKING + or - UP, then press ENTER. 7 Press SET/TRACKING + or - MENU SET/TRACKING +/- To change the minutes setting in ten minutes, press and hold SET/TRACKING + or -. ON-TIMER indicator Before starting • Check that the clock is set the channel number, then press ENTER. 8 Press SET/TRACKING + or - SUN-SAT: Daily program on at the programmed time to select ON TIMER, then...
... Friday. ENTER VX-S207 6 Press SET/TRACKING + or - UP, then press ENTER. 7 Press SET/TRACKING + or - MENU SET/TRACKING +/- To change the minutes setting in ten minutes, press and hold SET/TRACKING + or -. ON-TIMER indicator Before starting • Check that the clock is set the channel number, then press ENTER. 8 Press SET/TRACKING + or - SUN-SAT: Daily program on at the programmed time to select ON TIMER, then...

Operating Instructions
Page 19
... the line input, press SET/TRACKING + or - button. to display "LINE1" (from AUDIO/VIDEO IN jacks on the rear) or "LINE2" (from AUDIO/VIDEO IN jacks on the unit lights. Press MENU 3 times to return to TV VCR. 1 Press MENU. 2 Press SET/TRACKING + or - ENTER Before starting • Check that the clock is changed as you have played back a tape at the programmed time. to select TV SET- Setting the Off-Timer Once this function...
... the line input, press SET/TRACKING + or - button. to display "LINE1" (from AUDIO/VIDEO IN jacks on the rear) or "LINE2" (from AUDIO/VIDEO IN jacks on the unit lights. Press MENU 3 times to return to TV VCR. 1 Press MENU. 2 Press SET/TRACKING + or - ENTER Before starting • Check that the clock is changed as you have played back a tape at the programmed time. to select TV SET- Setting the Off-Timer Once this function...
Operating Instructions
Page 20
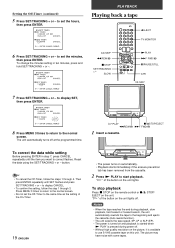
...; The unit selects the tape speed, SP, LP or SLP (EP). • The power is turned on and playback is started when d PLAY is pressed during power off at the programmed time. The picture may have noise with some tapes. PLAYBACK Playing back a tape zEJECT TV MONITOR 6 Press SET/TRACKING + or - button. SLOW dPLAY gF FWD/] aPAUSE/STILL ATR VX-S207 7 Press SET/TRACKING + or...
...; The unit selects the tape speed, SP, LP or SLP (EP). • The power is turned on and playback is started when d PLAY is pressed during power off at the programmed time. The picture may have noise with some tapes. PLAYBACK Playing back a tape zEJECT TV MONITOR 6 Press SET/TRACKING + or - button. SLOW dPLAY gF FWD/] aPAUSE/STILL ATR VX-S207 7 Press SET/TRACKING + or...
Operating Instructions
Page 21
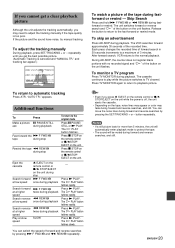
... the unit while the power is off, the unit ejects the cassette. • Depending on the tape, noise lines may appear or color may need to a maximum of the button on the unit flashes. "AUTO TR." Press d PLAY. If you cannot get the best possible picture. (Automatic Tracking is canceled and "MANUAL TR." If the picture and the sound have noise, try...
... the unit while the power is off, the unit ejects the cassette. • Depending on the tape, noise lines may appear or color may need to a maximum of the button on the unit flashes. "AUTO TR." Press d PLAY. If you cannot get the best possible picture. (Automatic Tracking is canceled and "MANUAL TR." If the picture and the sound have noise, try...
Operating Instructions
Page 24
The power turns on the unit flashes. To select CATV broadcast using the number buttons When selecting the numbers less than 10, press 0 to enter the tens digits, and then press the buttons 1 through the line input, press CHANNEL N or M, or TV/LINE to display "LINE1" (from the AUDIO/VIDEO IN jacks on the rear) or "LINE2" (from the AUDIO/VIDEO IN jacks on the front) in place. When selecting the number between 10...
The power turns on the unit flashes. To select CATV broadcast using the number buttons When selecting the numbers less than 10, press 0 to enter the tens digits, and then press the buttons 1 through the line input, press CHANNEL N or M, or TV/LINE to display "LINE1" (from the AUDIO/VIDEO IN jacks on the rear) or "LINE2" (from the AUDIO/VIDEO IN jacks on the front) in place. When selecting the number between 10...

Operating Instructions
Page 25
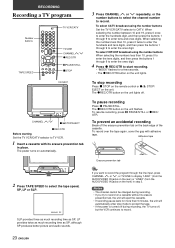
... the recording time. • Select the channel to record and tape speed. 1 Press w REC/OTR. OTPB VX-S207 wREC/OTR sSTOP VX-S207 ONE-TOUCH PLAYBACK 1 Stop recording (when recording without timer). Each press changes the recording duration on the unit lights. 2 Press w REC/OTR repeatedly to the start recording the current channel for more than two timer programs The unit starts playing back...
... the recording time. • Select the channel to record and tape speed. 1 Press w REC/OTR. OTPB VX-S207 wREC/OTR sSTOP VX-S207 ONE-TOUCH PLAYBACK 1 Stop recording (when recording without timer). Each press changes the recording duration on the unit lights. 2 Press w REC/OTR repeatedly to the start recording the current channel for more than two timer programs The unit starts playing back...

Operating Instructions
Page 27
... lights, and the unit stands by for more than 5 seconds, the preset program is ejected if the cassette's erasure prevention tab has been removed. • You can turn the unit off. Then press SET/TRACKING + or - Press MENU twice to return to change the setting. In this case, you want to the normal screen. • When the power supply is interrupted for timer...
... lights, and the unit stands by for more than 5 seconds, the preset program is ejected if the cassette's erasure prevention tab has been removed. • You can turn the unit off. Then press SET/TRACKING + or - Press MENU twice to return to change the setting. In this case, you want to the normal screen. • When the power supply is interrupted for timer...

Operating Instructions
Page 28
... channel number. • To confirm the setting, select TIMER REC SET in the menu to Friday) WKL-SAT (Every Saturday) WKL-FRI (Every Friday) ..... To cancel a program Select TIMER REC SET in the menu. to display "L1" (from the AUDIO/VIDEO IN jacks on the rear) or "L2" (from the AUDIO/VIDEO IN jacks on the front) in step 5 instead of the current date. To operate the others, press TREC. TV VCR...
... channel number. • To confirm the setting, select TIMER REC SET in the menu to Friday) WKL-SAT (Every Saturday) WKL-FRI (Every Friday) ..... To cancel a program Select TIMER REC SET in the menu. to display "L1" (from the AUDIO/VIDEO IN jacks on the rear) or "L2" (from the AUDIO/VIDEO IN jacks on the front) in step 5 instead of the current date. To operate the others, press TREC. TV VCR...
Operating Instructions
Page 34
... temperature changes. Tape operation buttons do not work while the power is on and the cassette is not a problem. External interference may be damaged or come off. The timer does not operate. • Set the clock correctly. • Check that the channel numbers match the guide channels which assigned to operate properly, read the instructions again, then check the following guide. There is poor or no sound and picture...
... temperature changes. Tape operation buttons do not work while the power is on and the cassette is not a problem. External interference may be damaged or come off. The timer does not operate. • Set the clock correctly. • Check that the channel numbers match the guide channels which assigned to operate properly, read the instructions again, then check the following guide. There is poor or no sound and picture...

Operating Instructions
Page 35
....8 lbs.) Supplied accessories Batteries (R03, size AAA) (2) Remote control (1) Antenna adaptor (1) (VX-S207 only) VHF/UHF telecopic antenna with antenna adaptor (1) (VX-S137 only) Design and specifications are designed to provide reasonable protection against harmful interference in accordance with the instructions, may void the user's right authority to operate this equipment does cause harmful interference to radio or television reception, which the receiver is connected. - This...
....8 lbs.) Supplied accessories Batteries (R03, size AAA) (2) Remote control (1) Antenna adaptor (1) (VX-S207 only) VHF/UHF telecopic antenna with antenna adaptor (1) (VX-S137 only) Design and specifications are designed to provide reasonable protection against harmful interference in accordance with the instructions, may void the user's right authority to operate this equipment does cause harmful interference to radio or television reception, which the receiver is connected. - This...
