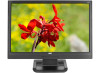

416Va Manual
Page 1
416Va User's Manual About This Guide This guide describes the monitor's features, setup, and operation. National Conventions The following subsections describe notational conventions used in Product Registration to avoid the problem. CAUTION: A CAUTION indicates either ... tips and solutions for bodily harm and tells you make better use of text may be accompanied by an icon. Product Registration Please link www.aoc.com, select your computer system. These blocks are notes, cautions, and warnings, and they are as follows: NOTE: A NOTE indicates important information that helps...
416Va User's Manual About This Guide This guide describes the monitor's features, setup, and operation. National Conventions The following subsections describe notational conventions used in Product Registration to avoid the problem. CAUTION: A CAUTION indicates either ... tips and solutions for bodily harm and tells you make better use of text may be accompanied by an icon. Product Registration Please link www.aoc.com, select your computer system. These blocks are notes, cautions, and warnings, and they are as follows: NOTE: A NOTE indicates important information that helps...

416Va Manual
Page 2
... Declaration Disposal of the following measures: 1. Consult the dealer or an experienced radio/TV technician for recycling, please contact your local city office, your computer monitor: The manufacturer is theresponsibilities of the FCC Rules. FCC Notice FCC Class B Radio Frequency Interference Statement WARNING: (FOR FCC CERTIFIED MODELS) NOTE: This equipment has...
... Declaration Disposal of the following measures: 1. Consult the dealer or an experienced radio/TV technician for recycling, please contact your local city office, your computer monitor: The manufacturer is theresponsibilities of the FCC Rules. FCC Notice FCC Class B Radio Frequency Interference Statement WARNING: (FOR FCC CERTIFIED MODELS) NOTE: This equipment has...

416Va Manual
Page 3
...power outlet as a safety feature. It could short circuit parts causing a fire or electric shock. opening or removing covers can expose you mount the monitor on the label. near the equipment and shall be used for long periods of power source indicated on a wall or shelf, use only with ...grounded plug. Unplug the unit during a lightning storm or when it can result in a wet basement. Do not place the monitor on the monitor. Do not attempt to dangerous voltages and other hazards. Do not defeat the safety purpose of the cabinet are not blocked or covered...
...power outlet as a safety feature. It could short circuit parts causing a fire or electric shock. opening or removing covers can expose you mount the monitor on the label. near the equipment and shall be used for long periods of power source indicated on a wall or shelf, use only with ...grounded plug. Unplug the unit during a lightning storm or when it can result in a wet basement. Do not place the monitor on the monitor. Do not attempt to dangerous voltages and other hazards. Do not defeat the safety purpose of the cabinet are not blocked or covered...

416Va Manual
Page 4
NOTE: Do not touch the LCD screen when you change the angle. Attaching the Cables It may cause damage or break the LCD screen. Adjusting Viewing Angle For optimal viewing it is recommended to look at the full face of the monitor, then adjust the monitor's angle to your own preference. Hold the stand so you do not topple the monitor when you change the monitor's angle. You are able to adjust the monitor's angle from -5°to 15¡ã. Setup the stand and base Please setup or remove the base following below steps.
NOTE: Do not touch the LCD screen when you change the angle. Attaching the Cables It may cause damage or break the LCD screen. Adjusting Viewing Angle For optimal viewing it is recommended to look at the full face of the monitor, then adjust the monitor's angle to your own preference. Hold the stand so you do not topple the monitor when you change the monitor's angle. You are able to adjust the monitor's angle from -5°to 15¡ã. Setup the stand and base Please setup or remove the base following below steps.
416Va Manual
Page 5
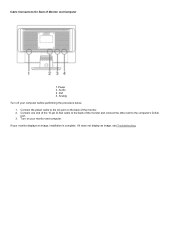
DVI 4. Connect the power cable to the AC port on your monitor and computer. Turn on the back of the monitor. 2. If your computer before performing the procedure below. 1. Analog Turn off your monitor displays an image, installation is complete. Cable Connections On Back of the monitor and connect the other end to the computer's D-Sub port. 3. If it does not display an image, see Troubleshooting. Connect one end of the 15-pin D-Sub cable to the back of Monitor and Computer 1.Power 2. Audio 3.
DVI 4. Connect the power cable to the AC port on your monitor and computer. Turn on the back of the monitor. 2. If your computer before performing the procedure below. 1. Analog Turn off your monitor displays an image, installation is complete. Cable Connections On Back of the monitor and connect the other end to the computer's D-Sub port. 3. If it does not display an image, see Troubleshooting. Connect one end of the 15-pin D-Sub cable to the back of Monitor and Computer 1.Power 2. Audio 3.
416Va Manual
Page 6
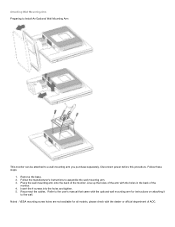
... to the user's manual that came with the optional wall mounting arm for all models, please check with the holes in the back of the monitor. 4. Follow these steps: 1. Disconnect power before this procedure. Follow the manufacturer's instructions to a wall mounting arm you purchase separately. Insert the 4 screws... into the holes and tighten. 5. Line up the holes of the arm with the dealer or official department of the monitor. Place the wall mounting arm onto the back of AOC. Attaching Wall Mounting Arm Preparing to Install An Optional Wall Mounting Arm This...
... to the user's manual that came with the optional wall mounting arm for all models, please check with the holes in the back of the monitor. 4. Follow these steps: 1. Disconnect power before this procedure. Follow the manufacturer's instructions to a wall mounting arm you purchase separately. Insert the 4 screws... into the holes and tighten. 5. Line up the holes of the arm with the dealer or official department of the monitor. Place the wall mounting arm onto the back of AOC. Attaching Wall Mounting Arm Preparing to Install An Optional Wall Mounting Arm This...

416Va Manual
Page 7
... the power button to 1920 by 1200. Volume / 4. Click SETTINGS. 6. The other control knobs are located at front panel of the monitor (See Figure ). By changing these settings, the picture can be adjusted to your personal preferences. * The power cord should be connected. ...* Press the power button to this monitor is 1920 by 1200. Double click DISPLAY. 5. Click START. 2. To setup the monitor to turn the monitor on the monitor. The power indicator will light up. 1.Souce 2. Auto Config 3. Volume / + 5. Power...
... the power button to 1920 by 1200. Volume / 4. Click SETTINGS. 6. The other control knobs are located at front panel of the monitor (See Figure ). By changing these settings, the picture can be adjusted to your personal preferences. * The power cord should be connected. ...* Press the power button to this monitor is 1920 by 1200. Double click DISPLAY. 5. Click START. 2. To setup the monitor to turn the monitor on the monitor. The power indicator will light up. 1.Souce 2. Auto Config 3. Volume / + 5. Power...

416Va Manual
Page 8
...you want to adjust any other function, repeat steps 2-3. OSD Lock Function: To lock the OSD, press and hold the MENUbutton while the monitor is off and then press power button to activate the OSD window. Press+ or - DCB Adjustment What is an advanced color adjustment technology. ... adjustments are in the third icon labeled "Color Temperature "in the OSD menu. OSD Settings Press the MENU-button to turn the monitor on. Press Exit key continually for more vivid and natural images to change the settings of color enhancers: "Color Boost" and "Picture ...
...you want to adjust any other function, repeat steps 2-3. OSD Lock Function: To lock the OSD, press and hold the MENUbutton while the monitor is off and then press power button to activate the OSD window. Press+ or - DCB Adjustment What is an advanced color adjustment technology. ... adjustments are in the third icon labeled "Color Temperature "in the OSD menu. OSD Settings Press the MENU-button to turn the monitor on. Press Exit key continually for more vivid and natural images to change the settings of color enhancers: "Color Boost" and "Picture ...

416Va Manual
Page 15
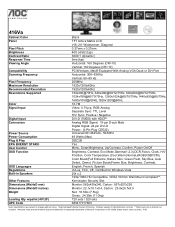
... Physical Characteristics Environmental Model number 416Va Driving system TFT Color LCD Viewable image size 609.6mm diagonal Pixel pitch 0.270mm(H) x 0.270mm(V) Video R, G, B Analog lnterface & Digital Interface Separate Sync. As an ENERGY STAR® Partner, AOC International (Europe) GmbH has determined...DVI-D Signal Cable Type Detachable Dimensions & Weight: Height (with base) 392.7 mm (463.3) Width 561.8 mm Depth 114.6 mm Weight (monitor only) 6.8 kg Weight (with packaging) 9.0 kg Temperature: Operating 0° to 50° Non-Operating -20¡ãto 60°...
... Physical Characteristics Environmental Model number 416Va Driving system TFT Color LCD Viewable image size 609.6mm diagonal Pixel pitch 0.270mm(H) x 0.270mm(V) Video R, G, B Analog lnterface & Digital Interface Separate Sync. As an ENERGY STAR® Partner, AOC International (Europe) GmbH has determined...DVI-D Signal Cable Type Detachable Dimensions & Weight: Height (with base) 392.7 mm (463.3) Width 561.8 mm Depth 114.6 mm Weight (monitor only) 6.8 kg Weight (with packaging) 9.0 kg Temperature: Operating 0° to 50° Non-Operating -20¡ãto 60°...

416Va Manual
Page 17
... the VESA DDC STANDARD. This monitor is a bi-directional data channel based on the level of DDC used, communicate additional information about its display capabilities. Signal Name 1 TMDS Data 2- 9 TMDS Data 1- ...
... the VESA DDC STANDARD. This monitor is a bi-directional data channel based on the level of DDC used, communicate additional information about its display capabilities. Signal Name 1 TMDS Data 2- 9 TMDS Data 1- ...
416Va Spec Sheet
Page 1
416Va Cabinet Color Panel Pixel Pitch Brightness Contrast Ratio Response Time Viewing Angle Compatibility Scanning Frequency Pixel Frequency Maximum Resolution Recommended Resolution Resolutions Supported Color Signal ..., Contrast, English, French, Spanish cULus, FCC, CE, Certified for Windows Vista 2W x 2 720p/1080i HD Compatible, VESA 100mm Wall Mount Compliant**, Kensington Security Slot Monitor: 562x459x240, Carton: 657x527x226 Monitor: 22.1x18.1x9.4, Carton: 25.9x20.7x8.9 Net: 16.5lbs (7.5kg) Gross: 24.2lbs (11.0kg) 720 sets / 320 sets 685417017683 Note: Specifications...
416Va Cabinet Color Panel Pixel Pitch Brightness Contrast Ratio Response Time Viewing Angle Compatibility Scanning Frequency Pixel Frequency Maximum Resolution Recommended Resolution Resolutions Supported Color Signal ..., Contrast, English, French, Spanish cULus, FCC, CE, Certified for Windows Vista 2W x 2 720p/1080i HD Compatible, VESA 100mm Wall Mount Compliant**, Kensington Security Slot Monitor: 562x459x240, Carton: 657x527x226 Monitor: 22.1x18.1x9.4, Carton: 25.9x20.7x8.9 Net: 16.5lbs (7.5kg) Gross: 24.2lbs (11.0kg) 720 sets / 320 sets 685417017683 Note: Specifications...


